Download Route Generator
License
Route Generator is released under the GPL license, this means you can use and distribute it for free. (See README.txt in the downloaded zip-file for more details)
Donations
If you like the product or encourage the development, please use the button below.
Download
The latest version is available on the SourceForge project page, where you can optionally download older versions as well. Or use the direct links below, depending on your OS.
Windows
The application has been tested on Windows 7 and 10, but should also still work on XP. An installer can be downloaded, which install Route Generator incuding FFpmeg and bmp2avi. If an older version of Route Generator is still installed, it can automatically uninstall de old version, which is recommended.
| v1.9.1 | routegen-win32-1.9.1.exe |  |
Linux
Linux users can download the Route_Generator-x86_64.AppImage. It doesn’t need installation. Just download, make executable and run. It should work on all Linux distributions, but has only been tested on Ubuntu 16 and 18.
| v1.9.1 | Route_Generator-1.9.1-x86_64.AppImage |  |
macOS and source code
The source code builds on Windows and Linux, but should also build on mac OS. I have not tested this myself.
Источник
Route generator mac os


for more docs with examples https://autoroute.vercel.app
What is AutoRoute?
It’s a Flutter navigation package, it allows for strongly-typed arguments passing, effortless deep-linking and it uses code generation to simplify routes setup, with that being said it requires a minimal amount of code to generate everything needed for navigation inside of your App.
If your App requires deep-linking or guarded routes or just a clean routing setup you’ll need to use named/generated routes and you’ll end up writing a lot of boilerplate code for mediator argument classes, checking for required arguments, extracting arguments and a bunch of other stuff. AutoRoute does all that for you and much more.
Setup and Usage
Create a placeholder class and annotate it with @MaterialAutoRouter which takes a list of routes as a required argument.
Note: The name of the router must be prefixed with $ so we have a generated class with the same name minus the $.
Tip: You can Shorten auto-generated route names from e.g. BookListPageRoute to BookListRoute using the replaceInRouteName argument.
Now simply run the generator
Use the [watch] flag to watch the files’ system for edits and rebuild as necessary.
if you want the generator to run one time and exits use
Finalize the setup
after you run the generator your router class will be generated, hook it up with MaterialApp.
A PageRouteInfo object will be generated for every declared AutoRoute, These objects hold path information plus strongly-typed page arguments which are extracted from the page’s default constructor. Think of them as string path segments on steroid.
if the declared route has children AutoRoute will add a children parameter to its constructor to be used in nested navigation. more on that here.
Navigating Between Screens
AutoRouter offers the same known push, pop and friends methods to manipulate the pages stack using both the generated PageRouteInfo objects and paths.
[. ].removeWhere((r)=>) context.router.removeWhere((route) => ); // you can also use the common helper methods from context extension to navigate context.pushRoute(const BooksListRoute()); context.replaceRoute(const BooksListRoute()); context.navigateTo(const BooksListRoute()); context.navigateNamedTo(‘/books’); context.popRoute(); «>
That’s the fun part! AutoRoute automatically detects and handles your page arguments for you, the generated route object will deliver all the arguments your page needs including path/query params.
e.g. The following page widget will take an argument of type Book .
Note: Default values are respected. Required fields are also respected and handled properly.
The generated BookDetailsRoute will deliver the same arguments to it’s corresponding page.
Note: all args are generated as named parameters regardless of their original type.
You can return results by either using the pop completer or by passing a callback function as an argument the same way you’d pass an object.
1 — Using the pop completer
then inside of your LoginPage pop with results
as you’d notice we didn’t specify the result type, we’re playing with dynamic values here, which can be risky and I personally don’t recommend it.
To avoid working with dynamic values we specify what type of results we expect our page to return, which is a bool value.
we push and specify the type of results we’re expecting
and of course we pop with the same type
2- Passing a callback function as an argument. We only have to add a callback function as a parameter to our page constructor like follows:
The generated BookDetailsRoute will deliver the same arguments to it’s corresponding page.
if you’re finishing with the results make sure you call the callback function as you pop the page
Note: Default values are respected. Required fields are also respected and handled properly.
Working with Paths
Working with paths in AutoRoute is optional because PageRouteInfo objects are matched by name unless pushed as a string using the initialDeepLink property in root delegate or pushNamed , replaceNamed navigateNamed methods.
if you don’t specify a path it’s going to be generated from the page name e.g. BookListPage will have ‘book-list-page’ as a path, if initial arg is set to true the path will be / unless it’s relative then it will be an empty string » .
When developing a web Application or a native App that requires deep-linking you’d probably need to define paths with clear memorable names, and that’s done using the path argument in AutoRoute .
Path Parameters (dynamic segments)
You can define a dynamic segment by prefixing it with a colon
The simplest way to extract path parameters from path and gain access to them is by annotating constructor param with @PathParam(‘optional-alias’) with the same alias/name of the segment.
Now writing /books/1 in the browser will navigate you to BookDetailsPage and automatically extract the bookId argument from path and inject it to your widget.
Query parameters are accessed the same way, simply annotate the constructor parameter to hold the value of the query param with @QueryParam(‘optional-alias’) and let AutoRoute do the rest.
you could also access path/query parameters using the scoped RouteData object.
Tip : if your parameter name is the same as the path/query parameter, you could use the const @pathParam or @queryParam and not pass a slug/alias.
Paths can be redirected using RedirectRoute . The following setup will navigate us to /books when / is matched.
When redirecting initial routes the above setup can be simplified by setting the /books path as initial and auto_route will automatically generate the required redirect code for you.
Note: RedirectRoutes are fully matched.
auto_route supports wildcard matching to handle invalid or undefined paths.
Note: be sure to always add your wildcards at the end of your route list because routes are matched in order.
Nesting routes with AutoRoute is as easy as populating the children field of the parent route. In the following example both UserProfilePage and UserPostsPage are nested children of UserPage .
The parent page UserPage will be rendered inside of root router widget provided by MaterialApp.router but not its children, that’s why we need to place an AutoRouter widget inside of UserPage where we need the nested routes to be rendered.
Now if we navigate to /user/1 we will be presented with a page that has an appBar title that says User 1 and an empty body, why? because we haven’t pushed any routes to our nested AutoRouter, but if we navigate to user/1/profile the UserProfilePage will be pushed to the nested router and that’s what we will see.
What if want to show one of the child pages at /users/1 ? we can simply do that by giving the child page an empty path » .
or by using RedirectRoute
in both cases whenever we navigate to /user/1 we will be presented with the UserProfilePage .
Finding The Right Router
Every nested AutoRouter has its own routing controller to manage the stack inside of it and the easiest way to obtain a scoped controller is by using context.
In the previous example UserPage is a root level stack entry so calling AutoRouter.of(context) anywhere inside of it will get us the root routing controller.
AutoRouter widgets that are used to render nested routes insert a new router scope into the widgets tree, so when a nested route calls for the scoped controller they will get the closest parent controller in the widgets tree not the root controller.
Here’s a simple diagram to help visualize this
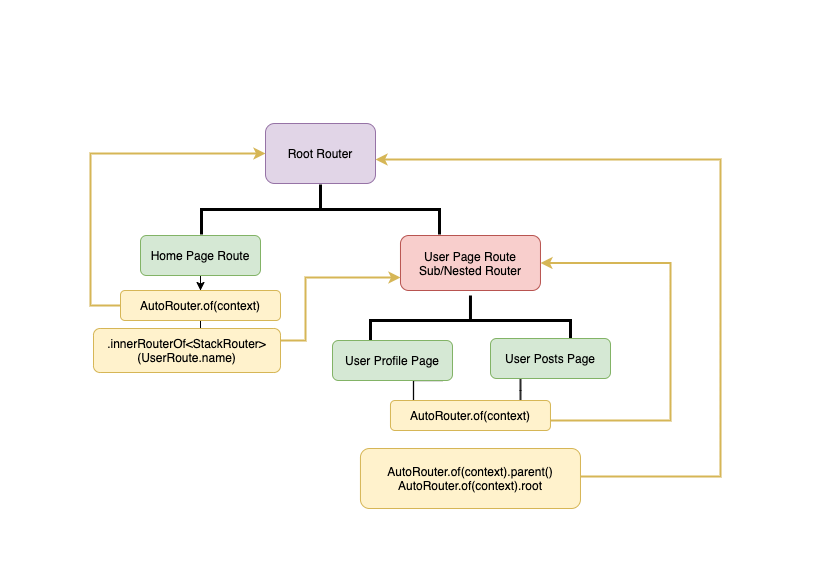
As you can tell from the above diagram it’s possible to access parent routing controllers by calling router.parent () , we’re using a generic function because we too different routing controllers StackRouter and TabsRouter , one of them could be the parent controller of the current router and that’s why we need to specify a type.
on the other hand obtaining the root controller does not require type casting because it’s always a StackRouter .
You could also obtain inner-routers from outside their scope as long as you have access to the parent router.
Accessing the UserPage inner router from the previous example.
Note: nested routing controllers are created along with the parent route so accessing them without context is safe as long as it’s somewhere beneath the parent route ( The host page ).
Think of route guards as middleware or interceptors, routes can not be added to the stack without going through their assigned guards, Guards are useful for restricting access to certain routes.
We create a route guard by extending AutoRouteGuard from the auto_route package and implementing our logic inside of the onNavigation method.
Important: resolver.next() should only be called once.
The NavigationResolver object contains the guarded route which you can access by calling the property resolver.route and a list of pending routes (if there are any) accessed by calling resolver.pendingRoutes .
Now we assign our guard to the routes we want to protect.
After we run code generation, our router will have a required named argument called authGuard or whatever your guard name is
MaterialAutoRouter | CupertinoAutoRouter | AdaptiveAutoRouter
| Property | Default value | Definition |
|---|---|---|
| preferRelativeImports [bool] | true | if true relative imports will be used when possible |
| replaceInRouteName [String] | » | used to replace conventional words in generated route name (whatToReplacePattern,replacment) |
| Property | Default value | Definition |
|---|---|---|
| customRouteBuilder | null | used to provide a custom route, it takes in BuildContext and a CustomPage and returns a PageRoute |
| transitionsBuilder | null | extension for the transitionsBuilder property in PageRouteBuilder |
| opaque | true | extension for the opaque property in PageRouteBuilder |
| barrierDismissible | false | extension for the barrierDismissible property in PageRouteBuilder |
| durationInMilliseconds | null | extension for the transitionDuration(millieSeconds) property in PageRouteBuilder |
| reverseDurationInMilliseconds | null | extension for the reverseDurationInMilliseconds(millieSeconds) property in PageRouteBuilder |
MaterialRoute | CupertinoRoute | AdaptiveRoute | CustomRoute
| Property | Default value | Definition |
|---|---|---|
| initial | false | sets path to ‘/’ or » unless path is provided then it generates auto redirect to it. |
| path | null | an auto generated path will be used if not provided |
| name | null | this will be the name of the generated route, if not provided a generated name will be used |
| usePathAsKey | false | if true path is used as page key instead of name |
| fullscreenDialog | false | extension for the fullscreenDialog property in PageRoute |
| maintainState | true | extension for the maintainState property in PageRoute |
CupertinoRoute Specific => CupertinoPageRoute
| Property | Default value | Definition |
|---|---|---|
| title | null | extension for the title property in CupertinoPageRoute |
CustomRoute Specific => PageRouteBuilder
| Property | Default value | Definition |
|---|---|---|
| transitionsBuilder | null | extension for the transitionsBuilder property in PageRouteBuilder |
| customRouteBuilder | null | used to provide a custom route, it takes in BuildContext and a CustomPage and returns a PageRoute |
| opaque | true | extension for the opaque property in PageRouteBuilder |
| barrierDismissible | false | extension for the barrierDismissible property in PageRouteBuilder |
| durationInMilliseconds | null | extension for the transitionDuration(millieSeconds) property in PageRouteBuilder |
| reverseDurationInMilliseconds | null | extension for the reverseDurationInMilliseconds(millieSeconds) property in PageRouteBuilder |
Custom Route Transitions
To use custom route transitions use a CustomRoute and pass in your preferences. The TransitionsBuilder function needs to be passed as a static/const reference that has the same signature as the TransitionsBuilder function of the PageRouteBuilder class.
Tip Use @CustomAutoRouter() to define global custom route transitions.
You can of course use your own transitionsBuilder function as long as it has the same function signature. The function has to take in exactly a BuildContext , Animation , Animation and a child Widget and it needs to return a Widget , typically you would wrap your child with one of flutter’s transition widgets as follows.
Now pass the reference of your function to CustomRoute .
Custom Route Builder
You can use your own custom route by passing a CustomRouteBuilder function to CustomRoute , there isn’t a simple way to strongly-type a static function in code generation, so make sure your custom builder signature matches the following.
Now we implement our builder function the same way we did with the TransitionsBuilder function, the most important part here is passing the page argument to our custom route.
We finish by passing a reference of our custom function to our CustomRoute.
More docs are coming soon
You can support auto_route by liking it on Pub and staring it on Github, sharing ideas on how we can enhance a certain functionality or by reporting any problems you encounter and of course buying a couple coffees will help speed up the development process.
Источник


