- Serial 2.0.11
- Mac’s and serial TTY’s
- Drivers:
- Software:
- Screen
- Minicom
- Is there an OS X terminal program that can access serial ports?
- 14 Answers 14
- Serial Port Access on your Mac with CoolTerm
- Step 1 — Start CoolTermВ
- Step 2 — Configure and select the Serial PortВ
- Step 3 — Use the Serial PortВ
- Открытие и завершение приложения «Терминал» на Mac
- Открытие Терминала
- Завершение приложения «Терминал»
- Завершение сеанса shell
Serial 2.0.11

Serial современный эмулятор терминала, который будет полезен инженерам и системным администраторам для эффективной работы с серверами, сетевым оборудованием и аппаратным обеспечением.
Для системных администраторов, Serial поддерживает все важные последовательности и прерывания, необходимые для подключении и управления маршрутизаторами и коммутаторами. Также включает в себя полнофункциональный эмулятор терминала, для работы с сетевым оборудованием и Unix программами, включая текстовые редакторы VI и Emacs.
Инженеры по достоинству оценят встроенную поддержку Serial для встраиваемых устройств, включая Arduino, Raspberry Pi, BeagleBone и тысячи других. Serial включает в себя несколько полезных функций для работы с этими устройствами, возможность сброса Arduino, а также подключение к BeagleBone через USB.
Наконец, Serial поддерживает наиболее распространенные USB to Serial адаптеры без необходимости установки драйверов и дополнительного программного обеспечения.
- Поддерживает сотни RS-232 и RS-485 USB to Serial адаптеров
- Поддерживает устройства Bluetooth с Serial интерфейсом
- Поддерживает USB Communication Device Class (CDC) устройства
- Полнофункциональный эмулятор терминала Xterm, Linux, и VT100
- Работает без драйверов, необходимых для многих распространенных устройств
- Поддержка передачи файлов XMODEM и YMODEM
- Режим передачи Line-buffered с историей команд
- Поддержка международных кодировок в том числе UTF-8, KIO8-R, и многих других
- Fixed keyboard shortcut for reset emulation
- Fixed issue affecting FTDI H-series devices
- Initial Release!
- Added SSH Support
- Added Telnet Support
- Added Hex View
- Added Bluetooth Smart Support
- Dozens of Bug Fixes and Improvements
Источник
Mac’s and serial TTY’s

Mac’s are excellent tools for accessing serial device TTY ports (to console into PBX’s, switches, and routers). You just need a serial to USB adapter, the right driver, and some Terminal software.
You can use screen, although Minicom (or a GUI program) offer more features and functionality.
Drivers:
Most Serial-to-USB adapters will work on a Mac with one of the following OS X drivers.
UPDATE: Mavericks (10.9) includes a driver for FTDI-based Serial-to-USB adapters.
➤ Prolific PL2303: PL2303_MacOSX_1_6_0.zip ➤ FTDI USB Serial: FTDIUSBSerialDriver_v2_3.zip
If your adapter doesn’t work with either of these, try the following sources:
- Silicon Labs — CP210x USB to UART Bridge Virtual COM Port (VCP) drivers.
- Belkin — USB Serial Adapters: F5U257, F5U103, F5U003 (poor OS X support).
- Keyspan serial-USB adapter drivers can be found in their Support Section.
After installing the correct driver, plug in your USB-Serial adapter, and open a Terminal session (Applications/Utilities).
Enter the command ls /dev/cu.* , and look for something like usbserial (or similar):
This indicates the USB-Serial driver is working. Select this port name in a terminal program.
You might notice that each serial device shows up twice in /dev, once as a tty.* and once as a cu.*. So, what’s the difference? Well, TTY devices are for calling into UNIX systems, whereas CU (Call-Up) devices are for calling out from them (eg, modems). We want to call-out from our Mac, so /dev/cu.* is the correct device to use.
The technical difference is that /dev/tty.* devices will wait (or listen) for DCD (data-carrier-detect), eg, someone calling in, before responding. /dev/cu.* devices do not assert DCD, so they will always connect (respond or succeed) immediately.
Software:
Having installed the right driver, our USB-Serial adapter will show up in /dev/cu.* (shown above). We now need to install some terminal emulation software before we can connect to anything.
- Two terminal methods are Screen and Minicom
- For a GUI solution, see OS X Serial Port Apps
Note: If you can’t find a driver for your adapter (eg, Belkin), try Serial which has built-in support for many USB-Serial devices.
Screen
It’s not actually necessary to download an install extra software, as you can use the Mac OS X built in Terminal and screen. Screen lacks some features, but it does include VT100/ANSI terminal emulation, and can be extremely useful.
- Open an OS X terminal session (window)
- Find the right TTY device. Type: ls /dev/cu.*
With the USB-Serial adapter plugged in, you’ll get a list, including something like this:
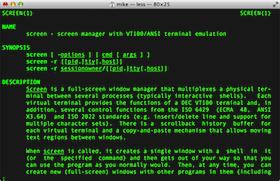
Type man screen in Terminal for further information on screen. (use ‘enter’ or ‘space’ to scroll, and ‘q’ to quit).
Minicom
Alternatively, if you’d like a few more features, and a retro feel, you can install minicom 2.2 .
.
Minicom supports VT100 emulation, which means it sorta kinda works with Meridian Mail (Function keys: fn + f-key).
- Download and run the minicom 2.2 package installer.
- Then manually edit your $PATH with sudo nano /private/etc/paths .
- Add the following line to the bottom of the file: /opt/minicom/2.2/bin , save and exit — then relaunch the terminal.
Run minicom -s first to configure your serial interface device name, and other options. Then, Save setup as dfl (default) and Exit. Your serial interface device name is found with ls /dev/cu.* (as shown above). Always launch minicom, with your selected serial adapter plugged in and available to avoid an error. In the example below, the serial device is /dev/cu.usbserial:

Configuration Options
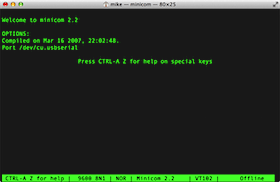
Connected to Port

Command Summary
In minicom, commands can be called by CTRL-A , for example, change your serial port settings with CTRL-A P
Press CTRL-A Z for a Command Summary, and help on special keys. Enter CTRL-A X to quit.
HINT: Change your OS X terminal window size to 80×25 (1 line more) so you can see the bottom Minicom status bar.
(Terminal Preferences ► Settings ► Window). Open a new window for this change to take effect.
 |
Note, the minicom installer creates /opt, and its not hidden in the OS X finder. Rectify this with: sudo chflags hidden /opt
Источник
Is there an OS X terminal program that can access serial ports?
What programs can act as a terminal and access serial ports?
This is not for terminal access on an IP connection, this is so I can access a hardware device plugged into a USB/serial converter running at 9600/8/N/1.

14 Answers 14
There’s a new Mac app called Serial, available in the app store. Full disclosure- I wrote it. The main advantage over other apps is it can work with most USB to serial devices without having to install any drivers, as it has its own drivers built-in. It also does full terminal emulation so you can use it to work with Linux or other devices that require it. You can try it for free, too.
Also, Apple began including their own driver for FTDI-based devices in Mavericks (10.9). So, if you’re on 10.9 or later and your device has an FTDI chip inside, you can use the built-in screen command in the terminal to access your device without worrying about drivers.

You can use the terminal command screen to do this.
I love using [screen] for connecting to serial consoles, i.e.
I often have to do router configuration via a console port, so I use a Keyspan Serial Adapter to get access. Two problems then present themselves: ZTerm is a horrible Mac OS X app. It hasn’t been updated in five years or so, and isn’t a Universal Binary. The developer doesn’t seem in any hurry to rectify the situation. It is not worth the shareware fee in its current form. Minicom requires installation of Fink or MacPorts and is overly complex. Solution: Use screen, Terminal, and a little AppleScripting.
First, launch Script Editor and type/paste in the following code:
Compile and save as an app from within Script Editor, and you have a double-clickable application to launch a serial Terminal session. You may want to customize this slightly — you can change the screen colors or number of columns or rows. You may also need to customize the screen command with a different device name if you are using something other than the Keyspan Serial Adapter (do an ls tty* of the /dev/ directory to get the right name).
screen uses Control-A to take commands directed to it. So type Control-A followed by Control-\ to exit your screen session. If you fail to do this and exit a Terminal session, you’ll leave the screen session alive and the serial resource unavailable until you kill the screen session manually. man screen will show you further commands to send to a screen session.
If anyone can reply with a link to a tutorial on how to wrap an interactive Unix App in Cocoa, that would be the next step — it would be nice to do this without involving Terminal. If you prefer to use Minicom, you could still use the AppleScript to wrap it into a nice launchable app — use this older hint to find the right command line commands.
Источник
Serial Port Access on your Mac with CoolTerm
A basic tool for testing your serial port connection on your Mac is CoolTerm by Roger Meier:
You can download CoolTerm here (mirror).
Step 1 — Start CoolTermВ
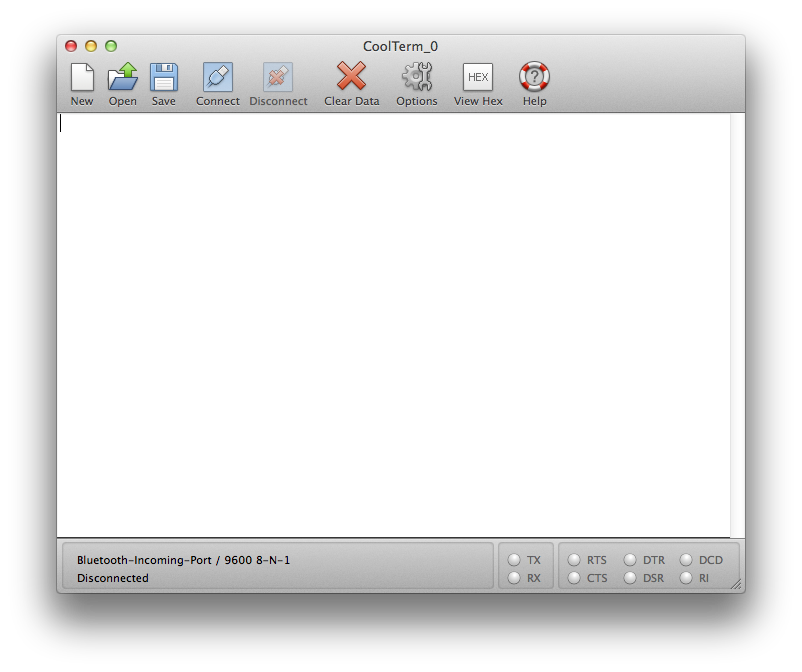
CoolTerm is idle state when you open it. First you need to select and configure the serial port by pressing the options button.
Step 2 — Configure and select the Serial PortВ
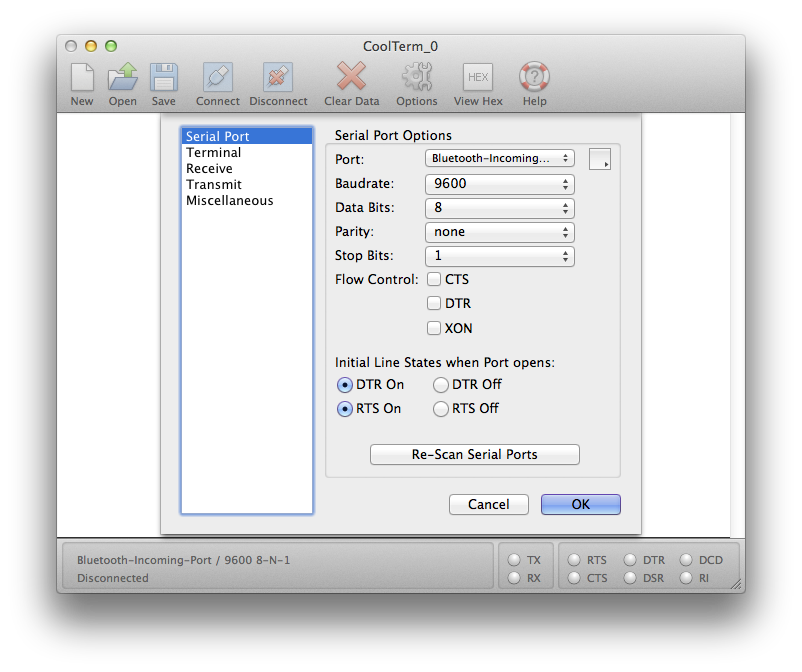
Configure the serial port and select the serial port. If CoolTerm doesn’t show your serial port, you need to press the Re-Scan Serial Ports button. The serial port should show up in the selection list, if it doesn’t show, please check if the driver has been installed correctly (see support).
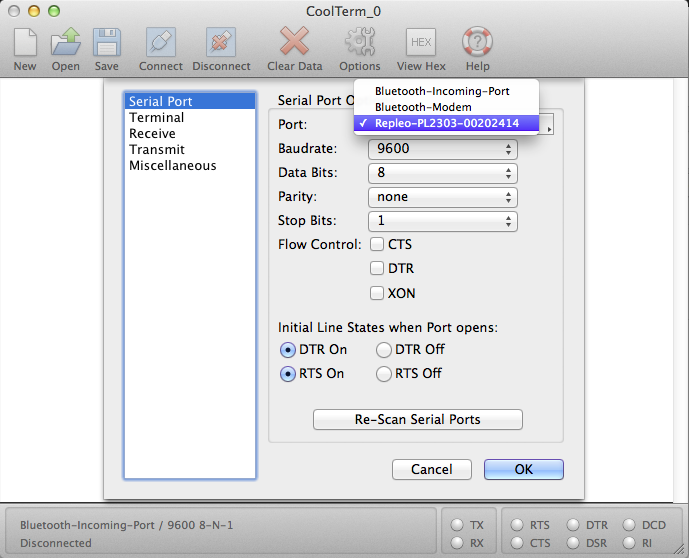
Press the ok button when you’re finished.
Step 3 — Use the Serial PortВ
CoolTerm is still Idle, press the Connect button to open the serial port. After pressing this button the character your type are send to the outer-space via the serial port, and characters it receives are displayed in the window. You can also monitor the handshake signals via the signal LEDS in the right corner, and you can control the RTS and DTR signal by pressing the signal LEDS
Источник
Открытие и завершение приложения «Терминал» на Mac
Каждое окно в Терминале представляет свой экземпляр процесса shell. Окно содержит приглашение, которое означает, что можно вводить команду. Отображаемое приглашение зависит от настроек Терминала и shell, однако обычно оно включает имя хоста, к которому Вы подключены, Вашу текущую рабочую папку, Ваше имя пользователя и символ приглашения. Например, если пользователь с именем michael использует по умолчанию оболочку zsh, приглашение выглядит следующим образом:
В приглашении указано, что пользователь с именем michael вошел в систему на компьютере с именем MacBook-Pro и текущей папкой является его папка пользователя, обозначаемая тильдой (
Открытие Терминала
На компьютере Mac выполните одно из следующих действий.
Нажмите значок Launchpad  в панели Dock, введите «Терминал» в поле поиска и нажмите значок Терминала.
В окне Finder  откройте папку «Программы/Утилиты» и дважды нажмите приложение «Терминал».
Завершение приложения «Терминал»
В приложении «Терминал»  на Mac выберите пункт меню «Терминал» > «Завершить Терминал».
Завершение сеанса shell
В окне приложения «Терминал» на Mac, где запущен процесс shell, который Вы хотите завершить, введите exit и нажмите клавишу Return.
Это обеспечит закрытие всех текущих команд, выполняемых в shell. Если что-то продолжает выполняться, появляется диалоговое окно.
Если Вы хотите изменить поведение при выходе из shell, см. Изменение настроек shell для профилей.
Источник


