- Grsync и GAdmin-Rsync: графические интерфейсы для Rsync
- 1. Grsync
- Установка Grsync
- Использование программы
- Проверка
- Синхронизация файлов
- Резервное копирование по расписанию
- 2. Gadmin-Rsync
- Установка
- Использование
- Резервное копирование по расписанию
- cwRsync — Rsync for Windows
- cwRsync — Rsync for Windows
- Acrosync — Rsync GUI for Windows
Grsync и GAdmin-Rsync: графические интерфейсы для Rsync
1. Grsync
Grsync — это графический интерфейс для rsync — кроссплатформенной утилиты, работающей в Linux, Windows OS и Mac OS. Grsync можно использовать для синхронизации вашей коллекции музыки на съемных устройствах, создания резервной копии данных на сетевом носителе, репликации раздела на другой диск, зеркалирования файлов и так далее. В этой части я расскажу о синхронизации файлов и директорий с помощью Grsync.
Установка Grsync
В Ubuntu/Debian/Linux Mint:
Grsync имеется в системных репозиториях, поэтому вы можете установить ее с помощью команды:
В системах на базе RHEL:
Теперь запустите Grsync из меню или Dash. Интерфейс программы после запуска имеет вид:
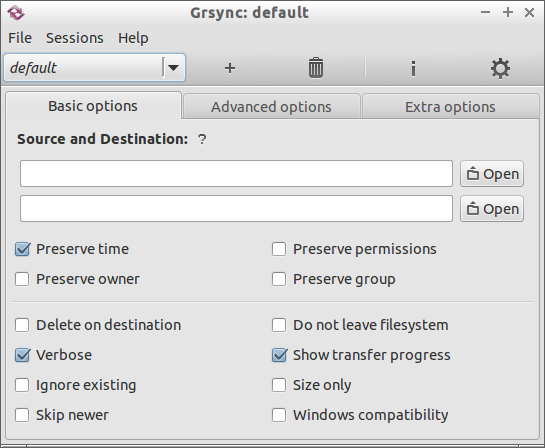
Интерфейс имеет три вкладки: Basic, Advanced и Extra, названия которых говорят сами за себя. При выборе любой опции появляется всплывающее окно с подсказкой.
Использование программы
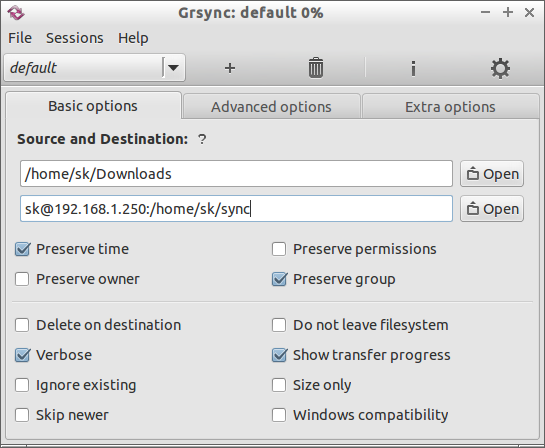
В этом руководстве я буду использовать две системы Ubuntu 14.04. IP-адрес моей локальной системы 192.168.1.200/24, а удаленной системы — 192.168.1.250/24.
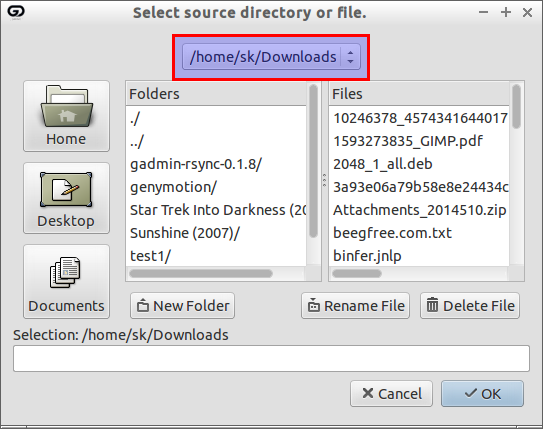
Теперь я собираюсь сделать резервную копию директории /home/sk/Downloads/ моей локальной системы и сохранить ее в директории /home/sk/sync/ удаленной системы с помощью Grsync.
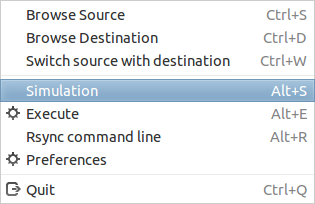
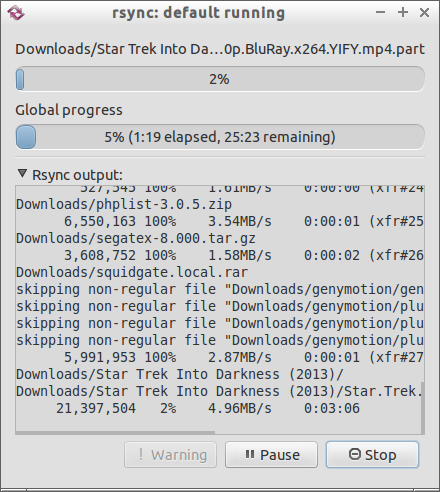
Теперь кликните пункт Simulation в меню File.
Вам предложат ввести пароль удаленного пользователя.
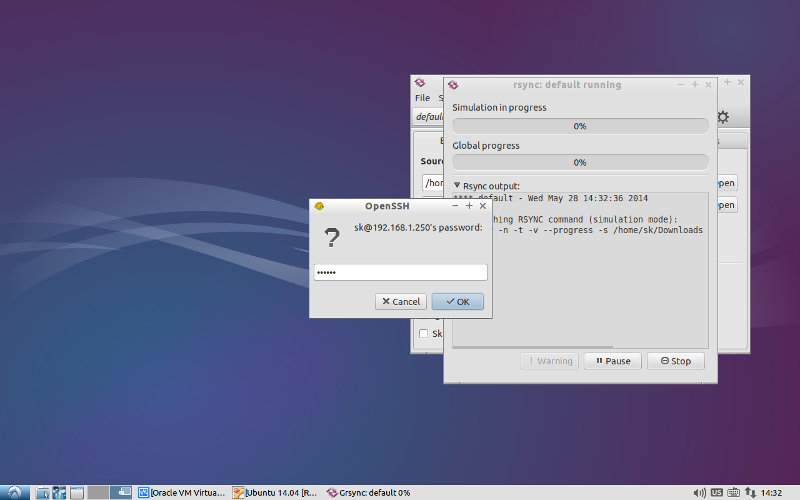
Если все прошло удачно, вы увидите сообщение «Completed successfully».
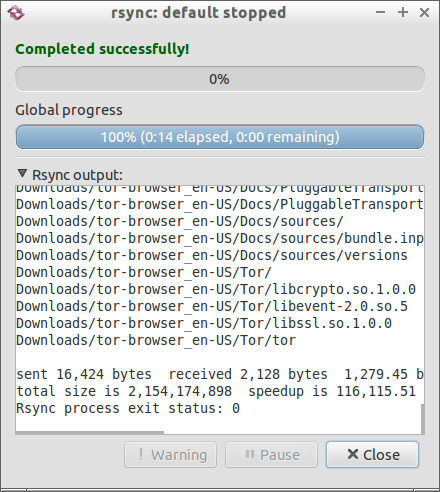
Теперь кликните Execute, чтобы сохранить изменения и начать передачу файлов.
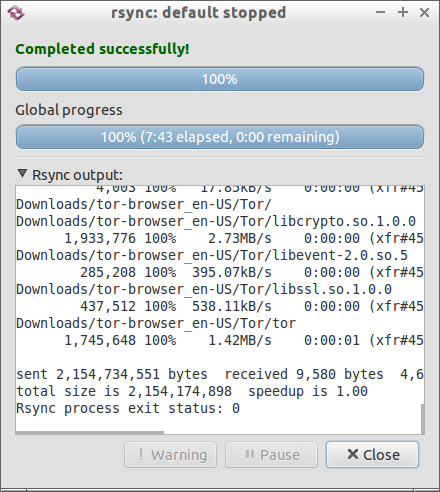
После завершения передачи должно вновь появиться сообщение «Completed successfully».
Проверка
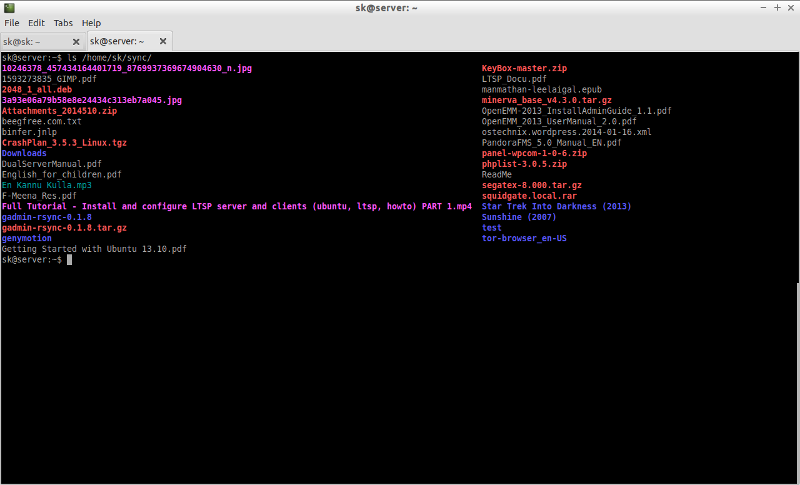
Перейдите в директорию на удаленной системе (т.е. /home/sk/sync) и проверьте наличие в ней файлов резервной копии.
Синхронизация файлов
Выше мы передавали файлы и/или директории вручную. Если вы хотите синхронизировать файлы удаленно через определенные промежутки времени, необходимо выполнить описанные ниже действия.
Для синхронизации файлов нам необходимо создать новую сессию. Назовем ее Synchronize. Кликните (+) в интерфейсе Grsync.
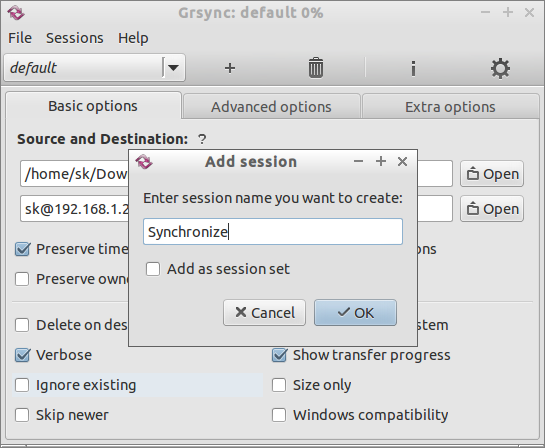
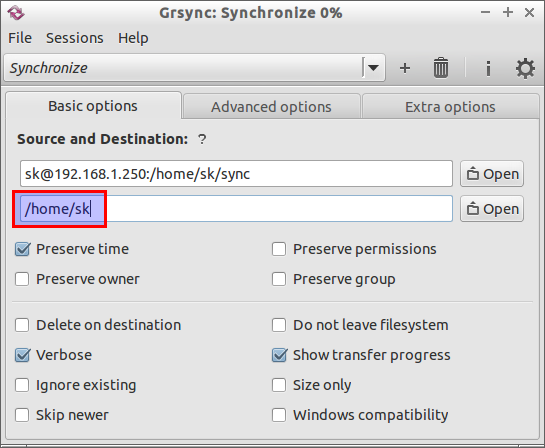
Будет создана новая сессия под названием Synchronize. Здесь вам необходимо ввести удаленную директорию (192.168.1.250:/home/s/sync) в качестве исходной, и локальную (/home/sk/Downloads) в качестве директории назначения. Обратите внимание, что не нужно вводить полный путь к директории назначения. Например, если я хочу синхронизировать содержимое директории /home/sk/sync с удаленного сервера с локальной системой, то просто ввожу местоположение директории назначения. В моем случае это директория sync в домашней директории удаленного сервера (т.е. /home/sk/). Поэтому я ввожу путь назначения /home/sk.
Проверьте наличие ошибок, кликнув кнопку Simulation в меню File. Если все в порядке, запустите процесс, кликнув Execute.
Резервное копирование по расписанию
Для создания резервных копий по расписанию добавьте обе сессии в файл crontab вашей локальной системы:
Добавьте обе сессии (то есть сессию по умолчанию и Synchronize) по очереди.
Приведенное выше задание для cron выполняет резервное копирование с локальной в удаленную директории в 11.00, а процесс синхронизации файлов в 12.00 соответственно. Сохраните файл crontab.
2. Gadmin-Rsync
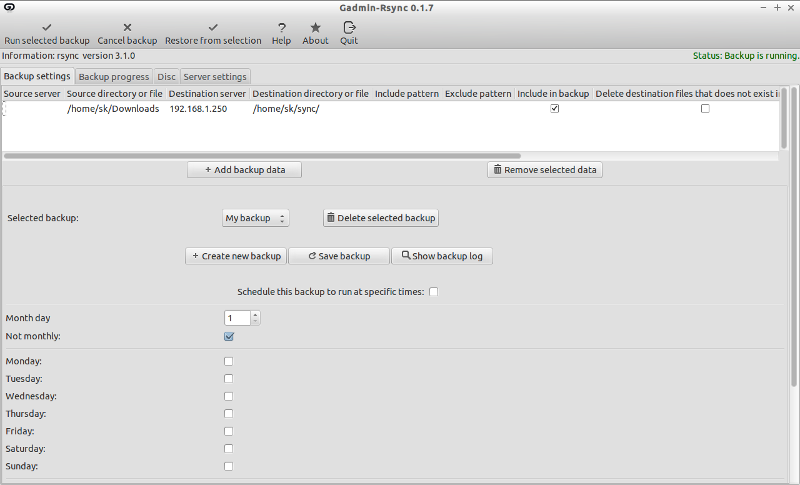
GAdmin-Rsync — это графический интерфейс для команды Rsync на базе C/GTK+. Эта утилита позволяет выполнять резервные копии файлов и директорий с локальной системы на локальную, с локальной на удаленную, и наоборот.
Установка
Вы также можете скомпилировать программу из исходного кода, как показано ниже.
Скачайте gadmin-rsync-x.x.x.tar.gz, распакуйте архив и установите программу.
Теперь вы можете запустить ее, вводя в терминале «gadmin-rsync», или из системного меню GNOME или KDE.
Использование
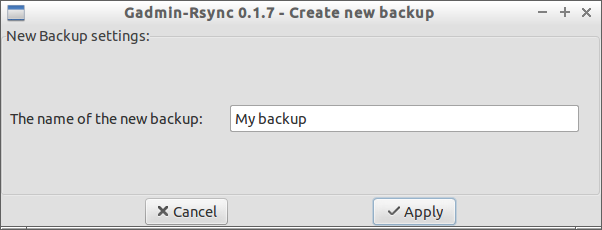
При первом запуске вас попросят задать имя для новой резервной копии. Введите его и кликните «Apply».
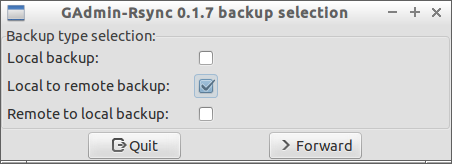
Затем выберите тип резервной копии: Local backup, Local to remote backup или Remote to local backup. В моем случае я выбрал тип local to remote backup. Кликните кнопку Forward.
Выберите директорию, резервную копию которой вы хотите сделать.
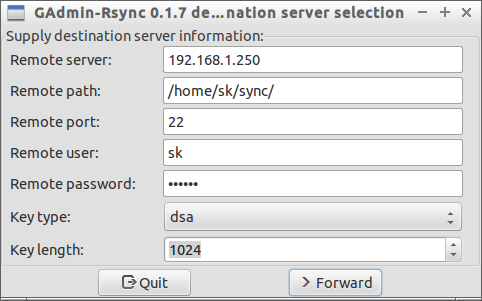
Введите IP-адрес удаленного сервера, путь на удаленной машине для размещения резервной копии, имя пользователя и пароль удаленного пользователя.
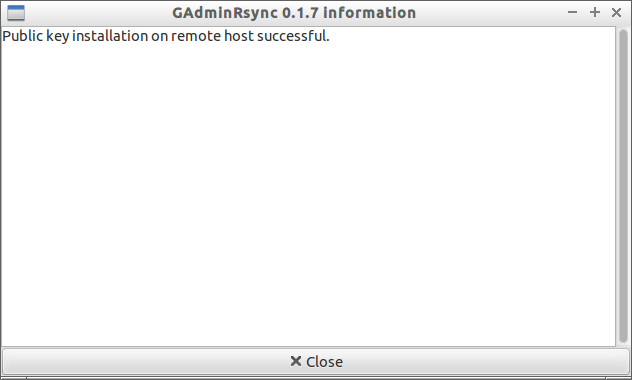
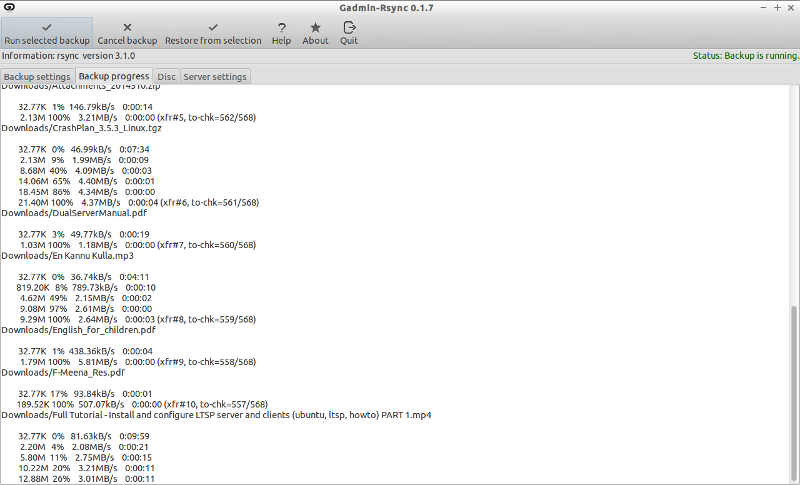
Теперь кликните кнопку Run selected backup в правом верхнем углу для запуска резервного копирования.
Теперь запустится процесс резервного копирования.
Резервное копирование по расписанию
В версии 0.1.7 я не смог запустить резервное копирование через заданный интервал времени. Когда я пытался сохранить расписание, получал ошибку:
Но кто-то с форума Askubuntu нашел решение этой проблемы. Надеюсь, оно вам поможет.
cwRsync — Rsync for Windows

cwRsync is a packaging of Rsync for Windows. You can use cwRsync for fast remote file backup and synchronization.
Rsync uses the Rsync algorithm which provides a very fast method for bringing remote files into sync. It does this by sending just the differences in the files across the link, without requiring that both sets of files are present at one of the ends of the link beforehand. At first glance this may seem impossible because the calculation of diffs between two files normally requires local access to both files.
Rsync normally uses ssh for communication. It requires no special privileges for installation. You must, however, have a working ssh system. Alternatively, rsync can run in `daemon’ mode, listening on a socket. This is generally used for public file distribution, although authentication and access control are available.
Cygwin is a Linux-like environment for Windows. It consists of a DLL (cygwin1.dll), which emulates substantial Linux API functionality, and a collection of tools.
A barebone distribution of Rsync client for Windows. That’s all you need to initiate rsync requests from your computer. The rsync binary provided has following convenient patches: transliterate, timelimit, ignore case, no strict check of password file permissions (unofficial).

If you need to serve rsync requests from your computer, you need to set up an rsync daemon, which we provide as a paid solution. Click here for more information.
cwRsync — Rsync for Windows
cwRsync is a packaging of Rsync for Windows. You can use cwRsync for fast remote file backup and synchronization.
Rsync uses the Rsync algorithm which provides a very fast method for bringing remote files into sync. It does this by sending just the differences in the files across the link, without requiring that both sets of files are present at one of the ends of the link beforehand. At first glance this may seem impossible because the calculation of diffs between two files normally requires local access to both files.
Rsync normally uses ssh for communication. It requires no special privileges for installation. You must, however, have a working ssh system. Alternatively, rsync can run in `daemon’ mode, listening on a socket. This is generally used for public file distribution, although authentication and access control are available.
Cygwin is a Linux-like environment for Windows. It consists of a DLL (cygwin1.dll), which emulates substantial Linux API functionality, and a collection of tools.
A barebone distribution of Rsync client for Windows. That’s all you need to initiate rsync requests from your computer. The rsync binary provided has following convenient patches: transliterate, timelimit, ignore case, no strict check of password file permissions (unofficial).
If you need to serve rsync requests from your computer, you need to set up an rsync daemon, which we provide as a paid solution. Click here for more information.
Acrosync — Rsync GUI for Windows

- OpenVPN IPv6 and IPv4 configuration — Mon, Mar 1 2021
- 4sysops author and member competition 2020 — Fri, Jan 1 2021
- Assign an IPv6 address to an EC2 instance (dual stack) — Tue, Dec 15 2020
If you are also at home in the Linux world, you most certainly are familiar with rsync, a popular file synchronization and file transfer tool. The counterpart in the Windows world is perhaps robocopy, although quite a few third-part rsync programs for Windows exist.
If you have been looking for ways to run Linux commands on Windows, you probably worked with Cygwin. Cygwin is not really lightweight and you usually need some time to get familiar with it. (Acrosync doesn’t require Cygwin.) As far as I know, PowerShell still lacks a native rsync cmdlet.

Nevertheless, Acrosync’s strength is that it has an easy-to-use GUI. This not only saves time when you want to quickly implement a sync solution between a Windows and a Linux machine, but it also has the advantage that configuration errors are less likely because you see all your settings at a glance. This is important if you want to use the sync tool for backups. Nothing is more annoying than urgently needing a backup only to discover that your backup script contained a little bug.
On the other hand, many GUI backup solutions are so overloaded with features that configuration errors are virtually programmed. This won’t happen with Acrosync because all its settings fit on a single screen.
The other question is why you’d want to back up data from a Windows computer to a Linux machine. I think this option is interesting because nowadays you can easily rent Linux VMs in the cloud for an apple and an egg. Some cloud providers even offer small Linux VMs for free. Thus, if you don’t trust Dropbox and company with your backups, you can use Acrosync to build your own little cloud drive in almost no time. All in all, I needed about five minutes for the entire procedure, including the time to understand how Acrosync works and to create a new Linux EC2 instance in AWS.
All you have to do is enter the address of your Linux box and your credentials (the tool also supports public key authentication), and then configure the local and remote folder. If you select Auto Upload, Acrosync will automatically detect changed files and upload them to your Linux machine. Hence, you can call Acrosync a Continuous Data Protection (CDP) solution.
The “Update destination in-place” option instructs the remote rsync not to create intermediate files and patch the existing files directly. The tool also supports the propagation of deleted files and the Windows Shadow Copy service. Thus, you can sync file deletions and files that another application opened. This way, you will always have an exact copy of your local folder and all its subfolders on your private cloud drive.
Alternatively, you can schedule backups. Because Acrosync can automatically start a backup profile when Windows boots up, you only have to configure a certain time of the day when your computer is online.
If you enable the “Create incremental snapshots” option, Acrosync will create a folder with the date of the backup on the remote machine. Although the backup is incremental in nature (to minimize network bandwidth and disk space consumption), each folder appears as a full backup, so it is easier to recover from a previous backup, and more importantly, any old backup can be quickly deleted.

Of course, you can combine both methods. You can configure a profile for Auto Upload and one for scheduled backups. To configure a second profile, you have to right-click the profile’s tab that is created when you first launch the tool.
If you don’t want to upload all file types, you can exclude them with the help of wildcards. Or, if you want to only upload certain file types, you only include those in the same way. And, if you are afraid that the backup tool will eat up all your bandwidth, you limit the download and upload speed. Because Acrosync currently doesn’t compress files, a low bandwidth could be a problem.
Before you start a backup, you might want to do a dry run. In PowerShell, this would correspond to the ‑WhatIf parameter. It allows you to verify that the tool is really syncing the right files. You can monitor what Acrosync is doing in the tool’s status bar, and you will also see Dropbox-like bulbs in the systray. The Log tab gives you a detailed overview of the tool’s actions and the Queue tab lists all files that still have to be synced.

Perhaps it is not entirely correct to speak of “syncing” here. Acrosync can upload and download. However, the tool is unable to detect file changes on the server. This is not surprising because it doesn’t have a server component. It is therefore not as convenient as using Dropbox or OneDrive to sync files between multiple clients. If you log on to a second client, you have to manually start a download profile to get the latest files.
If Acrosync supported the ability to automatically start a download process when Windows boots up, this would solve a part of the problem. Automatically starting scheduled backups doesn’t really help here because you would then have to wait for the scheduled hour for the download to start. However, a full-blown cloud drive requires frequent full scans of the remote folders; for this, a server component would be needed.
Having said that, Acrosync is more a backup tool than a Dropbox alternative even though versions for the Mac and iOS exist. Its strength is that it is extremely fast to set up. And, as a backup tool, the tool has surprisingly many useful features. A single license costs $49.99; if you buy multiple licenses, you can get a discount.


