- Ethical hacking and penetration testing
- InfoSec, IT, Kali Linux, BlackArch
- How to install the driver for W-Fi for cards with RTL8812AU/RTL8821AU chipsets (Alfa AWUS036ACH, Alfa AWUS036AC)
- What is the chipset in Alfa AWUS036ACH and Alfa AWUS036AC
- How to install the rtl8812au driver in Kali Linux
- How to install rtl8812au driver in Arch Linux, BlackArch
- How to install rtl8812au driver in Debian, Linux Mint, Ubuntu
- How to install rtl8812au driver in For Raspberry (RPI)
- Setting up TX power in rtl88xxau
- LED control in rtl88xxau
- NetworkManager
- How to set Alfa AWUS1900 into monitor mode
- Related articles:
- Recommended for you:
- 13 Comments to How to install the driver for W-Fi for cards with RTL8812AU/RTL8821AU chipsets (Alfa AWUS036ACH, Alfa AWUS036AC)
- how to install rtl8812au driver
- install rtl8812au driver
- Download rtl8812au driver
- Install DKMS
- Comments
- Rtl8812au kali linux 2020
- About
Ethical hacking and penetration testing
InfoSec, IT, Kali Linux, BlackArch
How to install the driver for W-Fi for cards with RTL8812AU/RTL8821AU chipsets (Alfa AWUS036ACH, Alfa AWUS036AC)
What is the chipset in Alfa AWUS036ACH and Alfa AWUS036AC
The RTL8812AU chipset has the following W-Fi adapters:
They are especially loved by those who perform wireless security testing of Wi-Fi networks, since they are modern wireless adapters that support monitor mode and can perform wireless injections.
The difference between the RTL8812AU and RTL8814AU chipsets is the ability to support a different number of antennas. The RTL8812AU supports up to 2 antennas, and the Realtek RTL8814AU supports up to 4 antennas. In some cases, depending on the design of the device manufacturer’s circuitry or firmware, one antenna can be used only for transmitting, and the other only for receiving. Also, some devices work only in one band by choice, others – in two bands at the same time. This also needs to be considered when purchasing devices.
How to install the rtl8812au driver in Kali Linux
If you bought a dual-band (2.4GHz & 5.0GHz) adapter with RTL8812AU/21AU chipset, you need to install the rtl8812au driver. On Kali Linux, you can do this with the command:
After installation, reboot your system or disconnect/reconnect the adapter.
How to install rtl8812au driver in Arch Linux, BlackArch
Start by installing the pikaur program according to the “Automatic installation and update of AUR packages” article. The pikaur program is analogous to pacman, but for working with the AUR, it allows you to automatically install and update programs from the AUR. You will definitely love pikaur!
Then run the command:
How to install rtl8812au driver in Debian, Linux Mint, Ubuntu
Run the following commands to install the rtl8812au driver.
Download driver source code:
Install the driver as a DKMS module – this means that when updating the kernel, you do not have to manually recompile the driver for the new kernel version. This will be done automatically by the DKMS module. Also note that the make command is unnecessary since the compilation is done by the DKMS module.
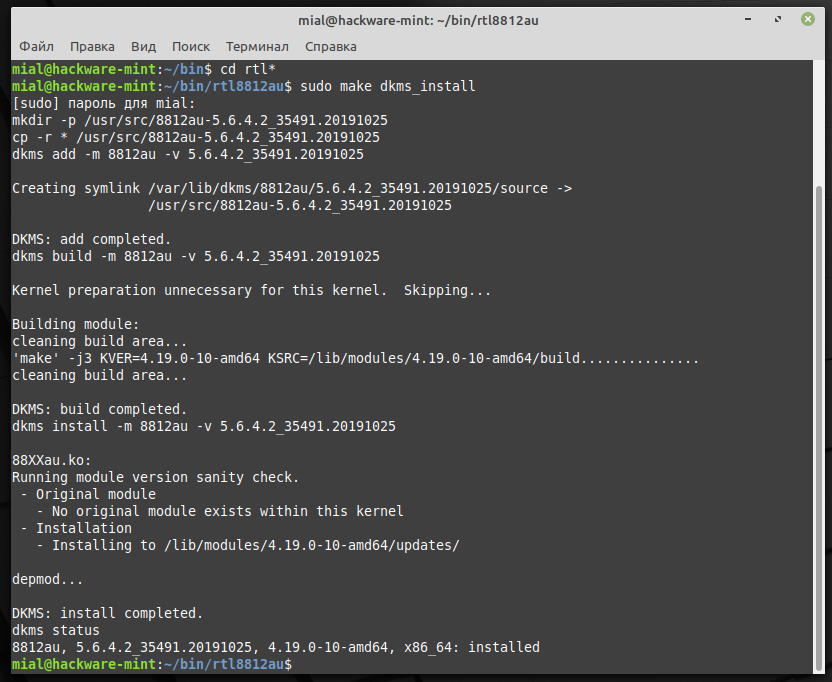
DKMS reports that the installation is complete and that the status for 8814au is “installed”.
How to uninstall the driver
To remove a driver from your system, open a terminal in your source directory and run the following command:
How to install rtl8812au driver in For Raspberry (RPI)
Download driver source code:
Changes to the Makefile must be made to change the processor architecture.
For RPI 1/2/3/ and 0/Zero:
But for RPI 3B+ and 4B, you will need to run the other commands below, they build the Arch ARM64 driver:
Also, if you get an error about an unrecognized command line parameter “-mgeneral-regs-only” (for example Raspbian Buster), you need to run the following commands:
Install the driver as a DKMS module – this means that when updating the kernel, you do not have to manually recompile the driver for the new kernel version. This will be done automatically by the DKMS module. Also note that the make command is unnecessary since the compilation is done by the DKMS module.
Removing the driver
To remove a driver from your system, open a terminal in your source directory and run the following command:
Setting up TX power in rtl88xxau
Switching between USB modes in rtl88xxau
Where NUMBER can be:
- 0: do not use switch
- 1: switch from usb2.0 to usb 3.0
- 2: switch from usb3.0 to usb 2.0
LED control in rtl88xxau
You can control the LED statically by specifying a module parameter in /etc/modprobe.d/8812au.conf or a similar file, like this:
Values can be 0 or 1.
You can also control the LED dynamically by changing the values in /proc/net/rtl8812au/$(YOUR INTERFACE NAME)/led_ctrl, for example:
Values can be 0 or 1.
To check the current value:
NetworkManager
Newer versions of NetworkManager switch to a random MAC address. Some users would prefer to use a fixed MAC address. Just add these lines below at the end of your /etc/NetworkManager/NetworkManager.conf file:
and restart NetworkManager with the command:
How to set Alfa AWUS1900 into monitor mode
The main thing to learn by now is to use the “ip” and “iw” commands instead of “ifconfig” and “iwconfig” – this applies to all Wi-Fi adapters.
Related articles:
- How to install driver for Wi-Fi for adapters with RTL8814AU chipset (Alfa AWUS1900) (100%)
- How to increase TX-Power of Wi-Fi adapters in BlackArch in 2021 (82%)
- How to install driver for Wi-Fi Mediatek MT7921 and Mediatek MT7961 in Linux (71.6%)
- How to increase TX-Power of Wi-Fi adapters in Kali Linux in 2021 (65.6%)
- USB Wi-Fi Adapters with monitor mode and wireless injection (100% compatible with Kali Linux) 2021 (65.6%)
- How in Windows view the contents of a Linux disk and copy files from it (RANDOM — 16.4%)
Recommended for you:
13 Comments to How to install the driver for W-Fi for cards with RTL8812AU/RTL8821AU chipsets (Alfa AWUS036ACH, Alfa AWUS036AC)
rtl88xxau is not currently working on raspberry pi.5.4.72-v7l+
make produces error «gcc: error: unrecognized command line option \u2018-mgeneral-regs-only\u2019» despite dkms.conf was modified as indicated
make dkms_install installs the driver but it is not recognized by the device.
Few months ago this driver installed and worked with no problem.
On the other hand, you indicate to modify dkms-install.sh with
sed -i ‘s/^dkms build/ARCH=arm dkms build/’ dkms- install .sh
but dkms-install.sh is not in the repository anymore.
Hello! You are right about dkms-install.sh and I corrected it in the manual.
Take a close look at the error message and unrecognized command line option: “\u2018-mgeneral-regs-only\u2019”. It is weird, isn’t it? Maybe try deleting the source directory and trying to download and reinstall?
Did you try to install this driver using DKMS?
/rtl8812au]
└─$ sudo make dkms_install
mkdir -p /usr/src/8812au-5.6.4.2_35491.20191025
cp -r * /usr/src/8812au-5.6.4.2_35491.20191025
dkms add -m 8812au -v 5.6.4.2_35491.20191025
Error! DKMS tree already contains: 8812au-5.6.4.2_35491.20191025
You cannot add the same module/version combo more than once.
make: *** [Makefile:2303: dkms_install] Error 3
You need to remove the old version first:
sudo dkms remove 8812au/5.6.4.2_35491.20191025 —all
sudo make dkms_install
how fix this guys ?
It looks like this driver is already installed. Try to remove it first (if you need it):
Your kernel headers for kernel 5.4.83-v7+ cannot be found at
/lib/modules/5.4.83-v7+/build or /lib/modules/5.4.83-v7+/source.
I didn’t get it, sorry.
Try with:
sudo apt install linux-headers-generic
this is the error i keep receiving…… can you pls help with this
Error! Your kernel headers for kernel 4.4.0-19041-Microsoft cannot be found.
You use WSL, right? So none can help you. Think of WSL as a virtual machine with no hardware access.
I mean, even if you can compile the driver, you still won’t be able to use your Wi-Fi dongle.
This just short Tutorial for NEWBIE (like me!) for installing driver USB Wifi driver for Linux Debian and it’s derivatives (Debian, Ubuntu, Linux Mint, Pop! OS, Elementary OS, etc.)
When you’re switch to new OS distro or updating OS or accidently delete some part of software sometimes your Wifi driver are no support / no working and got blank your mind … Yup thats right !
# First STEP to do :
1. You only need YOUR SMARTPHONES and make sure also they have “Internet Mobile Data”.
2. Then you need to opened “Developer Options” on your smartphone to do that first before.
3. Open your phone “Settings” and find it “About Phone” and selected “Version Number” and then now repeated click up to (7x) seven times.
4. Inside “Developer Options” find it or scrolling to the “Network” and selected “Select USB Configuration” and then select again to the “USB Ethernet (RNDIS)”.
5. After this all you need is USB cable connected to your PC or Laptop and it’s done, now you ready online!
# Second STEP to do :
1. Installing GDebi (I’m using Geary on Pop! OS that are the same software). You can find GDebi in Ubuntu Software Center, just search for it and install it from there.
2. Then installing the latest “realtek-rtl88xxau-dkms” deb package from Kali’s repository.
3. After this just type in your linux terminal “sudo reboot” to rebooting your PC or Laptop.
4. It’s done , just try to check it out !
I’m trying many times using this method when i switching to new OS distros or update Linux Kernel. This really saving my times and work to do! Thanks for your time to read this !
Hello! Thank you very much for your escape method when the laptop is stuck offline.
Источник
how to install rtl8812au driver
Last Updated on May 24, 2021 by Walid Salame 3 Comments
In order for dual-band WiFi adapter with the rtl8812au driver to be used in the Kali Linux, you need to install rtl8812au driver.
Although there are few WiFi adapters that can be put into Monitor mode, those that use RealTek’s RTL88xxAU chipset are particularly well known as “capable”.
however the driver need to be installed in Kali Linux to work and to be able to start monitor mode,
to do so please follow this tutorial step by step..
install rtl8812au driver
The wireless network card is a USB interface, and the chip model is Realtek RTL8811AU. If the wireless network card is placed in the Windows environment, it can be plug and play without installing a driver. But if it is placed under Linux, it may involve reloading the driver. At least, it is so under Kali Linux.
The following methods are fully applicable to rtl8812AU, rtl8821AU and rtl8811AU installed in Linux, other USB wireless NIC drivers should be similar, the detailed process is as follows (please use root privileges for the following operations):
You can follow this tutorial video or check the details below
Install rtl8812au driver
Install linux headers in Kali linux
Because the kernel of the Kali Linux system itself is not very complete, some things are reduced. The kernel header file linux-headers is reflected here, which needs to be installed manually. Other operating systems are similar. This file should be used when installing the driver for a while. The following are the commands for the installation.
Before installation may need to update the software source
If the depot inside the child does not correspond to the first document, the next step may not be successful
which means you must to choose a suitable source software for their own
Through the above steps, we should already have the kernel header file installed.
Download rtl8812au driver
To download the source code, you first need to install the git tool on your own linux (kali comes with it), of course, we can also go directly to the online download, but the method is a bit too low, I do not recommend. We can go directly to the official website to download and install, but here is a lazy, use the command:
Next, what you need to do is clone the source code:

Install DKMS
DKMS (Dynamic Kernel Module Support) is a tool for automatically compiling and installing kernel modules and managing things such as drivers that directly access kernels

now to install the driver go to rtl8812au directory
Install the driver In the directory you moved earlier
Uninstall the driver ? In the same directory as before
When driver installation is completed, if you connect the WiFi adapter to the “Kali Linux” VM, the Wi-Fi item will appear in the network connection indicator in the upper right, and you can select the connection destination.
to check if the driver was installed type this command:

Now reboot the operating system and execute the following commands to get the driver to work:

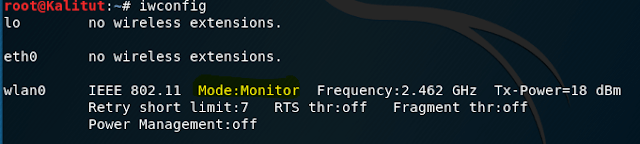
Next, let’s put the WiFi adapter into monitor mode:
check for monitor mode
Let’s scan Wi-Fi networks:
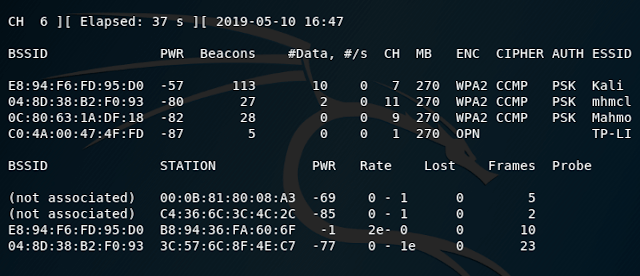
now let’s capture handshake
with this command as i’m targeting Kali wifi network
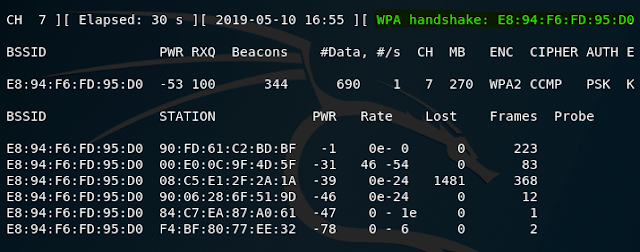
As you can see, everything works.
Comments
Forest Laflamme says
For anyone who can’t make this work, I used this:
Once the git link is cloned and you have cd into the directory:
dkms status
If the module is marked as added, instead of install as in the walk-through, use:
dkms install -m “Name of module you just got with dkms status” -v “version number of dkms status”
it will take a while, then you can verify it’s installed with one last:
dkms status
Hi, I still cant get it to work, the cloned files does not contain any installation script and DKMS status returns nothing.
Источник
Rtl8812au kali linux 2020
News: A new version of this driver is now available. Testing has shown it to be a solid driver. The driver located here will be discontinued in the near future so please transition to the new driver as you are able to do so.
Linux Driver for USB WiFi Adapters that are based on the RTL8812AU Chipset
- v5.9.3.2 (Realtek) (2020-10-12)
- Plus updates from the Linux community
- IEEE 802.11 b/g/n/ac WiFi compliant
- 802.1x, WEP, WPA TKIP and WPA2 AES/Mixed mode for PSK and TLS (Radius)
- IEEE 802.11b/g/n/ac Client mode
- Support wireless security for WEP, WPA TKIP and WPA2 AES PSK
- Support site survey scan and manual connect
- Support power saving mode
- Supported interface modes:
- IBSS
- Managed
- AP (see Bridged Wireless Access Point located in the main directory of this repo)
- Monitor
- P2P-client
- P2P-GO
- USB mode control
- Log level control
- LED control
- Power saving control
- VHT control (allows 80 MHz channel width in AP mode)
- SU Beamformee and MU Beamformee control
- SU Beamformer control
A FAQ is available at the end of this document.
- Kernels: 2.6.24 — 5.8 (Realtek)
- Kernels: 5.9 — 5.13 (community support)
Tested Linux Distributions
Arch Linux (kernel 5.4)
Arch Linux (kernel 5.9)
Fedora (kernel 5.11)
Kali Linux (kernel 5.10)
Linux Mint 20.2 (Linux Mint based on Ubuntu) (kernel 5.4)
Linux Mint 20 (Linux Mint based on Ubuntu) (kernel 5.4)
LMDE 4 (Linux Mint based on Debian) (kernel 4.19)
Manjaro 20.1 (kernel 5.9)
Raspberry Pi OS (2021-01-11) (ARM 32 bit) (kernel 5.10)
Raspberry Pi Desktop (x86 32 bit) (kernel 4.9)
Ubuntu 21.04 (kernel 5.11)
Ubuntu 20.10 (kernel 5.8)
Ubuntu 20.04 (kernel 5.4)
Ubuntu 18.04 (kernel 5.4)
Download Locations for Tested Linux Distributions
- Alfa AWUS036AC
- Alfa AWUS036ACH
- Belkin F9L1109
- Buffalo — WI-U3-866D
- D-Link DWA-182 (Rev. C1)
- Edimax EW-7822UAC
- Linksys WUSB6300 V1
- Rosewill RNX-AC1200UBE
- TRENDnet TEW-805UB
- Numerous products that are based on the supported chipset.
Warning: Beware of «multi-state» USB WiFi adapters. Some USB WiFi adapters have proprietary Windows drivers onboard. When plugged in, they act like a flash drive or CDROM and on Windows will attempt to start installing the Windows driver. That won’t work on Linux or MAC or any other non-Windows OS so the adapter sits there in flash drive or CDROM mode. The problem is that the state of the adapter has to be changed for the adapter to show up as the device that you expect, in this case, a WiFi adapter. Most modern Linux distributions ship with a utility called «usb-modeswitch» that will handle this issue for you if it has the correct information for your adapter. It is a good utility but if you buy adapters that are «multi-state,» that is one more potential headache you may have to deal with when something goes wrong. Often you can indentify adapters that are «multi-state» as they are advertised as «free driver» or «free installation driver.» If you are looking to buy a USB WiFi adapter for use on Linux, MAC OS, *NIX or anything besides Windows, it is a good idea to seek out single-state adapters.
Note: Some adapter makers change the chipsets in their products while keeping the same model number so please check to confirm that the product you plan to buy has the chipset you are expecting.
The installation instructions are for the novice user. Experienced users are welcome to alter the installation to meet their needs.
Temporary internet access is required for installation. There are numerous ways to enable temporary internet access depending on your hardware and situation. One method is to use tethering from a phone. Another method to enable temporary internet access is to keep a wifi adapter that uses an in-kernel driver in your toolkit.
You will need to use the terminal interface. The quick way to open a terminal: Ctrl+Alt+T (hold down on the Ctrl and Alt keys then press the T key)
DKMS is used for the installation. DKMS is a system utility which will automatically recompile and install this driver when a new kernel is installed. DKMS is provided by and maintained by Dell.
It is recommended that you do not delete the driver directory after installation as the directory contains information and scripts that you may need in the future.
There is no need to disable Secure Mode to install this driver. If Secure Mode is properly setup on your system, this installation will support it.
Step 1: Open a terminal (Ctrl+Alt+T)
Step 2: Update the system (select the option for the OS you are using)
Step 3: Install the required packages (select the option for the OS you are using)
Step 4: Create a directory to hold the downloaded driver
Step 5: Move to the newly created directory
Step 6: Download the driver
Step 7: Move to the newly created driver directory
Step 8: Warning: this step only applies if you are installing to Raspberry Pi hardware.
Run a preparation script
Step 9: Run the installation script (For automated builds, use NoPrompt as an option)
A file called 8812au.conf will be installed in /etc/modeprobe.d by default.
This file will be read and applied to the driver on each system boot.
To edit the driver options file, run the edit-options.sh script.
Documentation for Driver Options is included in the file 8812au.conf .
Removal of the Driver
Note: This script should be used in the following situations:
- the driver is no longer needed
- a fresh start with default settings is needed
- a new version of the driver needs to be installed
- a major operating system upgrade is going to be applied
Note: This script removes everything that has been installed, with the exception of the packages installed in Step 3 and the driver directory. The driver directory can and probably should be deleted in most cases after running the script.
Step 1: Open a terminal (Ctrl+Alt+T)
Step 2: Move to the driver directory
Step 3: Run the removal script
Recommended WiFi Router/ Access Point Settings
Note: These are general recommendations, some of which may not apply to your specific situation.
Security: Set WPA2-AES. Do not set WPA2 mixed mode or WPA or TKIP.
Channel width for 2.4G: Set 20 MHz fixed width. Do not use 40 MHz or 20/40 automatic.
Channels for 2.4G: Set channel 1 or 6 or 11 depending on the congestion at your location. Do not set automatic channel selection.
Mode for 2.4G: For best performance, set «N only» if you no longer use B or G capable devices.
Network names: Do not set the 2.4G Network and the 5G Network to the same name. Note: Unfortunately many routers come with both networks set to the same name.
Channels for 5G: Not all devices are capable of using DFS channels. It may be necessary to set a fixed channel in the range of 36 to 48 or 149 to 161 in order for all of your devices to work on 5g. (for US, other countries may vary)
Best location for the wifi router/ access point: Near center of apartment or house, at least a couple of feet away from walls, in an elevated location.
Check congestion: There are apps available for smart phones that allow you to check the congestion levels on wifi channels. The apps generally go by the name of WiFi Analyzer or something similar.
After making and saving changes, reboot the router.
Set regulatory domain to correct setting in OS
Check the current setting
If you get 00, that is the default and may not provide optimal performance.
Set it temporarily
Note: Substitute your country code if you are not in the United States.
Set it permanently
Recommendations regarding USB
Moving your USB WiFi adapter to a different USB port has been known to fix a variety of problems. Problems include WiFi going on and off as well as connections coming and going.
If connecting your USB WiFi adapter to a desktop computer, use the USB ports on the rear of the computer. Why? The ports on the rear are directly connected to the motherboard which will reduce problems with interference and disconnection that can happen with front ports that use cables.
If your USB WiFi adapter is USB 3 capable then plug it into a USB 3 port.
Avoid USB 3.1 Gen 2 ports if possible as almost all currently available adapters have been tested with USB 3.1 Gen 1 (aka USB 3) and not with USB 3.1 Gen 2.
If you use an extension cable and your adapter is USB 3 capable, the cable needs to be USB 3 capable.
Some USB WiFi adapters require considerable electrical current and push the capabilities of the power available via USB port. One example is devices that use the Realtek 8814au chipset. Using a powered multiport USB extension can be a good idea in cases like this.
How to disable onboard WiFi on Raspberry Pi 3B, 3B+, 3A+, 4B and Zero W.
Add the following line to /boot/config.txt
How to forget a saved WiFi network on a Raspberry Pi
Delete the relevant WiFi network block (including the ‘network=’ and opening/closing braces.
Press ctrl-x followed by ‘y’ and enter to save the file.
Question: Does WPA3 work with this driver?
Answer: No, WPA3 does not work with this driver. If you need an AC class adapter that does support WPA3, I suggest an Alfa AWUS036ACM (mt7612u chipset) but there are other adapters based on the mt7612u chipset available at various price points. Be aware that WPA3 support is not fully in place in all Linux distros currently. More than driver support is required for WPA3 support. You can get more information and links at the following site:
Question: What interface combinations does this driver support?
Answer: None. Realtek out-of-kernel drivers, including this driver, do not support interface combinations. If you need support for interface combinations, I suggest adapters based on the Mediatek chipsets. You can get more information and links at the following site:
Question: What extended features does this driver support?
Answer: None. For extended features, you need an adapter that uses Mediatek or Atheros drivers. You can get more information and links at the following site:
Question: I bought two rtl88x2bu adapters and am planning to run one of them as an AP and another as a WiFi client. How do I set that up?
Answer: You can’t. Realtek drivers do not support more than one adapter with the same chipset in the same computer. However, testing has shown that the Mediatek drivers do support more than one adapter with the same chipset in the same computer. I recommend adapters with the mt7612u chipset if you are looking for AC 1200+ adapters. You can get more information and links at the following site:
Question: Why do you recommend Mediatek based adapters when you maintain this repo for a Realtek driver?
Answer: Many Linux users already have adapters based on Realtek chipsets. This repo is for Linux users to support their existing adapters but my STRONG recommendation is for Linux users to seek out WiFi solutions based on Mediatek, Intel or Atheros chipsets and drivers. If users are looking at a USB solution, Mediatek and Atheros based adapters are the best solution. If users want a PCIe, mPCIe, SDIO or other implementation then Intel, Mediatek or Atheros are good solutions. Realtek based USB adapters are not a good solution because Realtek does not follow Linux Wireless standards for USB WiFi adapters. Realtek drivers are problematic in many ways. You have been WARNED. For information about usb wifi adapters:
About
Linux Driver for USB WiFi Adapters that are based on the RTL8812AU Chipset
Источник


