- Эмулятор Android SDK: обзор, инструкции, установка
- Функционал эмулятора
- Интерфейс Android SDK
- Системные требования Android SDK
- Производительность
- Инструкция: Как установить эмулятор Android SDK на свой ПК?
- Особенности эмулятора
- Как установить Android SDK на Windows, Mac и Linux
- Ручная установка
- Установка компонентов
- Ссылки
- How To Install Android SDK Tools On Windows
- Step 1 — Download SDK Tools
- Step 2 — Install Command Line Tools
- Step 3 — Install Platform Tools
- Step 4 — Configure Environment Variable
- Step 5 — Configure Commands
- Step 6 — Using the SDK Manager
- Step 7 — Using the Emulator and AVD Manager
- Summary
Эмулятор Android SDK: обзор, инструкции, установка
Android SDK – это эмулятор и среда разработки приложений для операционной системы Андроид одновременно. Программа занимает мало места на жестком диске и предоставляет впечатляющий функционал. Хотя ПО ориентировано на профессиональных разработчиков, его могут использовать и рядовые пользователи в качестве обычного эмулятора операционной системы. Так же смотрите аналогичный эмулятор Xamarin Android Player для разработчиков.

А вы знали, что данный эмулятор также называют «Android Studio».
Функционал эмулятора
Android SDK может эмулировать не только саму операционную систему, но и «железо». На выбор доступно множество виртуальных устройств с поддержкой Андроида:
- Смартфоны;
- Планшеты;
- Телевизоры;
- Умные часы;
- Очки, шлемы дополненной и виртуальной реальности;
- Бортовые компьютеры автомобилей;
- Терминалы.
Также присутствует эмуляция различных технологий, например, Bluetooth, WiFi, 2G, 3G, Edge.
Встроенная среда разработки поддерживает написание кода программы с подсветкой синтаксиса и авто дополнением. Среди поддерживаемых языков программирования есть C, C++, Kotlin и Java. Можно одновременно скомпилировать несколько apk одного проекта, каждый для разного устройства и версии ОС. С помощью встроенного диспетчера можно отслеживать нагрузку эмулятора на систему.
Существует консольный режим для опытных разработчиков.
Интерфейс Android SDK
Программа имеет настраиваемый интерфейс, каждый пользователь может расположить любые элементы где угодно, а также выбрать цвет оформления. Сам интерфейс включает в себя такие главные элементы:
- Кнопки открытия и сохранения проектов;
- Переходы по шагам;
- Увеличение/уменьшение масштаба окна;
- Выбор apk-файла;
- Выбор эмулируемого железа и версии системы;
- Изменение разрешения экрана;
- Запуск/пауза эмуляции;
- Настройки и помощь.

Откатить изменения и вернуть изначальное расположение элементов можно в настройках.
Системные требования Android SDK
Для Windows официальные системные требования следующие:
- ОС Windows 7/8/10;
- Минимум 3 ГБ оперативной памяти для запуска, 8 ГБ рекомендовано;
- Дополнительно 1 ГБ свободной оперативной памяти для эмуляции и тестирования работы приложений;
- Минимум 2 ГБ свободного места на диске для установки, рекомендуется 4 ГБ для создания файла подкачки;
- Монитор с разрешением 1280 x 800 или выше.
Версии для Mac и Linux предъявляют почти аналогичные требования к аппаратной части компьютера, но имеют свои отличия в программной части. Mac:
- Mac OS X 10.10 (Yosemite) или новее, но не выше 10.13 (macOS High Sierra);
- 1.5 ГБ свободного места для установки эмулятора;
- 500 МБ на диске для интегрированной среды разработки (опционально).
Официально версия Linux тестировалась на Ubuntu 14.04. Имеет следующие требования:
- Графическая оболочка GNOME или KDE;
- Библиотека GNU C (glibc) 2.19 или новее.
Эмулятор работает на 32 и на 64-битных системах.
Производительность
Программа сильно уступает аналогам в производительности, жертвуя ей в угоду точности. Соответственно, требования к железу в несколько раз выше. К другим недостаткам можно отнести:
- Отсутствие русcкоязычной версии;
- Нестабильная работа на Windows XP и старых версиях Mac OS X;
- Необходимость установки дополнительных пакетов Java JRE и Java SE Development Kit SDK;
- Не работает на процессорах без поддержки виртуализации.

В настройках программы можно выбрать ночную тему интерфейса.
Инструкция: Как установить эмулятор Android SDK на свой ПК?
Установка предельно проста. Загрузите установочный файл по ссылке ниже. Затем запустите его, 2 раза кликнув левой кнопкой мыши. В окне установщика ознакомьтесь с лицензией и нажимайте далее. Укажите путь установки. Выберите, какие версии Андроида вы хотите эмулировать. По умолчанию устанавливаются только новейшие варианты. Нажимайте OK и начнется установка.
Подробный видеообзор установки эмулятора Android SDK.
ВАЖНО: Чем больше компонентов будет выбрано при установке, тем больше потребуется места на диске.
Особенности эмулятора
Эмулятор имеет много преимуществ перед аналогами:
- Стабильность;
- Высокая производительность;
- Официальная техническая поддержка;
- Подробная документация и множество обучающих материалов;
- Встроенный файловый менеджер;
- Открытый исходный код;
- Поддержка стандартов GSM-телефонии;
- Тестирование созданных программ для Андроид;
- Поддержка виртуальных машин, например, Dalvik;
- Настраиваемый интерфейс.
Благодаря этим особенностям, Android SDK можно назвать самым функциональным в своей области. Сочетание средств разработки и возможности быстрого тестирования в одной программе определенно порадует разработчиков мобильных приложений. Рядовым пользователям, возможно, стоит обратить внимание на более простые аналоги.
Как установить Android SDK на Windows, Mac и Linux
22 октября 2008 года в Android появился магазин приложений Play Market. С тех пор прошло больше 10 лет и сегодня Google Play насчитывает почти 3 миллиона приложений в их числе Telegram с каналом AndroidInsider. Как же разработчикам со всего мира удается создавать качественные продукты? Они используют Android SDK. Чтобы получить все инструменты и средства разработки приложений, необходимо скачать среду разработки Android Studio. Но что, если вы хотите воспользоваться Android SDK с командной строкой без Android Studio и ненужных средств? В этом материале мы подскажем, как правильно установить и настроить Software Development Kit.

Ручная установка
Переходим по этой ссылке, находим раздел «Command line tools only» и скачиваем нужную версию в зависимости от вашей системы.
Создайте папку Android в корневой папке системы. В случае с Windows это локальный диск «С», а в OS X и Linux — домашняя папка пользователя. Распакуйте скачанный архив в папку Android. Для дальнейшей работы необходим установленный пакет Java на компьютере. OS X из коробки его поддерживает, чтобы проверить это, в терминале вбейте «which java», система должна выдать расположение пакета. На Windows и Linux устанавливаем JDK по этой ссылке.
Если вы используете Linux, вам понадобится установить еще несколько пакетов с помощью этой команды «sudo apt-get install lib32ncurses5 lib32stdc++6». Для других версий Linux необходимо найти подходящие пакеты ncurses5 и stdc++6.
Установка компонентов
Переходим в папку «Android/bin», находим исполняемый файл sdkmanager и запускаем, откроется следующее окно:
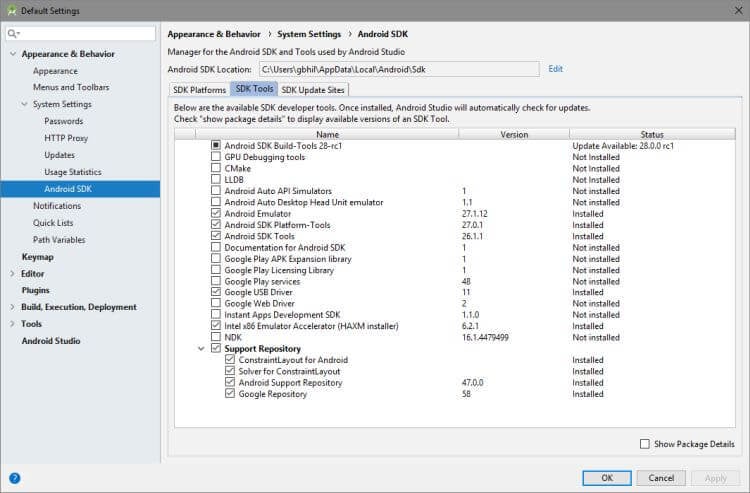
Выбираем «Android SDK Tools» и «Android SDK Platform-Tools», на Windows необходимо выбрать еще и «Google USB Driver». После этого подтвердите условия лицензионного соглашения, и начнется установка инструментов. В Windows они расположатся в папке «Windows\users\Имя пользователя\AppData\Local\Android», а на Linux и Mac в папке «.Android».
Ссылки
Теперь давайте создадим символическую ссылку на эти папки, чтобы можно было быстро запустить инструменты через командную строку.
В Windows переходим в «Этот компьютер → Свойства → Дополнительные параметры системы → Дополнительно → Переменные среды». В «Переменные среды для пользователя» находим строку «Path» и кликаем по ней 2 раза. Откроется окно, в нём нажимаем «Создать» и вставляем полный путь к инструментам через точку с запятой. Должно выглядеть примерно так «C:\Android\tools;C:\Android\platform-tools».
На Mac в домашней папке находим скрытый файл «.bash_profile» или просто «.profile». Открываем его командой «nano
/.profile» и добавляем путь до инструментов:
export PATH=»$HOME/Android/tools:$PATH»
export PATH=»$HOME/Android/platform-tools:$PATH»
Сохраняем файл комбинацией «CMD+X» и далее жмём «Y». На Linux процесс аналогичен, но нужно запускать файл .bashrc.
Вот и всё. Теперь команды Android SDK доступны через консоль. Вы сможете, например, устанавливать образы и вручную обновлять смартфон.
How To Install Android SDK Tools On Windows
It provides all the steps required to install Android Platform Tools and SDK Manager on Windows 10 without using Android Studio.
In this tutorial, we will discuss all the steps required to install Android Platform Tools and SDK Manager on Windows 10. This tutorial provides the steps for Windows 10, though the steps should be the same on other versions of Windows.
This post is useful for the developers using Android Platform Tools and SDK manager without installing Android Studio for the use cases including hybrid app development using Ionic. It also assumes that a valid JAVA_HOME environment variable exists pointing to the installation directory of Java.
You can follow How To Install Java 8 On Windows 10, How To Install Java 11 On Windows, How To Install Java 15 On Windows, or How To Install OpenJDK 15 On Windows to install Java on Windows. In case you are interested in developing Android applications using Android Studio, you can also follow How To Install Android Studio On Windows.
Step 1 — Download SDK Tools
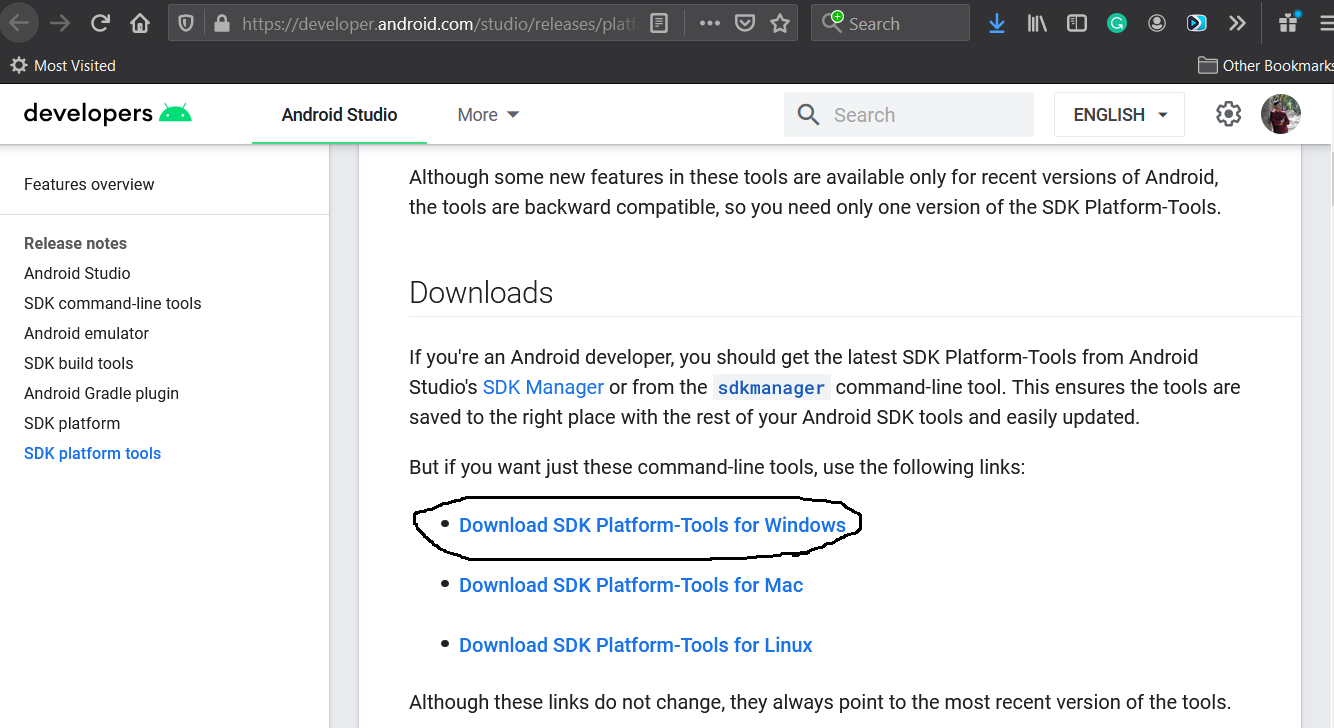
Open the download tab of Android Studio and scroll down to the Command line tools only section. This section shows various options to download the SDK tools as shown in Fig 1.
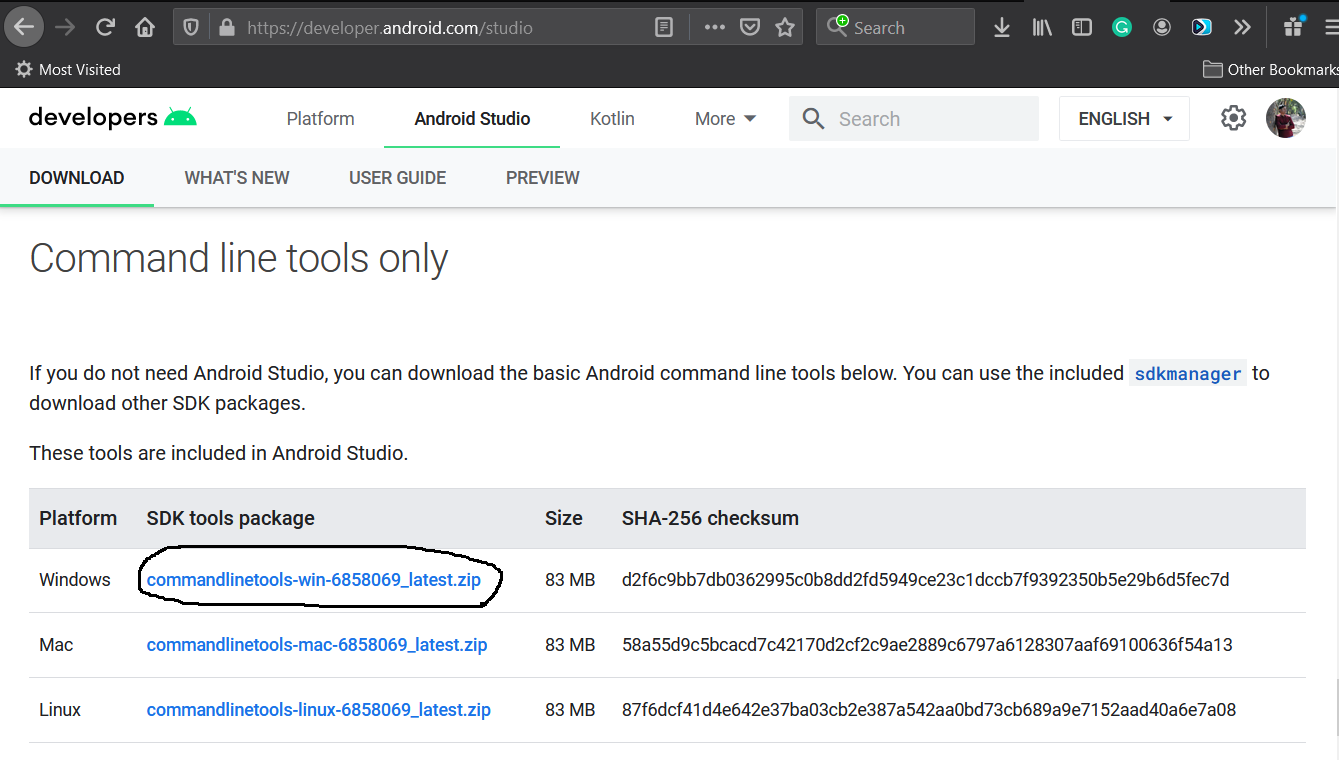
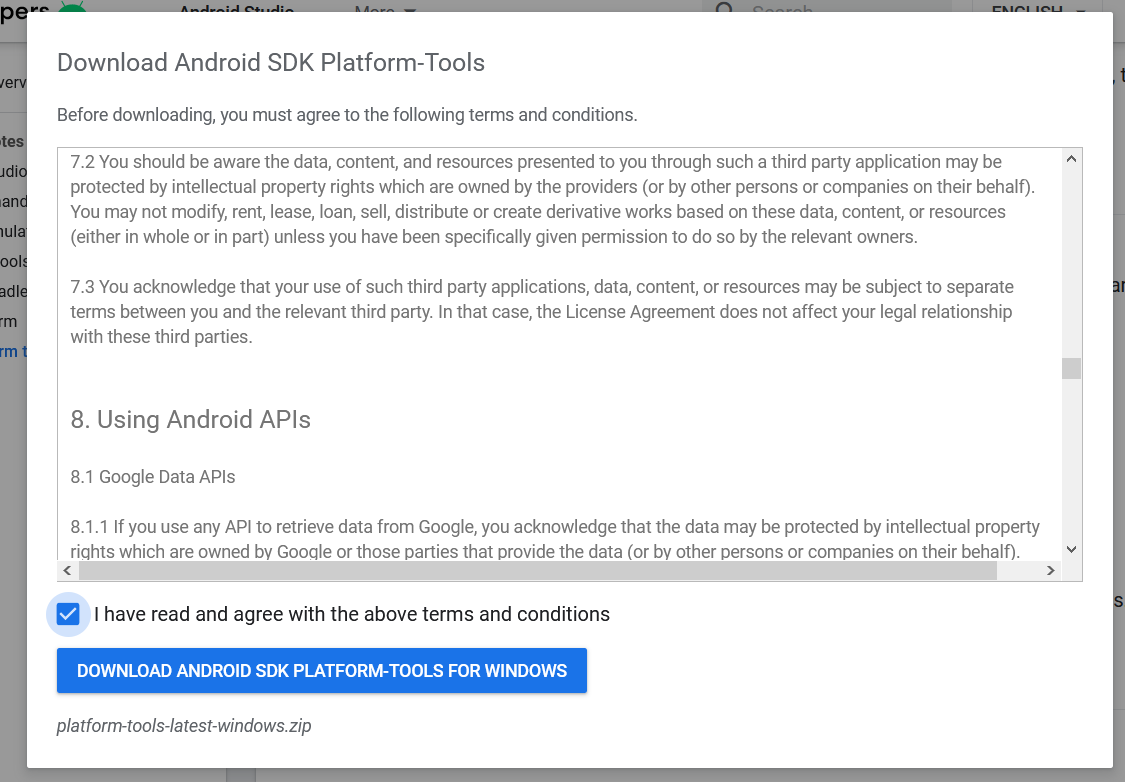
Click the first link having the download option for Windows as highlighted in Fig 1. It will ask to accept to terms and conditions as shown in Fig 2.
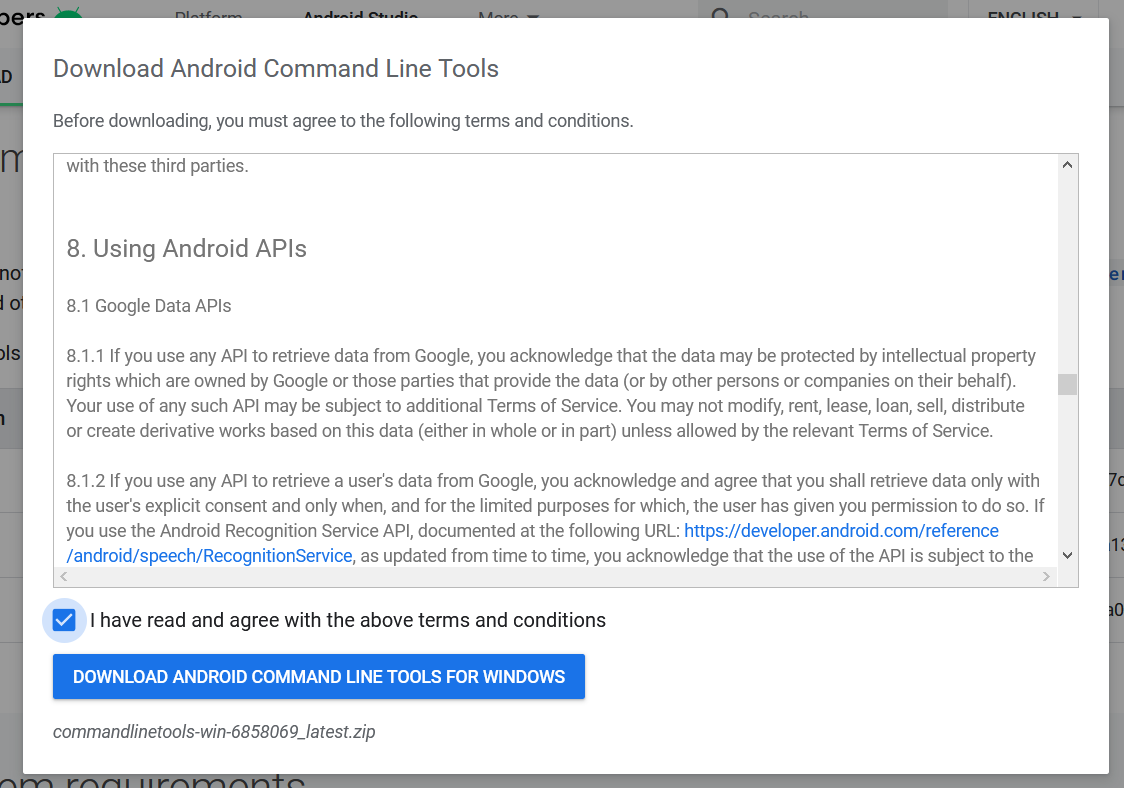
Go through the details, agree on the terms and conditions and click the Download Button to start the download.
Step 2 — Install Command Line Tools
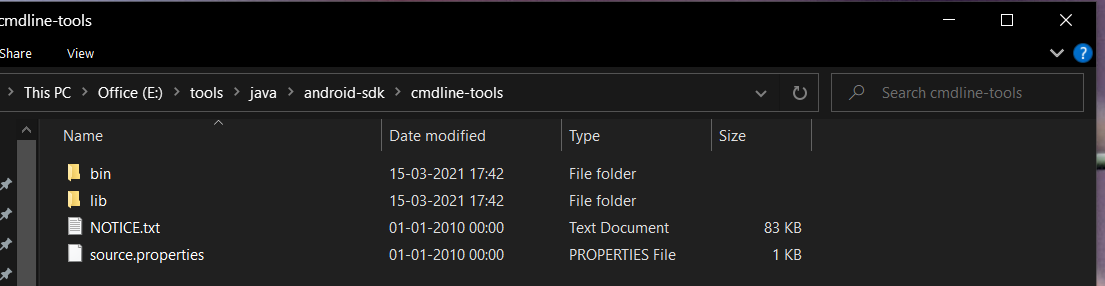
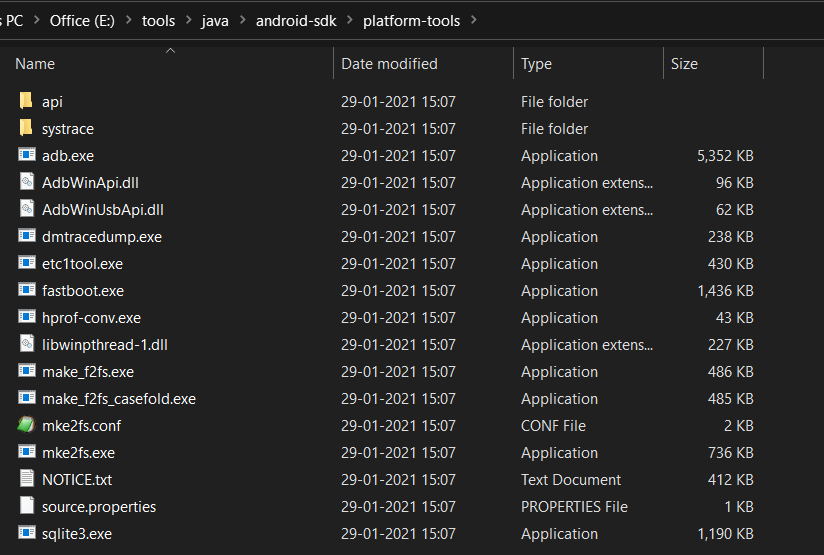
In this step, we will install the Android Command Line Tools on Windows 10. Create the directory android-sdk at your preferred location and extract the content of the downloaded SDK Tools zip to this directory. Make sure that the extracted content is available within the android-sdk directory created by us as shown in Fig 3.
Step 3 — Install Platform Tools
In this step, we will install the Android Platform Tools on Windows 10. Follow the same steps similar to Android SDK Tools to install Android Platform Tools using the download link as shown in Fig 4, Fig 5, and Fig 6.
Step 4 — Configure Environment Variable
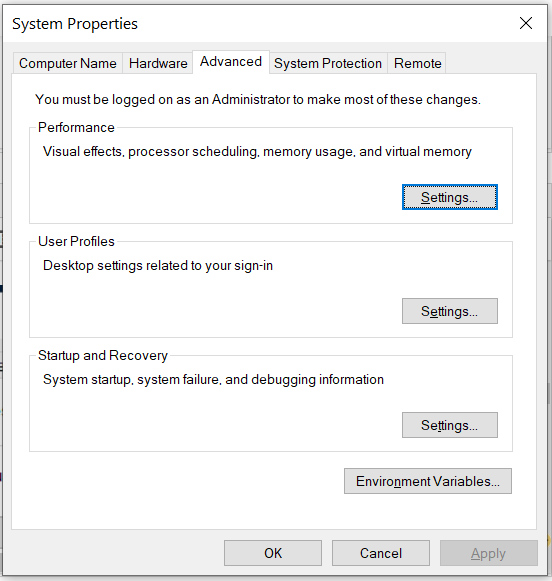
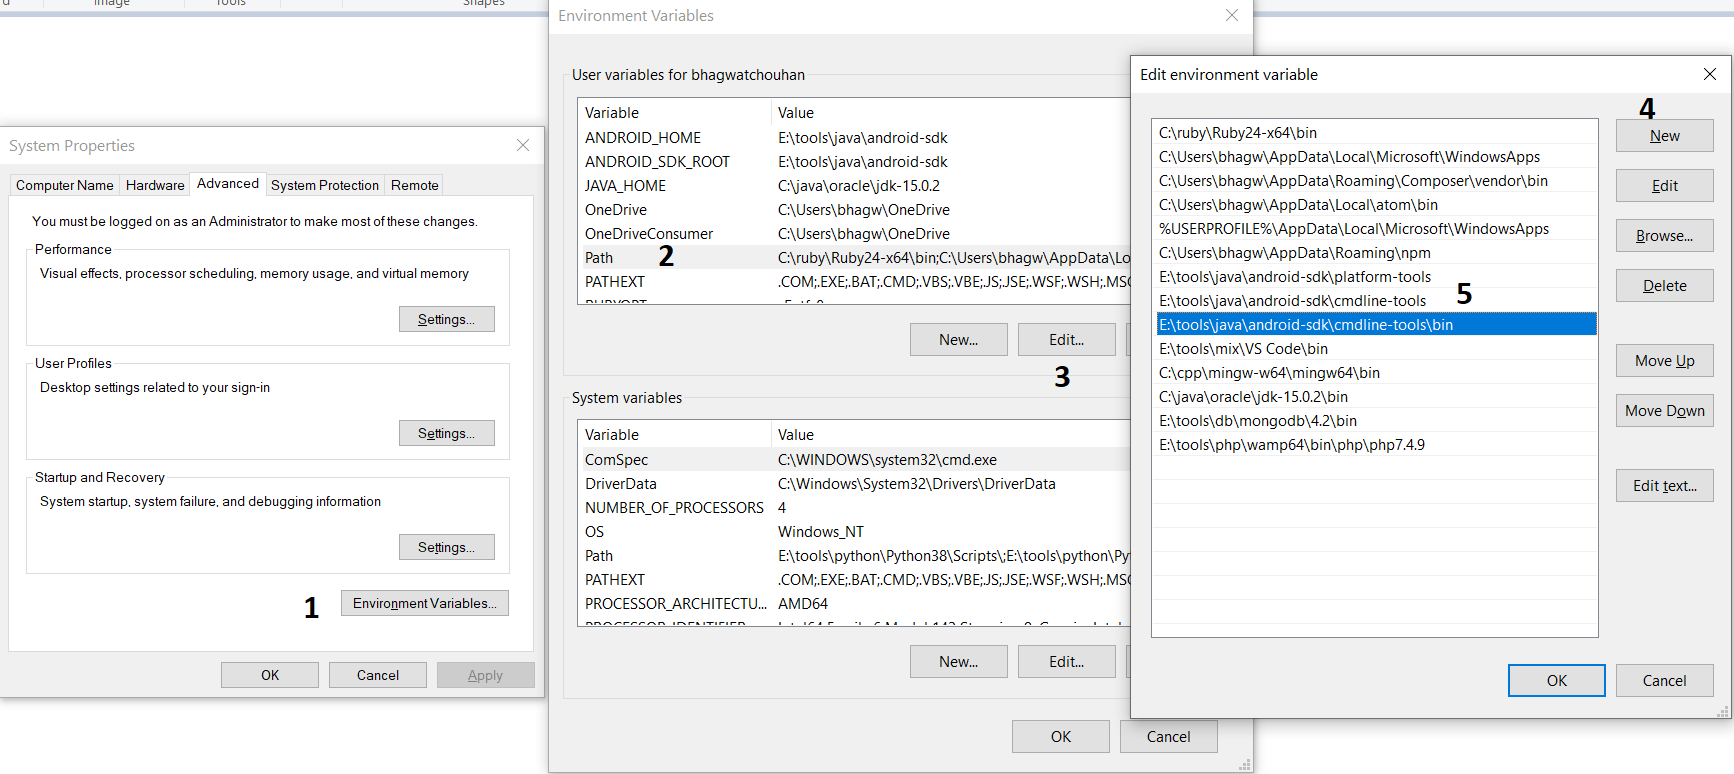
Right-click the My Computer or This PC on the desktop and click the Properties Option. Now click the Advanced system settings. It will show the System Properties dialog having Advanced Tab options as shown in Fig 7.
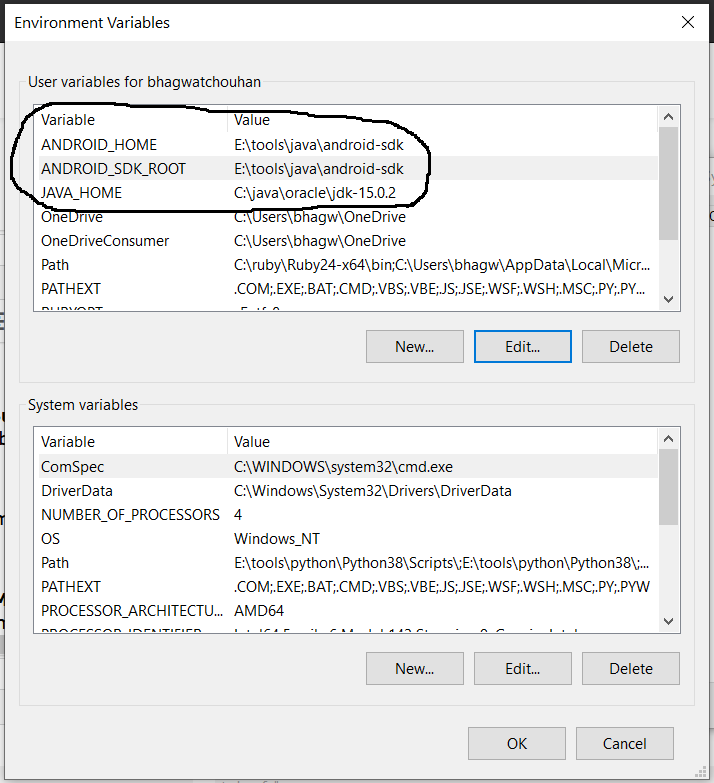
Click the Environment Variables Button and click the New Button in the first section. Set the Variable Name field to ANDROID_HOME and Variable Value to the android-sdk directory created by us in the previous step.
Similarly, also configure the environment variable ANDROID_SDK_ROOT to the android-sdk directory.
Also , make sure that the JAVA_HOME environment variable is set to the JDK installation directory. It must not end with the bin as we do with the system path variable.
Step 5 — Configure Commands
In previous steps, we have downloaded and extracted the Command Line Tools and Platform Tools to the android-sdk directory. Both the tools provide several command-line utilities which we need to run by going to the appropriate directory having the executable files.
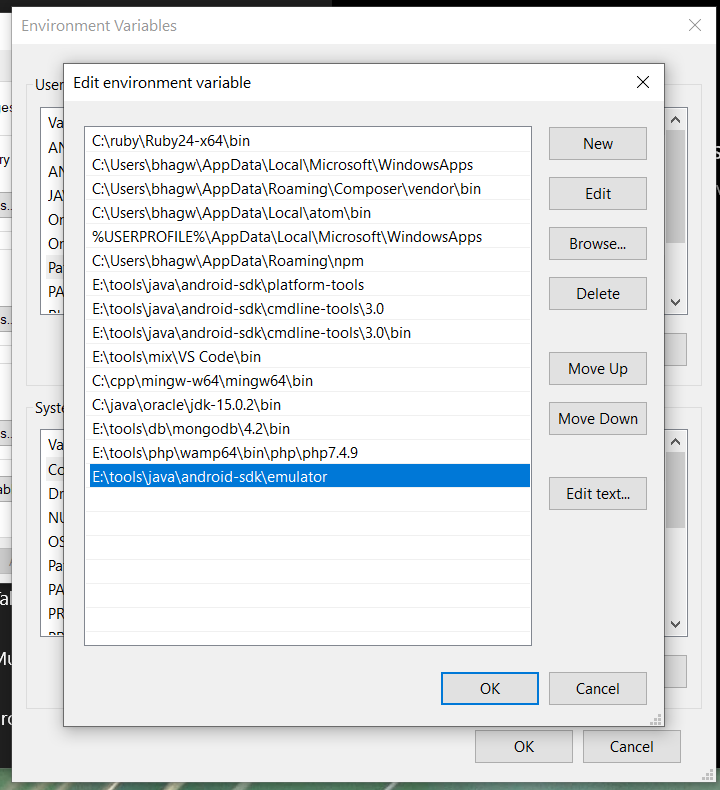
We can make these commands available at the system level without going to these directories by adding the path to tools, tools\bin, and platform-tools to the system path as shown in Fig 9. Make sure that these executables do not break other commands having the same name before adding these paths to the PATH environment variable.
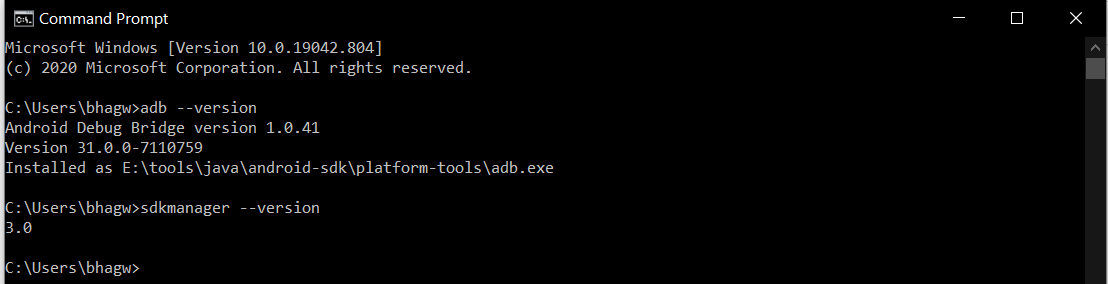
Now open the Command Prompt and check the ADB and SDK Manager versions as shown in Fig 10. You might be required to restart the system to apply the environment variables set by us.
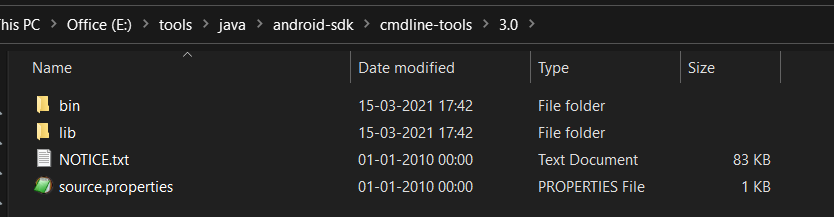
We can see that the ADB command works well and shows the version details, but the sdkmanager shows an error — «error: could not determine sdk root. error: either specify it explicitly with —sdk_root= or move this package into its expected location: \cmdline-tools\latest\» since it expects the Command Line Tools in a version-specific directory. Now open the source.properties file from the cmdline-tools directory to check the version. It will show the version details as shown below.
Now move all the files to the directory cmdline-tools/3.0 as shown in Fig 10.
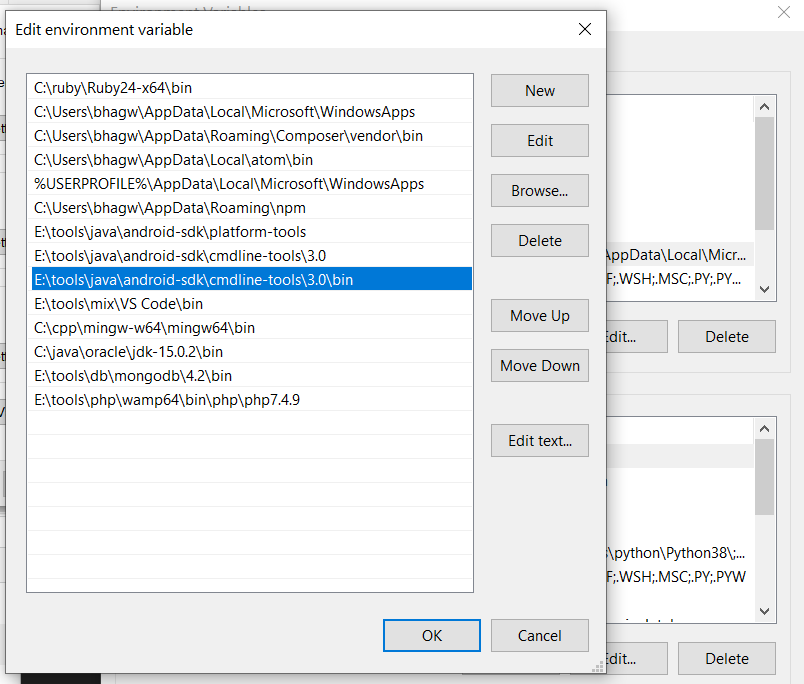
Also, update the system path as shown in Fig 11.
Now close and open the Command Prompt. Also, check the ADB and SDK Manager versions as shown in Fig 12.
Step 6 — Using the SDK Manager
List — We can list the installed and available packages and images using the list command as shown below.
Install Platform — Use the below-mentioned command to install the Android 10 (API level 30) using the SDK manager.
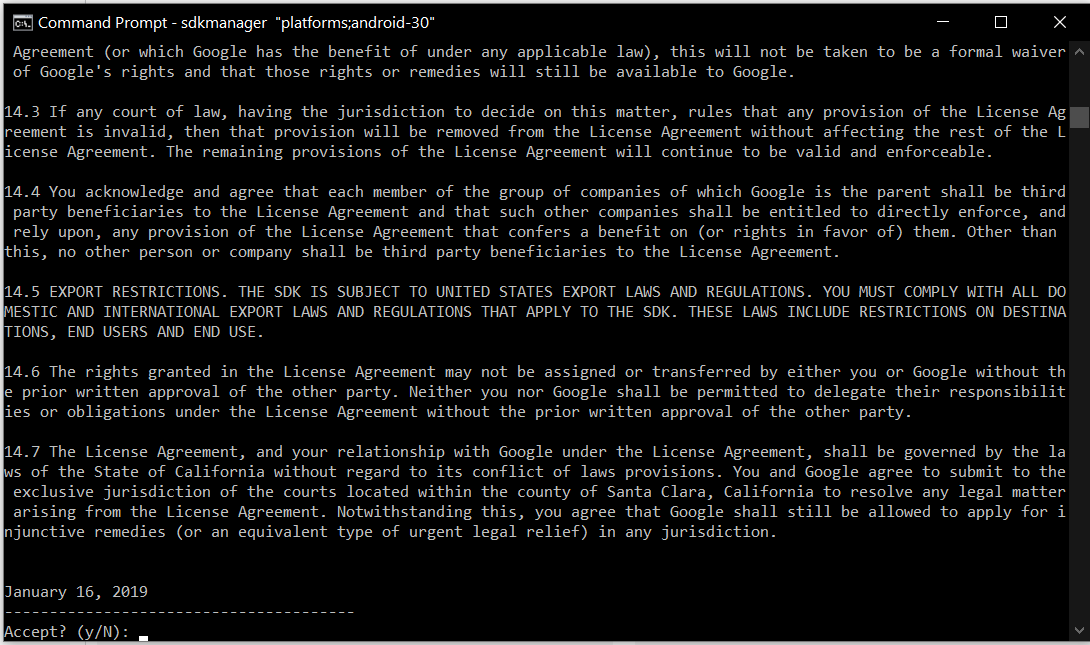
It will ask to accept the terms and conditions as shown in Fig 13. Enter y and hit Enter Key to accept the terms and conditions. This command creates the directory platforms within android-sdk and installs the package android-30 having all the required files to run the emulator for Android 10.
If we again check the installed packages, the list command shows the installed options as shown below.
Update SDK Manager — Update the SDK manager using the below-mentioned command.
Add System Image — We can add system images from available images shown by the list command using the SDK manager as shown below. We are adding the most recent default 64-bit system image.
Accept the License Agreement to complete the download.
There are several projects which need Google Play Services. We need system images specific to Google Play Services as shown below.
Accept the License Agreement to complete the download.
Install Emulator — We need to install the emulator before creating the AVD using SDK Manager.
Accept the License Agreement to complete the download.
Install Build Tools — Install the most recent build tool listed by the list command.
Step 7 — Using the Emulator and AVD Manager
Create Android Emulator — Create the emulator using the system image downloaded in the previous step as shown below. Replace with the actual name preferred by you.
The above commands ask a bunch of questions to configure the AVD if we choose the custom hardware profile option. We have excluded the details of these options from this tutorial since these configuration details depend on the actual needs. After completing all the configurations, it creates the AVD using the name provided by us while configuring it.
Similarly, we can also install the AVD of older versions as shown below.
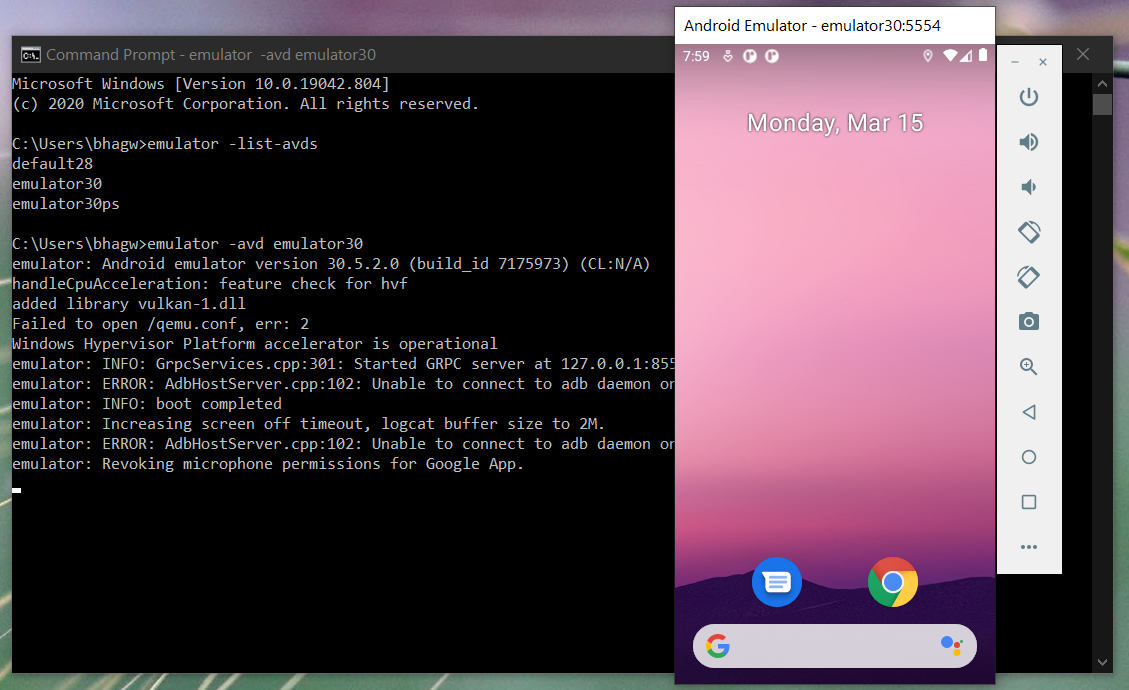
List Android Emulators — Now go to the tools directory on the command line and check the installed platform as shown below.
Notes: Add Emulator to the system path as shown in Fig 14.
Close and re-open the Command Prompt to check the AVDs created by us in the previous steps.
It will list all the AVDs installed by us.
Run Emulator — We can run the emulator created by us as shown below.
The emulator will take some time to completely launch the AVD. The final results should look similar to Fig 15.
Delete Emulator — We can also delete an existing emulator as shown below.
Summary
This tutorial provided all the steps required to install Android Platform Tools and Android SDK Manager on Windows 10. It also provided the steps required to create and launch the AVDs using the Emulator.


