- How to Enter the BIOS on a Windows 10 PC
- How to access BIOS on a Windows 7/Windows 10 PC
- How to get into BIOS in Windows 7 and Windows 10
- 1. Access BIOS on a HP device
- 2. Access BIOS on a Dell device
- Run a System Scan to discover potential errors
- 3. Access BIOS on an Asus device
- 4. Access BIOS on an Acer device
- 5. Access BIOS on Windows 10
- 6. Access BIOS on Windows 7
- How to enter BIOS on Windows 10 & Windows 7?
- Как работать с BIOS и UEFI компьютера или ноутбука
- Содержание
- Содержание
- Как зайти в BIOS компьютера или ноутбука?
- Виды интерфейса BIOS и UEFI, поддержка мыши в современных системах
- Выбор устройства загрузки в BIOS
- Отключаем встроенную аудиокарту в BIOS
- Автоматическое включение компьютера при подаче электричества
- Устанавливаем пароль на BIOS
- Настраиваем обороты вентиляторов ПК
- Итоги
How to Enter the BIOS on a Windows 10 PC
Windows 10 gives you a lot of options you can configure directly within the operating system, but on every laptop or desktop, there are some settings you can only change in the BIOS (basic input/output system). The BIOS is the software that is built into your computer’s motherboard and controls everything from the boot order of your drives to preboot security options to whether the Fn key on your keyboard activates a function key or a media control.
Unfortunately, because the BIOS is a pre-boot environment, you can’t access it directly from within Windows. On some older computers or those deliberately set to boot slowly, you can hit a function key such as F1 or F2 at power-on to enter the BIOS.

However, most computers made in the past four years boot Windows 10 too quickly to listen for a key press at startup. To access your BIOS on a Windows 10 PC, you must follow these steps.
How to Enter the BIOS on a Windows 10 PC
1. Navigate to settings. You can get there by clicking the gear icon on the Start menu.
2. Select Update & security.
3. Select Recovery from the left menu.
4. Click Restart Now under Advanced startup. The computer will reboot to a special menu.
5. Click Troubleshoot.
6. Click Advanced options.
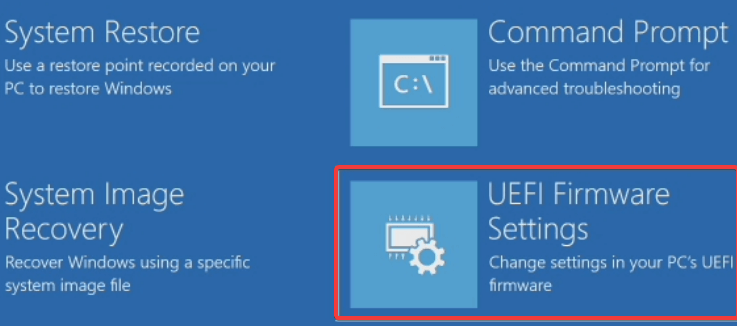
7. Select UEFI Firmware Settings. If you don’t see this icon, then press Startup Settings, instead. When your PC is restarting, tap F1 (or F2) to access the BIOS.
8. Click Restart.
Your system will restart and take you to the BIOS.
How to access BIOS on a Windows 7/Windows 10 PC

- Accessing the BIOS in Windows 10 is a must if you want to change the boot settings for instance.
- BIOS is an acronym for Basic Input/Output System and it’s a software tool installed in a ROM chip on your motherboard .
- In this article we explain how you can access BIOS on devices from several brands including HP, Dell, Asus, Acer.
- Read all our guide as you will also learn what you can do to access BIOS from Windows 10.

- Download Restoro PC Repair Tool that comes with Patented Technologies (patent available here).
- Click Start Scan to find Windows issues that could be causing PC problems.
- Click Repair All to fix issues affecting your computer’s security and performance
- Restoro has been downloaded by 0 readers this month.
BIOS which stands for Basic Input Output System is basically a ROM chip that contains instructions needed to perform hardware initialization operation during the boot-up process.
The BIOS section is also where you get a host of options to change the way the computer boots up along with a few other security and power settings as well.
All of this also makes it quite necessary to access the BIOS section just in case you need to tinker with the hardware setting or the default booting process.
Accessing BIOS also becomes imperative when you need to extract the most out of your existing hardware setup.
However, notwithstanding how critical it can be to have access to BIOS, that often isn’t the case. And the reasons might be varied, of both software and hardware origin.
Mentioned here are steps to reach BIOS on some of the most well known Windows PC brands like HP, Dell, Asus, and Acer.
How to get into BIOS in Windows 7 and Windows 10
- Access BIOS on a HP device
- Access BIOS on a Dell computer
- Access BIOS on a Asus PC
- Access BIOS on a Acer device
- Access BIOS on Windows 10
- Access BIOS on Windows 7
1. Access BIOS on a HP device

Turn off the PC, wait for a few seconds and re-start it. When the first screen come on, start pressing F10 repeatedly until the BIOS screen is displayed.
This applies to PCs that came pre-installed with Windows, which is devices manufactured in 2006 or later.
For PCs built before 2006, press F1 repeatedly during the booting process to get into BIOS.
2. Access BIOS on a Dell device

Turn off the PC and restart it again after waiting for a few seconds. When the first screen id displayed, press F2 continuously until the BIOS screen is displayed.
Run a System Scan to discover potential errors


Another method will be to start pressing F2 the moment the keyboard has been activated.
Note: Dell cautioned against pressing and holding down the F2 button as this might lead the system to interpret it as a stuck key. Instead, press F2 repeatedly.
3. Access BIOS on an Asus device
Turn off the PC, wait for a few seconds. Press and hold on to the F2 button and then click on the power button once. Continue holding on to the power button until the BIOS screen is displayed.
4. Access BIOS on an Acer device
The process is similar as on an Asus PC. Press and hold on to the F2 button and click on the power button. Continue holding on to the F2 button until the BIOS section is reached.
5. Access BIOS on Windows 10
- Go to Settings and select Update & Security.
- In the Update & Security page, select Recovery from the list of options on the left panel.
- Under Advanced start-up, select Restart now (This will re-boot the PC to launch a special set of menu options).

- Select Troubleshoot and select Advanced options.
- From the list of Advanced options provided, select UEFI Firmware Settings.
- You will next be led to the UEFI Firmware settings page.
- Click on the Restart button there.
- The PC re-starts and will launch BIOS.

Since Windows 10 is inherently designed to boot faster, that leaves virtually no scope for keypresses such as the F1 or F2 to register any response.
Fortunately, Microsoft has ensured there is a more foolproof means of accessing BIOS from right within Windows 10 though you surely have to restart the PC before getting to it.
6. Access BIOS on Windows 7

Getting into BIOS in Windows 7 can be a bit tricky in that you got to have your timing right. You have time before Windows loads completely to access BIOS.
If you miss the slot, you will have to begin all over again by rebooting your PC. Also, different manufacturers assign different keyboard buttons as the hotkey for accessing BIOS.
If you’re still running Windows 7, you need to know that Microsoft pulled its support for this OS and they no longer issue any updates for it. Therefore, using it can be risky for your system security.
You should update your PC to the last version of Windows 10 and perform any necessary updates for your safety.
We hope this guide helped to access your BIOS settings on your computer and if you have any suggestions, write a line in the comments section below.
How to enter BIOS on Windows 10 & Windows 7?
Last Updated: 3 years ago
Warning: Please DO NOT make changes to your BIOS settings unless you are well aware of the consequences.

BIOS stands for Basic Input/Output system. It is a software that checks the health of your computer’s hardware and allows Windows to start.
Your PC’s BIOS runs a power-on self-test (POST) every time you turn it on so as to ensure that the machine’s devices are connected and working properly. Your computer will turn on normally if it detects no problems, and your computer will be in control of the operating system that you have.
In BIOS, you can make some changes such as set a password, manage hardware and change the boot sequence. The instructions below shows you how to get into BIOS settings easily. But again, DO NOT make changes that you are not sure the function of.
On Windows 7 and previous builds
1) Start your computer. Pay close attention to the first screen that appears. Look for a notification that tells you which key or combination of keys to press to enter BIOS settings. You may be able to see the notification such as: Press DEL to enter SETUP; BIOS settings: Esc; Setup=Del or System configuration: F2.
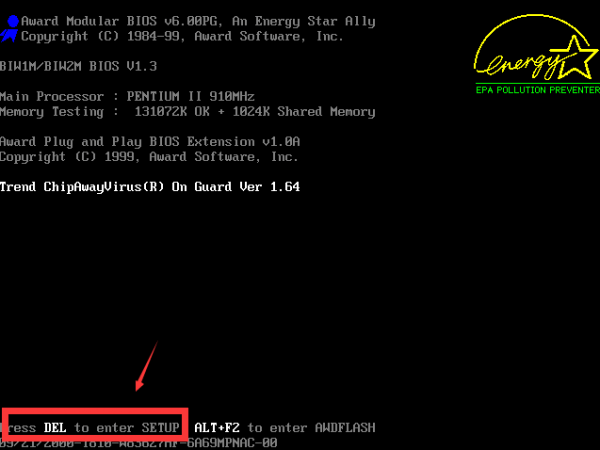
If you miss this notification the first time, just simply restart your computer again.
Usually, the key to press are likely to be: F1, F2, F3, Esc, or Delete. If you are not sure, consult the manufacturer of your computer for the answer.
2) When you are sure which key or combination of keys to press to enter BIOS, restart your computer again. Press the key to enter the BIOS settings and you will see yourself in the BIOS within a few seconds.
On Windows 10
On Windows 8 and Windows 10, the fast startup feature is adopted, therefore, you cannot press the function key to enter BIOS configuration when booting the system. Here is how you can do it.
1) Press and hold Shift, then turn off the system.
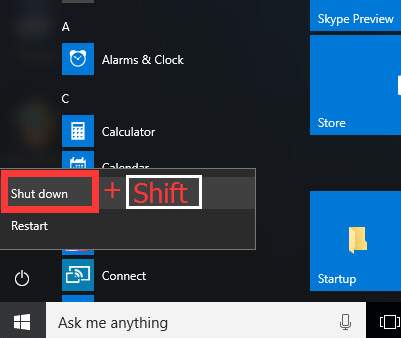
2) Press and hold the function key on your computer that allows you to go into BIOS settings, F1, F2, F3, Esc , or Delete (please consult your PC manufacturer or go through your user manual). Then click the power button.
Note: DO NOT release the function key until you see the BIOS screen display.
Как работать с BIOS и UEFI компьютера или ноутбука


Содержание
Содержание
Большинство пользователей компьютеров и ноутбуков знают о существовании BIOS или UEFI, но заходить в них и менять какие-либо настройки им просто нет нужды. Но рано или поздно может возникнуть ситуация, когда это придется сделать. Давайте разберемся, как входить в BIOS и какие его параметры нужно уметь менять начинающим пользователям.
Как зайти в BIOS компьютера или ноутбука?
Для простоты чтения в блоге под BIOS иногда будет подразумеваться и UEFI.
Первая проблема, с которой можно столкнуться — это сам вход в BIOS. На большинстве стационарных компьютеров это сделать легко, нажав кнопку Delete при включении. Иногда пользователи сталкиваются с тем, что не успевают нажать клавишу вовремя. Чтобы гарантированно войти в BIOS, нужно нажимать кнопку Delete циклически, несколько раз в секунду, пока компьютер включается.
А вот с ноутбуками ситуация уже сложнее. По нажатию на кнопку Delete не всякий ноутбук войдет в BIOS, обычно надо нажимать F2.

Некоторые модели могут потребовать нажатия F1, F3 или F10. А старые или редкие модели ноутбуков Dell или Lenovo иногда требуют совсем редкие клавиатурные сочетания — Ctrl+Alt+Enter, Ctrl+Alt+F3 или Ctrl+Alt+Ins.
Многие клавиатуры ноутбуков не имеют отдельных F-кнопок, поэтому нужно будет нажимать дополнительную кнопку Fn. Например, Fn+F2.
Модели SONY VAIO имеют специальную кнопку ASSIST, с помощью которой можно войти в BIOS.

Иногда подобная кнопка имеется и на ноутбуках Lenovo.

Обычно подсказка по кнопкам будет видна при загрузке, внизу экрана, но очень непродолжительное время.
Если вам не удается зайти в BIOS на ноутбуке по сочетанию Fn+F2, то начнется загрузка операционной системы, которая в случае устаревшего железа может занять одну-две минуты, и ждать возможности перезагрузки ноутбука бывает очень утомительно.
Поэтому проще поступать так: нажимаете Fn+F2 и, если вход в BIOS не произошел, быстро нажимаете сочетания кнопок Ctrl+Alt+Del и пробуете еще раз или другое сочетание кнопок. Лучше заранее почитать руководство по эксплуатации ноутбука, если оно имеется, или скачать его из интернета.
Однако бывают ситуации, когда и интернета под рукой нет, а ноутбук очень экзотический, и подсказка по сочетаниям клавиш появляется на долю секунды. В таком случае выручит смартфон — включайте запись видео экрана ноутбука при загрузке и потом рассмотрите подсказку по клавишам на видео, поставленном на паузу.
Вообще, смартфон часто выручает и опытных пользователей при работе с BIOS, ведь им очень удобно сфотографировать настройки, которые трудно запомнить.

Виды интерфейса BIOS и UEFI, поддержка мыши в современных системах
Итак, мы вошли в BIOS, и нас встречает его главный экран, который выглядит по-разному в зависимости от производителя и возраста материнской платы компьютера или ноутбука.
Один из самых старых видов BIOS — это AMI BIOS от разработчика American Megatrends inc. Он начал массово распространяться еще в 90-х, но встретить его можно и сейчас на технике конца нулевых годов.

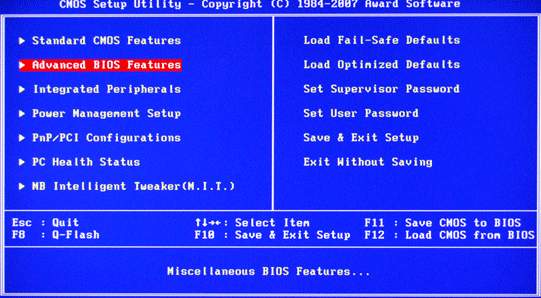
Более массовый и знакомый многим BIOS от Award имеет привычный синий экран с желтыми символами.

Phoenix-Award BIOS более похож по цветам на AMI BIOS и часто используется в ноутбуках.

Обычные виды BIOS уже давно не отвечали новым требованиям рынка ПК, имели мало возможностей и постепенно их заменяет интерфейс UEFI (Unified Extensible Firmware Interface).
Если ваш компьютер куплен в 2010-х годах, то скорее всего на нем уже стоит UEFI.
Интерфейс UEFI является графическим, имеет поддержку мыши и нескольких языков. По сути, это небольшая операционная система с множеством функций, которых не было в BIOS.

Итак, мы разобрались с тем, как войти в BIOS и с тем, как он будет выглядеть на большинстве систем. Теперь давайте рассмотрим функции, изменять которые может понадобиться начинающему пользователю компьютера или ноутбука.
Выбор устройства загрузки в BIOS
Первое и самое частое, что приходится делать пользователям — это менять устройство, с которого будет загружаться компьютер. Например, нужно выбрать флешку с которой будет устанавливаться Windows. Или при покупке нового SSD нужно установить загрузку с него, а не со старого HDD.
Однократно выбрать устройство загрузки при установке Windows будет удобнее горячей клавишей. В таблице в начале блога есть списки кнопок, которыми можно зайти в «Меню загрузки» (Boot menu) при старте компьютера. Обычно это F8, F11 или F12.

Но не только для установки Windows может потребоваться загрузка с флеш-накопителя. Иногда компьютер настолько плохо работает из-за заражения вирусами, что лечение от них в операционной системе невозможно.
В таком случае на помощь придет загрузочная флешка с антивирусом. Создать такую флешку предлагают все ведущие разработчики антивирусных программ, например, Kaspersky или Dr.Web.

Если же вы добавили новый накопитель в компьютер, и нужно, чтобы он загружался с него, придется зайти в BIOS и изменить настройки.
Покажем это на примере компьютера с материнской платой MSI B450-A PRO MAX с графическим интерфейсом. На других моделях плат настройки будут похожими.
При входе в UEFI MSI B450-A PRO MAX мы попадаем в так называемое EZ Mode меню, где настройки рассчитаны на начинающего пользователя.
Вкладка Storage покажет, какие диски и к каким SATA-портам материнской платы подключены.

Панель Boot Priority показывает иконки накопителей, порядок загрузки которых можно менять перетаскиванием.
Однако у меня эта панель показывает только один из трех дисков, поэтому мне придется переключиться в Advanced Mode нажатием кнопки F7 или выбрать его мышью в верхней части экрана.
Advanced Mode предлагает уже заметно больше настроек. И что особенно удобно, они логически выстроены. Я перехожу в раздел Settings и в подраздел Boot.

Далее в Hard Disk Drive BBS Priorities.

И в строке Boot Option #1 выбираю SSD, с которого будет загружаться Windows.

Отключаем встроенную аудиокарту в BIOS
Все чаще в компьютеры ставят качественную дискретную звуковую карту, при этом встроенную надо отключить. Делается это просто, заходим в меню Settings и подраздел Advanced\Integrated Peripherals.

HD Audio Controller переводим в режим Disabled.

Автоматическое включение компьютера при подаче электричества
Многим пользователям будет удобно настроить включение компьютера при наличии электропитания в его розетке. Это удобно тем, что, включив удлинитель питания кнопкой, у вас автоматически включится ПК вместе с монитором и периферией. И кнопку Power на системном блоке нажимать не придется.

Для этого идем в раздел Settings и подраздел Advanced. Далее — в подраздел Power Management Setup.

И параметр Restore after AC Power Loss переводим в значение Power On.

Устанавливаем пароль на BIOS
Если вы нуждаетесь в более надежной защите от проникновения посторонних в компьютер, чем просто пароль при входе в Windows, то желательно установить пароль и в BIOS.
Его можно установить в разделе Settings и подразделе Security.

Пароль нужно ввести в поле Administrator Password. Постарайтесь не забыть пароль, иначе придется делать сброс настроек BIOS.

Настраиваем обороты вентиляторов ПК
Бывают такие случаи, когда охлаждение компьютера избыточно и слишком шумно. Исправить это можно в настройках UEFI, в подразделе Fan Info.

В моем случае в эти настройки удобно попасть из EZ Mode.

MSI B450-A PRO MAX позволяет задать кривую оборотов вентилятора с PWM в зависимости от температуры выбранных компонентов: процессора, чипсета или системы питания.
А обычные вентиляторы можно настроить, отрегулировав подаваемое напряжение. Не стоит сразу сильно снижать обороты вентиляторов. Снизьте их на 20 % и проверьте в работе компьютера под нагрузкой температуры и уровень шума. Если температуры в порядке, а шум еще присутствует, снизьте еще. Однако при снижении питания или оборотов вентилятора на 50 % и ниже, он может просто не запуститься.
Итоги
Мы с вами рассмотрели наиболее часто встречающиеся причины, по которым начинающим пользователям придется воспользоваться BIOS или UEFI. Не стоит бояться применять эти настройки, ничего критического в компьютере или ноутбуке они не затрагивают.
А по мере накопления опыта, вы сможете настраивать и более серьезные вещи в BIOS, например, увеличить производительность компьютера с помощью разгона. Или снизить его нагрев и уровень потребления электричества с помощью андервольта. Но эти обширные темы уже для отдельных блогов.


