- Digital Inception: Here’s how to run Android, Chrome OS, and Windows on your Mac
- Windows 10
- Windows 11
- Android
- Chrome OS
- Conclusion
- Run Google Chrome OS within Mac OS X
- Install & Run Chromium OS on a MacBook Air
- Пошаговая установка Google Chrome на MacBook
- Особенности версии Хрома для MacOS
- Требования к системе
- Порядок скачивания
- Процесс установки
- Начало использования браузера
Digital Inception: Here’s how to run Android, Chrome OS, and Windows on your Mac
— Jul. 12th 2021 10:25 am PT
Lots of folks like to think of the Mac as just another product in Apple’s precious walled garden, but many don’t know that you can actually run virtually any operating system on a Mac with a little bit of work. It’s fairly easy to get the three biggest platforms that aren’t made by Apple up and running on a Mac, even at the same time. Here’s how to do it.
Windows 10
First and foremost, Windows. Apple has offered Boot Camp since it first introduced Intel Macs back in the mid-2000s. Boot Camp comes built into macOS on Intel Macs and makes it dead simple to install a copy of Windows on a separate partition on your Mac. Boot Camp keeps Windows entirely separate from your installation of macOS. But some users might want to use the two operating systems at the same time. That’s what Parallels is for. Parallels allows you to run Windows within a window in macOS and allows you to add Windows apps to your Mac dock.
Both options will cost you, but Parallels is more expensive because you have to purchase both a Parallels license and a Windows license. If you want to install Windows 10 on an M1 Mac, you’ll need to use Parallels. Parallels starts at $79.99 for the basic standard edition. Boot Camp, though, only requires a Windows license. Before you get started, keep in mind that a legitimate copy of Windows 10 Home costs $139. If you want to use Windows 10 Pro, that will cost you $199.
- Download your preferred Windows 10 ISO file from Microsoft’s website
- Head over to your Mac’s Applications folder and launch Boot Camp Assistant
- Import your Windows 10 ISO file by clicking the “choose” button
- Choose how much storage space you want Windows to have
- Click “install” to partition your Mac
- Your Mac will restart and show the Windows installer
- After installing Windows, you’ll want to allow the Boot Camp to install the proper drivers
Once your Mac has installed Windows and the necessary drivers, your Mac will be up and running with Windows 10. Now, you might think that you’re finished and that you somehow installed Windows 10 for free, but nope you still need to purchase a Windows 10 product key. Once you sign in to your Microsoft account (create one if you don’t own one), you can launch the Microsoft Store and search for Windows 10 Home or Pro. Then you can enter your credit card details and purchase a legitimate copy of Windows 10. Once you’ve done that, you can use Windows entirely and indefinitely. When you want to switch back to macOS, just turn off your Mac and then hold down the option key when pressing the power button.
Windows 11
I suspect that many of you are wondering if you can install Windows 11 on your Mac. Technically, you can with some workarounds, but Microsoft isn’t officially supporting Macs with Windows 11. This is because Apple doesn’t enable the TPM 2.0 chip that comes with Intel processors inside of its Intel-based machines. For now, it looks like the only official way that Windows 11 might be able to work on an Intel Mac is with a virtual machine. Microsoft has, fortunately, announced that it is working with Parallels to enable support for Windows 11 on the Mac.
You can read our first impressions of the new design in Windows 11 here.
Android
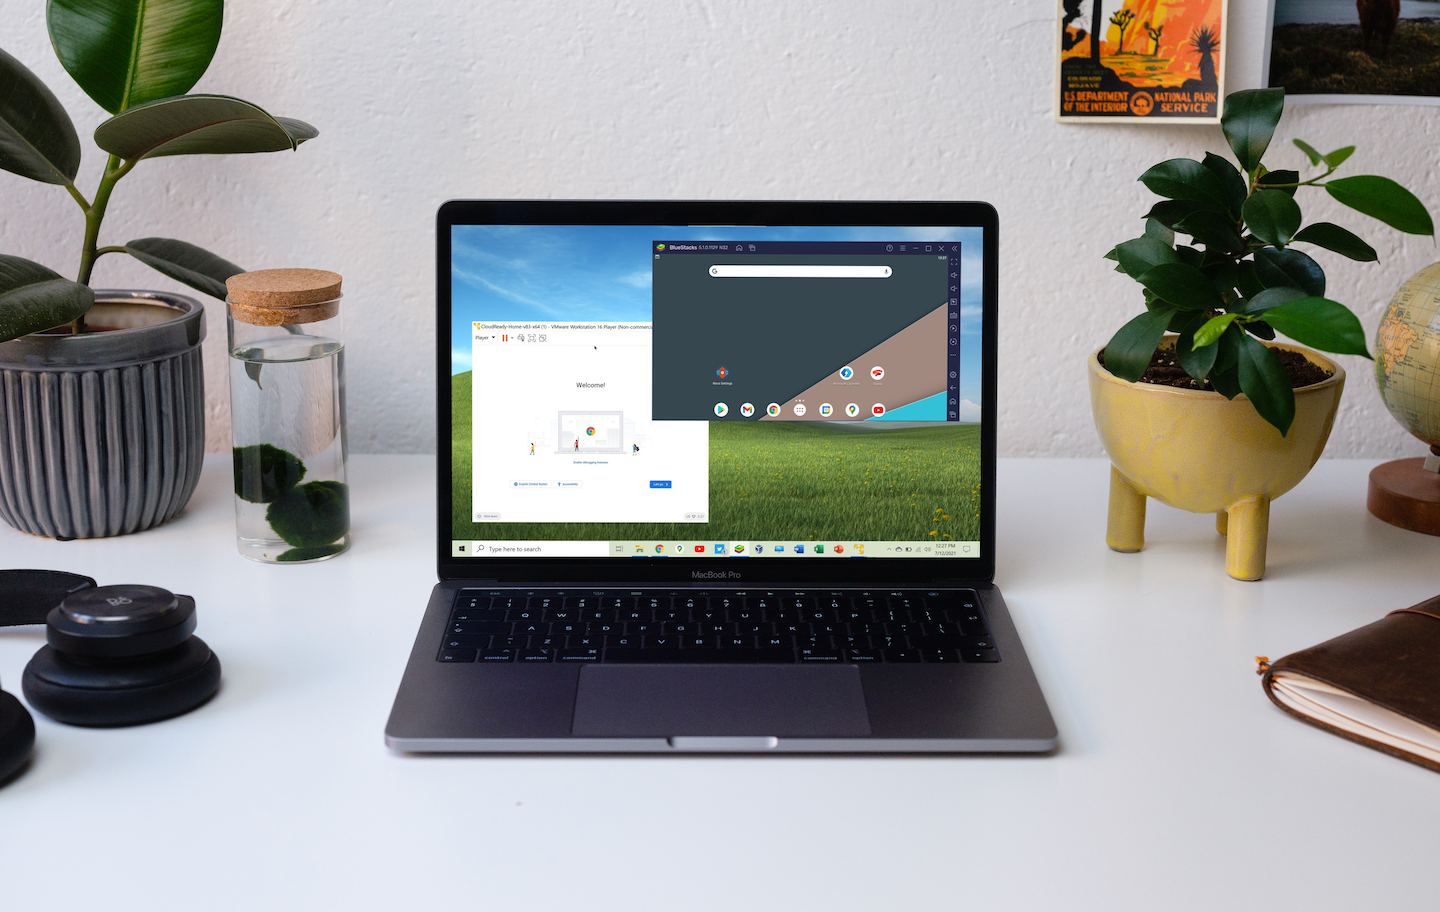
There are millions of Android apps that you might want to run on your Mac. Luckily, as Dr. Ian Malcolm once said, “Life finds a way.” Bluestacks is a free emulator for both macOS and Windows that allows you to use Android apps on your laptop or desktop. Keep in mind that Bluestacks uses a much older version of Android, but it still works with most apps. It’s based on Android 7, otherwise known as Nougat.
Bluestacks is primarily for gaming, but it works well for any kind of Android app. Bluestacks even comes with Google Play and Google services. Once you sign in to a Google account, you can download and use Google’s own apps right on your computer through Bluestacks. The app comes with its own launcher that’s a simple grid, but you can install any other Android app launcher like Nova launcher or Microsoft launcher.
If you’re really crazy, you can even run Android through Bluestacks inside of Windows 10 on a Mac.
Chrome OS
Google’s other operating system can technically be installed on a Mac, but it can be hit or miss. You can’t actually install stock Chrome OS, but you can install a variation of it called CloudReady Neverware. That might sound scary, but CloudReady is now owned by Google, so it’s totally legit. The company was created to give new life to old Macs and PCs by installing a Chromium-based operating system on them.
This means you can install Chrome OS on old Macs and PCs, but you’ll need to check if your machine is officially compatible with CloudReady. You can also attempt to install it on a non-certified machine, but your mileage may vary.
To install CloudReady, you should download the USB Maker. You’ll want to have a compatible USB stick with 8GB or more. CloudReady won’t work with Sandisk drives, so avoid those. Once you’ve got the USB stick set up with CloudReady, you can turn your Mac off. Plug in the USB stick and hold option when turning your Mac on. Then boot up from your USB stick.
You can also attempt to install CloudReady in a virtual machine, but it’s not officially supported. You’ll need two things. The first is the OVA file of CloudReady. Head over to this link to download it. Unfortunately, popular VM app VirtualBox won’t work properly with CloudReady due to graphics compatibility issues. CloudReady recommends installing a version of VMware. Compatible versions are listed on CloudReady’s website.
With the virtual machine workaround, you can run Chrome OS inside of Windows on a Mac. Throw Bluestacks into the equation, and you can run Android, Chrome OS, and Windows on an Intel Mac at the same time.
Conclusion
Long story short, it’s quite easy to get all three of these other platforms up and running on an Intel Mac. You can, of course, install both Bluestacks and CloudReady on macOS, but it’s a lot more fun to install them both on Windows through Boot Camp creating a complete Frankenstein of a Mac.
Let us know if you end up installing any of these on your machine and how it went in the comments below!
FTC: We use income earning auto affiliate links. More.
Источник
Run Google Chrome OS within Mac OS X
 The last few days the tech world has been blazing about Google’s latest creation, Chrome OS, which is a lightweight and free Linux-based operating system intended to run on Netbooks and, eventually, Desktops. It’s basically just the Chrome web browser with some other features unique to the OS itself, which makes it very fast and able to run without much of a strain on hardware.
OK so talk is all fine and dandy, but how about we run this thing within Mac OS X! It’s actually pretty easy to do, you’ll just need to download the Chrome OS image (via torrent) as well as the free virtual machine software known as VirtualBox. The torrent is provided by PirateBay and has tons of seeders so you should be able to pick up the image file very quickly, again the OS is free so there’s no piracy issues here.
If you’re familiar with running VM’s, you likely won’t need a walkthrough guide, you just select the image and boot it. If you’re new to virtual machines or would just like a little more guidance, TechCrunch posted a great and easy to follow walkthrough on installing Google Chrome OS within VirtualBox on top of Windows, Linux, and of course Mac OS X (the walkthrough uses Mac OS X screenshots, like the one below).
I ran Chrome OS for about two minutes and got bored, it’s basically just a web browser running in a VM. It’s obviously still under development and has work to be done before it is a really usable operating system, but with how easy it is to install in a virtual machine it’s a fun way to geek out and try something new. At the very least I think it’s a glimpse into the future of OS’s, with more and more of our lives and data being found, shared, and accessed online.
Источник
Install & Run Chromium OS on a MacBook Air
If the prospect of installing Mac OS X Lion isn’t your thing, you can try running Chromium OS on the MacBook Air instead. Chromium OS is the open-source version of Google’s Chrome OS, which is an operating system based almost entirely around the Chrome browser – you boot directly into a browser, and that’s basically it.
All hardware works with the exception of Bluetooth, but all the brightness, sound, trackpad, WiFi, and it is said to install on both the MacBook Air 11″ and 13″ models, and possibly even nVidia based MacBook and MacBook Pro’s. The major caveat? You lose OS X, so don’t expect to dual boot here.
We haven’t tested this ourselves and you’ll want to be sure you backup Mac OS X before proceeding because it’ll be overwritten. If you’re brave enough to give this a try, you’ll need a compatible MacBook Air, a 2GB+ USB stick, and the Mac OS X USB Installer key that comes with the MacBook Air.
The following instructions are repeated from Hexxah.net, who got this working, here’s the instructions:
- FINAL WARNING: You’re going to destroy all of your data by following this guide! I am not responsible for any data loss, make sure your backup any data first!
- Download the install image from here
- Extract the archive using your decompression tool of choice (The Unarchiver for Mac works great)
- Burn the image to a USB stick using dd (check the wiki if you need help with this, same as Flow/Vanilla instructions)
- Insert both this USB stick and the OS X install drive into your Macbook Air while it’s switched off
- Hold the “C” key down and press the power button, you can let go of the “C” key once the Apple logo appears
- Once the language selection screen appears, pick the appropriate option and click next
- Once the install wizard appears, click Utilities on the bar at the top, and then Terminal
- Type the following command without quotes: “dd if=/dev/rdisk1 of=/dev/rdisk0 bs=4m count=512″
- Once it says it’s finished (basically when it says X bytes copied in Y seconds), hold down the power button until your machine switches off
- Remove both your USB stick and the OS X install drive
- Hit the power button, wait about 22 seconds
- Enjoy
Anyone want to try this? I’m going to stick with Lion on my MacBook Pro, but this could be fun if a dual or triple boot option was easily supported. That won’t be coming from Hexxah at least, who specifically states that he won’t be supporting dual boot configurations, following that up with “don’t ask me for help with dual-booting this.”
Update: If you’re not interested in this approach, you can also run Chrome OS in a virtual machine for free by downloading VirtualBox and a Chrome OS image (Hexxah has those too).
Источник
Пошаговая установка Google Chrome на MacBook
Ноутбуки от Apple в стоковой комплектации поставляются с веб-браузером собственного производства – Safari. Однако несмотря на всю популярность и удобство их продукции, многим людям действительно непривычно пользоваться заводским браузером. Для кого-то важно перенести свои данные и пароли, синхронизированные с аккаунтом от Google. Для других людей неудобен интерфейс и им намного приятнее пользоваться знакомым решением для веб-сёрфинга. Поэтому в этом материале мы рассмотрим, как установить Google Chrome на Mac..
Особенности версии Хрома для MacOS
После перехода устройств от Apple на новый тип процессоров именно один из главных их конкурентов – Гугл – первым выпустил свой браузер для нового поколения чипсетов. Естественно было предположить, что стоковое решение будет работать эффективнее, потребляя меньшее количество ресурсов и выдавая лучшие результаты. Однако, за время прошедшее с выпуска М1, разработчики из Маунтин-Вью хорошо постарались, минимизировав разрыв в производительности.
Результатом их работы стали повышение эффективности работы Chrome на новом процессоре, в сравнении с версиями для старых чипсетов, вплоть до 5 раз; увеличение скорости загрузки как самого браузера, так и сайтов; повышение эргономичности за счет новых функций работы вкладок; снижение нагрузки на оперативную память до 65%, что повышает время автономной работы MacBook.
Из действительно выделяющихся особенностей новых версий Google Chrome следует особенно выделить следующие:
- PartitionAllo-everywhere — новый механизм работы вкладок, благодаря которому снижается потребление оперативной памяти для каждой из открытых вкладок. Данная технология экономит до 100 Мб ОЗУ на вкладку, а также ускоряет время их открытия примерно на 20%.
- Back and forward cache — это технология, позволяющая мгновенно открыть предыдущую страницу за счет вытягивания информации о ней из сохраненного кэша.
- Freeze-Dried Tabs — данный механизм делает снимок экрана для показа в случаях, когда страница перегружена.
- IsolatedSplits — используется для поддержания работоспособности только тех страниц, которые находятся в поле обозрения пользователя.
- Таймер JavaScript — простой механизм, отсчитывающий время запуска последних сайтов и замораживающий потребление памяти вкладками, которые не открывались дольше одной минуты.
Требования к системе
Современные ноутбуки от разработчиков из Купертино имеют оборудование, позволяющее пользоваться любым программным обеспечением, поддерживающим OS X.
Требования, которые Chrome предъявляет: наличие ОС не ниже версии El Capitan (10.11) и правильный выбор инсталлятора, поддерживающего тот процессор, который установлен на вашем устройстве.
Если с версией операционной системы проблемы вряд ли у кого возникнут, то с установкой самого пакета могут возникнуть проблемы, если используется версия, не подходящая к процессору. Но это небольшая трудность, которая легко обходится, о чем будет рассказано ниже.
 macOS El Capitan
Порядок скачивания
Прежде всего, перед тем как скачивать установщик, следует определить, какой процессор используется в вашем макбуке. Для этого нужно сделать пару простых шагов:
- В левом верхнем углу нажимаем на логотип Apple;
- В появившемся выпадающем окне выбираем и нажимаем на пункт “Об этом Mac”;
- Появится окно, в котором следует перейти во вкладку “Обзор”;
- В данном окне следует обратить внимание на производителя процессора: Apple или Intel.
После того как мы узнали, какой чипсет используется на устройстве, следует перейти на официальный сайт Google Chrome, перейти на страницу скачивания браузера, где нужно скачать версию установщика, подходящего для вашего процессора.
 Загрузка браузера Google Chrome для macOS
Отдельная рекомендация: если вы не веб-разработчик, то качайте стабильную версию браузера, хотя и установка бета-версии никаких проблем привнести не должна.
Процесс установки
Вот мы и подошли к главной теме статьи – как установить Хром на Макбук? На самом деле процесс довольно прост и нетривиален, а что главное – универсален для всех приложений, разработанных для OS X.
Вот пошаговая инструкция, как установить Гугл Хром на Мак:
- Открываем файл, скачанный с сайта Google Chrome. Он имеет название googlechrome.dmg, либо googlechrome.pkg.
- В появившемся окне выбираем значок Chrome и перетаскиваем его в папку “Программы”.
- Открываем приложение Google Chrome, после чего переходим в Finder, где нажимаем на значок извлечения, находящийся правее от иконки устанавливаемого браузера.
- Готово, вы можете начинать пользоваться удобным для вас приложением для веб-сёрфинга.
Начало использования браузера
После установки браузера, вы можете сразу приступать к работе с ним. Однако не забудьте сперва настроить синхронизацию с аккаунтом Google, чтобы перенести пароли, сохраненные закладки и данные автозаполнения.
Также полезным шагом будет установка необходимых расширений. С этим никаких проблем возникнуть не должно, т.к. версия браузера для MacBook поддерживает те же расширения, что и версия для Windows, а их установка происходит тем же образом, через Google Play.
 Работа с Google Chrome на macOS
И, после всех пройденных этапов, можно лишь пожелать вам приятной работы с вашим новым браузером на MacBook.
Источник


