- Install and run CoCoA
- Macintosh
- MacOS X
- Textual interface
- Graphical interface
- Emacs interface
- Setting up Emacs
- MacOS 9
- Unix/Linux
- For a personal installation
- For a system wide installation
- Graphical interface
- Textual interface
- Emacs Interface
- MS Windows
- Textual interface
- Graphical User Interface (MacOS, Linux/Unix, MSWindows)
- How hard is it to get a Cocoa application to run on Windows?
- 3 Answers 3
- Using CocoaPods on Windows
- Step one — install Ruby
- Step two — install curl
- Step three — install git
- Step four — install CocoaPods
- Step five — running pod commands (optional)
- The Cocoa Environment. Part 1
- Поприветствуйте Cocoa!
- Как и с чем?
- И как же Cocoa дружит с Mac OS X?
- И как же Cocoa дружит с iOS?
Install and run CoCoA
Macintosh
MacOS X
You may use the Textual Interface (within Terminal) or Emacs Interface (within Emacs) or the GraphicalUserInterface:
 Textual interface
Download CoCoA and DRAG the CoCoA-4.7 folder into the Applications folder.
Double-click on the cocoa icon. This should automatically open the application Terminal and run CoCoA into it.
If you want to add cocoa to your Dock just drag the icon into the file area of your Dock (next to the Trash icon)
This way you will have NO EDITING facilities, so you might want to:
- open the CoCoA files with your preferred editor
- CUT and PASTE CoCoA commands from it to the CoCoA-Terminal window.
More instructions
Graphical interface
Emacs interface
Download CoCoA and DRAG the CoCoA-4.7 folder into the Applications folder.
May 2006 : Suggested Emacs application (a proper Emacs with a remarkable Macintosh «feel») Carbon Emacs Package (for Mac OS X 10.4 or later)
C-x/C-c/C-v cut and paste (CUA) and Save Options from its Options menu [NB: C stands for the control key and not the command (apple) key] —>
Setting up Emacs
For Emacs experts: copy the settings you want from CoCoA-4.7/emacs/cocoa.emacs into your
/.emacs.
update-prefs.command adds one line to your current .emacs file (creating it if necessary)
ALL SET!!
Now Emacs recognises files with a CoCoA extension ( .coc, .cocoa, .cpkg): REMEMBER to add one to the name of your files!
If under Finder you cannot see the file extensions I suggest you check [Advanced] Show all file extensions in Finder — Preferences. .
Open by dragging: You may open any file in Emacs by dragging it onto the Emacs icon or into an Emacs window.
Open by double-click: If you want all your cocoa files to open with Emacs when double-clicked, this is what you need to do:
- Select in Finder a file with a cocoa extension, say foo.cocoa and select File — Get Info, click the Open with: triangle and choose Other. to select Emacs.
- Now click on Change all. to «Use this application to open all documents like this» (i.e. with the extension .cocoa ).
A few words for the Emacs beginners.
Older Emacs applications for MacOSX 10.2 and MacOSX 10.1: download and move into the Applications folder.
MacOS 9
The code will (should) automatically expand into a folder called «CoCoA 4.0».
When you are in the folder «CoCoA 4.0», double-click on «CoCoA 4» to run the program.
The manual is called by typing Man( ); . If you want to know about some topic, e.g. Hilbert-Poincare’ Series, type a suitable substring, e.g. Man(«hilb»);
To quit CoCoA select «Quit» from the «Edit» menu.
Unix/Linux
Download CoCoA and gunzip-tar your binary in the directory you want, e.g. It will produce a directory called «cocoa-4.7».
For a personal installation
When you are in the directory «cocoa-4.7/», type ./cocoa_text to run the program.
For a system wide installation
To allow all users in a Unix system to share the same installation you should:
if your cocoa directory is NOT /usr/local/cocoa-4.7 then you need to edit the file called cocoa according to the instructions contained therein (you probably want to change only the value of the variable COCOA_PREFIX=/usr/local/cocoa-4.7 ). link it to some publicly accessible directory of executables like this:
Any user may then type cocoa xcocoa —>to run the program from any directory. /usr/lib/qt-2.3.0 (the default installation location for that version of the QT library) then there should be no need to change XCoCoA either. —> cocoa-4.1 :
e.g. COCOA_LIBRARY=/usr/local/cocoa-4.1/
The file «CoCoA» will then be the program which you should call INSTEAD OF «cocoa». You may put the file «CoCoA» wherever is convenient for you:
e.g. (if installed by root) save «CoCoA» as /usr/local/bin/cocoa and —>
Graphical interface
Textual interface
Emacs Interface
Open your .emacs file with any editor (it should be in your home, and it may not exist!):
- If you are familiar about changing your .emacs, then copy the settings you want from cocoa-4.7/emacs/cocoa.emacs .
If you are not then just add this line at the end of your .emacs:
(load-file «
/emacs/cocoa.emacs»)
for example:
(load-file «/usr/local/cocoa-4.7/emacs/cocoa.emacs»)
If you did not install cocoa in /usr/local/ then you need to correct the path in the files:
/cocoa-4.7/cocoa
ALL SET!!
Now Emacs recognises files with a CoCoA extension ( .coc, .cocoa, .cpkg): REMEMBER to add one to the name of your files!
A few words for the Emacs beginners.
MS Windows
Just unzip it and you are ready to use it.
You may also want to create shortcuts to the files wincocoa.exe and CoCoAServer.exe on your desktop. Please remember to start the CoCoA server before starting WinCoCoA if you want to use CoCoA 5 functions such as GBasis5(. ).
The usage of the graphical user interface is explained below.
Unzip it and follow the easy instructions in the README-emacs file in the directory emacs-win
Here is a download for Emacs: choose emacs-NN.N-bin-i386.zip (with NN.N = 23.2 or higer)
http://mirrors.usc.edu/pub/gnu/emacs/windows/
  For further installation instructions, we suggest you have a look at the CoCoA Forum and the CoCoA Wiki
Textual interface
The manual is called by typing Man( ); .
If you want to know about some topic, e.g. Hilbert-Poincare’ Series, type a suitable substring, e.g. Man(«hilb»); or ?hilb (starting from version 4.2)
To quit CoCoA type Quit; (or Ciao; 😉
Graphical User Interface (MacOS, Linux/Unix, MSWindows)
To enter commands from the interactive buffer click on the «cog» symbol in the top bar or type .
To enter commands from an editing buffer (file): a one-line command from a file or a selected region, type .
To quit enter Quit; or select Quit from the Edit menu.
Manual: Click on Help . You get a Windows help system which is self-explanatory. You can search for all commands containing (in their name or description) a given string.
How hard is it to get a Cocoa application to run on Windows?
There are also open source implementations of major parts of the Cocoa framework that allows cross-platform (including Microsoft Windows) Cocoa application development, such as GNUstep, Cappuccino, and Cocotron.
Yet when I looked into whether Mac application Tweetie was available for windows the developer had ruled it out:
Windows doesn’t have Cocoa, the programming environment that Tweetie is made in, as such, it seems like a poor possibility.
I’d like to have an answer to point the Tweetie developers (and as a resource for other cocoa developers) which would tell them:
- Which implementation is the most suitable for getting a cocoa app running on windows?
- How much work is it likely to take to get the app running under windows?
- How easy/hard is it to maintain a common code base for Mac and Windows?
- (any other considerations I’ve missed?)
Of course if it would be too much work I’d like to know that too before suggesting it and potentially sending someone else on a fruitless search.

3 Answers 3
- “Major parts of the Cocoa frameworks” is not the same as “the entirety of the Cocoa frameworks”. Tweetie could be using something that’s missing.
- Tweetie could be (very probably is) using APIs from the non-Cocoa frameworks, such as Core Foundation, Core Services, Core Graphics, and Core Animation. A port of the Cocoa frameworks alone won’t include any of these APIs, and even a more complete Mac-API-emulation framework will not include all of them.
- These frameworks are eternally chasing Apple. Even if they catch up, they’ll be instantly behind again as of the next Mac OS X release. Mac developers already put off using new APIs in new Mac OS X releases while they wait for users to upgrade to those new releases; now you’re asking atebits to also wait for the other-framework developer to catch up to Apple again.
- Any second implementation of an existing API will have bugs that the first implementation doesn’t, and vice versa. These differences will cause development and support problems.
- You’re asking atebits to add a third platform to an application that already exists on two. Supporting one platform is a lot of work. Supporting two platforms is a hell of a lot of work. Supporting three? Now you’re getting into big-company territory.
So, even with these Cocoa-like frameworks, the answer is: Hard.
Using CocoaPods on Windows

Apr 24, 2019 · 3 min read
CocoaPods is a dependency manager for Swift and Objective-C Cocoa projects. With over 60 thousand libraries, it is the most popular repository of its kind, impacting over 3 million apps (quoting the official site).
Traditionally, the CocoaPods only targeted macOS, which made sense as it was meant to work with Xcode and the related toolchain. However, the success of cross-platform development frameworks such as Flutter or React Native gave rise to demand for CocoaPods to work on non-macOS platforms such as Windows (for example, some folks have reported issues #8055 and #8077).
Starting with CocoaPods 1.7 (in Beta as of time of writing), it is now possible to get some basic operations, such as pod install and pod update to run on Windows. This guide walks through the necessary steps to get this to work.
Step one — install Ruby
Ruby is required to run CocoaPods. An easy way to install Ruby is to download an installer from https://rubyinstaller.org/. Use the recommended download (Ruby+DevKit x64) unless you have a reason to install a different package.
When installing Ruby, accept the defaults but make sure “Use UTF-8 as default external encoding” is selected. Ruby will prompt to install MSYS — pick the first option ( MSYS2 base installation).
To confirm that Ruby has been properly installed, open a command prompt and type “ gem list”. If a list of gems is displayed, you’re all set.
Step two — install curl
CocoaPods uses curl to download packages. Since curl is not installed by default on Windows machines, you will need to install it — you can get curl from https://curl.haxx.se/dlwiz/?type=bin&os=Win64&flav=-&ver=*&cpu=x86_64. Download the latest 64-bit curl, extract the package and make sure that curl.exe in accessible via command line.
For example, if you’ve extracted curl as C:\curl-7.64.1_1-win64-mingw, add the following to your path: C:\curl-7.64.1_1-win64-mingw\bin (see “Environment Variables” in Advanced System Settings).
To confirm that curl has been installed, open a command prompt and type “ curl — help” — this should display the curl help pages.
Step three — install git
CocoaPods needs git and tar command-line tools. You can install git from https://git-scm.com/download/win. When installing git, you may select the “Use Git and optional Unix tools from the Command Prompt”. Use default settings for everything else.
To confirm that git and Unix tools have been installed, open a command prompt and type the “ git” and “ tar” commands.
Step four — install CocoaPods
Now that all the tools have been installed, install CocoaPods.
Run “ gem install cocoapods” to install the latest released version of CocoaPods. At the time of the writing, Windows support is only available in the Beta of CocoaPods 1.7.0, meaning you will need to run “ gem install cocoapods — pre” instead.
To confirm, open a command prompt and run the following command: “ pod — version”. You should see version 1.7.0 or higher.
Step five — running pod commands (optional)
In order to run “pod install”, you need an actual Xcode project. Since Xcode does not run on Windows, use a macOS machine with Xcode to generate an Xcode project. To test CocoaPods:
- Transfer the Xcode project to the Windows machine
- Navigate to the project folder using the command line
- Run “pod init” to create the Podfile
- Edit the Podfile and add some pods (for example, you can add “ Firebase/Analytics”)
- Run “pod install” to install the pods
The Cocoa Environment. Part 1
Многие об этом говорят, но какое на самом деле место занимает Cocoa environment в жизни IOS и MacOS, да и вообще что это за такая уличная магия?
Поприветствуйте Cocoa!
Cocoa — это основная среда приложений для Mac OS X (есть еще Carbon, но эта среда используется в основном только для поддержки кода написанного для Mac OS 9.) и единственная среда приложений для операционных систем IOS. Она состоит из набора объектно-ориентированных библиотек, исполняющей среды и среды разработки.
Большинство программ, которые используют пользователи Mac OS X (например, Mail или Safari), а тем более, пользователи IOS, это программы, написанные с помощью Cocoa.
Ну а для создания приложений под Cocoa используется знаменитый Xcode.
Как и с чем?
Как и во всех средах приложений, Cocoa имеет два мира: мир runtime’а и мир разработки. В мире runtime’а, Cocoa приложения представляют пользовательский интерфейс и тесную интеграцию с другими компонентами операционной системы в Mac OS X, например, Finder и Dock.
Но в мире разработки Cocoa – интегрированный набор объектно-ориентированных программных компонентов-классов, которые, собственно, позволяют творить ПО под Mac OS X и IOS. Они дают возможность делать тучу вещей, от user-interface’а до управления массивами данных.
При разработке Cocoa приложений, на самом деле, можно использовать несколько языков программирования, но родной язык — Objective-C, который является расширением ANSI C, с некоторыми синтаксическими и семантическими особенностями (на основе Smalltalk) для поддержки ООП. Кроме того, ваш код может вызывать функции определенные в non-Cocoa интерфейсе, такие как библиотеки BSD в /usr/include. Вы даже можете смешивать C++ код с Cocoa кодом и ссылаться на этот скомпилированное чудо в вашем исполняемом файле.
Наиболее важные библиотеки Cocoa упакованы в два основных framework’a для каждой платформы: AppKit для Mac OS X и UIKit для IOS. Как и все framework’и, они содержат не только динамически доступные библиотеки (а иногда и несколько версий библиотек, необходимые для обеспечения обратной совместимости), но и файлы заголовков, API документацию, и связанных с ними ресурсы. Framework — это очень важная составляющая для любого проекта под Mac или IOS.
Мас OS X поддерживает ко всему прочему еще много полезных библиотек, таких как: WebKit и Address Book frameworks, но об этом позже.
И как же Cocoa дружит с Mac OS X?
Архитектурно, Mac OS X является серией программных слоев (рис 1).
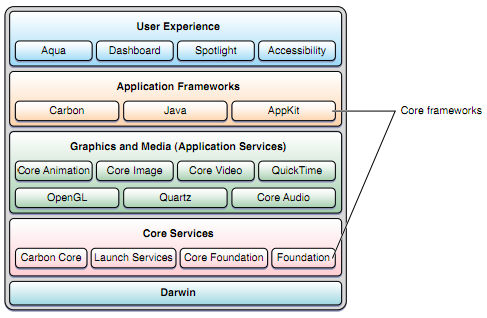
Рис 1. Вот так дружит с Mac OS X
Например, системный компонент, который в значительной степени ответственный за работу интерфейса Aqua – Quartz (реализован в Core Graphics framework), является частью слоя Application Services. Но в основании всего этого лежит Darwin (набор основных компонентов, используемых в Mac OS X и iOS). все в Mac OS X, в том числе Cocoa, в конечном счете зависит от этого слоя.
В Mac OS X, Cocoa состоит из двух основных framework’ов, которые необходимы для разработки приложений для Mac OS X:
- AppKit. AppKit, один из компонент application framework’а, предоставляет отображение приложения на экрне и определяет структуру поведения приложений, включая обработку событий.
- Foundation — компонент в слое Core Services, определяет основные поведения объектов, устанавливает механизмы их управления, и предоставляет возможность использовать примитивных типов данных, коллекций и сервисов операционной системы.
AppKit зависит от Foundation, который функционально находится в слое Core Services. Если посмотреть поближе на классы AppKit, можно увидеть, где Cocoa зависит от других частей Mac OS X, например, Carbon Core, Core Graphics (Quartz), и Launch Services.
- Core Foundation. Многие классы Foundation framework основаны на эквивалентных непрозрачных классах Core Foundation. Эта тесная связь делает преобразования между совместимыми типами Core Foundation и Foundation «бесплатными». В свою очередь, классы Core Foundation используют BSD слой Darwin’а.
- Carbon Core. AppKit и Foundation используют Carbon Core framework для получения доступа к некоторым системным службам. Например, Carbon предоставляет Core File Manager, который используется Cocoa для работы с различными файловыми системами.
- Core Graphics. Cocoa использует Core Graphics для большинства задач связанных с отображением графики.
- Launch Services. Класс NSWorkspace предоставляет основные возможности Launch Services. Cocoa также использует возможности Launch Services для ассоциации иконок с приложениями и документами.
Apple тщательно разработал Cocoa так, чтобы некоторые из ее программных интерфейсов давали доступ к базовым функциям, которые обычно необходимы приложениям. Но если требуются некоторые возможности, которые не
доступны через интерфейсы Cocoa, или если нужен более тонкий контроль над тем, что происходит в приложении, вы можете непосредственно использовать основные framework’и (ярким примером является Core Graphics, путем вызова функций которой можно получить более мощные средства управления графикой).
И как же Cocoa дружит с iOS?
Слой выполнения приложений в IOS называется Cocoa Touch. Хотя IOS инфраструктура, в которой работает Cocoa Touch похож на ту, в которой работает Cocoa в Mac OS X, есть некоторые существенные различия (Рис 2).
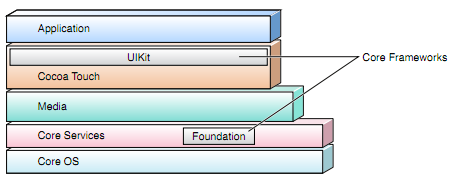
Рис 2. Вот так дружит с iOS
Как правило, системные библиотеки и framework’и IOS, которые использует UIKit являются подмножеством библиотек и framework’ов Mac OS X. Однако, из-за характера устройств, поддерживаемых ОС IOS,
есть некоторые framework’и, которые являются специфическими для IOS.
Ниже приводится краткое изложение некоторых из framework’ов каждого слоя:
- Core OS. Этот уровень содержит ядро, файловую систему, сетеву инфраструктуру, безопасность, управления питанием, а также ряд драйверов устройств. В нем, ко всему прочему, содержится библиотека libSystem, которая поддерживает POSIX / BSD 4.4/C99 API спецификации и включает в себя системы на уровне API для многих сервисов.
- Core Services. Предоставляет основные сервисы, такие как манипуляции со строками, управление коллекциями и сетевым взаимодействием, управление контактами, настройками. Они также дают возможность пользоваться аппаратными особенностями устройства (GPS, компас, акселерометр и гироскоп).
- Примеры framework’а этого слоя — Core Location, Core Motion, и System Configuration.
- Этот слой включает в себя как Foundation так и Core Foundation, которые предоставляют некоторые типы данных, такие как строки и коллекции.
- Media. Обеспечивает слою Cocoa Touch доступ к мультимедийным возможностям. Включает в себя Core Graphics, Core Text, OpenGLES,
- Core Animation, AVFoundation, Core Audio, и сервисы воспроизведения видео.
- Cocoa Touch. Занимается непосредственной поддержкой приложений. Содержит такие компоненты как Game Kit, Map Kit и iAd.
Cocoa в IOS, как и Cocoa в Mac OS X, дает приложениям доступ к возможностям базовых функциям. И если вам требуется нечто большее, чем предоставляет Cocoa API, вы так же можете непосредственно использовать методы более низкого уровня.


