- Installation of CUDA Toolkit on Linux
- 0. Pay attention to system requirements
- 1. Manage kernel version
- 2. Check out GCC
- 3. Download the toolkit
- 4. Extract installer’s content
- 5. Uninstall existing Nvidia drivers
- 6. Remove X server config
- 7. Disable Nouveau drivers
- 8. Reboot
- 9. Switch to text mode
- 10. Disable display manager
- 11. Install display driver and toolkit
- 12. Update environment variables
- 13. Verify display driver version
- 14. Verify CUDA compiler driver
- 15. Give CUDA proper version of GCC
- 16. Test compilation
- 17. Reboot
- 18. Get your hands dirty
- Установка CUDA в Ubuntu
- Что такое Nvidia CUDA
- Какую версию CUDA выбрать
- Установка CUDA из репозиториев Ubuntu
- Установка CUDA 9 в Ubuntu
- Установка CUDA 6.5, 7 или другой версии
- Удаление Cuda из Ubuntu
- Выводы
- kmhofmann / installing_nvidia_driver_cuda_cudnn_linux.md
- This comment has been minimized.
- bgyarbro commented Aug 10, 2020
- This comment has been minimized.
- PSS67 commented Sep 12, 2020
- This comment has been minimized.
- prikmm commented Nov 18, 2020 •
- Update:
- This comment has been minimized.
- aloizo03 commented Nov 23, 2020
- This comment has been minimized.
- emenshoff commented Dec 4, 2020
- This comment has been minimized.
- johndpope commented Dec 18, 2020 •
- This comment has been minimized.
- saidmithilesh commented Jan 22, 2021
- This comment has been minimized.
- aloizo03 commented Jan 22, 2021
- This comment has been minimized.
- kyleawayan commented Feb 19, 2021
- This comment has been minimized.
- hrithikppawar commented Mar 8, 2021
- This comment has been minimized.
- SakibFarhad commented Mar 9, 2021
- This comment has been minimized.
- hrithikppawar commented Mar 9, 2021
- This comment has been minimized.
- tyuvraj commented May 22, 2021 •
- Update:
Installation of CUDA Toolkit on Linux

A short guideline for installation of CUDA Toolkit 9.1 on Ubuntu 17.10

This article aims to be a guideline for installation of CUDA Toolkit on Linux. Target environment of this guideline is CUDA 9.1 and Ubuntu 17.10, however it can be applicable to other systems. Actually, it’s not a rocket science, but there are certain points which require extra attention and those points are completely distributive-independent.
0. Pay attention to system requirements
Official installation guide for Linux defines system requirements which you must conform to make things work. This might be obvious that everyone should get familiar with system requirements before installing anything on a target system. However it is easy to lull your vigilance if you are working basically with software in the modern world of constant changes and updates.
So, pay special attention to supported versions of kernel and gcc. If your existing installation differs from the recommended one, you must be able to decide whether you are OK to upgrade/downgrade your kernel and whether it’s possible for you to install required version of gcc.
1. Manage kernel version
CUDA is a device architecture which is implemented inside GPU. It allows to create a heterogeneous computing architecture, where CPU acts as a supervisor and GPU takes role of a workhorse. Thus, CPU and GPU need to talk to each other and such communication is done via driver. As Linux implements microkernel architecture where drivers are treated as plugins, they must be compatible with the kernel which they are going to be plugged into.
Unfortunatelly, Nvidia’s drivers are source-closed and you cannot compile them for your kernel version. Hence, you are left to use what you are given. If driver is not compatible with your kernel, you have to change the kernel.
As official documentation states, supported version of kernel for Ubuntu 17 is 4.9. Well, Ubuntu 17.10 is shipped with kernel 4.13 and downgrading it to version 4.9 may look too aggressive.
So, will it work with kernel 4.13? Actually, yes and no, it depends. Installation has failed for my version 4.13.0–32 and it has failed for version 4.13.26. Why? Well, there are bugs inside the kernel. For example, some functions may be used without includes of their headers and this results into compilation errors. While such issues are easy to fix, there are other errors which can drive you crazy.
Luckily, kernel 4.13.16 is suitable for CUDA 9.1 and no errors were observed.
I recommend to use UKUU to manage kernels on Ubuntu. You can stay without it, however personally I have found it to be very useful, as it allows you to do all job with few command-line instructions. Feel free to follow this article to get familiar with UKUU. In short installation looks like:
Don’t forget to reboot your system after switching to another kernel:
After that make sure the kernel headers and development packages for the currently running kernel are installed:
2. Check out GCC
CUDA needs gcc 6 for Ubuntu 17. The latter one comes with gcc 7. Required version can coexist with default one:
3. Download the toolkit
Download process is straightforward:
- Go to download page.
- Select Linux OS.
- Select x86_64 architecture.
- Select Ubuntu distribution.
- Select version 17 .
- Select runfile (local) installer type.
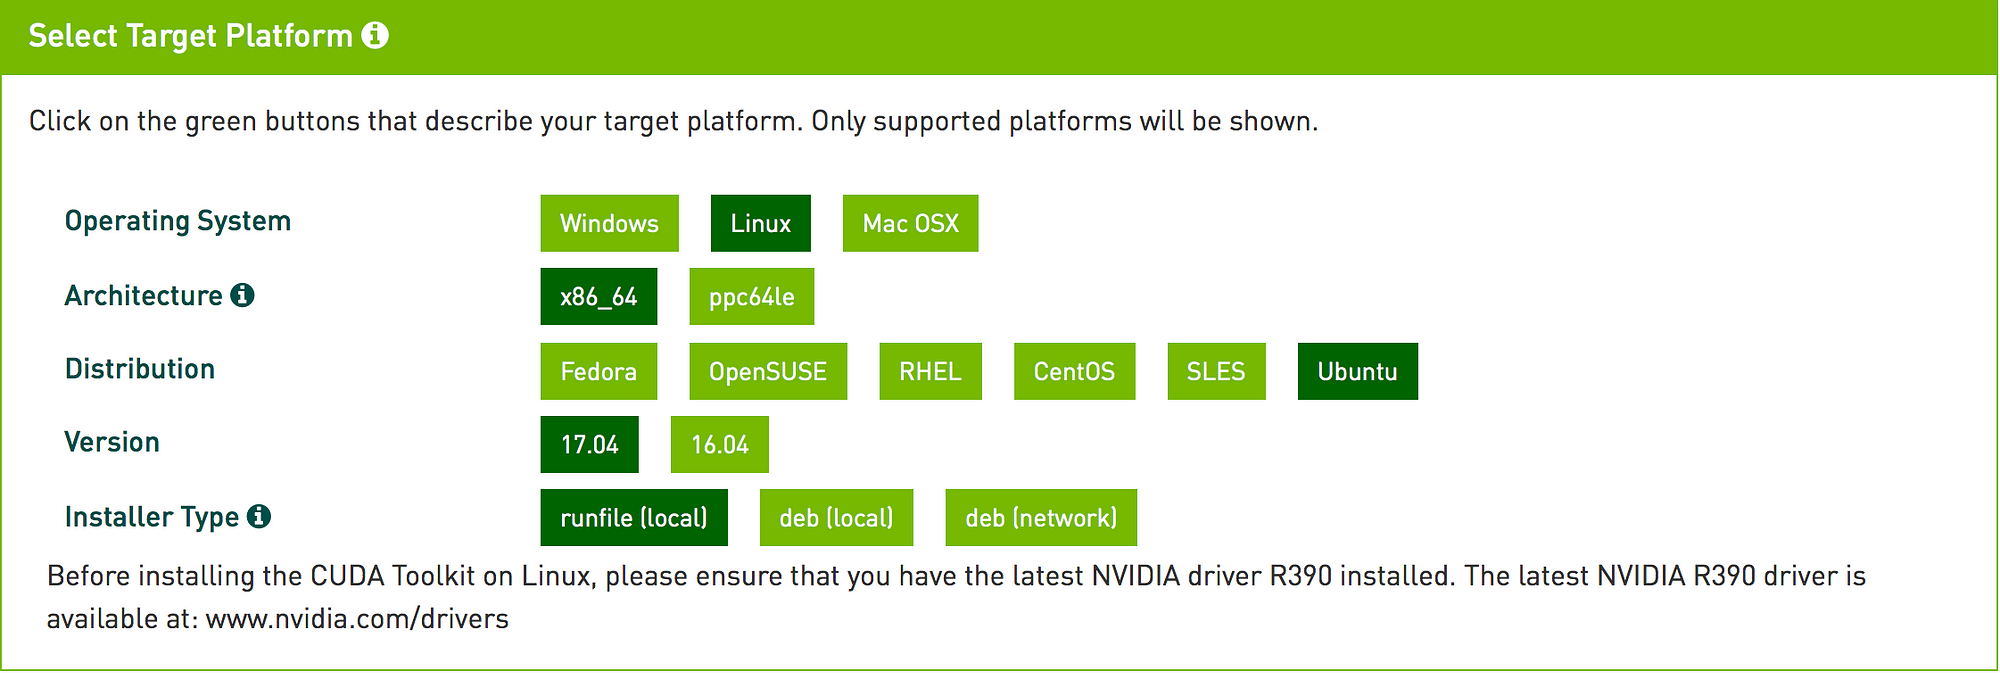
It’s important to select runfile for installer type, as this installer will contain display driver of version which is guaranteed to be compatible with toolkit.
4. Extract installer’s content
Downloaded installer contains display driver, toolkit and samples. We are going to install them manually, so extract them:
5. Uninstall existing Nvidia drivers
If your system already has display driver installed, delete it:
6. Remove X server config
If you have configuration of X server, delete or backup it:
7. Disable Nouveau drivers
- Create a file /etc/modprobe.d/blacklist-nouveau.conf with the following 2 lines:
2. Regenerate the kernel initramfs :
8. Reboot
9. Switch to text mode
Press Ctrl + Alt + F1 to enter text mode and login as usual user.
10. Disable display manager
Disable display manager, so nothing will interact with graphics device:
After this point you will not be able to read this text from target machine, so make sure you can read it from another device.
11. Install display driver and toolkit
Now it’s time to install all we need:
12. Update environment variables
Edit rc file of your shell to update environment variables (e.g.,
and refresh environment for current session:
13. Verify display driver version
Check display driver is installed properly:
14. Verify CUDA compiler driver
Check CUDA compiler driver is installed properly:
15. Give CUDA proper version of GCC
We have installed gcc 6 and g++ 6 at step #2. Now it’s time to make CUDA able to use it:
16. Test compilation
Now it’s time to check if installation was successful. We can do this by compiling and running one of samples.
Go to the sample directory:
Compile sample (as root , because samples are located inside system dir):
Check it can run:
17. Reboot
Reboot just to be sure everything is good:
18. Get your hands dirty
At this point CUDA Toolkit is installed and it’s time to get hands dirty.
Источник
Установка CUDA в Ubuntu
Видеокарты уже давно перестали быть только устройствами, способными рисовать красивую графику в играх. Перед ними всё чаще ставят задачи, связанные со сложными математическими вычислениями, расчётами и искусственным интеллектом. Видеокарты намного лучше справляются с такими заданиями, чем обычные процессоры. Именно для того, чтобы обеспечить работу своих карт в этой сфере, NVIDIA выпустила платформу CUDA (Compute Unified Device Architecture).
В этой статье мы рассмотрим, как выполняется установка Cuda Ubuntu, как установить библиотеки и окружение для разработки, а также необходимую версию программы.
Что такое Nvidia CUDA
Архитектура CUDA позволяет разработчикам использовать вычислительные возможности видеокарт Nvidia для параллельных расчётов. Это очень сильно повышает производительность программ, которым нужно решать много однообразных задач. Одни из самых популярных способов применения CUDA — это майнинг криптовалюты, а также разработки в сфере искусственного интеллекта.
Платформа позволяет программистам самим управлять доступными инструкциями видеоускорителя, а также распределять память. Все программы пишутся на Си-подобном языке программирования.
Какую версию CUDA выбрать
На данный момент самая свежая версия NVIDIA CUDA Ubuntu — девятая. Если вы собрались создавать собственное программное обеспечение на основе этой платформы, лучше всего начать с этой или восьмой версии. Но если вам нужно запустить в системе программу, которая уже собрана под определенный вариант CUDA, то вам придется ставить именно его. Потому что между более старыми и новыми вариациями есть серьезные отличия, и приложение может попросту не заработать. Попытайтесь запустить нужную вам программу и посмотрите, каких библиотек ей не хватает в сообщении об ошибке:

Или же эту информацию можно найти в описании программы. Обычно разработчики пишут, какая версия CUDA нужна для работы. А теперь давайте рассмотрим, как выполняется установка CUDA на Ubuntu 16.04, 17.10 и другие модификации этого дистрибутива.
Установка CUDA из репозиториев Ubuntu
Нужно отметить, что для успешной работы Nvidia, CUDA необходимо, чтобы уже был установлен драйвер NVIDIA. Сейчас в официальных репозиториях Ubuntu находится восьмая версия платформы. Вы можете без проблем её установить, выполнив всего несколько команд. Сначала обновите списки пакетов:
sudo apt update
Затем наберите такую команду, чтобы установить CUDA Ubuntu:
sudo apt install nvidia-cuda-toolkit
Если вам также нужны заголовочные файлы для разработки, то понадобится дополнительно установить пакет nvidia-cuda-dev:
sudo apt install nvidia-cuda-dev
Установка платформы может длиться достаточно много времени, поскольку все необходимые библиотеки занимают около одного гигабайта. После завершения установки вы можете проверить, всё ли работает, выполнив:
Установка CUDA 9 в Ubuntu
Самая свежая на данный момент, как уже упоминалось, версия — Nvidia Cuda 9.0. Она включает некоторые алгоритмы для ускорения вычислений в приложениях AI и HPC на видеокартах NVIDIA Volta. Кроме того, были исправлены некоторые ошибки и проблемы платформы. Но для девятки нужен свежий драйвер Nvidia 384. Установить его вы можете с официального сайта.

Тут вам необходимо выбрать операционную систему, архитектуру и дистрибутив Linux, а в самом конце — способ установки (deb-пакет).

Только после этого появиться ссылка на установщик. Скачайте его, нажав кнопку Download 1.2 GB, и запустите установку с помощью dpkg:
Перед тем, как будет выполнена установка CUDA 9 Ubuntu, вам необходимо добавить ключ репозитория:
sudo apt-key add /var/cuda-repo-ubuntu1704-9-1-local_9.1.85-1/7fa2af80.pub
И обновить список пакетов:
sudo apt update
Затем можно установить CUDA 9 в Ubuntu:
sudo apt install cuda cuda-libraries-9.1
Готово, теперь можете проверить версию:
Установка CUDA 6.5, 7 или другой версии
Для многих программ необходима определенная версия CUDA, например, многие майнеры были собраны только с версией 6.5, и поэтому вам нужно будет установить именно эти библиотеки, чтобы всё заработало. На сайте Nvidia есть архив со всеми предыдущими версиями платформы. Рассмотрим установку на примере версии 6.5. Первое, что вам нужно выбрать — версия:

Затем выберите операционную систему Linux x86:


А дальше установочный deb-пакет для Ubuntu 14.04. Проверено на Ubuntu 17.10: установка работает. После загрузки пакета репозитория выполните:
sudo apt install

Далее обновите список пакетов:
sudo apt update
Осталась установка CUDA Ubuntu нужной вам версии:
sudo apt install nvidia-cuda-6.5

Поскольку программа размещается в /usr/local, нужно добавить путь к её папке в переменную среды PATH и LD_PRELOAD:
/.bashrc
echo «export PATH=/usr/local/cuda-6.5/bin:$PATH» >>
/.bashrc
echo «export LD_LIBRARY_PATH=/usr/local/cuda-6.5/lib64:$LD_LIBRARY_PATH» >>
Готово, после этого можно проверять версию:

Удаление Cuda из Ubuntu
Удалить Nvidia CUDA вы можете также, как и устанавливали. Еесли вы ставили nvidia-cuda-toolkit, то для удаления достаточно набрать:
sudo apt purge nvidia-cuda-toolkit
Или для версии 6.5:
sudo apt purge nvidia-cuda-toolkit-6.5
Также не забудьте удалить репозиторий:
sudo apt purge cuda-repo-ubuntu1404
Имя пакета может отличаться в зависимости от версии. Если вы выполняли установку с помощью бинарного файла или из исходников, то для удаления нужно использовать скрипт, который вы применяли при инсталляции.
Выводы
В этой небольшой статье мы рассмотрели, как выполняется установка CUDA Ubuntu 17.10 и в других версиях этой операционной системы. Как видите, это не так сложно, и вы можете установить не только последнюю версию, но и ту, которая вам нужна.
Источник
kmhofmann / installing_nvidia_driver_cuda_cudnn_linux.md
Installing the NVIDIA driver, CUDA and cuDNN on Linux (Ubuntu 20.04)
This is a companion piece to my instructions on building TensorFlow from source. In particular, the aim is to install the following pieces of software
on an Ubuntu Linux system, in particular Ubuntu 20.04.
At the time of writing (2020-08-06), these were the latest available versions. As a disclaimer, please note that I am not interested in running an outdated Ubuntu version or installing a CUDA/cuDNN version that is not the latest. Therefore, the below instructions may or may not be useful to you. Please also note that the instructions are likely outdated, since I only update them occasionally. Don’t just copy these instructions, but check what the respective latest versions are and use these instead!
Installing the NVIDIA driver
Download and install the latest NVIDIA graphics driver from here: https://www.nvidia.com/en-us/drivers/unix/. Note that every CUDA version requires a minimum version of the driver; check this beforehand.
Ubuntu 20.04 currently offers installation of the NVIDIA driver version 440.100 through its built-in ‘Additional Drivers’ mechanism, which should be sufficient for CUDA 10.2. CUDA 11.0 appears to require a newer version of the NVIDIA driver, so we’re going to install this manually.
Download and install the latest NVIDIA graphics driver from here: https://www.nvidia.com/en-us/drivers/unix/.
The CUDA runfile also includes a version of the NVIDIA graphics driver, but I like to separate installing either, as the version supplied with CUDA Is not necessarily the latest version of the driver.
Download the latest CUDA version here. For example, I downloaded:
Thankfully, CUDA 11 currently supports the up-to-date Ubuntu version, 20.04, so we don’t need to jump through hoops to deal with an unsupported GNU version error as in previous versions of this document. Simply install as per the official instructions:
You may need to confirm that the display driver is already installed, and de-select installation of the display driver.
Once finished, you should see a summary like this:
Do what the instructions given in the summary say and add the given directories to your PATH and LD_LIBRARY_PATH . For example by adding the following lines to your .bashrc , .zshrc , or whatever shell you are using:
Just go here and follow the instructions. You’ll have to log in, so downloading of the right cuDNN binary packages cannot be easily automated. Meh.
Once downloaded, un-tar the file and copy the contents to their respective locations:
This comment has been minimized.
Copy link Quote reply
bgyarbro commented Aug 10, 2020
Thank you for this tutorial! This is awesome info. I was able to get it setup easily.
This comment has been minimized.
Copy link Quote reply
PSS67 commented Sep 12, 2020
Thanks. Do you know if this will work on WSL2 (with Ubuntu 20.04)?
This comment has been minimized.
Copy link Quote reply
prikmm commented Nov 18, 2020 •
Update:
Hey, I downloaded using package manager. Everything went great and i was able to use tensorflow on gpu. But, while running ldconfig, I see the following error:
/sbin/ldconfig.real: /usr/local/cuda-11.0/targets/x86_64-linux/lib/libcudnn_ops_train.so.8 is not a symbolic link /sbin/ldconfig.real: /usr/local/cuda-11.0/targets/x86_64-linux/lib/libcudnn_ops_infer.so.8 is not a symbolic link /sbin/ldconfig.real: /usr/local/cuda-11.0/targets/x86_64-linux/lib/libcudnn_adv_train.so.8 is not a symbolic link /sbin/ldconfig.real: /usr/local/cuda-11.0/targets/x86_64-linux/lib/libcudnn_cnn_infer.so.8 is not a symbolic link /sbin/ldconfig.real: /usr/local/cuda-11.0/targets/x86_64-linux/lib/libcudnn_cnn_train.so.8 is not a symbolic link /sbin/ldconfig.real: /usr/local/cuda-11.0/targets/x86_64-linux/lib/libcudnn_adv_infer.so.8 is not a symbolic link /sbin/ldconfig.real: /usr/local/cuda-11.0/targets/x86_64-linux/lib/libcudnn.so.8 is not a symbolic link
To check I went to:
/usr/local/cuda-11.0/targets/x86_64-linux/lib
and did:
ls -ln
Among all the symlinks I got as my ouput, I saw:
-rwxr-xr-x 1 0 0 98957080 Nov 18 13:54 libcudnn_adv_infer.so
-rwxr-xr-x 1 0 0 98957080 Nov 18 13:54 libcudnn_adv_infer.so.8
-rwxr-xr-x 1 0 0 98957080 Nov 18 13:54 libcudnn_adv_infer.so.8.0.5
-rwxr-xr-x 1 0 0 65344120 Nov 18 13:54 libcudnn_adv_train.so
-rwxr-xr-x 1 0 0 65344120 Nov 18 13:54 libcudnn_adv_train.so.8
-rwxr-xr-x 1 0 0 65344120 Nov 18 13:54 libcudnn_adv_train.so.8.0.5
-rwxr-xr-x 1 0 0 1288305728 Nov 18 13:55 libcudnn_cnn_infer.so
-rwxr-xr-x 1 0 0 1288305728 Nov 18 13:55 libcudnn_cnn_infer.so.8
-rwxr-xr-x 1 0 0 1288305728 Nov 18 13:55 libcudnn_cnn_infer.so.8.0.5
-rwxr-xr-x 1 0 0 58705816 Nov 18 13:55 libcudnn_cnn_train.so
-rwxr-xr-x 1 0 0 58705816 Nov 18 13:55 libcudnn_cnn_train.so.8
-rwxr-xr-x 1 0 0 58705816 Nov 18 13:55 libcudnn_cnn_train.so.8.0.5
-rwxr-xr-x 1 0 0 251390696 Nov 18 13:55 libcudnn_ops_infer.so
-rwxr-xr-x 1 0 0 251390696 Nov 18 13:55 libcudnn_ops_infer.so.8
-rwxr-xr-x 1 0 0 251390696 Nov 18 13:55 libcudnn_ops_infer.so.8.0.5
-rwxr-xr-x 1 0 0 26002104 Nov 18 13:55 libcudnn_ops_train.so
-rwxr-xr-x 1 0 0 26002104 Nov 18 13:55 libcudnn_ops_train.so.8
-rwxr-xr-x 1 0 0 26002104 Nov 18 13:55 libcudnn_ops_train.so.8.0.5
-rwxr-xr-x 1 0 0 158264 Nov 18 13:55 libcudnn.so
-rwxr-xr-x 1 0 0 158264 Nov 18 13:55 libcudnn.so.8
-rwxr-xr-x 1 0 0 158264 Nov 18 13:55 libcudnn.so.8.0.5
I got confused whether this files are to be completely removed or symlinks are to be created for then, and while copy pasting they got messed.
While searching on the web for this answer I came across one command for checking cudnn:
/sbin/ldconfig -N -v $(sed ‘s/:/ /’ /dev/null | grep libcudnn
I ran the above command (I don’t know what it means, thought of understanding how it works after seeing the output, but got even more confused), and got something like below:
sed: -e expression #1, char 1: unknown command: ‘�’
libcudnn_ops_train.so.8 -> libcudnn_ops_train.so.8.0.5
libcudnn_ops_infer.so.8 -> libcudnn_ops_infer.so.8.0.5
libcudnn_adv_train.so.8 -> libcudnn_adv_train.so.8.0.5
libcudnn_cnn_infer.so.8 -> libcudnn_cnn_infer.so.8.0.5
libcudnn_cnn_train.so.8 -> libcudnn_cnn_train.so.8.0.5
libcudnn_adv_infer.so.8 -> libcudnn_adv_infer.so.8.0.5
libcudnn.so.8 -> libcudnn.so.8.0.5
Now, I don’t know what to do whether to generate symlinks or remove libcudnn* files from /usr/local/cuda-11.0/targets/x86_64-linux/lib.
Kindly help me.
Thank you in advance 🙂
PS: If I have to create symlinks, then it would be helpful if I can get an example using one of the ones that have to be created, I just started using linux and am not to familiar with it. 🙂
This comment has been minimized.
Copy link Quote reply
aloizo03 commented Nov 23, 2020
Hello i want to install cuda 11 in Ubuntu 18.04 this installation tutorial i will be okay ?
This comment has been minimized.
Copy link Quote reply
emenshoff commented Dec 4, 2020
Hello i want to install cuda 11 in Ubuntu 18.04 this installation tutorial i will be okay ?
It works fine, but I, personaly was not able to build working version of tensorflow in Uabuntu 18.04 with cuda 11
This comment has been minimized.
Copy link Quote reply
johndpope commented Dec 18, 2020 •
you may find more solace in using POP-OS — latest nvidia drivers out of the box. https://pop.system76.com/
I added a request to create a new distro for ML — https://github.com/pop-os/iso/issues/270 / we should be able to get something off the shelf like AWS / AMI.
CHECK LATEST CUDNN versions on https://docs.nvidia.com/deeplearning/cudnn/install-guide/index.html
sudo apt-get install libcudnn8=8.0.5.39-1+cuda11.1
sudo apt-get install libcudnn8-dev=8.0.5.39-1+cuda11.1
This comment has been minimized.
Copy link Quote reply
saidmithilesh commented Jan 22, 2021
Hello i want to install cuda 11 in Ubuntu 18.04 this installation tutorial i will be okay ?
This comment has been minimized.
Copy link Quote reply
aloizo03 commented Jan 22, 2021
Hello i want to install cuda 11 in Ubuntu 18.04 this installation tutorial i will be okay ?
Thanks for the help i solve this problem 2 months ago the issue was at the nvidia driver and the cuda version
This comment has been minimized.
Copy link Quote reply
kyleawayan commented Feb 19, 2021
Thanks for this guide! Unfortunately on Ubuntu 20.04.2 LTS, the tar file installation didn’t really work as there were missing files (at least when using dlib ). I downloaded the two runtime and developer deb files for Ubuntu 20.04 from NVIDIA, installed them using sudo dpkg -i libcudnn8_8.1.0.77-1+cuda11.2_amd64.deb and sudo dpkg -i libcudnn8-dev_8.1.0.77-1+cuda11.2_amd64.deb , and it worked with dlib .
This comment has been minimized.
Copy link Quote reply
hrithikppawar commented Mar 8, 2021
Hello!
I am going to start a project on Object Detection so I want to use the Tensorflow framework but can Tesorflow supports Cuda-11.0 or I need to install any other version on Cuda.
Can anyone brief me about how I should set up my development environment? I am using Ubuntu-20.10 with Nvidia’s GPU.
This comment has been minimized.
Copy link Quote reply
SakibFarhad commented Mar 9, 2021
Hello!
I am going to start a project on Object Detection so I want to use the Tensorflow framework but can Tesorflow supports Cuda-11.0 or I need to install any other version on Cuda.
Can anyone brief me about how I should set up my development environment? I am using Ubuntu-20.10 with Nvidia’s GPU.
You can use cuda-11.0, It is supported now as per this https://www.tensorflow.org/install/source#gpu
This comment has been minimized.
Copy link Quote reply
hrithikppawar commented Mar 9, 2021
Hello!
I am going to start a project on Object Detection so I want to use the Tensorflow framework but can Tesorflow supports Cuda-11.0 or I need to install any other version on Cuda.
Can anyone brief me about how I should set up my development environment? I am using Ubuntu-20.10 with Nvidia’s GPU.
Thank you for your response!
I successfully installed the cuda-11.0 and it is working great with tensorflow.
I think the best configuration is:
This worked for me
This comment has been minimized.
Copy link Quote reply
tyuvraj commented May 22, 2021 •
Update:
Hey, I downloaded using package manager. Everything went great and i was able to use tensorflow on gpu. But, while running ldconfig, I see the following error:
/sbin/ldconfig.real: /usr/local/cuda-11.0/targets/x86_64-linux/lib/libcudnn_ops_train.so.8 is not a symbolic link /sbin/ldconfig.real: /usr/local/cuda-11.0/targets/x86_64-linux/lib/libcudnn_ops_infer.so.8 is not a symbolic link /sbin/ldconfig.real: /usr/local/cuda-11.0/targets/x86_64-linux/lib/libcudnn_adv_train.so.8 is not a symbolic link /sbin/ldconfig.real: /usr/local/cuda-11.0/targets/x86_64-linux/lib/libcudnn_cnn_infer.so.8 is not a symbolic link /sbin/ldconfig.real: /usr/local/cuda-11.0/targets/x86_64-linux/lib/libcudnn_cnn_train.so.8 is not a symbolic link /sbin/ldconfig.real: /usr/local/cuda-11.0/targets/x86_64-linux/lib/libcudnn_adv_infer.so.8 is not a symbolic link /sbin/ldconfig.real: /usr/local/cuda-11.0/targets/x86_64-linux/lib/libcudnn.so.8 is not a symbolic link
To check I went to:
/usr/local/cuda-11.0/targets/x86_64-linux/lib
and did:
ls -ln
Among all the symlinks I got as my ouput, I saw:
-rwxr-xr-x 1 0 0 98957080 Nov 18 13:54 libcudnn_adv_infer.so
-rwxr-xr-x 1 0 0 98957080 Nov 18 13:54 libcudnn_adv_infer.so.8
-rwxr-xr-x 1 0 0 98957080 Nov 18 13:54 libcudnn_adv_infer.so.8.0.5
-rwxr-xr-x 1 0 0 65344120 Nov 18 13:54 libcudnn_adv_train.so
-rwxr-xr-x 1 0 0 65344120 Nov 18 13:54 libcudnn_adv_train.so.8
-rwxr-xr-x 1 0 0 65344120 Nov 18 13:54 libcudnn_adv_train.so.8.0.5
-rwxr-xr-x 1 0 0 1288305728 Nov 18 13:55 libcudnn_cnn_infer.so
-rwxr-xr-x 1 0 0 1288305728 Nov 18 13:55 libcudnn_cnn_infer.so.8
-rwxr-xr-x 1 0 0 1288305728 Nov 18 13:55 libcudnn_cnn_infer.so.8.0.5
-rwxr-xr-x 1 0 0 58705816 Nov 18 13:55 libcudnn_cnn_train.so
-rwxr-xr-x 1 0 0 58705816 Nov 18 13:55 libcudnn_cnn_train.so.8
-rwxr-xr-x 1 0 0 58705816 Nov 18 13:55 libcudnn_cnn_train.so.8.0.5
-rwxr-xr-x 1 0 0 251390696 Nov 18 13:55 libcudnn_ops_infer.so
-rwxr-xr-x 1 0 0 251390696 Nov 18 13:55 libcudnn_ops_infer.so.8
-rwxr-xr-x 1 0 0 251390696 Nov 18 13:55 libcudnn_ops_infer.so.8.0.5
-rwxr-xr-x 1 0 0 26002104 Nov 18 13:55 libcudnn_ops_train.so
-rwxr-xr-x 1 0 0 26002104 Nov 18 13:55 libcudnn_ops_train.so.8
-rwxr-xr-x 1 0 0 26002104 Nov 18 13:55 libcudnn_ops_train.so.8.0.5
-rwxr-xr-x 1 0 0 158264 Nov 18 13:55 libcudnn.so
-rwxr-xr-x 1 0 0 158264 Nov 18 13:55 libcudnn.so.8
-rwxr-xr-x 1 0 0 158264 Nov 18 13:55 libcudnn.so.8.0.5
I got confused whether this files are to be completely removed or symlinks are to be created for then, and while copy pasting they got messed.
While searching on the web for this answer I came across one command for checking cudnn:
/sbin/ldconfig -N -v $(sed ‘s/:/ /’ /dev/null | grep libcudnn
I ran the above command (I don’t know what it means, thought of understanding how it works after seeing the output, but got even more confused), and got something like below:
sed: -e expression #1, char 1: unknown command: ‘�’
libcudnn_ops_train.so.8 -> libcudnn_ops_train.so.8.0.5
libcudnn_ops_infer.so.8 -> libcudnn_ops_infer.so.8.0.5
libcudnn_adv_train.so.8 -> libcudnn_adv_train.so.8.0.5
libcudnn_cnn_infer.so.8 -> libcudnn_cnn_infer.so.8.0.5
libcudnn_cnn_train.so.8 -> libcudnn_cnn_train.so.8.0.5
libcudnn_adv_infer.so.8 -> libcudnn_adv_infer.so.8.0.5
libcudnn.so.8 -> libcudnn.so.8.0.5
Now, I don’t know what to do whether to generate symlinks or remove libcudnn* files from /usr/local/cuda-11.0/targets/x86_64-linux/lib.
Kindly help me.
Thank you in advance 🙂
PS: If I have to create symlinks, then it would be helpful if I can get an example using one of the ones that have to be created, I just started using linux and am not to familiar with it. 🙂
Источник


