- How to Play in Windows Game Mode
- Enable Windows 10 Game Mode to enhance gaming performance
- How Windows 10 Game Mode Differs From Standard Windows Mode
- How to Enable Game Mode
- Enable Game Mode From Game Bar
- Game Bar
- Advanced Game Bar Options
- OkeyGeek .
- How to run a game in windowed mode
- Using game settings
- Using “hot keys”
- Using “-window” property for shortcut
- Using third party applications
- Utilities for launching a game in a windowed mode
- Emulators to launch a game in a windowed mode
- Play a Computer Game in Windowed Mode
- Multitask while you play
- Check for the Easy Button
- Make Windows Work for You
- Alternative Ways to Window a Game
- Keyboard Shortcuts
- Modify the .INI File
- Use DxWnd
- If Your Game Is Really Old.
- Virtualization
- Some Considerations
How to Play in Windows Game Mode
Enable Windows 10 Game Mode to enhance gaming performance
:max_bytes(150000):strip_icc()/JoliBallew-d00245b1a8a84e8592739e87c8546bd7.jpg)
Windows Game Mode is specifically designed to make any gaming experience faster, smoother, and more reliable. Game Mode, sometimes referred to as Windows 10 Game Mode, Gaming Mode, or Microsoft Games Mode, is available in the Windows 10 Creator’s Update. If you have the latest Windows updates, you have access to Game Mode.
Instructions in this article apply to Windows 10.
How Windows 10 Game Mode Differs From Standard Windows Mode
Windows has always performed in a default configuration often referred to as Standard Mode. Microsoft initially created this mode to provide a balance between energy usage and performance for the devices that run Windows operating systems.
The settings for power, CPU, memory and so on do indeed suit the majority of user’s needs, and most never make any changes to them. You may have experienced some of the results of those settings; the screen goes dark after a specific amount of inactivity, the Power Options are set to Balanced, and so on.
However, gamers need the computer to lean more heavily toward the performance side and less toward the energy- and resource-saving side. In the past, this meant gamers had to learn how to access the Performance options hidden in the Control Panel or even tweak the computer hardware. It’s easier now with the creation of Game Mode.
When Game Mode is enabled, Windows 10 configures the appropriate settings automatically. These settings stop or restrict unwanted tasks and unnecessary processes from running in the background, such as anti-virus scans, hard drive defragging, updates to software, and so on.
Windows also configures the system so that the CPU and any graphical CPUs will prioritize gaming tasks, to keep necessary resources as free as possible. The idea behind Game Mode is to configure the system to focus on the game, and not to tasks that aren’t important at the moment, like checking for updates to your existing Windows apps or keeping up with Twitter posts.
How to Enable Game Mode
When you start a Microsoft game for Windows, the option to enable Game Mode appears toward the bottom of the screen. All white-listed Windows games trigger this feature. To enable Game Mode you simply agree to by placing a check the option in the prompt that appears.
If you miss the prompt, don’t enable it, or if the option to enable Game Mode doesn’t appear, you can enable it from Settings.
The best way to explore Game Mode is to get a trusted game app from the Windows App Store. The first time you start the Windows game the option to enable Game Mode will appear.
Select Start > Settings. (Settings is the cog on the left side of the Start menu.)
Select Gaming in the Windows Settings window.
Select Game Mode on the left side of the Gaming window.
:max_bytes(150000):strip_icc()/gamemode-a9e91d8f5a4d481a9408308c5e33d14d.jpg)
Toggle Game Mode to On.
:max_bytes(150000):strip_icc()/gamemodeon-d5368bbcd5ae458e8f1284b65af907af.jpg)
If desired, select each entry on the left to see other options and settings:
- Game Bar to configure the Game Bar and set keyboard shortcuts.
- Game DVR to configure recording settings and configure the mic and system volume.
- Broadcasting to configure broadcast settings and configure audio quality, echo, and similar settings.
Close the Gaming window when finished. Any settings selected will be applied.
Enable Game Mode From Game Bar
You can also enable Game Mode is from the Game Bar itself.
Open a Windows game you want to play.
Press and hold the Windows key on your keyboard and then select the G key (Windows key+G).
:max_bytes(150000):strip_icc()/Capture-27d350164bc443d2835cc149dc69c673.JPG)
Select Settings on the Game Bar that appears.
From the General tab, select the box for Game Mode.
Game Bar
You can make the Game Bar appear while playing a Windows game by using the Windows key+G key combination. However, it will also disappear when you start to play the game, so when you want to see it again you’ll have to repeat that key sequence. If you want to explore the Game Bar now, open a Windows game before continuing.
You can open the Game Bar with the Windows key + G key combination even if you aren’t playing a game or don’t yet have any. All you need is an open program, like Microsoft Word or the Edge web browser. When you are prompted, check the box that implies what you have open is indeed a game, and the Game Bar will appear.
The Game Bar offers access to settings and features. One notable feature is the ability to record the game as you play it. The Game Bar also offers the option to broadcast your game. You can take screenshots too.
The settings include but are not limited to configuring Audio settings, Broadcast settings, and General settings such as configuring the mic or using Game Bar for a specific game (or not). The settings in the Game Bar include much of what you will find in Settings > Gaming.
Advanced Game Bar Options
As noted in the steps earlier you can configure what you see on the Game bar in the Settings window. One of those settings is to open the Game Bar by using the Xbox button on a gaming controller. This is an important point to recognize, because Game Mode, Game Bar, and other gaming features are integrated with Xbox as well. For example, you can use the Windows 10 Xbox game DVR to record your screen. This makes creating gaming videos a total breeze.
OkeyGeek .

You are here: Home » Windows » How to run a game in windowed mode
How to run a game in windowed mode
 Computers are often used not only for work, but also for entertainment, including games. A game, just like any other application on a computer, can run in full screen mode or in a windowed mode. Depending on the situation, it may be convenient to use one or another option. There are many ways to start the game in windowed mode, and each of them has its own advantages and disadvantages.
Using game settings
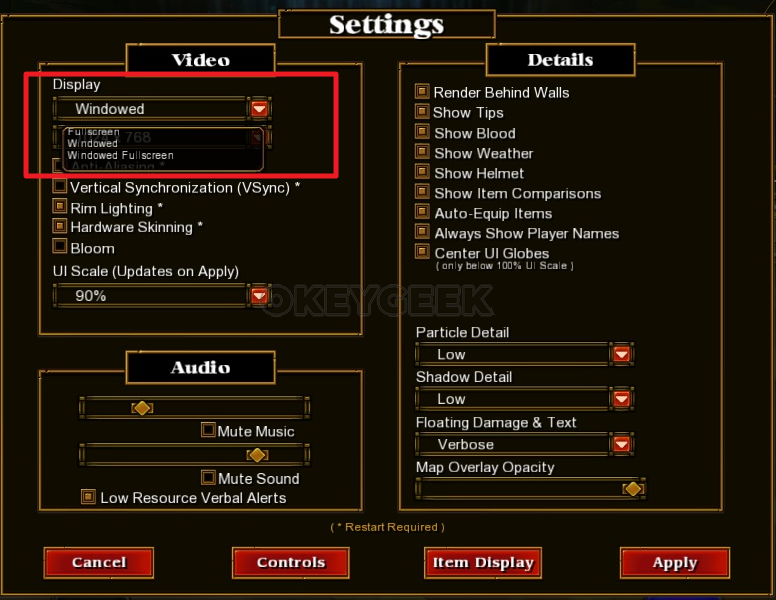
The easiest way to transfer a game from full-screen to windowed mode is to use the game settings. Most often, the switch between the window mode and the regular mode is in the “Display” or “Graphics” options. However, not all games allow you to do this.
Using “hot keys”
Experienced Windows users perfectly know a set of “hot keys” that allows to switch from one version of the system to another and to quickly perform all sorts of actions. There is a way in the system to transfer an application or game to windowed mode. To do this, it is enough to simultaneously press Alt + Enter keys on the keyboard. After that, the full screen mode will change to windowed mode or vice versa.
Using “-window” property for shortcut
If the game does not respond to any of the above methods, or there is no possibility to change its display mode in the settings, you can try adding the windowed mode parameter to the shortcut. To do this, find the game shortcut on the desktop and right-click on it. In the drop-down menu, select “Properties”. There will open a new window and in this window you need to enter the “–window” parameter. This property must be written in the “Target” column, as shown in the example below.
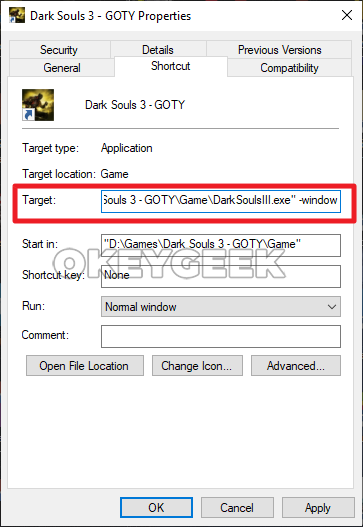
When the required parameter is registered, click “OK” to save the changes. After that, start the game through this shortcut, and it will open in windowed mode.
Using third party applications
There are two types of applications that allow you to run programs in windowed mode – these are specialized utilities and emulator applications. Let’s take a closer look at both of these options.
Utilities for launching a game in a windowed mode
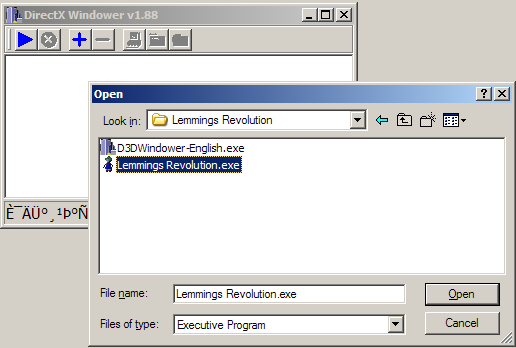
There are many auxiliary applications that allow you to start the game in windowed mode. Let’s take D3DWindower as an example. This utility can be downloaded for free from the official website of its developers. After downloading the program, follow these steps to open the game in windowed mode:
- Install applications in a folder;
- Start the application and click on the plus sign. There will open a window where you need to select the game you want, and then click on the icon with the closed folder;

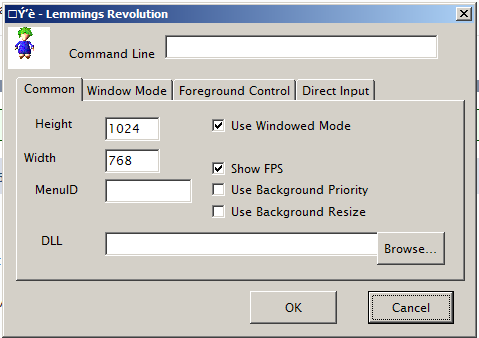
- There will open a settings window where you need to set the following parameters:
- The first two fields indicate the width and height of the window. Make sure that a check mark at the right is activated;
- In the lower right part of the window, click the button and select the file called D3DHook.dll from the folder where the D3DWindower application is installed;
- Save the settings;
- After that you only have to press the “Run program” button, which has a computer icon (this button is the third on the right).
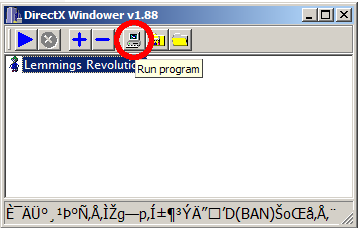
Now there will open a window where the necessary game will start.
Emulators to launch a game in a windowed mode
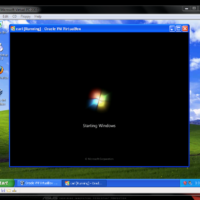
Emulators are the most difficult way and they should be used as a last resort. \this way implies a complete emulation of the operating system inside the window, followed by launching a game inside it. There are many emulators, both paid and free. Among the most famous options are Windows Virtual PC and Vmware.
Depending on which emulator you will use, the list of actions that you need to perform to start the game varies. In general, the process looks as follows:
- An emulator must be installed on the computer and started;
- Next, in the emulator, you need to specify the path to the files used to install the operating system;
- After that, you need to wait for the OS installation and restart the emulator;
- Next, you need to install your game in the emulator and start it.
 An emulator must be installed on the computer and started;
It is worth noting that for the emulator operation you will need to have about 20 GB of free space on the hard drive (only for installation). In addition, emulators are quite demanding to computer resources.
Play a Computer Game in Windowed Mode
Multitask while you play
:max_bytes(150000):strip_icc()/jonfishersquare-93eb80e77a004035887f56816d3623c5.jpg)
Most computer games take over the whole screen when you play. But, depending on whether or not the developer allows it, you might be able to play in a window instead.
The process to window a game takes just a few seconds, however, some games don’t natively support windowed mode. So, you may have to take some more involved steps to prevent those games from taking up the whole screen.
:max_bytes(150000):strip_icc()/computer-game-windowed-mode-837057-effb14649be74321b35c73e90cb0bdcd.gif)
This guide applies to Windows 10 and later.
Check for the Easy Button
Some games explicitly allow the application to run in a windowed mode. Go into the Settings menu and you’ll see options listed using varying language. If you don’t see the below options there, you might access them from the game’s launcher.
- Windowed Mode: Runs the game in a resizeable window just like any other application.
- Borderless Window Mode: Runs the game as a window, which may be full screen or not, but without the usual chrome (borders, toolbars, etc.) normal apps enjoy.
- Fullscreen (Windowed) Mode: Runs the game full-screen, but full-screen view is just a maximized window, so you can run other apps atop the game.
:max_bytes(150000):strip_icc()/001_computer-game-windowed-mode-837057-5bf4b79ec9e77c0051f52e9b.jpg)
Make Windows Work for You
The Windows operating system supports command-line switches to adjust certain start-up parameters of programs. One way to «force» an application like your favorite game to run in a windowed mode is to create a special shortcut to the program’s main executable, then configure that shortcut with the applicable command-line switch.
Right-click or tap-and-hold the shortcut for the computer game you want to play in windowed mode.
If you don’t see the shortcut on the desktop, you can make one yourself. To make a new shortcut to a game or program in Windows, either drag it to the desktop from the Start menu or right-click (or tap-and-hold if you’re on a touchscreen) the executable file and choose Send to > Desktop.
Select Properties.
:max_bytes(150000):strip_icc()/002_computer-game-windowed-mode-837057-5bf4b7d446e0fb002dcb3e7f.jpg)
In the Shortcut tab, in the Target: field, add -window or -w at the end of the file path. If one doesn’t work, try the other.
:max_bytes(150000):strip_icc()/003_computer-game-windowed-mode-837057-5bf4b7fa46e0fb00513e8a40.jpg)
Select OK.
If you receive an «Access Denied» message, you may need to confirm you’re an administrator on that computer.
If the game doesn’t support Windowed Mode play, adding a command-line switch won’t work. But, it’s worth trying. Many games, officially or unofficially, allow the Windows operating system to control how they render.
Alternative Ways to Window a Game
Here are some additional methods to try if you want to play games in windowed mode:
Keyboard Shortcuts
Some games can be recomposed into a window by pressing the Alt + Enter keys together while in the game, or by pressing Ctrl + F.
Modify the .INI File
Some games store full-screen mode settings in an .INI file. They might use the line «dWindowedMode» to define whether to run the game in windowed mode or not. If there’s a number after that line, make sure it’s 1. Some may use True/False to define that setting.
Use DxWnd
If the game relies on DirectX graphics, programs like DxWnd serve as «wrappers» offering custom configurations to force full-screen DirectX games to run in a window. DxWnd sits between the game and the Windows operating system; it intercepts system calls between the game and the OS and translates them into an output that fits into a resizable window. But again, the game must rely on DirectX graphics for this method to work.
If Your Game Is Really Old.
Some very old games from the MS-DOS era run in DOS emulators like DOSBox. DOSBox and similar programs use configuration files that specify full-screen behavior through customizable toggles.
Virtualization
Another option is to run the game through virtualization software like VirtualBox or VMware, or a Hyper-V virtual machine. Virtualization technology lets an entirely different operating system run as a guest OS within your existing operating system’s session. These virtual machines always run in a window, although you can maximize the window to get a full-screen effect.
Run a game in a virtual machine if it can’t be run in a windowed mode. As far as the game is concerned, it’s functioning like normal. The virtualization software governs its appearance as a window in its host operating system, not the game itself.
Some Considerations
There are a few things to keep in mind when attempting to modify your games:


