- Как установить компилятор gcc / g++ для Windows. Установка gcc
- 0. Прежде чем поставить компилятор GCC
- 1. Скачиваем установщик компилятора
- 2. Установка GCC
- 3. Проверка установки
- 4. Бонус. Компиляция программ с помощью GCC
- Что ещё за a.out? Непонятно!
- А Вы знаете, что мы пишем программы на C, C++, C#, Pascal и Python?
- Почему именно мы?
- Как с нами связаться?
- GCC for Windows How to install gcc in Windows 10? (the easier way)
- Installation
- Preshing on Programming
- 1. Install Cygwin
- 2. Install Required Cygwin Packages
- 3. Download, Build and Install the Latest GCC
- 4. Test the New Compiler
- Recent Posts
Как установить компилятор gcc / g++ для Windows. Установка gcc
15 декабря 2018
Время чтения: 5 минут
Для того, чтобы писать программы на C/C++ обычно достаточно установить какую-нибудь интерактивную среду разработки (IDE), например, Visual Studio или Eclipse, однако иногда (обычно в целях обучения студентов) требуется создавать программы в обыкновенном текстовом редакторе и компилировать приложение, используя консоль и компилятор gcc. В Unix системах он обычно установлен прямо «из коробки», а вот на Windows системах такой роскоши не наблюдается. Более того, у многих пользователей возникает множество проблем при установке компилятора. Поэтому нами было принято решение написать данную статью, чтобы помочь всем тем, кому пришлось или приходится мучаться с установкой этого компилятора на Windows.
Кстати, если вдруг на вашей Unix системе не установлен GCC, то поставить его можно командой sudo apt install gcc , введя свой пароль и согласившись на установку.
0. Прежде чем поставить компилятор GCC
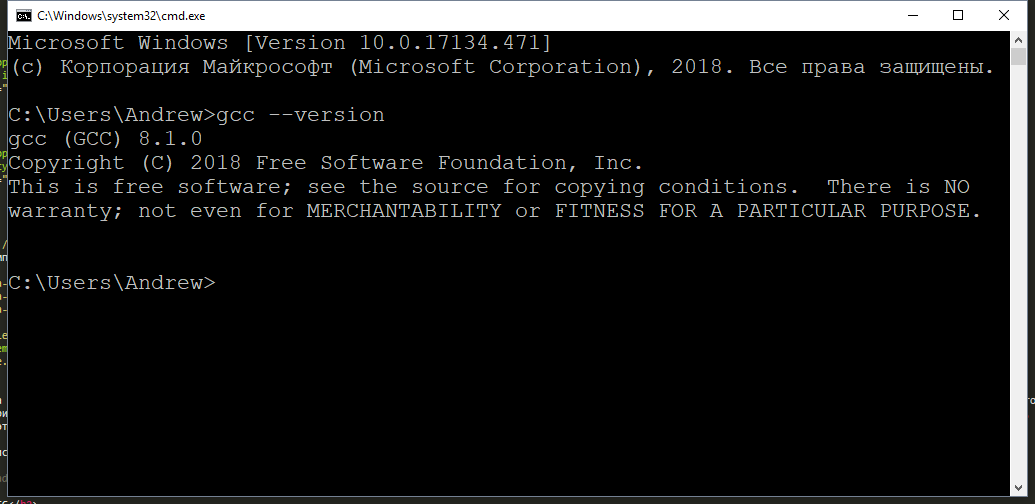
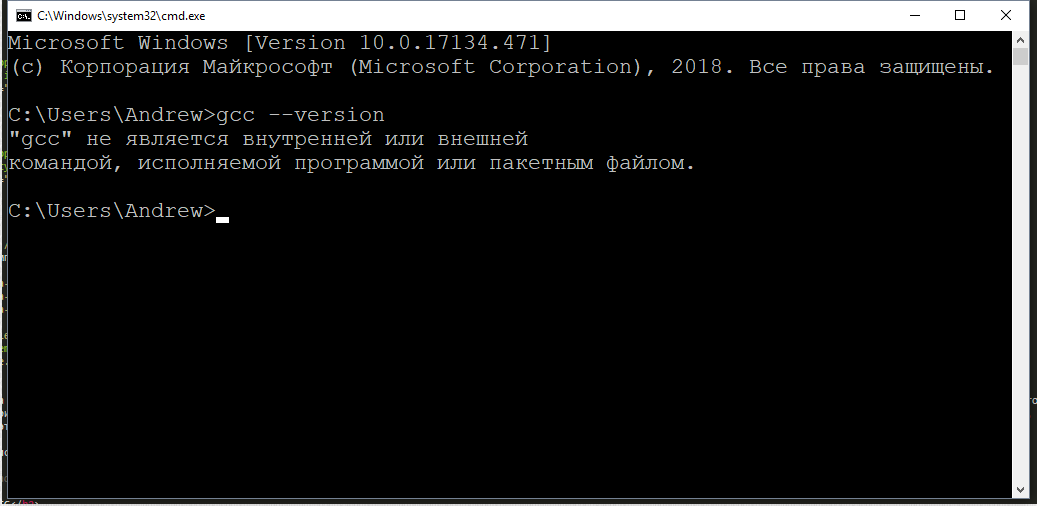
Перед тем как приступить к установке этого компилятора на ваш компьютер, убедитесь в том, что GCC ещё не установлен на нём. Для этого откройте консоль (нажмите Win + R, введите в появившемся окне cmd и нажмите клавишу Enter) и введите следующую команду: gcc —version и нажмите Enter. Если компилятор уже установлен, то выполненная команда выдаст примерно следующую информацию:
Если в окне консоли появилось сообщение с версией компилятора и другая информация о GCC (второй скриншот), значит компилятор уже установлен и больше дополнительно ничего делать не нужно. А вот если вывод командной строки такой:
— значит GCC ещё не установлен в системе, поэтому двигаемся дальше.

1. Скачиваем установщик компилятора
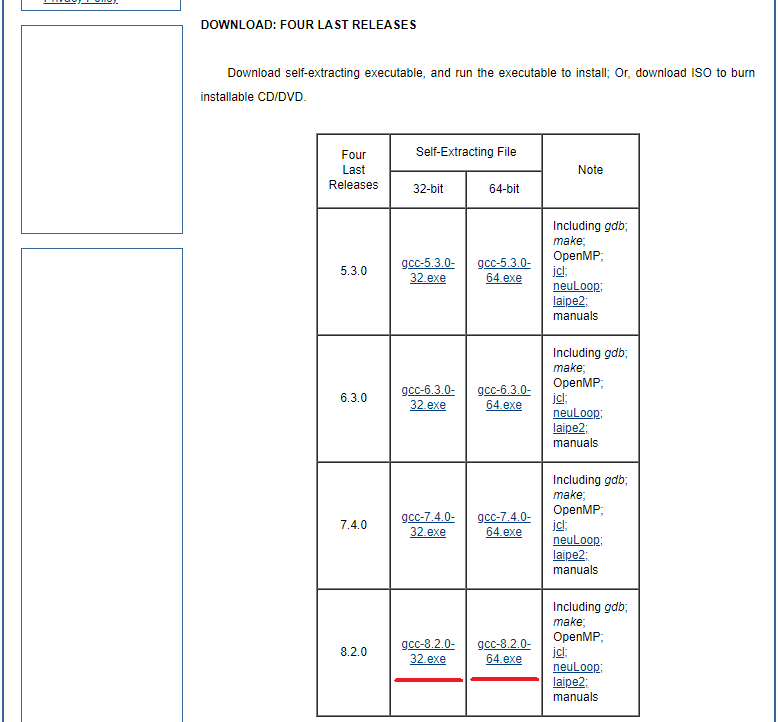
Чтобы поставить GCC на операционную систему Windows, необходимо скачать установочный файл для него. Сделать это можно здесь: equation.com/servlet/equation.cmd?fa=fortran. Найдите в таблице версию компилятора, которая вам больше нравится (мы рекомендуем скачивать самую последнюю, на текущий момент — это версия 8.2.0) и скачайте установщик для вашей системы (32 или 64 бит).
2. Установка GCC
После того, как файл был скачан, откройте в проводнике папку, в которую был скачан установщик и запустите его, кликнув по файлу дважды левой кнопкой мыши. Появится окно, требующее подтверждения действия. В нём нужно выбрать да (иначе ничего ставиться не будет).
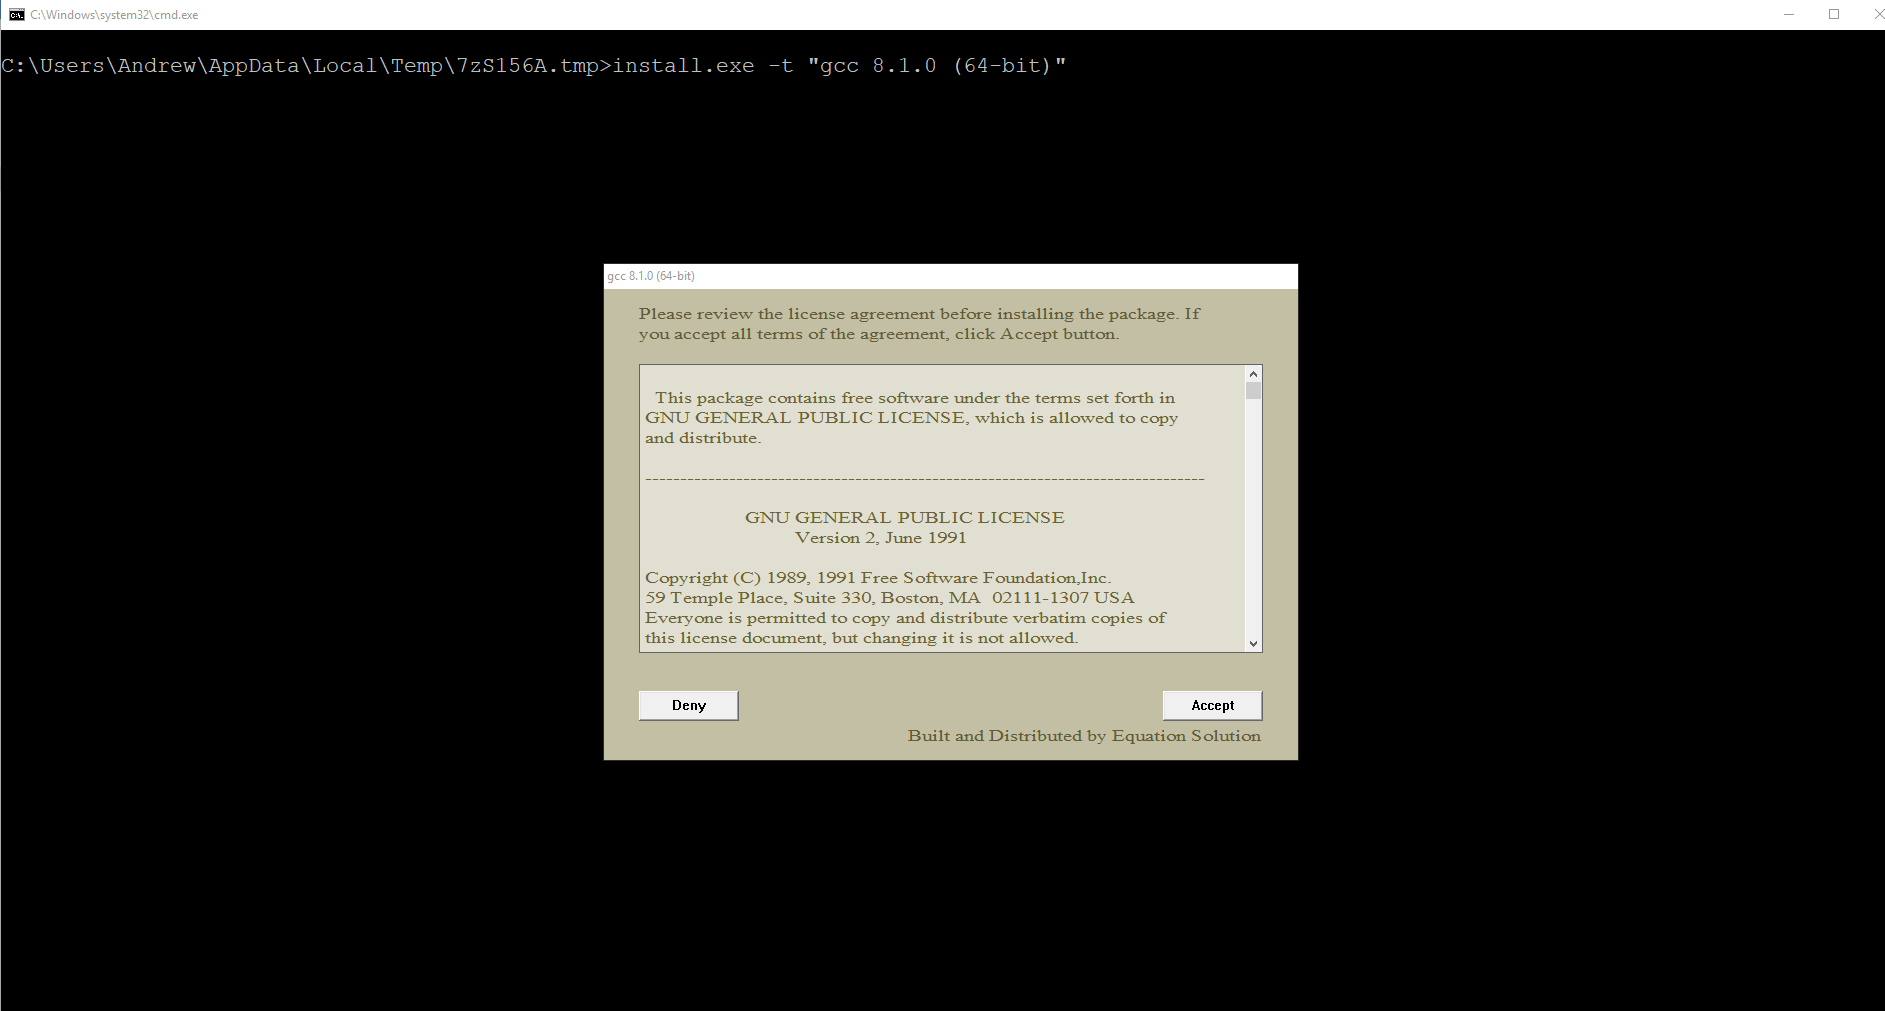
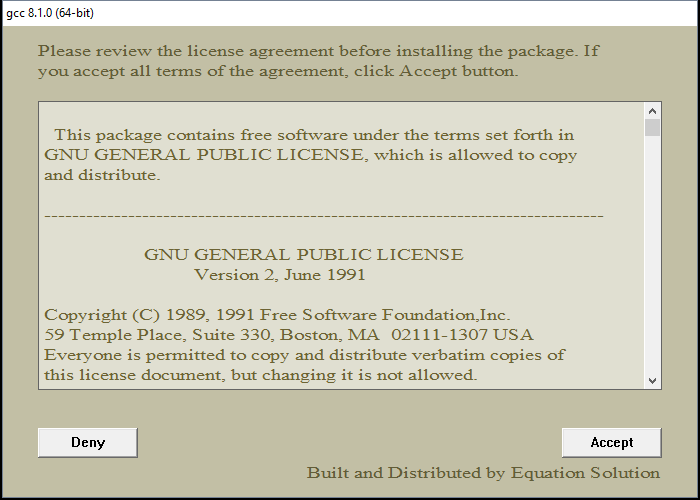
Установщик начнёт работу и отобразит окно с консолью, а также окно с бежевым фоном, в котором попросит прочесть и принять (или отклонить) лицензионное соглашение. Нажимаем Accept.
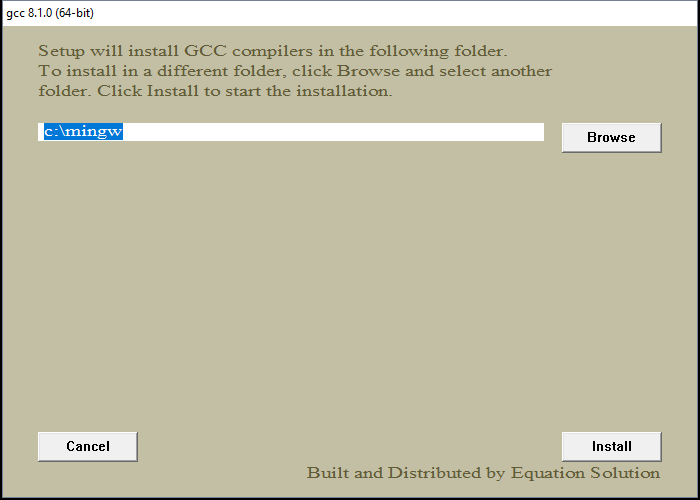
После этого установщик попросит выбрать путь для установки, предложив по умолчанию путь C:\mingw . Если вам категорически не нравится этот путь — измените его на более подходящий на ваш взгляд, в противном же случае просто нажмите Install.
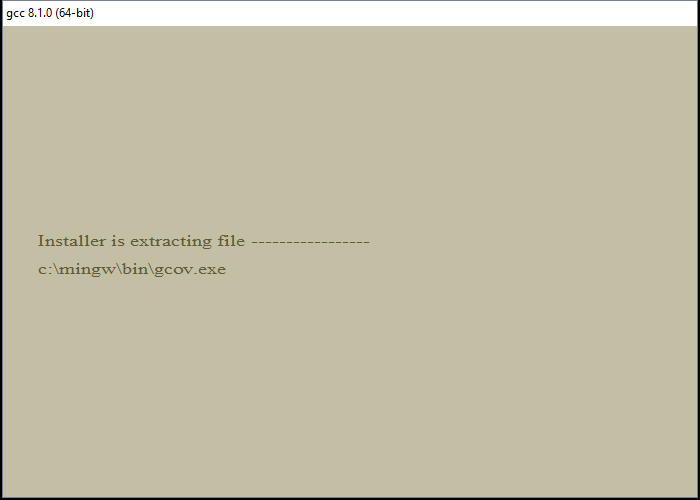
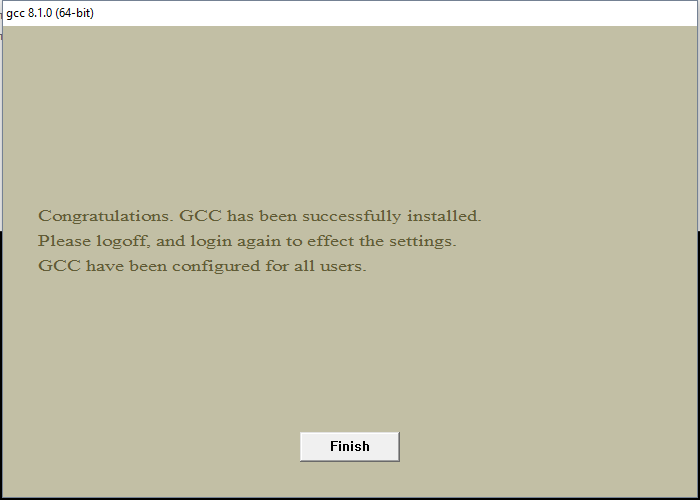
Теперь остаётся только дождаться окончания распаковки архивов и установки их на компьютер. Как только все файлы будут установлены, инсталятор сообщит об этом, после чего нужно будет нажать на кнопку Finish.
3. Проверка установки
По завершении работы установщика перезагрузите компьютер и вновь откройте окно командной строки, введите команду gcc —version и нажмите Enter. На этот раз ответ от этой команды должен будет совпадать со вторым скриншотом из пункта 0. Если это не так, то скорее всего работа установщика была некорректно или преждевременно завершена, так что просто начните установку заново.
Поздравляем! Теперь на вашем компьютере установлен компилятор GCC и вы можете писать программы на языках C и C++, а компилировать их через командную строку!
4. Бонус. Компиляция программ с помощью GCC
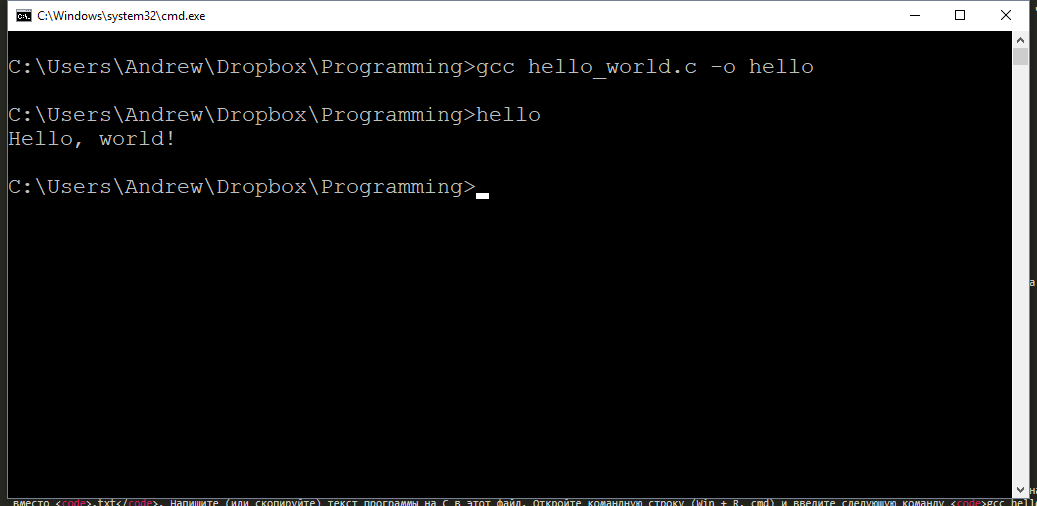
Теперь, когда у вас установлен компилятор GCC, вы можете создавать программы на C/C++, используя только текстовый редактор и консоль. Для этого создайте новый файл и назовите его как угодно (например, hello_world). Задайте ему расширение .c вместо .txt . Напишите (или скопируйте) текст программы на С в этот файл. Откройте командную строку (Win + R, cmd) и введите следующую команду gcc hello_world.c и нажмите Enter. Если код не содержит ошибок, то результатом команды будет пустота. В противном же случае вы увидите все ошибки, который нашёл компилятор в программе с указанием места этой ошибки. При этом в проводнике появится файл a.out.exe , который будет являться исполняемым файлом для написанной программы. Чтобы запустить его введите в консоли a.out (для Unix-систем нужно писать ./a.out ) и нажмите Enter.
Что ещё за a.out? Непонятно!
По умолчанию при компиляции программ GCC в качестве результата создаём исполняемый файл с именем a.out (если такой уже есть, то b.out и т.д.). Это может быть не очень удобно, если у вас в папке лежит сразу много программ, которые нужно скомпилировать и затем запустить. Неудобно хотя бы тем, что разобраться, что такое a.out, а что такое b.out и c.out может быть непросто. Именно поэтому мы рекомендуем компилировать программы с явным указанием имени выходного файла. делается это так: gcc имя_файла.c -o имя_программы .
В результате выполнения такой программы вместо a.out будет создаваться файл с именем, заданным в имя_программы. Например, если для файла hello_world.c мы хотим получить программу hello, то компилировать нужно такой командой: gcc hello_world.c -o hello .
Используя понятные имена выходных программ (исполняемых файлов), вы гарантируете себе простоту работы и сокращение времени на разбирательство спустя долгое время.

Программист, сооснователь programforyou.ru, в постоянном поиске новых задач и алгоритмов
Языки программирования: Python, C, C++, Pascal, C#, Javascript
Выпускник МГУ им. М.В. Ломоносова
А Вы знаете, что мы пишем программы на C, C++, C#, Pascal и Python?
Так что если Вам нужно написать программу на C/C++, C#, Pascal или Python — мы с радостью поможем с этим!
В том числе мы занимаемся репетиторством по информатике и программированию, а также готовим к ОГЭ и ЕГЭ!
Почему именно мы?
- Более 1800 выполненных заказов;
- Более 170 отзывов;
- Качественное решение
- Короткие сроки и привлекательные цены
- Различные акции и скидки
Как с нами связаться?

Programforyou — доверяя нам писать программы, вы получаете качественное решение в короткие сроки по привлекательной цене!
GCC for Windows How to install gcc in Windows 10? (the easier way)
GCC, abbreviation for ‘GNU C Compiler’ (and not Gulf Cooperation Council, like I’d assumed) is a necessity if you (or your pesky college) is into C Programming.
Almost all Linux distros come pre-installed with it so they are out of the trouble. But for those of you who were constant users of Windows and Command Prompt, and never felt the necessity for a C compiler, GCC seems to come out of the blue and a tough nut to install. 1000 rage-quits later, I present you this article.
This article is written so that the installation process is made easier than most of the trashy articles I had to go through.
Installation
- Go to MinGW official website and click on ‘Downloads’ on the left panel. You’ll be redirected to the site which hosts the files. Important Edit: MinGW official website is now down (as of 24th March 2021). Hence, instead of their official website, download from MinGW SourceForge page
- Look for mingw-get-setup.exe for downloading. Download it and launch the installer. Accept the terms and move on.
- You’ll now see that the installer is connecting to the Internet and downloading a lot of tiny and small files. Wait till it ends.
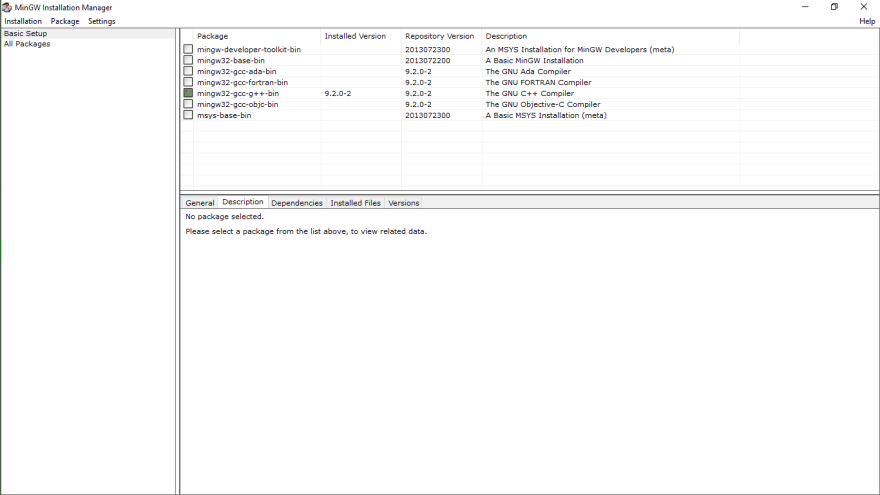
- Right when it ends (which won’t take long), you’ll be presented a window with title MinGW Installation Manager. You should be in the ‘Basic Setup’ tab by default when it launches. If not, click on Basic Setup.
- Out of the numerous check boxes presented to you on the right side, tick «mingw32-gcc-g++-bin«. If you are prompted with a menu, click on Mark for Install.
- Then on the top left corner click on Installation > Apply Changes. And wait while it downloads a billion files and installs them.
- Now you gotta edit your «Environment Variables» as well, so that gcc works in cmd no matter the file location.
- For that go to Windows Explorer > Right click on This PC > Properties > Advanced system settings > Environment Variables or you could just search for «Environment Variables» in Windows Search.
At the bottom «System Variables» panel, look for a Variable named «Path» and double click on it. Some systems show a good UI for adding a New Path easily (by clicking New), else you just need to add ; at the end and add the following path
(This is assuming you didn’t manually change any installation paths and went with just clicking ‘Next’ during installation)
Click on OK, and OK and close the other windows. Open a Command Prompt Terminal and try typing gcc —version and press Enter.
If you get something like
gcc has been successfully installed in your PC. Enjoy!
 Preshing on Programming
 Preshing on Programming
Several modern C++ features are currently missing from Visual Studio Express, and from the system GCC compiler provided with many of today’s Linux distributions. Generic lambdas – also known as polymorphic lambdas – are one such feature. This feature is, however, available in the latest versions of GCC and Clang.
The following guide will help you install the latest GCC on Windows, so you can experiment with generic lambdas and other cutting-edge C++ features. You’ll need to compile GCC from sources, but that’s not a problem. Depending on the speed of your machine, you can have the latest GCC up and running in as little as 15 minutes.
- Install Cygwin, which gives us a Unix-like environment running on Windows.
- Install a set of Cygwin packages required for building GCC.
- From within Cygwin, download the GCC source code, build and install it.
- Test the new GCC compiler in C++14 mode using the -std=c++14 option.
[Update: As a commenter points out, you can also install native GCC compilers from the MinGW-w64 project without needing Cygwin.]
1. Install Cygwin
First, download and run either the 32- or 64-bit version of the Cygwin installer, depending on your version of Windows. Cygwin’s setup wizard will walk you through a series of steps. If your machine is located behind a proxy server, make sure to check “Use Internet Explorer Proxy Settings” when you get to the “Select Your Internet Connection” step.
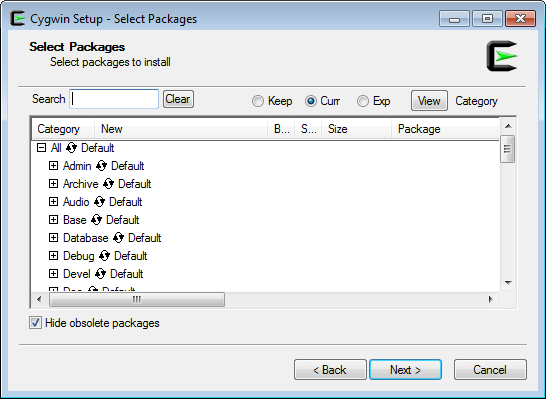
When you reach the “Select Packages” step (shown below), don’t bother selecting any packages yet. Just go ahead and click Next. We’ll add additional packages from the command line later.
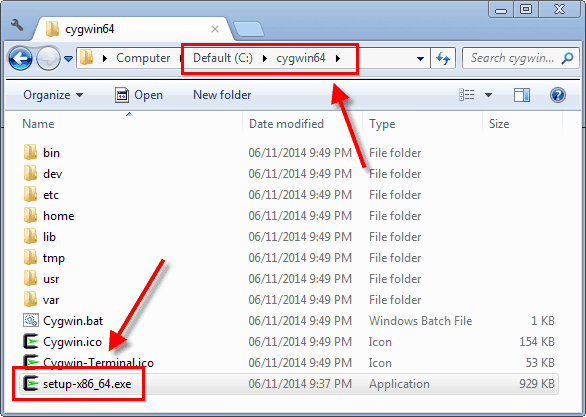
After the Cygwin installer completes, it’s very important to keep the installer around. The installer is an executable named either setup-x86.exe or setup-x86_64.exe , and you’ll need it to add or remove Cygwin packages in the future. I suggest moving the installer to the same folder where you installed Cygwin itself; typically C:\cygwin or C:\cygwin64 .
If you already have Cygwin installed, it’s a good idea to re-run the installer to make sure it has the latest available packages. Alternatively, you can install a new instance of Cygwin in a different folder.
2. Install Required Cygwin Packages
Next, you’ll need to add several packages to Cygwin. You can add them all in one fell swoop. Just open a Command Prompt (in Windows), navigate to the folder where the Cygwin installer is located, and run the following command:
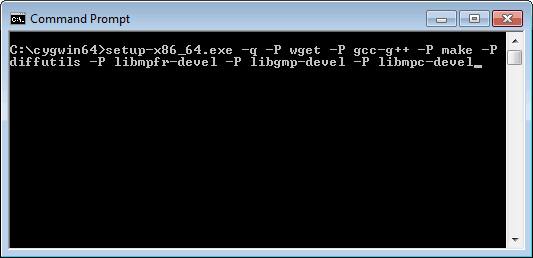
A window will pop up and download all the required packages along with their dependencies.
At this point, you now have a working GCC compiler on your system. It’s not the latest version of GCC; it’s whatever version the Cygwin maintainers chose as their system compiler. At the time of writing, that’s GCC 4.8.3. To get a more recent version of GCC, you’ll have to compile it yourself, using the GCC compiler you already have.
3. Download, Build and Install the Latest GCC
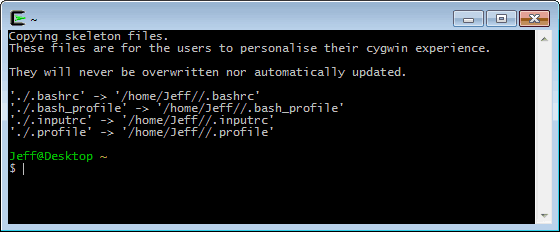
Open a Cygwin terminal, either from the Start menu or by running Cygwin.bat from the Cygwin installation folder.
If your machine is located behind a proxy server, you must run the following command from the Cygwin terminal before proceeding – otherwise, wget won’t work. This step is not needed if your machine is directly connected to the Internet.
To download and extract the latest GCC source code, enter the following commands in the Cygwin terminal. If you’re following this guide at a later date, there will surely be a more recent version of GCC available. I used 4.9.2, but you can use any version you like. Keep in mind, though, that it’s always best to have the latest Cygwin packages installed when building the latest GCC. Be patient with the tar command; it takes several minutes.
That will create a subdirectory named gcc-4.9.2 . Next, we’ll configure our GCC build. As the GCC documentation recommends, it’s best to configure and build GCC in another directory outside gcc-4.9.2 , so that’s what we’ll do.
Here’s a description of the command-line options passed to configure :
The —program-suffix=-4.9.2 option means that once our new GCC is installed, we’ll run it as g++-4.9.2 . This will make it easier for the new GCC compiler to coexist alongside the system GCC compiler provided by Cygwin.
The —enable-languages=c,c++ option means that only the C and C++ compilers will be built. Compilers for other languages, such as Fortran, Java and Go, will be excluded. This will save compile time.
The —disable-bootstrap option means that we only want to build the new compiler once. If we don’t specify —disable-bootstrap , the new compiler will be built three times, for testing and performance reasons. However, the system GCC compiler (4.8.3) provided by Cygwin is pretty recent, so —disable-bootstrap is good enough for our purposes. This will save a significant amount of compile time.
The —disable-shared option means that we don’t want to build the new standard C++ runtime library as a DLL that’s shared with other C++ applications on the system. It’s totally possible to make C++ executables work with such DLLs, but it takes care not to introduce conflicts with C++ executables created by older or newer versions of GCC. That’s something distribution maintainers need to worry about; not us. Let’s just avoid the additional headache.
By default, the new version of GCC will be installed to /usr/local in Cygwin’s virtual filesystem. This will make it easier to launch the new GCC, since /usr/local/bin is already listed in Cygwin’s PATH environment variable. However, if you’re using an existing Cygwin installation, it might prove difficult to uninstall GCC from /usr/local later on (if you so choose), since that directory tends to contain files from several different packages. If you prefer to install the new GCC to a different directory, add the option —prefix=/path/to/directory to the above configure command.
We’re not going to build a new Binutils, which GCC relies on, because the existing Binutils provided by Cygwin is already quite recent. We’re also skipping a couple of packages, namely ISL and CLooG, which means that the new compiler won’t be able to use any of the Graphite loop optimizations.
Next, we’ll actually build the new GCC compiler suite, including C, C++ and the standard C++ library. This is the longest step.
The -j4 option lets the build process spawn up to four child processes in parallel. If your machine’s CPU has at least four hardware threads, this option makes the build process run significantly faster. The main downside is that it jumbles the output messages generated during the build process. If your CPU has even more hardware threads, you can specify a higher number with -j . For comparison, I tried various numbers on a Xeon-based machine having 12 hardware threads, and got the following build times:
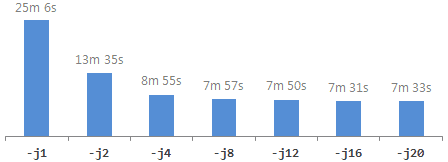
Be warned: I encountered a segmentation fault the first time I ran with -j4 . Bad luck on my part. If that happens to you, running the same command a second time should allow the build process to finish successfully. Also, when specifying higher numbers with -j , there are often strange error messages at the end of the build process involving “jobserver tokens”, but they’re harmless.
Once that’s finished, install the new compiler:
This installs several executables to /usr/local/bin ; it installs the standard C++ library’s include files to /usr/local/include/c++/4.9.2 ; and it installs the static standard C++ library to /usr/local/lib , among other things. Interestingly, it does not install a new standard C library! The new compiler will continue to use the existing system C library that came with Cygwin.
If, later, you decide to uninstall the new GCC compiler, you have several options:
- If you installed GCC to a directory other than /usr/local , and that directory contains no other files, you can simply delete that directory.
- If you installed GCC to /usr/local , and there are files from other packages mixed into the same directory tree, you can run the list_modifications.py script from this post to determine which files are safe to delete from /usr/local .
- You can simply uninstall Cygwin itself, by deleting the C:\cygwin64 folder in Windows, along with its associated Start menu entry.
4. Test the New Compiler
All right, let’s compile some code that uses generic lambdas! Generic lambdas are part of the C++14 standard. They let you pass arguments to lambda functions as auto (or any templated type), like the one highlighted below. Create a file named test.cpp with the following contents:
You can add files to your home directory in Cygwin using any Windows-based text editor; just save them to the folder C:\cygwin64\home\Jeff (or similar) in Windows.
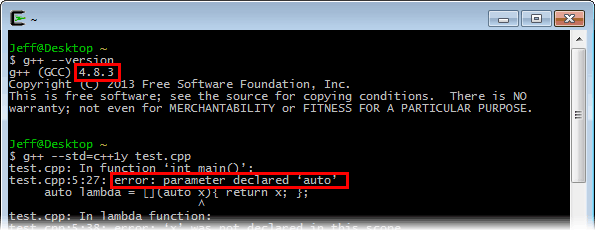
First, let’s see what happens when we try to compile it using the system GCC compiler provided by Cygwin:
If the system compiler version is less than 4.9, compilation will fail:
Now, let’s try it again using our freshly built GCC compiler. The new compiler is already configured to locate its include files in /usr/local/include/c++/4.9.2 and its static libraries in /usr/local/lib . All we need to do is run it:

Check out Plywood, a cross-platform, open source C++ framework:
Recent Posts
Copyright © 2021 Jeff Preshing — Powered by Octopress


