- Start your PC in safe mode in Windows 10
- Windows Setup: Installing using the MBR or GPT partition style
- Why should I convert my drive?
- Reformatting the drive using a different partition style
- Make sure Windows Setup boots to the correct firmware mode
- Windows Setup Supported Platforms and Cross-Platform Deployments
- Firmware considerations: BIOS vs. UEFI
- Firmware: BIOS 32-bit and 64-bit
- Using Windows Setup to Install Previous Versions of Windows
- Cross-Platform Deployment
- Limitations of cross-platform deployment
- Creating a .wim file for multiple architecture types
- Installing 64-bit drivers
- Hardware considerations: Encrypted Hard Drives (e-Drives)
Start your PC in safe mode in Windows 10
Safe mode starts Windows in a basic state, using a limited set of files and drivers. If a problem doesn’t happen in safe mode, this means that default settings and basic device drivers aren’t causing the issue. Observing Windows in safe mode enables you to narrow down the source of a problem, and can help you troubleshoot problems on your PC.
There are two versions of safe mode: Safe Mode and Safe Mode with Networking. Safe Mode with Networking adds the network drivers and services you’ll need to access the Internet and other computers on your network.
Select from the following sections to find out how to start your PC in safe mode from Settings, from the sign-in screen, or from a black or blank screen.
Press Windows logo key + I on your keyboard to open Settings. If that doesn’t work, select the Start button, then select Settings .
Under Advanced startup, select Restart now.
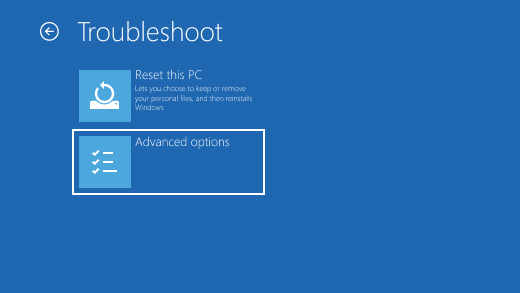
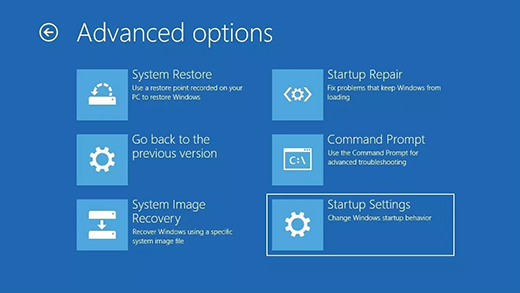
After your PC restarts to the Choose an option screen, select Troubleshoot > Advanced options > Startup Settings > Restart. You may be asked to enter your BitLocker recovery key.


After your PC restarts, you’ll see a list of options. Select 4 or press F4 to start your PC in Safe Mode. Or if you’ll need to use the Internet, select 5 or press F5 for Safe Mode with Networking.
When you can’t open Settings to get into safe mode, restart your device from the Windows sign-in screen.
On the Windows sign-in screen, press and hold the Shift key while you select the Power > Restart .
After your PC restarts to the Choose an option screen, select Troubleshoot > Advanced options > Startup Settings > Restart. You may be asked to enter your BitLocker recovery key.
After your PC restarts, you’ll see a list of options. Select 4 or F4 to start your PC in safe mode. Or if you’ll need to use the Internet, select 5 or F5 for Safe Mode with Networking.
Note: If you’ve encrypted your device, you’ll need your BitLocker key to start in safe mode.
Before you enter safe mode, you need to enter the Windows Recovery Environment (winRE). To do this, you will repeatedly turn your device off, then on:
Hold down the power button for 10 seconds to turn off your device.
Press the power button again to turn on your device.
On the first sign that Windows has started (for example, some devices show the manufacturer’s logo when restarting) hold down the power button for 10 seconds to turn off your device.
Press the power button again to turn on your device.
When Windows restarts, hold down the power button for 10 seconds to turn off your device.
Press the power button again to turn on your device.
Allow your device to fully restart. You will enter winRE.
Now that you are in winRE, you will follow these steps to take you to safe mode:
On the Choose an option screen, select Troubleshoot > Advanced options > Startup Settings > Restart.
After your device restarts, you’ll see a list of options. Select option 5 from the list or press F5 for Safe Mode with Networking.
If you need more info on a black or blank screen error, see Troubleshoot black or blank screen errors.
Notes: If you need to exit safe mode, simply restart your device, or:
Press the Windows logo key + R.
Type msconfig in the Open box and then select OK.
Select the Boot tab.
Under Boot options, clear the Safe boot checkbox.
Windows Setup: Installing using the MBR or GPT partition style
When installing Windows on UEFI-based PCs using Windows Setup, your hard drive partition style must be set up to support either UEFI mode or legacy BIOS-compatibility mode.
For example, if you receive the error message: “Windows cannot be installed to this disk. The selected disk is not of the GPT partition style”, it’s because your PC is booted in UEFI mode, but your hard drive is not configured for UEFI mode. You’ve got a few options:
Reboot the PC in legacy BIOS-compatibility mode. This option lets you keep the existing partition style. For more info, see Boot to UEFI Mode or Legacy BIOS mode.
Configure your drive for UEFI by using the GPT partition style. This option lets you use the PC’s UEFI firmware features.
You can preserve your data and convert the drive using the MBR2GPT tool. You can also choose to reformat the drive using the instructions below. Reformatting will erase all the data on the drive.
Why should I convert my drive?
Many PCs now include the ability to use the UEFI version of BIOS, which can speed up boot and shutdown times and can provide additional security advantages. To boot your PC in UEFI mode, you’ll need to use a drive formatted using the GPT drive format.
Many PCs are ready to use UEFI, but include a compatibility support module (CSM) that is set up to use the legacy version of BIOS. This version of BIOS was developed in the 1970s and provides compatibility to a variety of older equipment and network configurations, and requires a drive that uses the MBR drive format.
However, the basic MBR drive format does not support drives over 4TB. It’s also difficult to set up more than four partitions. The GPT drive format lets you set up drives that are larger than 4 terabytes (TB), and lets you easily set up as many partitions as you need.
Reformatting the drive using a different partition style
To wipe and convert the drive by using Windows Setup
Turn off the PC, and put in the Windows installation DVD or USB key.
Boot the PC to the DVD or USB key in UEFI mode. For more info, see Boot to UEFI Mode or Legacy BIOS mode.
When choosing an installation type, select Custom.
On the Where do you want to install Windows? screen, select each of the partitions on the drive, and select Delete. The drive will show a single area of unallocated space.
Select the unallocated space and click Next. Windows detects that the PC was booted into UEFI mode, and reformats the drive using the GPT drive format, and begins the installation.
To manually wipe a drive and convert it to GPT:
Turn off the PC, and put in the Windows installation DVD or USB key.
Boot the PC to the DVD or USB key in UEFI mode. For more info, see Boot to UEFI Mode or Legacy BIOS mode.
From inside Windows Setup, press Shift+F10 to open a command prompt window.
Open the diskpart tool:
Identify the drive to reformat:
Select the drive, and reformat it:
Close the command prompt window.
Continue the Windows Setup installation.
When choosing an installation type, select Custom. The drive will appear as a single area of unallocated space.
Select the unallocated space and click Next. Windows begins the installation.
Make sure Windows Setup boots to the correct firmware mode
To automate this process, you’ll need to run Windows Setup through Windows PE, and use a script to detect which mode you’re in before installing Windows. For more info, see WinPE: Boot in UEFI or legacy BIOS mode.
Windows Setup Supported Platforms and Cross-Platform Deployments
This topic describes the supported platforms and deployment scenarios for running for Windows Setup.
When you’re deploying different types of PCs, you can use Windows Setup as a way to choose between your images through the Windows Setup user interface to select a specific image. You can include images for a variety of hardware platforms (such as BIOS and UEFI, 32-bit and 64-bit PCs), and across different versions of Windows (such as Windows 8.1, Windows Server 2012 R2, and Windows 7).
You can also run Windows Setup through a script. Boot the PC to Windows PE, and then use the \sources\setup.exe file to specify your image.
Firmware considerations: BIOS vs. UEFI
For UEFI-based PCs that support booting into either UEFI or legacy BIOS modes, make sure your PC is booted into the correct firmware mode before starting Windows Setup. Otherwise, Windows Setup may set up the hard drive partitions incorrectly, or may abort the installation if the hard drives are preconfigured. For more information, see WinPE: Boot in UEFI or legacy BIOS mode.
Firmware: BIOS 32-bit and 64-bit
To set up a single environment or set of scripts that can deploy Windows to both 32-bit and 64-bit BIOS PCs, use a 32-bit version of Windows PE and a 32-bit version of Windows Setup.
The 64-bit version of Windows Setup does not run on the 32-bit version of Windows PE.
To install a 64-bit version of Windows from a 32-bit version of Windows PE:
Boot the PC using the 32-bit version of Windows PE.
Use any of the following techniques to install a 64-bit version of Windows:
Run a 32-bit version of Windows Setup, and use the /InstallFrom command-line option to select a 64-bit Windows image:
Run a 32-bit version of Windows Setup, and use the Microsoft-Windows-Setup\ImageInstall\OSImage\ InstallFrom unattend setting to select a 64-bit Windows image.
Use image-capturing tools to apply a 64-bit version of Windows to the PC.
WarningВ В This procedure does not support deploying Windows 7.
Using Windows Setup to Install Previous Versions of Windows
You can use the Windows 8.1 and WindowsВ Server 2012 R2 versions of Windows Setup to install previous versions of Windows:
| Host Operating System | Windows 8.1 Setup Support | |||||||
|---|---|---|---|---|---|---|---|---|
| Version of Windows Setup | Windows PE 5.0 (Windows 8.1) | WindowsВ PE 4.0 (WindowsВ 8) | WindowsВ PE 3.0 (WindowsВ 7) | WindowsВ PE 2.0 (WindowsВ Vista) |
|---|---|---|---|---|
| 64-Bit Windows 8.1 image | 32-bit Windows 8.1 image | 64-Bit WindowsВ 8 image | 32-bit WindowsВ 8 image |
|---|---|---|---|


