- Run a Java Application from the Command Line
- Get started with Spring 5 and Spring Boot 2, through the Learn Spring course:
- 1. Overview
- 2. Create a JAR Application
- 3. Java Command Line Arguments
- 4. Run an Executable JAR with Arguments
- 5. Run a Non-Executable JAR with Arguments
- 6. Conclusion
- Run a .jar file on Windows 7
- 3 Answers 3
- Guide to Creating and Running a Jar File in Java
- Get started with Spring 5 and Spring Boot 2, through the Learn Spring course:
- 1. Overview
- 2. Java Program Setup
- 3. Jar Command
- 3.1. Using the Defaults
- 3.2. Setting the Main Class
- 3.3. Updating the Contents
- 3.4. Setting a Manifest File
- 3.5. Verbose Output
- 4. Using Maven
- 4.1. Default Configuration
- 4.2. Indicating the Main Class
- 5. Using Spring Boot
- 5.1. Using Maven and Defaults
- 5.2. Setting the Entry Point
- 6. Running the Jar
- 6.1. Inferring the Main Class
- 6.2. Specifying the Main Class
- 6.3. Listing the Contents of a Jar
- 6.4. Viewing the Manifest File
- 7. Conclusion
- Работа с Java в командной строке
- От простого к .
- Один файл
- Отделяем бинарные файлы от исходников
- Используем пакеты
- Если в программе несколько файлов
- Если удивляет результат
- Хорошо бы протестировать
- Создадим библиотеку
- Надо узнать, что у библиотеки внутри
- Лучше снабдить библиотеку документацией
- Можно подписать jar-архив
- Использование библиотеки
- Собираем программу
- Первый способ
- Второй способ
- Третий способ
- Запуск исполняемого jar-файла
- Как быть с приложениями JavaEE
Run a Java Application from the Command Line
Last modified: December 7, 2019
Get started with Spring 5 and Spring Boot 2, through the Learn Spring course:
If you have a few years of experience in the Java ecosystem, and you’re interested in sharing that experience with the community (and getting paid for your work of course), have a look at the «Write for Us» page. Cheers, Eugen
1. Overview
Typically, every meaningful application includes one or more JAR files as dependencies. However, there are times a JAR file itself represents a standalone application or a web application.
We’ll focus on the standalone application scenario in this article. Hereafter, we’ll refer to it as a JAR application.
In this tutorial, we’ll first learn how to create a JAR application. Later, we’ll learn how to run a JAR application with or without command-line arguments.
2. Create a JAR Application
A JAR file can contain one or more main classes. Each main class is the entry point of an application. So, theoretically, a JAR file can contain more than one application, but it has to contain at least one main class to be able to run.
A JAR file can have one entry point set in its manifest file. In this case, the JAR file is an executable JAR. The main class has to be included in that JAR file.
First of all, let’s see a quick example of how to compile our classes and create an executable JAR with a manifest file:
A non-executable JAR is simply a JAR file that doesn’t have a Main-Class defined in the manifest file. As we’ll see later, we can still run a main class that’s contained in the JAR file itself.
Here’s how we would create a non-executable JAR without a manifest file:
3. Java Command Line Arguments
Just like any application, a JAR application accepts any number of arguments, including zero arguments. It all depends on the application’s need.
This allows the user to specify configuration information when the application is launched.
As a result, the application can avoid hardcoded values, and it still can handle many different use cases.
An argument can contain any alphanumeric characters, unicode characters and possibly some special characters allowed by the shell, for example ‘@’.
Arguments are separated by one or more spaces. If an argument needs to contain spaces, the spaces have to be enclosed between quotes. Either single quotes or double quotes work fine.
Usually, for a typical Java application, when invoking the application, the user enters command-line arguments after the name of the class.
However, it’s not always the case for JAR applications.
As we have already discussed, the entry point of a Java main class is the main method. The arguments are all Strings and are passed to the main method as a String array.
That said, inside the application, we can convert any element of the String array to other data types, such as char, int, double, their wrapper classes, or other appropriate types.
4. Run an Executable JAR with Arguments
Let’s see the basic syntax for running an executable JAR file with arguments:
java -jar jar-file-name [args …]
The executable JAR created earlier is a simple application that just prints out the arguments passed in. We can run it with any number of arguments. Below is an example with two arguments:
We’ll see the following output in the console:
So, when invoking an executable JAR, we don’t need to specify the main class name on the command line. We simply add our arguments after the JAR file name. If we do provide a class name after the executable JAR file name, it simply becomes the first argument to the actual main class.
Most times, a JAR application is an executable JAR. An executable JAR can have a maximum of one main class defined in the manifest file.
Consequently, other applications in the same executable JAR file can’t be set in the manifest file, but we can still run them from the command line just like we would for a non-executable JAR. We’ll see exactly how in the next section.
5. Run a Non-Executable JAR with Arguments
To run an application in a non-executable JAR file, we have to use -cp option instead of -jar. We’ll use the -cp option (short for classpath) to specify the JAR file that contains the class file we want to execute:
java -cp jar-file-name main-class-name [args …]
As you can see, in this case, we’ll have to include the main class name in the command line, followed by arguments.
The non-executable JAR created earlier contains the same simple application. We can run it with any (including zero) arguments. Here’s an example with two arguments:
And, just like we saw above, we’ll see the following output:
6. Conclusion
In this tutorial, we learned two ways of running a JAR application on the command line with or without arguments.
We also demonstrated that an argument could contain spaces and special characters (when allowed by the shell).
As always, the code for the examples is available over on GitHub.
Run a .jar file on Windows 7
I have downloaded a .jar file and it won’t run on my computer. I have installed Java RE 5.0 and have Java 7 update 72. Every time I double click on the file it pops up and closes.
I have reinstalled the java re and java 7u72 and still no success.
Any help with running executable .jar file on windows 7?
3 Answers 3
By default, java does not run in windows mode, maybe it’s just a console java program.
The .jar file must have a lib folder in the folder the .jar is in to open a window (without using native java libraries). If it doesn’t, then the .jar won’t open any windows, as it needs external libraries to do so. However, if your .jar isn’t meant to open any windows, then it has been performing as expected. Try running your .jar from the command line:
Have you checked the Environment Variables? Maybe the variable PATH is not specified. Besides, you can try this:
If it doesn’t work, try to configure the Environment Variables:
Note: You may see a PATH environment variable similar to the following when editing it from the Control Panel:
Variables enclosed in percentage signs (%) are existing environment variables. If one of these variables is listed in the Environment Variables window from the Control Panel (such as JAVA_HOME), then you can edit its value. If it does not appear, then it is a special environment variable that the operating system has defined. For example, SystemRoot is the location of the Microsoft Windows system folder. To obtain the value of a environment variable, enter the following at a command prompt. (This example obtains the value of the SystemRoot environment variable):
Guide to Creating and Running a Jar File in Java
Last modified: August 5, 2020
Get started with Spring 5 and Spring Boot 2, through the Learn Spring course:
If you have a few years of experience in the Java ecosystem, and you’re interested in sharing that experience with the community (and getting paid for your work of course), have a look at the «Write for Us» page. Cheers, Eugen
1. Overview
Usually, it’s convenient to bundle many Java class files into a single archive file.
In this tutorial, we’re going to cover the ins and outs of working with jar – or Java ARchive – files in Java.
Specifically, we’ll take a simple application and explore different ways to package and run it as a jar. We’ll also answer some curiosities like how to easily read a jar’s manifest file along the way.
2. Java Program Setup
Before we can create a runnable jar file, our application needs to have a class with a main method. This class provides our entry point into the application:
3. Jar Command
Now that we’re all set up let’s compile our code and create our jar file.
We can do this with javac from the command line:
The javac command creates JarExample.class in the com/baeldung/jar directory. We can now package that into a jar file.
3.1. Using the Defaults
To create the jar file, we are going to use the jar command.
To use the jar command to create a jar file, we need to use the c option to indicate that we’re creating a file and the f option to specify the file:
3.2. Setting the Main Class
It’s helpful for the jar file manifest to include the main class.
The manifest is a special file in a jar located the META-INF directory and named MANIFEST.MF. The manifest file contains special meta information about files within the jar file.
Some examples of what we can use a manifest file for include setting the entry point, setting version information and configuring the classpath.
By using the e option, we can specify our entry point, and the jar command will add it to the generated manifest file.
Let’s run jar with an entry point specified:
3.3. Updating the Contents
Let’s say we’ve made a change to one of our classes and recompiled it. Now, we need to update our jar file.
Let’s use the jar command with the u option to update its contents:
3.4. Setting a Manifest File
In some cases, we may need to have more control over what goes in our manifest file. The jar command provides functionality for providing our own manifest information.
Let’s add a partial manifest file named example_manifest.txt to our application to set our entry point:
The manifest information we provide we’ll be added to what the jar command generates, so it’s the only line we need in the file.
It’s important that we end our manifest file with a newline. Without the newline, our manifest file will be silently ignored.
With that setup, let’s create our jar again using our manifest information and the m option:
3.5. Verbose Output
If we want more information out of the jar command, we can simply add the v option for verbose.
Let’s run our jar command with the v option:
4. Using Maven
4.1. Default Configuration
We can also use Maven to create our jar. Since Maven favors convention over configuration, we can just run package to create our jar file.
By default, our jar file will be added to the target folder in our project.
4.2. Indicating the Main Class
We can also configure Maven to specify the main class and create an executable jar file.
5. Using Spring Boot
5.1. Using Maven and Defaults
If we’re using Spring Boot with Maven, we should first confirm that our packaging setting is set to jar rather than war in our pom.xml file.
Once we know that’s configured, we can run the package goal:
5.2. Setting the Entry Point
Setting our main class is where we find differences between creating a jar with a regular Java application and a fat jar for a Spring Boot application. In a Spring Boot application, the main class is actually org.springframework.boot.loader.JarLauncher.
Although our example isn’t a Spring Boot application, we could easily set it up to be a Spring Boot console application.
Our main class should be specified as the start class:
6. Running the Jar
Now that we’ve got our jar file, we can run it. We run jar files using the java command.
6.1. Inferring the Main Class
Since we’ve gone ahead and made sure our main class is specified in the manifest, we can use the -jar option of the java command to run our application without specifying the main class:
6.2. Specifying the Main Class
We can also specify the main class when we’re running our application. We can use the -cp option to ensure that our jar file is in the classpath and then provide our main class in the package.className format:
Using path separators instead of package format also works:
6.3. Listing the Contents of a Jar
We can use the jar command to list the contents of our jar file:
6.4. Viewing the Manifest File
Since it can be important to know what’s in our MANIFEST.MF file, let’s look at a quick and easy way we can peek at the contents without leaving the command line.
Let’s use the unzip command with the -p option:
7. Conclusion
In this tutorial, we set up a simple Java application with a main class.
Then we looked at three ways of creating jar files: using the jar command, with Maven and with a Maven Spring Boot application.
After we created our jar files, we returned to the command line and ran them with an inferred and a specified main class.
We also learned how to display the contents of a file and how to display the contents of a single file within a jar.
Both the plain Java example and the Spring Boot example are available over on GitHub.
Работа с Java в командной строке
От простого к .
Каждая программа обычно содержится в отдельном каталоге. Я придерживаюсь правила создавать в этом каталоге по крайней мере две папки: src и bin. В первой содержатся исходные коды, во второй — результат компиляции. В данных папках будет структура каталогов, зависящая от пакетов.
Один файл
Можно сделать и без лишних папок.
Берем сам файл HelloWorld.java.
Переходим в каталог, где лежит данный файл, и выполняем команды.
В данной папке появится файл HelloWorld.class. Значит программа скомпилирована. Чтобы запустить
Отделяем бинарные файлы от исходников
Теперь сделаем тоже самое, но с каталогами. Создадим каталог HelloWorld и в нем две папки src и bin.
Компилируем
Здесь мы указали, что бинарные файлы будут сохраняться в отдельную папку bin и не путаться с исходниками.
Используем пакеты
А то, вдруг, программа перестанет быть просто HelloWorld-ом. Пакетам лучше давать понятное и уникальное имя. Это позволит добавить данную программу в другой проект без конфликта имен. Прочитав некоторые статьи, можно подумать, что для имени пакета обязательно нужен домен. Это не так. Домены — это удобный способ добиться уникальности. Если своего домена нет, воспользуйтесь аккаунтом на сайте (например, ru.habrahabr.mylogin). Он будет уникальным. Учтите, что имена пакетов должны быть в нижнем регистре. И избегайте использования спецсимволов. Проблемы возникают из-за разных платформ и файловых систем.
Поместим наш класс в пакет с именем com.qwertovsky.helloworld. Для этого добавим в начало файла строчку
В каталоге src создадим дополнительные каталоги, чтобы путь к файлу выглядел так: src/com/qwertovsky/helloworld/HelloWorld.java.
Компилируем
В каталоге bin автоматически создастся структура каталогов как и в src.
Если в программе несколько файлов
HelloWorld.java
Calculator.java
Adder.java
Ошибка возникла из-за того, что для компиляции нужны файлы с исходными кодами классов, которые используются (класс Calculator). Надо указать компилятору каталог с файлами с помощью ключа -sourcepath.
Компилируем
Если удивляет результат
Есть возможность запустить отладчик. Для этого существует jdb.
Сначала компилируем с ключом -g, чтобы у отладчика была информация.
Отладчик запускает свой внутренний терминал для ввода команд. Справку по последним можно вывести с помощью команды help.
Указываем точку прерывания на 9 строке в классе Calculator
Запускаем на выполнение.
Чтобы соориентироваться можно вывести кусок исходного кода, где в данный момент находится курссор.
Узнаем, что из себя представляет переменная а.
Выполним код в текущей строке и увидим, что sum стала равняться 2.
Поднимемся из класса Adder в вызвавший его класс Calculator.
Удаляем точку прерывания
Можно избежать захода в методы, используя команду next.
Проверяем значение выражения и завершаем выполнение.
Хорошо бы протестировать
Запускаем. В качестве разделителя нескольких путей в classpath в Windows используется ‘;’, в Linux — ‘:’. В консоли Cygwin не работают оба разделителя. Возможно, должен работать ‘;’, но он воспринимается как разделитель команд.
Создадим библиотеку
Класс Calculator оказался полезным и может быть использован во многих проектах. Перенесем всё, что касается класса Calculator в отдельный проект.
Измените также назавания пакетов в исходных текстах. В HelloWorld.java нужно будет добавить строку
Делаем архив jar
С помощью ключа -C мы запустили программу в каталоге bin.
Надо узнать, что у библиотеки внутри
Можно распаковать архив zip-распаковщиком и посмотреть, какие классы есть в библиотеке.
Информацию о любом классе можно получить с помощью дизассемблера javap.
Из результата видно, что класс содержит кроме пустого конструктора, ещё один метод sum, внутри которого в цикле вызывается метод add класса Adder. По завершении метода sum, вызывается Adder.getSum().
Без ключа -c программа выдаст только список переменных и методов (если использовать -private, то всех).
Лучше снабдить библиотеку документацией
Изменим для этого класс калькулятора.
Документацию можно создать следующей командой. При ошибке программа выдаст список возможных опций.
В результате получиться следующее 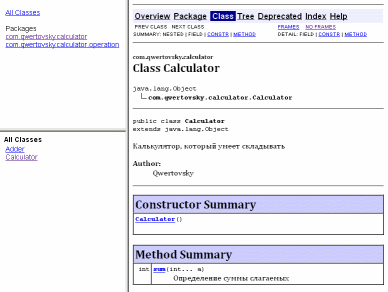
Можно подписать jar-архив
Если требуется подписать свою библиотеку цифровой подписью, на помощь придут keytool и jarsigner.
Генерируем подпись.
Генерируем Certificate Signing Request (CSR)
Содержимое полученного файла отправляем в центр сертификации. От центра сертификации получаем сертификат. Сохраняем его в файле (например, qwertokey.cer) и импортируем в хранилище
Файл qwertokey.cer отправляем всем, кто хочет проверить архив. Проверяется он так
Использование библиотеки
Есть программа HelloWorld, которая использует библиотечный класс Calculator. Чтобы скомпилировать и запустить программу, нужно присоединить библиотеку.
Компилируем
Собираем программу
Это можно сделать по-разному.
Первый способ
Здесь есть тонкости.
В строке
не должно быть пробелов в конце.
Вторая тонкость описана в [3]: в этой же строке должен стоять перенос на следующую строку. Это если манифест помещается в архив сторонним архиватором.
Программа jar не включит в манифест последнюю строку из манифеста, если в конце не стоит перенос строки.
Ещё момент: в манифесте не должно быть пустых строк между строками. Будет выдана ошибка «java.io.IOException: invalid manifest format».
При использовании команды echo надо следить только за пробелом в конце строки с main-class.
Второй способ
В данном способе избегаем ошибки с пробелом в main-class.
Третий способ
Включили код нужной библиотеки в исполняемый файл.
Запуск исполняемого jar-файла
Файл calculator.jar исполняемым не является. А вот helloworld.jar можно запустить.
Если архив был создан первыми двумя способами, то рядом с ним в одном каталоге должна находится папка lib с файлом calculator.jar. Такие ограничения из-за того, что в манифесте в class-path указан путь относительно исполняемого файла.
При использовании третьего способа нужные библиотеки включаются в исполняемый файл. Держать рядом нужные библиотеки не требуется. Запускается аналогично.
Как быть с приложениями JavaEE
Аналогично. Только библиотеки для компиляции нужно брать у сервера приложений, который используется. Если я использую JBoss, то для компиляции сервлета мне нужно будет выполнить примерно следующее
Структура архива JavaEE-приложения должна соответствовать определенному формату. Например
Способы запуска приложения на самом сервере с помощью командной строки для каждого сервера различны.
Надеюсь, данная статья станет для кого-нибудь шпаргалкой для работы с Java в командной строке. Данные навыки помогут понять содержание и смысл Ant-скриптов и ответить на собеседовании на более каверзные вопросы, чем «Какая IDE Вам больше нравится?».


