- Ubuntu Documentation
- Introduction
- Preparing your system
- Installing Mac-on-Linux
- Configuring Mac-on-Linux
- Running Mac-on-Linux as a normal user
- Running MOL
- Configuring Network
- Alternative — Networking without DHCP
- Trouble Shooting
- OS 9 Double Click and Slow Response Trouble
- To run Tiger and Eliminate Annoying Sluggish Behavior on MOL Install this Patched Version
- Remove boot loader out of memory problem
- External Links
- How to Run Mac Apps on Linux
- Run a macOS Virtual Machine (All Apps)
- Using the Darling Translation Layer (CLI Only)
- Building and Installing Darling
- How To Install macOS In A Virtual Machine On Linux Using Sosumi (Snap Package)
- How to install macOS in a virtual machine (QEMU) on Linux using Sosumi snap package
Ubuntu Documentation

Unsupported Version
This article applies to an unsupported version of Ubuntu. More info.
Introduction
Mac-on-Linux (MOL) allows you to run MacOS 9 and MacOS X from within Linux. It requires a Mac OS (9/X) and PowerPC computer. As it does not need to emulate a processor it runs at near native speeds. see http://mac-on-linux.sourceforge.net/ for full details.
This howto assumes that you have a working install on MacOS on your computer. It is also possible to use MOL to install MacOS into a disk image, see man mol for more details.
The MOL kernel modules are included in DapperDrake so it is no longer necessary to compile and install them manually.
Preparing your system
To install all of Mac-on-Linux, you’ll need to enable the universe and multiverse, see AddingRepositoriesHowto for details.
Installing Mac-on-Linux
You will need to install the following packages mol and mol-drivers-macosx and/or mol-drivers-macos for MacOS X and/or MacOS 9 support.
You may need to add this repository to get some of the drivers: http://people.debian.org/
jensen woody/. See AddingRepositoriesHowto for more information.
This can be done using Synaptic Package Manager or by running the following commands
Configuring Mac-on-Linux
If you are not comfortable with editing text look at NanoHowto.
This assumes that you have a working install of Mac OS X or 9, on a partition on you harddrive somewhere.
There are a few settings you may want to play with be for you use mol. One of them is memory. The default is 96mb, which is barely enough to boot Mac OS X (although ok for Mac OS 9 if you arn’t planning to do much).
In /etc/mol/molrc.osx (molrc.macos for Mac OS 9) find ram_size: 96 (or ram_size: 48 in molrc.macos) and change to at least 128
Its possible to give mol more RAM than you physically have, and linux will deal with putting stuff into swap, but you are likely to end up with a slow system. (It may also crash if you give too much RAM; I had to keep a ram_size of 48 in my molrc.macos.)
Then it is worth setting up the video modes, run sudo molvconfig
You basically type ‘y’ to try out a configuration, and then ‘y’ if you can see a nice gradient on the screen. The red screen comes out as a stripes, but it seems to work anyway. If you get a random mess, blank screen or some other problem then press ‘n’
Running Mac-on-Linux as a normal user
By default, Mac-on-Linux requires root privileges to run. The following command makes sure you can run Mac-on-Linux as a normal user.
Running MOL
Now you should be able to run startmol --osx (just startmol for Mac OS 9), and Mac OS X will boot up in a window or on a new virtual terminal. You need to install the MOL package that you find on the desktop. This provides sound and network drivers.
To exit mol, choose shutdown from the apple menu.
If the video modes are correctly configured then pressing CTRL + ALT + F8 (sometimes higher F keys) will take you to a full screen MOL. CTRL + ALT + F7 should take you back to your Linux desktop.
If you want mol to always start full screen, edit /etc/mol/molrc.video and change enable_xvideo: yes to
See its manpage for more usage information.
Configuring Network
If you are using mol to use the iTunes music store, or watch flash on the web, then you will need to get networking running.
You will need to install ipmasq, dnsmasq and dhcpd using synaptic or
Then enable dhcp for the tun0 interface that mol uses, in /etc/default/dhcp, put the line
Then in /etc/mol/molrc.net add the line
and in /etc/mol/tunconfig at the bottom just before
Now run startmol --osx, and we can set up the network on the Mac OS X side. MOL creates a network tunnel called tun0 at the Linux end, and en3 on the Mac OS X end.
Once you have logged into to Mac OS X open up the system preferences. Make sure that en3 is set to configure with DHCP.
Now open up Safari or Firefox, and if you are lucky you should have a web connection.
Alternative — Networking without DHCP
Do as above, but without installing dhcpd. Once you have completed the setup, run ip addr to check the ip address for the tun0 interface. Mine was given as follows:
In OS X, then set up the en3 network port manually, by allocating an appropriate IP (in my case 192.168.40.2 was a good choice), set Router and DNS server to the ip associated with your tun0 interface in linux (192.168.40.1) and the subnet mask to 255.255.255.0. Now you should be ready to go.
Trouble Shooting
If you get mol module not found errors, try insmodding it manually
If OSX doesn’t start, edit the blkdev settings in /etc/mol/molrc.osx. Your OSX boot partition should not be mounted under linux and should have the setting of
Obviously the hda3 part could be different for you.
OS 9 Double Click and Slow Response Trouble
If you are having very slow response with OS 9, you probably need to open the MOL Install CD that appears on the desktop and drag the MOLAudio to the System Folder. Then you need to go to the sound control panel and enable the MOL Audio for output. (Before I did this I was unable to even double click. Afterwards, the response was more snappy.) The real fix is to use a more recent version of Mac-on-Linux though. To do that, I am providing my notes below.
To run Tiger and Eliminate Annoying Sluggish Behavior on MOL Install this Patched Version
Thanks to folks on the MOL mailing list for these tips. http://www.maconlinux.org/lists/index.html
1) Download the latest kernel source. You can user uname -r to determine your version. Mine was 2.6.12-9-powerpc. You can also use the synaptic package manager or Adept to do this.
sudo apt-get install linux-source-2.6.12
2) Follow the instructions on this Wiki for building the kernel found at https://wiki.ubuntu.com/KernelBuildPPCHowTo.
3) Download the patched MOL that Joe Jezak has kindly provided. http://dev.gentoo.org/
josejx/ Look for the latest mol version he has provided.
4) Extract it using tar -jxvf
5) Build it using make.
6) Set up and start MOL using the instructions in the section above. Actually, I had better luck on the networking setup with the sheep driver. I just made the /etc/mol/molrc.net have the line:
netdev: eth1 -sheep
You may need eth0 instead if that is your primary network interface (do an ip addr call to find out). With this setting Tiger boots and gets an IP address via dhcp from my local wireless router.
A side note: I have not been able to boot an OS 9 partition with this setup and there have been some similar notes on a Yellow Dog Linux forum. If I figure that out, I’ll append this note.
Remove boot loader out of memory problem
If you start MoL to boot OS X and get an error that looks like this:
Then you need to install the new boot loader.
2) Extract the bootx file.
3) Copy the file into /usr/share/mol/drivers/. You will need to do this as root.
External Links
Mac How To Everything about Macintosh OS
MacOnLinuxHowto (последним исправлял пользователь ckimes 2017-09-13 01:41:18)
The material on this wiki is available under a free license, see Copyright / License for details
You can contribute to this wiki, see Wiki Guide for details
Источник
How to Run Mac Apps on Linux

macOS and Linux share a common heritage. Unfortunately, that does not mean applications can smoothly transition between the operating systems. To run Mac apps on Linux, you’ll need some sort of virtual machine or translation layer.
Run a macOS Virtual Machine (All Apps)
The most reliable way to run Mac apps on Linux is through a virtual machine. With a free, open-source hypervisor application like VirtualBox, you can run macOS on a virtual device on your Linux machine. A properly-installed virtualized macOS environment will run all macOS apps without issue.

Virtualizing a desktop like this does require significant RAM, so it may not run smoothly on low-resource devices. For machines with the technical specs, virtualizing an operating systems through a VirtualBox virtual machine is the best option.
Using the Darling Translation Layer (CLI Only)
You can also run a translation layer called Darling. This works like WINE, which creates a Windows-to-Linux translation environment that allows you to run some Windows applications on Linux systems. Darling tries to accomplish the same goal between macOS and Linux. Because macOS and Linux both share the same UNIX-style base, Darling is less resource-intensive than WINE, producing better results in more circumstances.
For the time being, Darling can only work with very simple GUI apps and several command-line apps. While GUI app support is a goal for the project, the feature hasn’t yet been implemented. Basically, you can run a macOS shell in Terminal reliably and may or may not be able to run other apps effectively.
It also contains an enormous amount of code, requiring about 12 gigabytes of disk space after building. It’s essentially duplicating the functionality of the macOS operating system. So, if you worry about remote executables corrupting your system, you might want to avoid a package of this size.
Building and Installing Darling
1. Follow the installation instructions to download the correct dependencies for your Linux distro from the Darling Install page. Depending on your distro, you may need to run a lengthy command.
For example, for Ubuntu, run the following Terminal command to download Darling’s dependencies:
2. Clone Darling’s git depository to your local machine:
Источник
How To Install macOS In A Virtual Machine On Linux Using Sosumi (Snap Package)
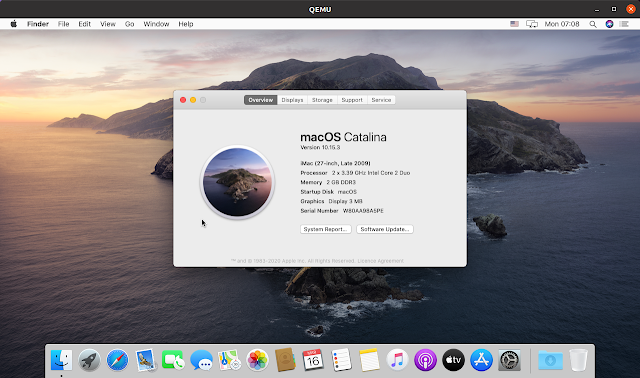
Sosumi is a snap package based on macOS-Simple-KVM that makes it easy to download and install macOS in a virtual machine (is comes bundled with qemu-virgil, which includes virtio-vga, a paravirtual 3D graphics driver). It does not ship with macOS, but downloads an installer image for macOS Catalina.
It’s worth noting from the start that Apple doesn’t allow installing macOS on non-Apple hardware, so to use this legally you must have Linux installed on Apple hardware.
After using Sosumi for a few hours on my Ubuntu 20.04 desktop, I can tell you that the installation takes quite a while (about 50 minutes on my system), and the macOS system may be a bit slow, but it’s usable. So this may not be suitable to be used for heavy tasks, but it’s perfect for testing.
This snap package, created by Alan Pope of Canonical / Ubuntu, makes it easy to install and run macOS in a virtual machine on Debian / Ubuntu, Fedora and other Linux distributions (after installing snapd), shipping with basically everything you need to get it running. You can find the snap package source on GitHub. If you don’t want to use the snap package though, you have the alternative of using macOS-Simple-KVM, a set of tools to set up a quick macOS virtual machine in QEMU (accelerated by KVM).
Before installing this there are a few important things I want to note:
- After installing macOS in the virtual machine, the total size of the Sosumi folder (
/snap/sosumi ) on my system is about 31,5 GB, but this can get larger as you install extra applications in the macOS virtual machine
How to install macOS in a virtual machine (QEMU) on Linux using Sosumi snap package
To install Sosumi you’ll need to be able to install Snap packages on your system. This is enabled by default in Ubuntu, and on other Linux distributions follow the instructions from the Snapcraft docs.
Why edge? In my test, the macOS virtual machine did not start after using the Sosumi stable package, but it does work with the edge version. You can skip —edge from the command to install the stable version if you wish.
2. Run Sosumi for the first time by typing sosumi in a terminal. This is only required the first time; an applications menu shortcut is created for future launches.
[[Edit]] In case you run into an issue saying it failed to run Sosumi / qemu because it can’t start X11, add your user to the kvm group:
Issue mentioned by Bob White in the comments below.
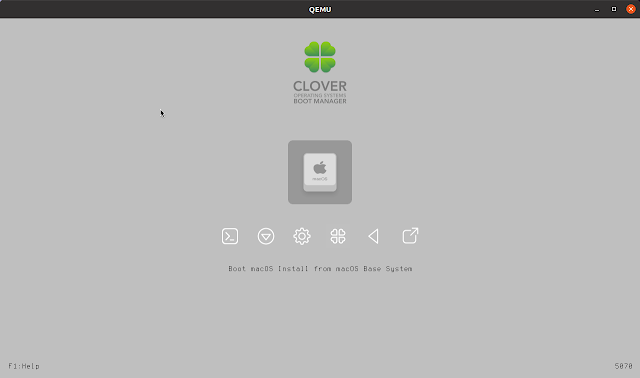
3. After the virtual machine boots, press Enter to Boot macOS Install from macOS Base System :
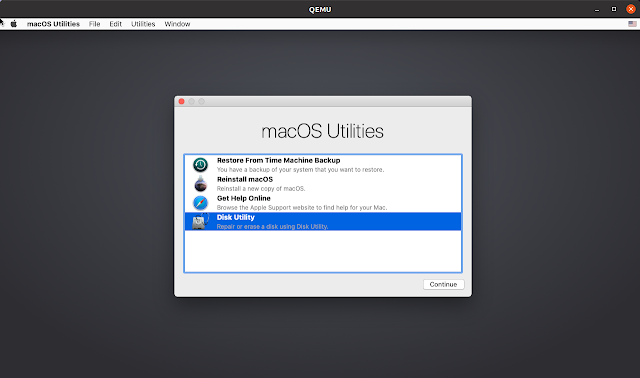
4. Format the macOS virtual machine HDD.
You’ll get to a screen with a dialog called macOS Utilities — from there click on Disk Utility :
In the Disk Utility dialog choose the first Apple HDD on the left-hand sidebar (the one with a capacity of 68,72 GB), then click Erase , enter a name for the HDD (like macOS), and leave the rest of options as they are (mac OS Extended (Journaled) filesystem with GUID Partition Map):
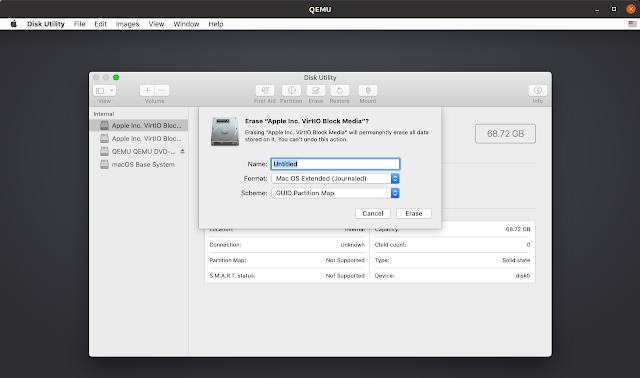
Now click the Erase button to format the partition.
5. Install macOS in the virtual machine.
When you’re done close Disk Utility , and you’ll get to the macOS Utility dialog again. From this dialog choose Reinstall macOS . Click Continue a couple of times and you’ll get to a screen where you must choose the HDD formatted in step 4:
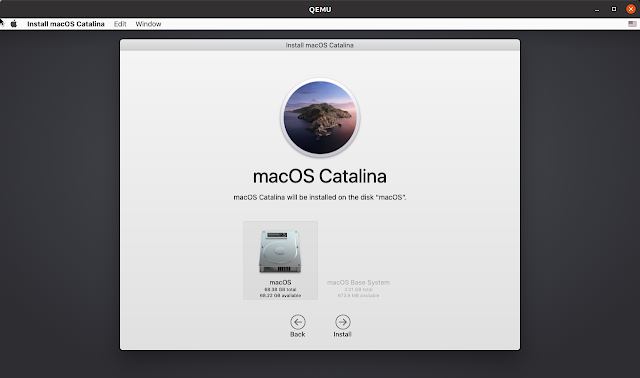
Next, click Install and the installation will begin:
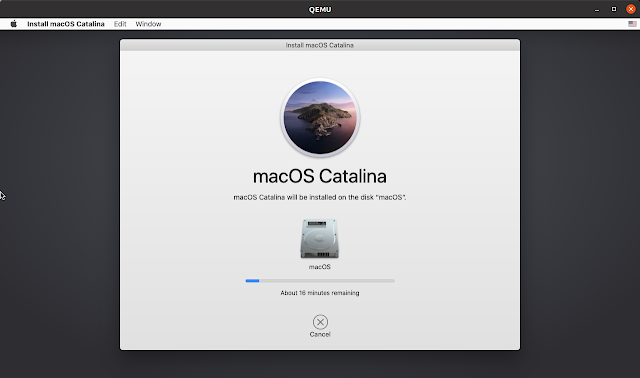
The virtual machine will reboot automatically at some point, continuing with the installation after that, and reboot again when it’s done.
6. Boot into macOS
After the installation is completed, the macOS virtual machine will reboot, and in the boot menu you’ll see some extra options. Use the left/right arrow keys to select Boot macOS from. , like this (in Boot macOS from macOS , the second macOS is the name of the HDD set in step 4):
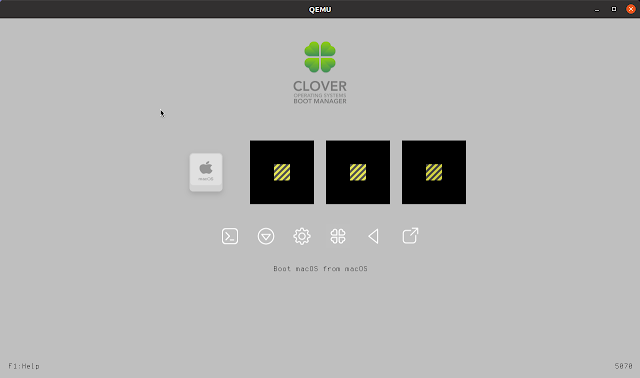
You will need to select this option each time you start the virtual machine, when you want to boot into macOS.
Источник


