- How to make a Minecraft server on Windows, Mac, or Linux
- How to make a Minecraft server on Windows, Mac, or Linux
- Things to keep in mind before you start:
- Running a Minecraft server from home?
- What if you don’t want to host your server at home?
- Make a Minecraft server on your Windows PC
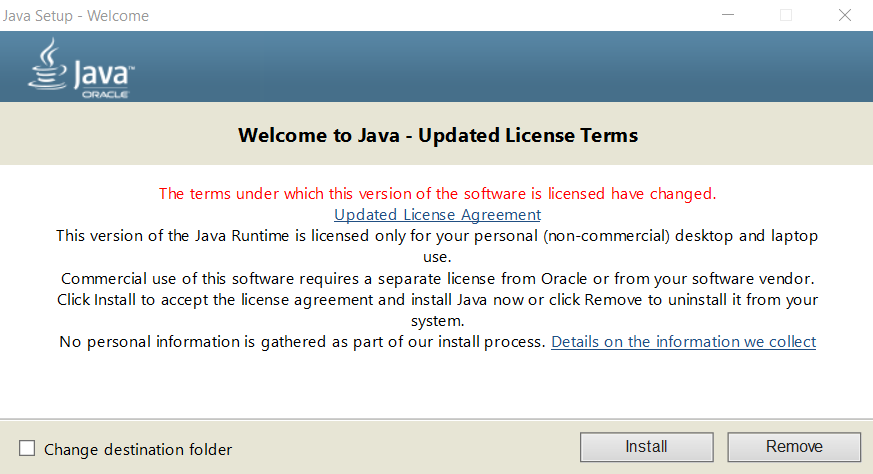
- 1. Get the latest version of Java.
- 2. Choose a location for your Minecraft server files.
- 3. Download and start the Minecraft server software.
- 4. Enable port forwarding on your router.
- 5. Start the Minecraft server.
- Make a Minecraft server on your Mac
- 1. Make sure you have Java installed.
- 2. Choose a location for your Minecraft server files.
- 3. Download the Minecraft server software.
- 4. Enable port forwarding on your router.
- 5. Start the Minecraft server.
- Make a Minecraft server on a Linux host
- 1. Install Java.
- 2. Create a location for your Minecraft server files.
- 3. Download the Minecraft server files.
- 4. Start your Minecraft server.
- 5. Point a domain at your Minecraft server.
- Additional resources for managing a Minecraft server
- How to Make a Minecraft Server on Ubuntu, Windows and CentOS
- How to Make a Minecraft Server in hPanel?
- How to Make a Minecraft Server on Linux?
- 1. Installing Java and Screen
- 2. Installing and Running Minecraft Server on Linux
- 3. Running Minecraft Server
- How to Make a Minecraft Server on Windows?
- How to Make a Minecraft Server on macOS?
- Why You Should Make Your Own Minecraft Server?
- Conclusion
How to make a Minecraft server on Windows, Mac, or Linux
Minecraft is the world’s second-most popular video game, having sold over 121 million copies as of February 2017.
But Minecraft is so much more than just a game. It’s also a tool for teaching kids how to code; an open platform to be expanded by mod developers; and it’s the heart of a global community of creators.
If you’re interested in the full Minecraft experience, you can take it a step further by launching your own private Minecraft server. With a private server, you’re free to create a Minecraft world of your very own.
In this article we’re going to show you exactly how to do that. We’ll look at how to make a Minecraft server on a Windows PC, on a Mac, and on a Linux hosting plan.
How to make a Minecraft server on Windows, Mac, or Linux
At a very high level, making a Minecraft server follows a few basic steps:
- Install the latest version of Java
- Install the latest version of the Minecraft server software
- Configure your server & network
- Start the server
- Check that your server is accessible
Things to keep in mind before you start:
Setting up a server takes some effort. You need a bit of technical know-how to properly configure a Minecraft server.
You should have a basic understanding of computer and networking concepts, which are fundamental to managing any kind of server.
Specifically, you should be comfortable and familiar with:
- Using the command line
- Networking (IP, DHCP, ports)
- Your system configuration
- Your network configuration
- Your router configuration (for home setups)
Running a Minecraft server from home?
You don’t need a top-of-the-line system to run a Minecraft server; a desktop computer is ideal.
While you can run a Minecraft server and play on the same machine, you’ll need a more powerful system to do it.
And lastly, use a wired ethernet connection for your server instead of wireless. A wired connection is more reliable.
What if you don’t want to host your server at home?
Hosting any kind of server from home means you’re exposing your home network to the world.
If you’d rather not take that risk, then you can use a hosting provider instead. You’ll need to pay a monthly or annual fee, but you won’t have to deal with the hassle of managing the server hardware.
A GoDaddy Virtual Private Server is a good fit if you’re just getting started. Just keep in mind that you’re sharing hardware with other users, so keep an eye on resource usage.
If you need a little more oomph and you want to hook up a lot of players, you might try a dedicated server instead.
Make a Minecraft server on your Windows PC
1. Get the latest version of Java.
Open the Windows Control Panel. Under Programs, look for Java, and click Update Now.
Open a command prompt and enter java -version . You should see a version number.
If your version is outdated, or if you don’t have Java installed, download it from the official website.
2. Choose a location for your Minecraft server files.
Before you download the Minecraft server software, choose a location on your PC where you’d like to run the server from.
When you first run the server, it’ll create a few configuration files. It’s best to have all these files stored in a dedicated folder.
You could place this folder on your Desktop, in your Documents folder, in your Programs folder, or anywhere else you’d like. It’s entirely up to you.
3. Download and start the Minecraft server software.
Download the server software from the Minecraft website. It comes as a Java .jar file. Save it to the location you chose in the previous step.
Double-click the .jar file to start the server. It’ll create the server configuration files, which need to be modified before the server is ready to use.
Accept the EULA: A text file called eula.txt was created. Open the file in a text editor and change eula=false to eula=true. Failing to accept the EULA will prevent you from starting the Minecraft server.
What if you see a “Can’t save server properties” error? Run the Minecraft server as an administrator by right clicking the .jar file and selecting “Run as administrator”.
4. Enable port forwarding on your router.
Note: Port forwarding can be a security risk.
If you’re just hosting a server for players on your local network, you don’t need to worry about port forwarding. If, however, you want to make your server accessible to the world, you’ll need to enable port forwarding on your router. (To learn more about port forwarding, check out PortForward.com for tutorials.)
Refer to your router’s documentation to find specific instructions on how to configure port forwarding for your device. For Minecraft, you’ll need to forward TCP port 25565.
You’ll also need to enter your server’s local IP address as the Output IP or Server IP for the forwarded port. This tells the router which device to point at. To find your server’s local IP, open a command prompt and enter ipconfig.
5. Start the Minecraft server.
To start the Minecraft server, open the Windows command prompt.
Navigate to the file path where the Minecraft server file (named something like “minecraft_server.1.12.2.jar”) was installed.
Start the server with the following command:
java -Xmx1024M -Xms1024M -jar
(Replace
If you’d rather use the server’s UI, exclude the “nogui” parameter:
java -Xmx1024M -Xms1024M -jar
You can also create a .bat file to batch the commands together.
Once the server is running, you can invite others to connect to your server via your local IP address if they’re on your home network, or via your external/public IP address if they’re not on your home network.
You can find your public IP address by searching for “my ip address” on Google.
To check if your server is accessible, enter your public IP address into the Minecraft Server Status Checker.
Make a Minecraft server on your Mac
1. Make sure you have Java installed.
Newer versions of MacOS includes Java by default. If you’re running an older version of MacOS (OS X), you may need to download the legacy version of Java from the Apple website.
2. Choose a location for your Minecraft server files.
Create a folder to contain your Minecraft server files. You could create the folder on your desktop, for example, but the choice is completely up to you.
3. Download the Minecraft server software.
Download the server software from the Minecraft website. It comes as a Java .jar file. Save it to the location you chose in the previous step.
Open TextEdit. Set the format to plain text. Enter the following:
exec java -Xms1G -Xmx1G -jar
(Replace
Save the file as start.command in the same folder where the server’s .jar file is located.
Open the Terminal and grant permissions for the new start.command file so it can be run. Type chmod a+x with a space after the command. Drag and drop the start.command file into the terminal window. Press Enter.
4. Enable port forwarding on your router.
Note: Port forwarding can be a security risk.
If you’re just hosting a server for players on your local network, you don’t need to worry about port forwarding. If, however, you want to make your server accessible to the world, you’ll need to enable port forwarding on your router. (To learn more about port forwarding, check out PortForward.com for tutorials.)
Refer to your router’s documentation to find specific instructions on how to configure port forwarding for your device. For Minecraft, you’ll need to forward TCP port 25565.
You’ll also need to enter your server’s local IP address as the Output IP or Server IP for the forwarded port. This tells the router which device to point at. To find your server’s local IP, open the Terminal and enter ifconfig.
5. Start the Minecraft server.
Double-click the “start.command” file you created in step 3. A Terminal window will open. You’ll probably see error messages the first time you run the server. This is normal.
Once the server is running, you can invite others to connect to your server via your local IP address if they’re on your home network, or via your external/public IP address if they’re not on your home network.
You can find your public IP address by searching for “my ip address” on Google.
To check if your server is accessible, enter your public IP address into the Minecraft Server Status Checker.
Make a Minecraft server on a Linux host
If you’re not inclined to host a Minecraft server at home, you can spin up a Linux hosting plan to do it instead. This way you’re not responsible for managing any of the hardware, plus you’re not exposing your private home network to the public.
As mentioned before, a Linux VPS hosting plan from GoDaddy is a lightweight option if you’re experimenting or not expecting a lot of players to join your server. If, however, you’re expecting a lot of players, you should look at using a dedicated Linux server instead.
To follow these steps, you’ll need to connect to your hosting with SSH. (If you’re not familiar with the process, this Help article has you covered.)
1. Install Java.
While SSH’d into your host as the root user, enter the command:
apt-cache search openjdk
This’ll list the available OpenJDK packages that can install Java. For this example we’ll select openjdk-7-jdk, which is the OpenJDK 7 Development Kit.
Update the list of available packages from the remote repositories:
Then install the selected software package:
apt-get install openjdk-7-jdk
Press “Y” when prompted to authorize the required storage space for installation. Once that’s done, verify that Java has been successfully installed:
You should see the version of Java that has just been installed.
2. Create a location for your Minecraft server files.
Create a directory on your host where the Minecraft server files will be saved, then change to that directory.
3. Download the Minecraft server files.
Within the Minecraft directory, run the wget command to download the Minecraft server files:
wget -O minecraft_server.jar https://s3.amazonaws.com/Minecraft.Download/versions/1.12.2/minecraft_server.1.12.2.jar
(Tip: Double-check the Minecraft download page for the URL to the latest version.)
Next, we’ll need to install and run “screen”, so that your server continues to run even when you’re not connected:
yum install screen
4. Start your Minecraft server.
java -Xmx512M -Xms512M -jar minecraft_server.jar nogui
(Tip: You can change the -Xmx and -Xms settings to adjust allocated memory for the Minecraft server. For example, you could enter -Xmx1G -Xmx1G to bump it up to 1GB of RAM. The available memory will depend on your hosting plan.)
To make sure everything is running correctly, stop your server with:
Then edit the “server.properties” file and set:
Save the “server.properties” file and restart your server. From there, enter your server IP address into the Minecraft Server Status Checker to see if it’s publicly accessible.
5. Point a domain at your Minecraft server.
Providing players with an easy-to-remember domain name instead of a complicated IP address makes it even easier for people to connect to your Minecraft server.
It’s super simple: Update your domain’s DNS records by adding an “A” record for your domain (using @ as hostname), or subdomain (using something like “mc” as the hostname), that points to your Minecraft server’s IP address.
Note that it can take up to
24 hours for DNS changes to take effect globally.
Additional resources for managing a Minecraft server
We’ve just scratched the surface of making a Minecraft server of your very own. Here are a few resources that dig deeper into setting up, managing, and promoting your server:
This article contains information about how to use third-party products, but GoDaddy does not endorse or directly support third-party products and is not responsible for the functions or reliability of such products. Third-party marks and logos are registered trademarks of their respective owners. All rights reserved.
How to Make a Minecraft Server on Ubuntu, Windows and CentOS

In this tutorial, we will show you how to make a Minecraft server on various platforms. This way, you’ll have more freedom to play the game with your own sets of rules.
How to Make a Minecraft Server in hPanel?
Setting up a Minecraft server with Hostinger has never been easier. Once you have chosen your plan and made your purchase, login to your Hostinger account. From there, we’ll take you through the rest of the steps:
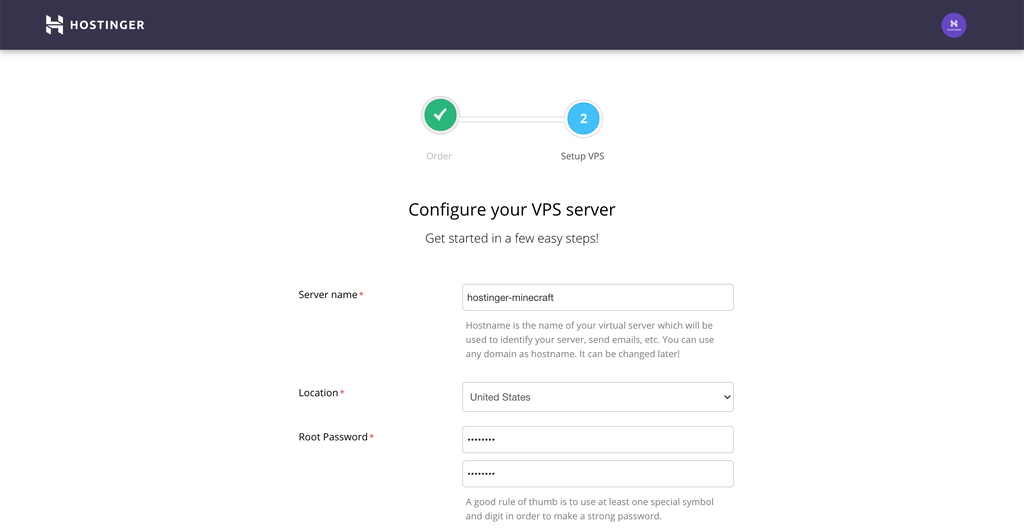
- In the hPanel, under the Setup section, you’ll see your newly purchased Minecraft server ready to be set up. Click the Setup button on the right.
- Follow the given instructions, such as filling in your server name and root password, to complete the initial setup process.

- Once that’s done, you’ll find your Minecraft VPS server under the VPS section in your hPanel’s home screen. Click Continue to go to the Server Managment screen.
- To start your newly set up server, simply click the Start button under the Server Status and wait for a couple of minutes.
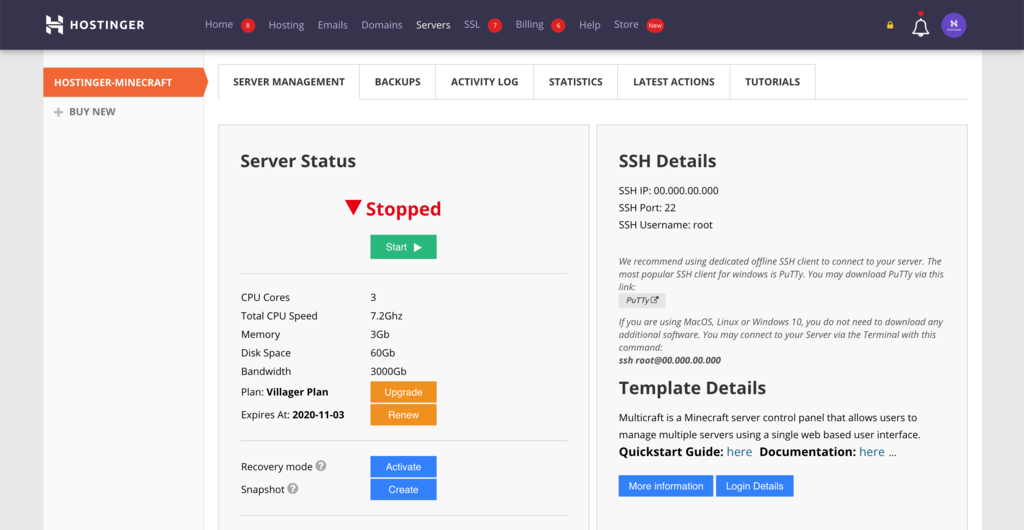
Congratulations, your Minecraft server is now live. In the Server Managment page, you’ll find the Minecraft Control Panel login details under the Notes section along with any additional information you might need when when managing your server.
How to Make a Minecraft Server on Linux?

In this section, you will learn how to make a Minecraft server on a machine that runs on Ubuntu or CentOS.
Before we start, ensure that you have a root SSH access to your machine. If you are using Hostinger’s Minecraft Hosting plan, the login credentials are in the Servers tab of hPanel.
The process of creating servers for Minecraft on these two operating systems is quite similar, but there are a few differences you’ll notice when installing the required packages.
1. Installing Java and Screen
Before we begin, keep in mind that the minimum operating system requirements for the following tutorial are Ubuntu 16.04 and CentOS 7.
Connect to your server via SSH. Open the built-in terminal shell (PuTTY for Windows users) and type the following command:
NOTE: Don’t forget to change both values with your real username and server IP address. When prompted, enter your username and password.
- A Minecraft server requires Java. Therefore, check whether it’s installed on your system by executing this command:
- Proceed to the second section of this tutorial if you already have Java installed. However, if Java is not found, follow the next step.
- Run these two commands to download the latest software packages and install Java:
-
- On Ubuntu:
-
- On CentOS:
- Once Java installation is complete, you can install Screen:
-
- On Ubuntu:
-
- On CentOS:
2. Installing and Running Minecraft Server on Linux
Now that Java and Screen are ready, we can begin installing a Minecraft server.
- Create a new directory where you will store all your Minecraft configuration files. This step is optional, but we highly recommend it so you can keep your system organized. To do this, type:
- Move to the newly created directory by entering:
- Before we can download the required configuration files, install wget:
-
- On Ubuntu:
-
- On CentOS:
- Use wget command to download the Minecraft server properties file:
- In this example, the latest server version is 1.15.2. You should visit this link to check if a newer version is available for download. If so, change the link for the command above.
- Run the Minecraft server properties file by entering this command. If you want to use the graphical user interface, simply remove the nogui part from the command:
- At this point, the server program will not start yet. Instead, it will create a EULA (end-user license agreement) file that we need to accept first.
- To accept Minecraft’s EULA, open eula.txt file with Nano text editor:
- Find the line that says:
Then change it to:
Once done, don’t forget to save your changes.
- Once that is done, activate Screen so the server can run in the background:
- You can change the name based on your preferences.
Good job! You have successfully installed your custom Minecraft server on Ubuntu or CentOS.
3. Running Minecraft Server
Now, we are going to run the Minecraft server for real this time. Type the following command again:
The minimum requirement to run the server is 1024MB (1 GB) of RAM. That’s why we’ve entered 1024M after the -Xmx and -Xms parts. If you want to allocate more RAM, you can change the value to 2048M or above, given that your server offers such specifications.
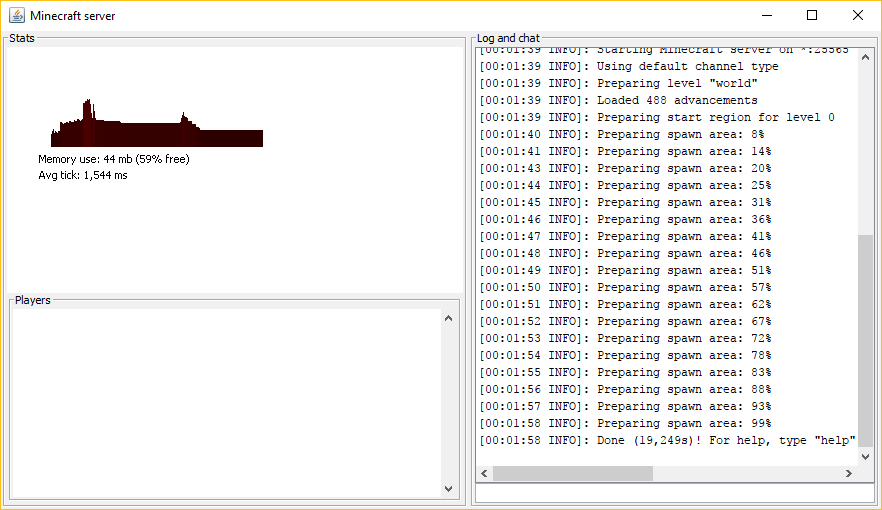
Here’s what you should see after executing the command:
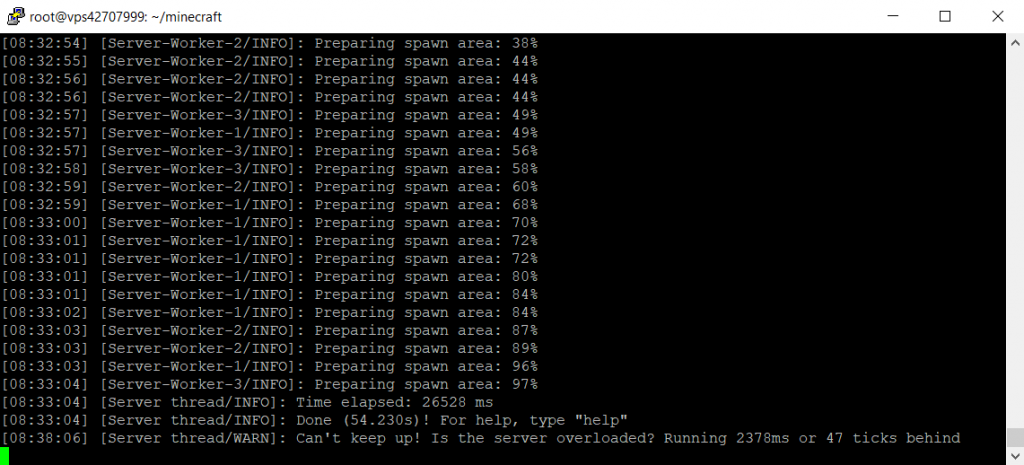
The server is now running in the background. To leave Screen, press CTRL + A, then D.
You can re-open the Screen window by typing this command:
Should you need to customize the server settings, open the server’s properties file with Nano:
Nonetheless, we suggest that you stick with the default configuration to prevent any issues.
How to Make a Minecraft Server on Windows?
You can also set up a Minecraft server on your Windows PC. What’s great, the steps are easier than the previous one.
- Open the command prompt and check the Java version on your computer:
- If it matches the latest server version on the official website, you can continue to the next step. In case it’s unavailable or outdated, download the installer.
- Download the setup software (.jar file) from the official server page.
- Create a new folder for the Minecraft server and move the .jar file to that folder.
- Double-click the setup program to create a eula.txt file.
- Open the EULA file and change the value from false to true.
- Run the Minecraft server by double-clicking the .jar file. To do this, you might need to allow the program through the firewall.
Alternatively, you can open the command prompt and navigate to the dedicated Minecraft folder. For example:
Then, execute this command:
If you see a similar screen, it means your Minecraft server has successfully started:
How to Make a Minecraft Server on macOS?

Lastly, let’s see how we can make a Minecraft server on macOS:
- Note that Java is included by default on newer versions of macOS. You can double-check by entering this command on your terminal:
- If it’s not available, you may download and install a legacy version of Java from the Apple website.
- Create a dedicated folder for your Minecraft server. Then, download the Minecraft server setup program and put it in that folder.
- Open TextEdit and set the format to plain text (Format ->Make Plain Text). Paste the following line:
- Save this file as startmc.command in the same directory where the Minecraft server file resides.
- To make startmc.command file work, the execute permission is needed. To do so, open the terminal and head to your Minecraft folder. For example:
- Grant the required permission using this command:
- If the steps are done correctly, you should be able to start the server by double-clicking the startmc.command file. It will open a new terminal window.
- A missing file or directory warning might appear at this time. Don’t worry, this is completely normal when you run a Minecraft server for the first time.
Why You Should Make Your Own Minecraft Server?
With more than 68 million players, Minecraft remains one of the most popular video games in the world.
Minecraft offers unlimited possibilities to create a virtual world, a place where you can let your imagination loose and build some incredible pieces of work. What’s great, you can take such experience to a whole new level by making your own Minecraft server.
Owning a private server gives you more control over your gameplay. You can invite your friends or other users, create your own rules, install any mods, and much more.
Unfortunately, many people think that building a private Minecraft server is difficult and expensive. However, the truth is, you only need a little bit of knowledge about the command-line interface. What’s more, you can set up the server on your Windows, Linux, or macOS computer, so there’s no need to buy a new machine.
If you’re ready, it’s time to learn how to make a server for Minecraft.
Conclusion
If you want to make Minecraft more exciting, you should consider making a private Minecraft server. You’re guaranteed to have much more freedom when playing Minecraft.
Thankfully, in this article, you have learned how to make a Minecraft server on Linux (Ubuntu and CentOS), Windows, and macOS. What’s great, the steps are easy to follow and won’t cost you a fortune.
Good luck and happy building!
Domantas leads the content and SEO teams forward with fresh ideas and out of the box approaches. Armed with extensive SEO and marketing knowledge, he aims to spread the word of Hostinger to every corner of the world. During his free time, Domantas likes to hone his web development skills and travel to exotic places.


