- Using Nmap on Windows
- Installing Nmap for Windows
- Nmap on the Windows Command Line
- Zenmap on Windows
- Testing SMB Security with Nmap NSE Scripts
- Wrapping Up
- How to Install NMAP on Windows with Real-time Usage Examples?
- Installing NMAP
- Detecting the version
- Checking certificate information
- Checking cipher information
- Run nmap on windows
- Microsoft Windows binaries
- Linux RPM Source and Binaries
- Mac OS X Binaries
- Source Code Distribution
- Other Operating Systems
- Run nmap on windows
- Windows Self-installer
- Command-line Zip Binaries
- Installing the Nmap zip binaries
- Compile from Source Code
- Executing Nmap on Windows
Using Nmap on Windows
Running Nmap on Windows is not as difficult or problematic as it was in the past. Nmap is supported on Windows 7 and higher with performance close to if not quite as good as Linux based operating systems. The majority of users still do use *nix based systems however a good number of people use it on Windows.
By installing Nmap on your Windows based systems you have access to the world’s best port scanner for security testing and troubleshooting of network connectivity. In addition you have ncat available a full-featured version of netcat a virtual swiss army knife for networks. I am a big fan of ncat and encourage any system administrator or techie to explore the options.
Installing Nmap for Windows
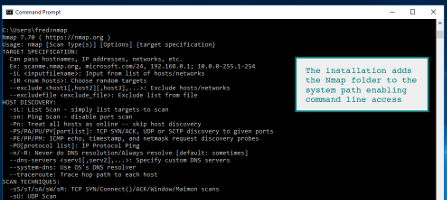
To install the Windows version of Nmap download the executable installer and click through the wizard. It is your standard Next | Next | Next | finish. all done. By default, the Nmap installation directory will be added to the system path. With Nmap in your system path, you can run nmap or ncat from any command window.
It will run on all the more modern versions of Windows including Windows 7, 2008 and Windows 10. If you are running something older such as 2K or earlier you may run into problems, but if you are still on those platforms you already have problems.
If you install from the zip file, there are a few additional configuration items to be aware of and apply. These are all documented on the nmap installation page for Windows.
Nmap on the Windows Command Line
During a default installation of the Nmap Windows package, the installation path will be added to the system path. Simply fire up a command prompt and launch nmap . If you installed from the standalone zip file, you need to add the installation folder to the system path manually through system properties.
As you can see the familiar Nmap command options appear after running the command. Access to the Nmap NSE scripts is available as are all the standard options.
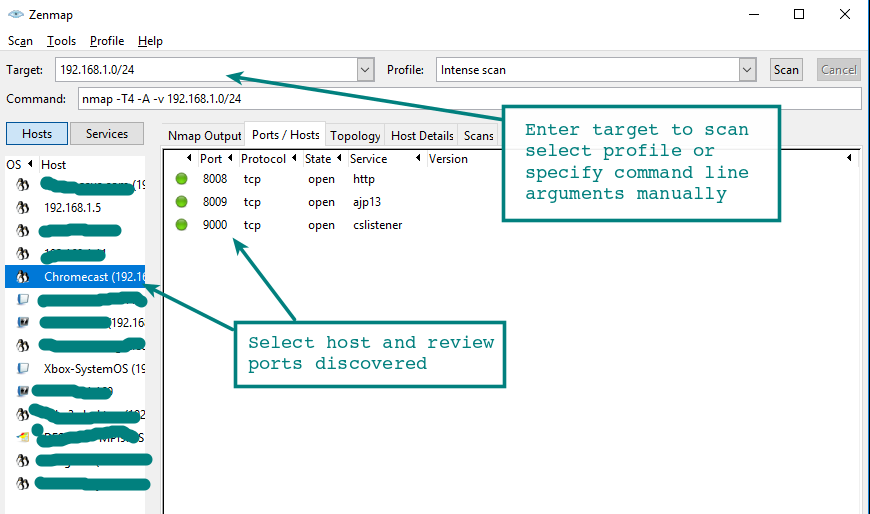
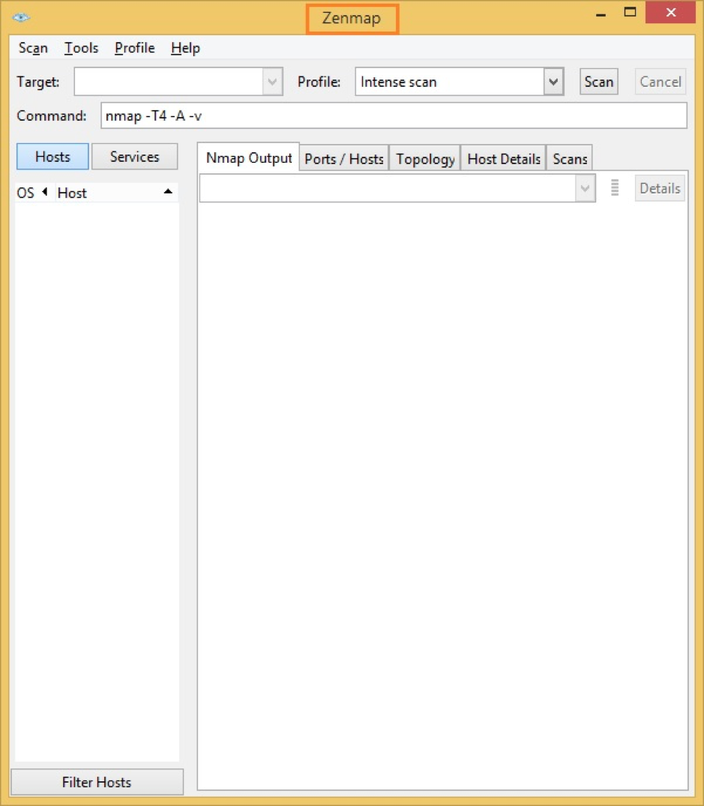
Zenmap on Windows
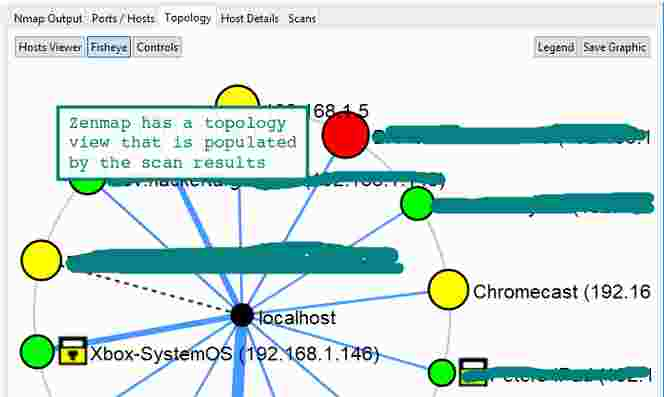
Zenmap is an excellent GUI front-end to the Nmap core scanning engine. It has some pretty nifty features that are not available with the command line version, in particular the network topology map. This rivals commercial mapping tools that perform a similar function and is a nice feature.
It is also intuitive to browse through results from different hosts using Zenmap, there are options to save the results in standard Nmap format (.nmap) or as XML (.xml) for further processing. There does not appear to be the option to save in the standard Grep format (-oG).
Zenmap is available on Windows and Linux distributions, it can be a great introduction for those less familiar with the command line.
Testing SMB Security with Nmap NSE Scripts
Bundled with Nmap are addon scripts that perform all manner of functionality. Of note to those in a Windows environment are the 34 smb- scripts that are available. These allow enumeration of entities on Windows systems remotely using the Microsoft SMB protocol (port 445). Examples include smb-os-discovery , smb-enum-users and smb-brute .
There are also vulnerability detection scripts, for testing even the most recent high profile Windows vulnerabilities. Head over to the Nmap NSE scripts page for all the documentation and a list of the scripts.
| smb-vuln-ms08-067 | Test Microsoft Windows systems for the very popular remote code execution vulnerability known as MS08-067. For years this was the go to exploit when using Metasploit. Note this check is dangerous and it may crash systems. |
| smb-vuln-ms10-054 | Detect whether target machines are vulnerable to ms10-054 the SMB remote memory corruption vulnerability. |
| smb-vuln-ms10-061 | Attempts to discover whether systems are vulnerable to ms10-061 Printer Spooler vulnerability. |
| smb-vuln-ms17-010 | Attempts to detect if a Microsoft SMBv1 server is vulnerable to a remote code execution vulnerability ms17-010. The vulnerability is actively exploited by WannaCry and Petya ransomware and other malware. |
Wrapping Up
Having access to both Nmap and ncat when on a Windows system is very convenient and lots of fun. There is an amazing number of tricks that can be done with ncat , whether you are troubleshooting, security testing or just need some network-fu during a penetration test.
There are now 600 Nmap NSE scripts. The capabilities these provide is another bonus for having Nmap installed on your Windows workstation. Using the bundled scripts there are large number of short cuts and tests that can be conducted that might otherwise be difficult without additional software installed.
Thanks for reading, we also have a tutorial and cheat sheet for those wanting to discover more about this excellent tool.
How to Install NMAP on Windows with Real-time Usage Examples?

NMAP (Network Mapper), one of the famous open-source tools to perform network scans, security auditing, and find vulnerabilities in network infrastructure.
One of the popular know usages of NMAP is to find the open ports in the network. NMAP can be installed on Windows, Linux, macOS, and much more.
In this quick guide, I will explain how to get NMAP installed on Windows OS & some usage examples.
Installing NMAP
- Go to Nmap download link and download the latest stable version
- Go to the location where the file is downloaded
- Right-click on the EXE file and click “Run as administrator.”
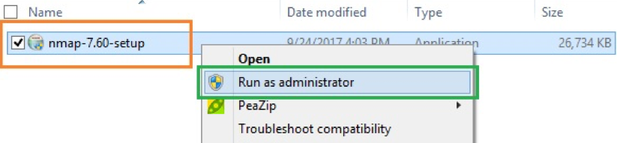
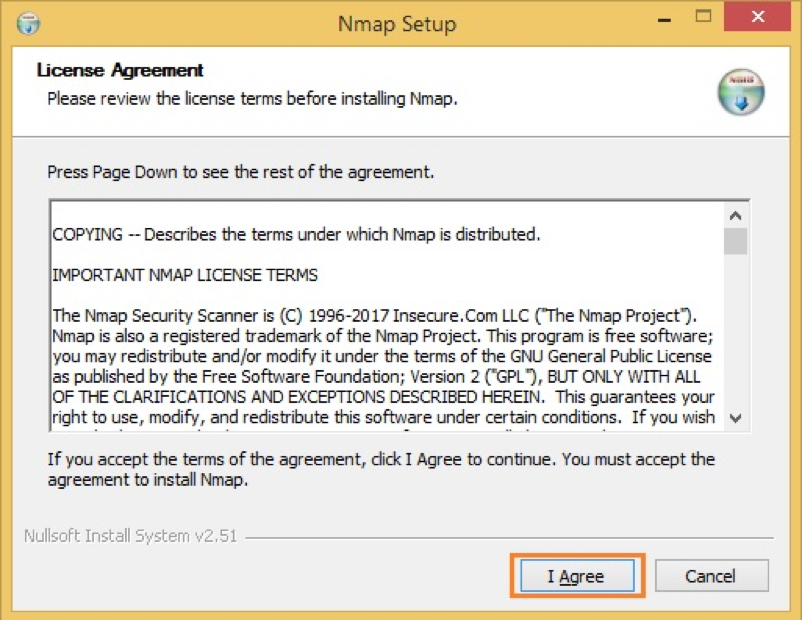
- It will start the installation process, accept the license agreement
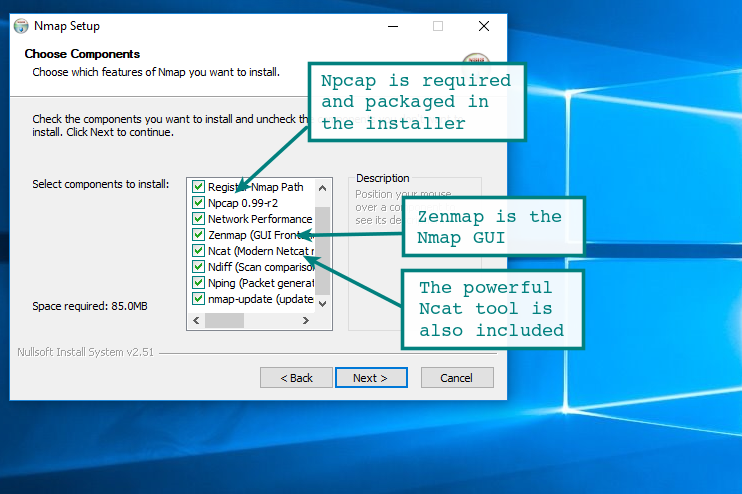
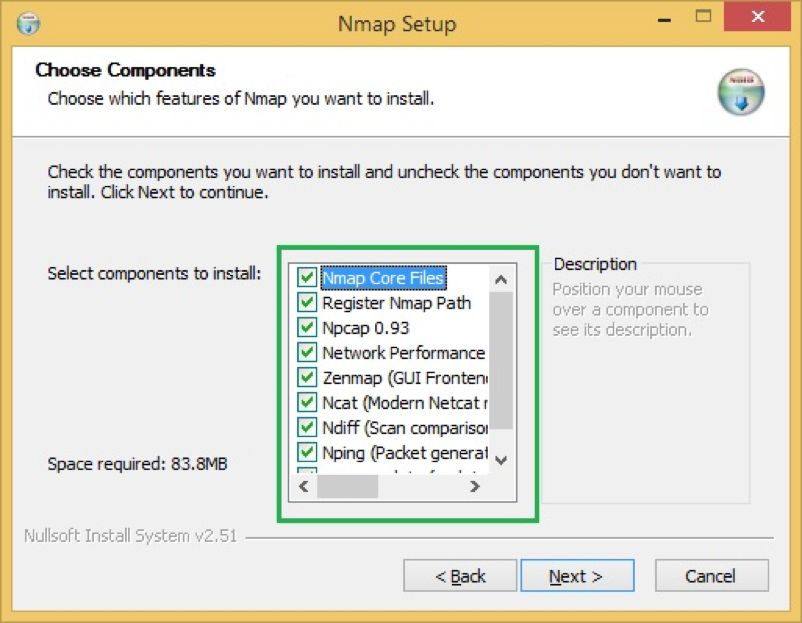
- You can choose what components to install, but it would be good to install all of them
- By default, it will install under C:\Program Files (x86)\Nmap but feel free to change if needed
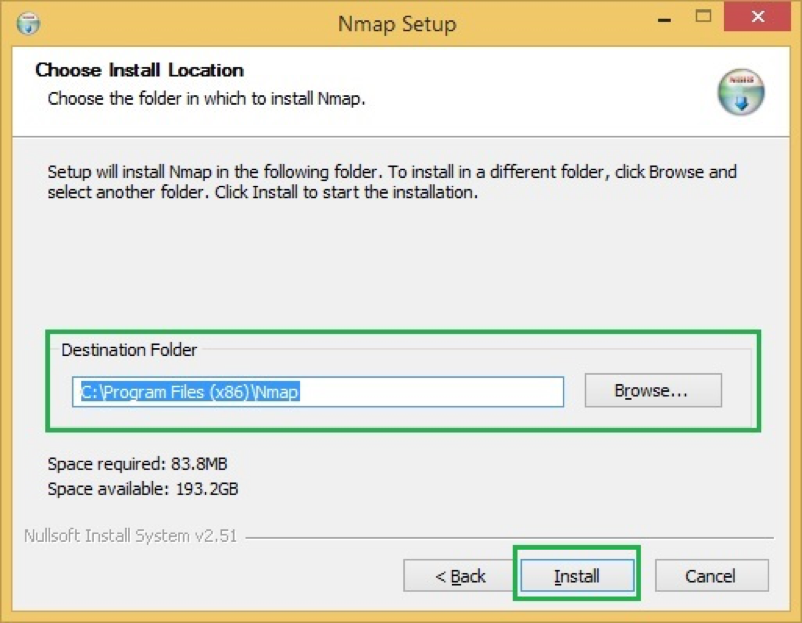
- It will start installing NMAP and once done; you will get confirmation
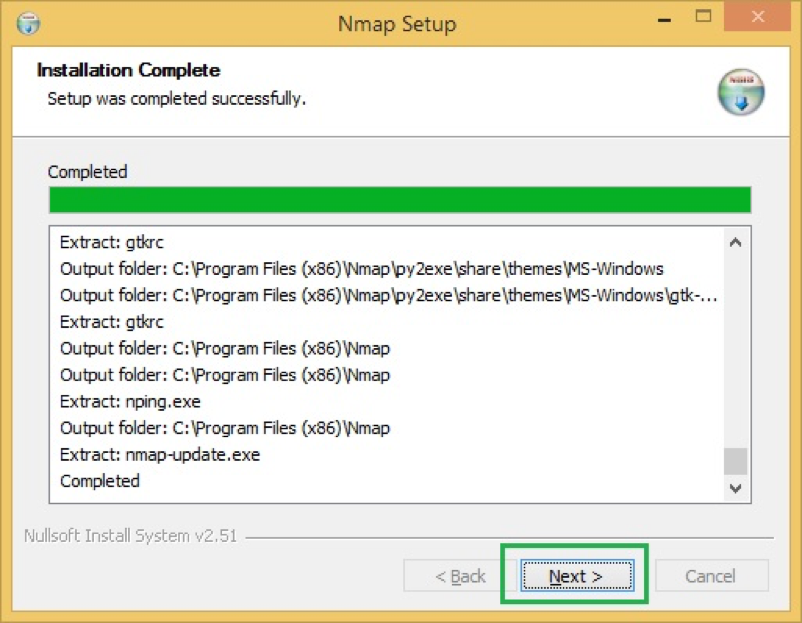
- This concludes NMAP is successfully installed.
Go ahead and play around with the tool to get an idea of how it works. Here are some of the examples.
Detecting the version
One of the wide usage for NMAP is to fingerprint the OS and running technologies.
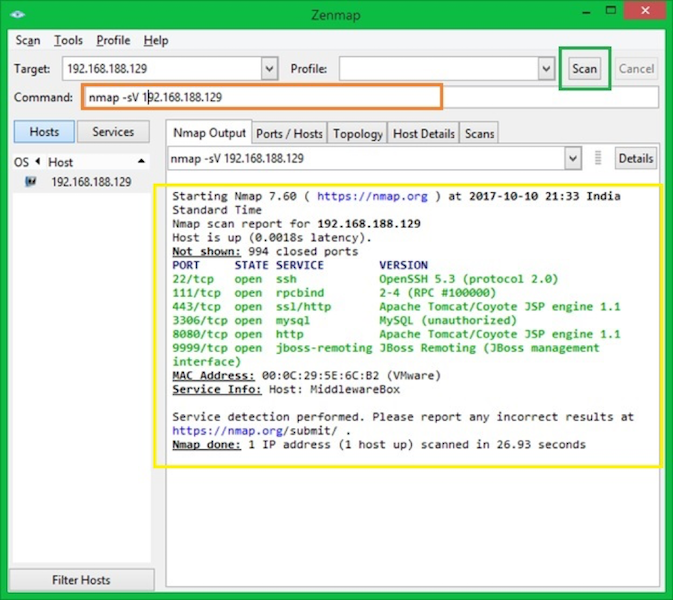
-sV command argument will detect the versions & state of running services
Checking certificate information
OpenSSL is mostly used to perform the certificate operation like generation, verification, modification, etc. However, you can do certain things with NMAP as well.
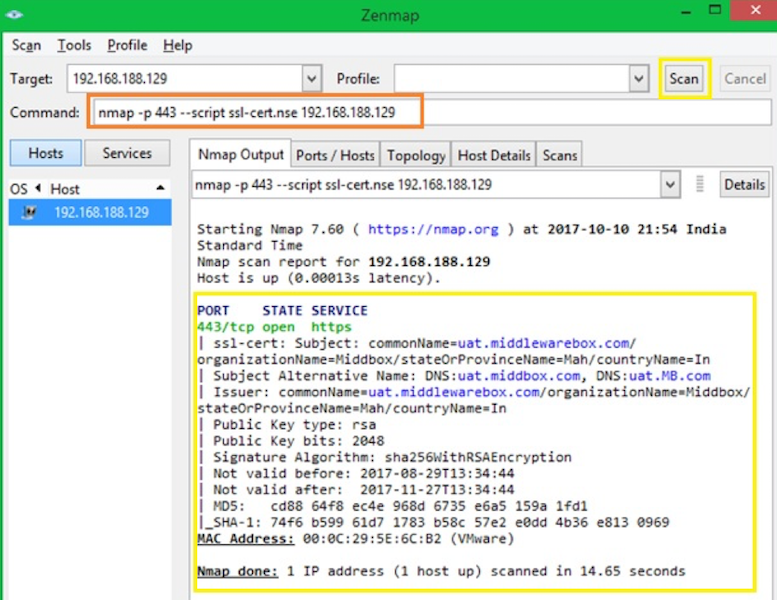
In case you are wondering, ssl-cert.nse is the script gets installed along with NMAP. It’s available under the default location C:\Program Files x86)\Nmap\scripts
Checking cipher information
ssl-enum-cihpers.nse script can be used to validate the SSL cipher information.
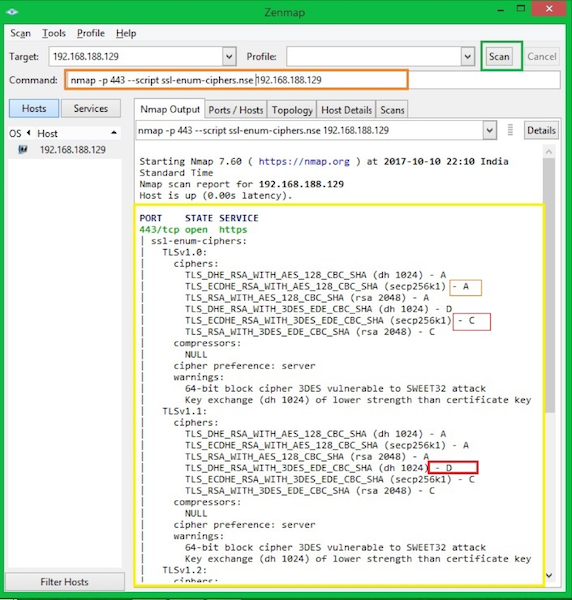
Each cipher suite is shown with a letter grade (A through F) indicating the strength of the connection. The grade is based on the cryptographic strength of the key exchange and of the stream cipher.
The message integrity (hash) algorithm choice is not a factor. The output line beginning with the least strength shows the strength of the weakest cipher offered.
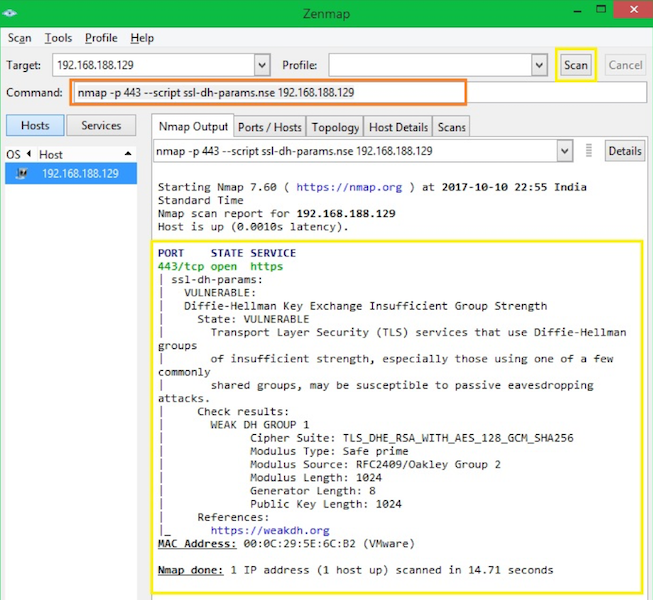
To detect DH (Diffie-Hellman) vulnerability, you can use below syntax.
I hope this quick instruction helps you to install and get familiar with NMAP on Windows operating system.
If you are looking to master how to use NMAP then check out this online course by Jimmy Larsson.
Run nmap on windows
Nmap and Zenmap (the graphical front end) are available in several versions and formats. Recent source releases and binary packages are described below. Older version (and sometimes newer test releases) are available from the dist directory (and really old ones are in dist-old). For the more security-paranoid (smart) users, GPG detached signatures and SHA-1 hashes for each release are available in the sigs directory (verification instructions). Before downloading, be sure to read the relevant sections for your platform from the Nmap Install Guide. The most important changes (features, bugfixes, etc) in each Nmap version are described in the Changelog. Using Nmap is covered in the Reference Guide, and don’t forget to read the other available documentation, particularly the new book Nmap Network Scanning!
Nmap users are encouraged to subscribe to the Nmap-hackers mailing list. It is a low volume (7 posts in 2015), moderated list for the most important announcements about Nmap, Insecure.org, and related projects. You can join the 128,953 current subscribers (as of September 2017) by submitting your email address here:
You can also get updates from our Facebook and Twitter pages.
Nmap is distributed with source code under custom license terms similar to (and derived from) the GNU General Public License, as noted in the copyright page.
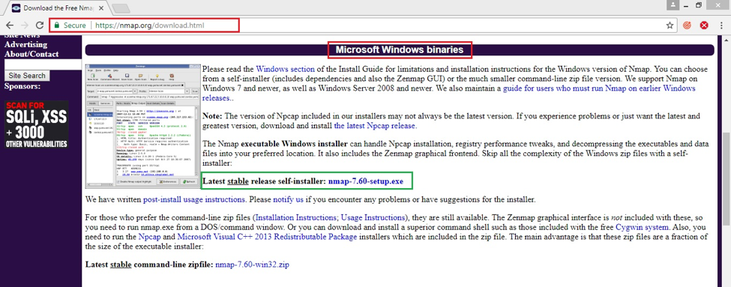
Microsoft Windows binaries
Please read the Windows section of the Install Guide for limitations and installation instructions for the Windows version of Nmap. You can choose from a self-installer (includes dependencies and also the Zenmap GUI) or the much smaller command-line zip file version. We support Nmap on Windows 7 and newer, as well as Windows Server 2008 and newer. We also maintain a guide for users who must run Nmap on earlier Windows releases..
Note: The version of Npcap included in our installers may not always be the latest version. If you experience problems or just want the latest and greatest version, download and install the latest Npcap release.
The Nmap executable Windows installer can handle Npcap installation, registry performance tweaks, and decompressing the executables and data files into your preferred location. It also includes the Zenmap graphical frontend. Skip all the complexity of the Windows zip files with a self-installer:
Latest stable release self-installer: nmap-7.91-setup.exe
Latest Npcap release self-installer: npcap-1.30.exe
We have written post-install usage instructions. Please notify us if you encounter any problems or have suggestions for the installer.
For those who prefer the command-line zip files (Installation Instructions; Usage Instructions), they are still available. The Zenmap graphical interface is not included with these, so you need to run nmap.exe from a DOS/command window. Or you can download and install a superior command shell such as those included with the free Cygwin system. Also, you need to run the Npcap and Microsoft Visual C++ 2013 Redistributable Package installers which are included in the zip file. The main advantage is that these zip files are a fraction of the size of the executable installer:
Linux RPM Source and Binaries
Many popular Linux distributions (Redhat, Mandrake, Suse, etc) use the RPM package management system for quick and easy binary package installation. We have written a detailed guide to installing our RPM packages, though these simple commands usually do the trick: You can also download and install the RPMs yourself:
Mac OS X Binaries
Nmap binaries for Mac OS X (Intel x86) are distributed as a disk image file containing an installer. The installer allows installing Nmap, Zenmap, Ncat, and Ndiff. The programs have been tested on Intel computers running Mac OS X 10.8 and later. See the Mac OS X Nmap install page for more details. Users of PowerPC (PPC) Mac machines, which Apple ceased selling in 2006, should see this page instead for support information.
Source Code Distribution
This is the traditional compile-it-yourself format. The Nmap tarball compiles under Linux, Mac OS X, Windows, and many UNIX platforms (Solaris, Free/Net/OpenBSD, etc.) It includes Zenmap, the GUI frontend.
Detailed Linux/BSD/Solaris compilation instructions and options are provided here, though this usually does the trick:
Most Mac OS X users install with our Mac installer, but we also provide Mac OS X source code compilation instructions.
If you are compiling Nmap anyway, you might prefer to get the very latest code from our SVN source code repository rather than downloading a tarball here.
Other Operating Systems
Many other operating systems support Nmap so well that I have no need to create and distribute binary packages myself. You can choose to use the packages below, or compile the source distribution, which is often newer. We have created installation pages for the following platforms:
Run nmap on windows
While Nmap was once a Unix-only tool, a Windows version was released in 2000 and has since become the second most popular Nmap platform (behind Linux). Because of this popularity and the fact that many Windows users do not have a compiler, binary executables are distributed for each major Nmap release. We support Nmap on Windows 7 and newer, as well as Windows Server 2008 and newer. We also maintain a guide for users who must run Nmap on earlier Windows releases. While it has improved dramatically, the Windows port is not quite as efficient as on Unix. Here are the known limitations:
Nmap only supports ethernet interfaces (including most 802.11 wireless cards and many VPN clients) for raw packet scans. Unless you use the -sT -Pn options, RAS connections (such as PPP dialups) and certain VPN clients are not supported. This support was dropped when Microsoft removed raw TCP/IP socket support in Windows XP SP2. Now Nmap must send lower-level ethernet frames instead.
When using Nmap with WinPcap instead of Npcap, you cannot generally scan your own machine from itself (using a loopback IP such as 127.0.0.1 or any of its registered IP addresses). This is a Windows limitation that we have worked around in Npcap, which is included in the Windows self-installer. Users stuck with WinPcap can use a TCP connect scan without pinging ( -sT -Pn ) as that uses the high level socket API rather than sending raw packets.
Scan speeds on Windows are generally comparable to those on Unix, though the latter often has a slight performance edge. One exception to this is connect scan ( -sT ), which is often much slower on Windows because of deficiencies in the Windows networking API. This is a shame, since that is the one TCP scan that works over all networking types (not just ethernet, like the raw packet scans). Connect scan performance can be improved substantially by applying the Registry changes in the nmap_performance.reg file included with Nmap. By default these changes are applied for you by the Nmap executable installer. This registry file is in the nmap- directory of the Windows binary zip file, and nmap- /mswin32 in the source tarball (where is the version number of the specific release). These changes increase the number of ephemeral ports reserved for user applications (such as Nmap) and reduce the time delay before a closed connection can be reused. Most people simply check the box to apply these changes in the executable Nmap installer, but you can also apply them by double-clicking on nmap_performance.reg , or by running the command regedt32 nmap_performance.reg . To make the changes by hand, add these three Registry DWORD values to HKEY_LOCAL_MACHINE\SYSTEM\CurrentControlSet\Services\Tcpip\Parameters :
Set a large value such as 65534 (0x0000fffe). See MS KB 196271.
Set the minimum value (0x0000001e). See MS KB 149532.
Set to 1 so TCPTimedWaitDelay is checked.
I would like to thank Ryan Permeh of eEye, Andy Lutomirski , and Jens Vogt for their hard work on the Nmap Windows port. For many years, Nmap was a Unix-only tool, and it would likely still be that way if not for their efforts.
Windows users have three choices for installing Nmap, all of which are available from the download page at https://nmap.org/download.html.
Windows Self-installer
Every Nmap release includes a Windows self-installer named nmap- -setup.exe (where is the version number of the specific release). Most Nmap users choose this option since it is so easy. Another advantage of the self-installer is that it provides the option to install the Zenmap GUI and other tools. Simply run the installer file and let it walk you through panels for choosing an install path and installing Npcap. The installer was created with the open-source Nullsoft Scriptable Install System. After it completes, read the section called “Executing Nmap on Windows” for instructions on executing Nmap on the command-line or through Zenmap.
Command-line Zip Binaries
Most users prefer installing Nmap with the self-installer discussed previously.
Every stable Nmap release comes with Windows command-line binaries and associated files in a Zip archive. No graphical interface is included, so you need to run nmap.exe from a DOS/command window. Or you can download and install a superior command shell such as those included with the free Cygwin system available from http://www.cygwin.com. Here are the step-by-step instructions for installing and executing the Nmap .zip binaries.
Installing the Nmap zip binaries
Uncompress the zip file into the directory you want Nmap to reside in. An example would be C:\Program Files . A directory called nmap- should be created, which includes the Nmap executable and data files. Microsoft Windows XP and later includes zip extraction—just right-click on the file in Explorer . If you do not have a Zip decompression program, there is one (called unzip) in Cygwin described above, or you can download the open-source and free 7-Zip utility. Commercial alternatives are WinZip and PKZIP.
For improved performance, apply the Nmap Registry changes discussed previously.
Nmap requires the free Npcap packet capture library. We include a recent Npcap installer which is available in the zip file as npcap- .exe , where is the Npcap version rather than the Nmap version. Alternatively, you can obtain and install the latest version from https://npcap.org.
Due to the way Nmap is compiled, it requires the Microsoft Visual C++ 2013 Redistributable Package of runtime components. Many systems already have this installed from other packages, but you should run vcredist_x86.exe from the zip file just in case you need it. Pass the /q option to run these installers in quiet (non interactive) mode.
Instructions for executing your compiled Nmap are given in the section called “Executing Nmap on Windows”.
Compile from Source Code
Most Windows users prefer to use the Nmap binary self-installer, but compilation from source code is an option, particularly if you plan to help with Nmap development. Compilation requires Microsoft Visual C++ 2013, which is part of their commercial Visual Studio suite. Any of the Visual Studio 2013 editions should work, including the free Visual C++ 2013 Express.
Some of Nmap’s dependencies on Windows are inconvenient to build. For this reason, precompiled binaries of the dependencies are stored in Subversion, in the directory /nmap-mswin32-aux . When building from source, whether from a source code release or from Subversion, check out /nmap-mswin32-aux as described below.
Compiling Nmap on Windows from Source
Download the Windows dependencies from Subversion with the command svn checkout https://svn.nmap.org/nmap-mswin32-aux . The build files are configured to look for dependencies in this checked-out directory. If you want to build the dependencies yourself instead, you will have to reconfigure the Visual Studio project files to point to the alternate directory.
Decide whether to obtain the Nmap source code by downloading the latest release from nmap.org, or using a Subversion client to retrieve even newer (but less tested) code from our repository. These instructions are for the web download approach, but using Subversion instead is straightforward (see the section called “Obtaining Nmap from the Subversion (SVN) Repository”).
Download the latest Nmap source distribution from https://nmap.org/download.html. It has the name nmap- .tar.bz2 or nmap- .tgz . Those are the same tar file compressed using bzip2 or gzip, respectively. The bzip2-compressed version is smaller.
Uncompress the source code file you just downloaded. The source code directory and the nmap-mswin32-aux must be in the same parent directory. Recent releases of the free Cygwin distribution can handle both the .tar.bz2 and .tgz formats. Use the command tar xvjf nmap-version.tar.bz2 or tar xvzf nmap-version.tgz , respectively. Alternatively, the common WinZip application can decompress these files.
Open Visual Studio and the Nmap solution file ( nmap- /mswin32/nmap.sln ).
Right click on Solution ‘nmap’ in the Solution Explorer sidebar and choose “ Configuration Manager ” . Ensure that the active solution configuration is Release and then close the Configuration Manager.
Build Nmap by pressing F7 or choosing “ Build Solution ” from the GUI. Nmap should begin compiling, and end with the line “ — Done — ” saying that all projects built successfully and there were zero failures.
The executable and data files can be found in nmap- /mswin32/Release/ . You can copy them to a preferred directory as long as they are all kept together.
Ensure that you have Npcap installed. You can obtain it by installing our binary self-installer or executing npcap- .exe from our zip package. Alternatively, you can obtain the official installer at https://npcap.org.
Instructions for executing your compiled Nmap are given in the next section.
If you wish to build an Nmap executable Windows installer or Zenmap executable, see docs/win32-installer-zenmap-buildguide.txt in the Nmap SVN repository.
Many people have asked whether Nmap can be compiled with the gcc / g++ included with Cygwin or other compilers. Some users have reported success with this, but we don’t maintain instructions for building Nmap under Cygwin.
Executing Nmap on Windows
Nmap releases now include the Zenmap graphical user interface for Nmap. If you used the Nmap installer and left the Zenmap field checked, there should be a new Zenmap entry on your desktop and Start Menu. Click this to get started. Zenmap is fully documented in Chapter 12, Zenmap GUI Users’ Guide. While many users love Zenmap, others prefer the traditional command-line approach to executing Nmap. Here are detailed instructions for users who are unfamiliar with command-line interfaces:
Make sure the user you are logged in as has administrative privileges on the computer (user should be a member of the administrators group).
Open a command/DOS Window. Though it can be found in the program menu tree, the simplest approach is to choose “ Start ” -> “ Run ” and type cmd . Opening a Cygwin window (if you installed it) by clicking on the Cygwin icon on the desktop works too, although the necessary commands differ slightly from those shown here.
Change to the directory you installed Nmap into. You can skip this step if Nmap is already in your command path (the Zenmap isntaller adds it there by default). Otherwise, type the following commands.
On Windows releases prior to Windows 7, specify \Program Files\Nmap instead. The directory will also be different if you chose to install Nmap in a non-default location.
Execute nmap.exe . Figure 2.1 is a screen shot showing a simple example.
Figure 2.1. Executing Nmap from a Windows command shell
If you execute Nmap frequently, you can add the Nmap directory ( c:\Program Files (x86)\Nmap by default on Windows 7) to your command execution path. The exact place to set this varies by Windows platform. On my Windows XP box, which installs Nmap in c:\Program Files\Nmap , I do the following:
From the desktop, right click on My Computer and then click “ properties ” .
In the System Properties window, click the “ Advanced ” tab.
Click the “ Environment Variables ” button.
Choose Path from the System variables section, then hit edit.


