- Get started using Python on Windows for beginners
- Set up your development environment
- Install Python
- Install Visual Studio Code
- Install Git (optional)
- Hello World tutorial for some Python basics
- Hello World tutorial for using Python with VS Code
- Create a simple game with Pygame
- Resources for continued learning
- Online courses for learning Python
- Working with Python in VS Code
- How to Run Your Python Scripts
- Scripts vs Modules
- What’s the Python Interpreter?
- How to Run Python Code Interactively
- How Does the Interpreter Run Python Scripts?
- How to Run Python Scripts Using the Command-Line
- Using the python Command
- Redirecting the Output
- Running Modules With the -m Option
- Using the Script Filename
- How to Run Python Scripts Interactively
- Taking Advantage of import
- Using importlib and imp
- Using runpy.run_module() and runpy.run_path()
- Hacking exec()
- Using execfile() (Python 2.x Only)
- How to Run Python Scripts From an IDE or a Text Editor
- How to Run Python Scripts From a File Manager
- Conclusion
Get started using Python on Windows for beginners
The following is a step-by-step guide for beginners interested in learning Python using Windows 10.
Set up your development environment
For beginners who are new to Python, we recommend you install Python from the Microsoft Store. Installing via the Microsoft Store uses the basic Python3 interpreter, but handles set up of your PATH settings for the current user (avoiding the need for admin access), in addition to providing automatic updates. This is especially helpful if you are in an educational environment or a part of an organization that restricts permissions or administrative access on your machine.
If you are using Python on Windows for web development, we recommend a different set up for your development environment. Rather than installing directly on Windows, we recommend installing and using Python via the Windows Subsystem for Linux. For help, see: Get started using Python for web development on Windows. If you’re interested in automating common tasks on your operating system, see our guide: Get started using Python on Windows for scripting and automation. For some advanced scenarios (like needing to access/modify Python’s installed files, make copies of binaries, or use Python DLLs directly), you may want to consider downloading a specific Python release directly from python.org or consider installing an alternative, such as Anaconda, Jython, PyPy, WinPython, IronPython, etc. We only recommend this if you are a more advanced Python programmer with a specific reason for choosing an alternative implementation.
Install Python
To install Python using the Microsoft Store:
Go to your Start menu (lower left Windows icon), type «Microsoft Store», select the link to open the store.
Once the store is open, select Search from the upper-right menu and enter «Python». Open «Python 3.9» from the results under Apps. Select Get.
Once Python has completed the downloading and installation process, open Windows PowerShell using the Start menu (lower left Windows icon). Once PowerShell is open, enter Python —version to confirm that Python3 has installed on your machine.
The Microsoft Store installation of Python includes pip, the standard package manager. Pip allows you to install and manage additional packages that are not part of the Python standard library. To confirm that you also have pip available to install and manage packages, enter pip —version .
Install Visual Studio Code
By using VS Code as your text editor / integrated development environment (IDE), you can take advantage of IntelliSense (a code completion aid), Linting (helps avoid making errors in your code), Debug support (helps you find errors in your code after you run it), Code snippets (templates for small reusable code blocks), and Unit testing (testing your code’s interface with different types of input).
VS Code also contains a built-in terminal that enables you to open a Python command line with Windows Command prompt, PowerShell, or whatever you prefer, establishing a seamless workflow between your code editor and command line.
To install VS Code, download VS Code for Windows: https://code.visualstudio.com.
Once VS Code has been installed, you must also install the Python extension. To install the Python extension, you can select the VS Code Marketplace link or open VS Code and search for Python in the extensions menu (Ctrl+Shift+X).
Python is an interpreted language, and in order to run Python code, you must tell VS Code which interpreter to use. We recommend sticking with Python 3.7 unless you have a specific reason for choosing something different. Once you’ve installed the Python extension, select a Python 3 interpreter by opening the Command Palette (Ctrl+Shift+P), start typing the command Python: Select Interpreter to search, then select the command. You can also use the Select Python Environment option on the bottom Status Bar if available (it may already show a selected interpreter). The command presents a list of available interpreters that VS Code can find automatically, including virtual environments. If you don’t see the desired interpreter, see Configuring Python environments.
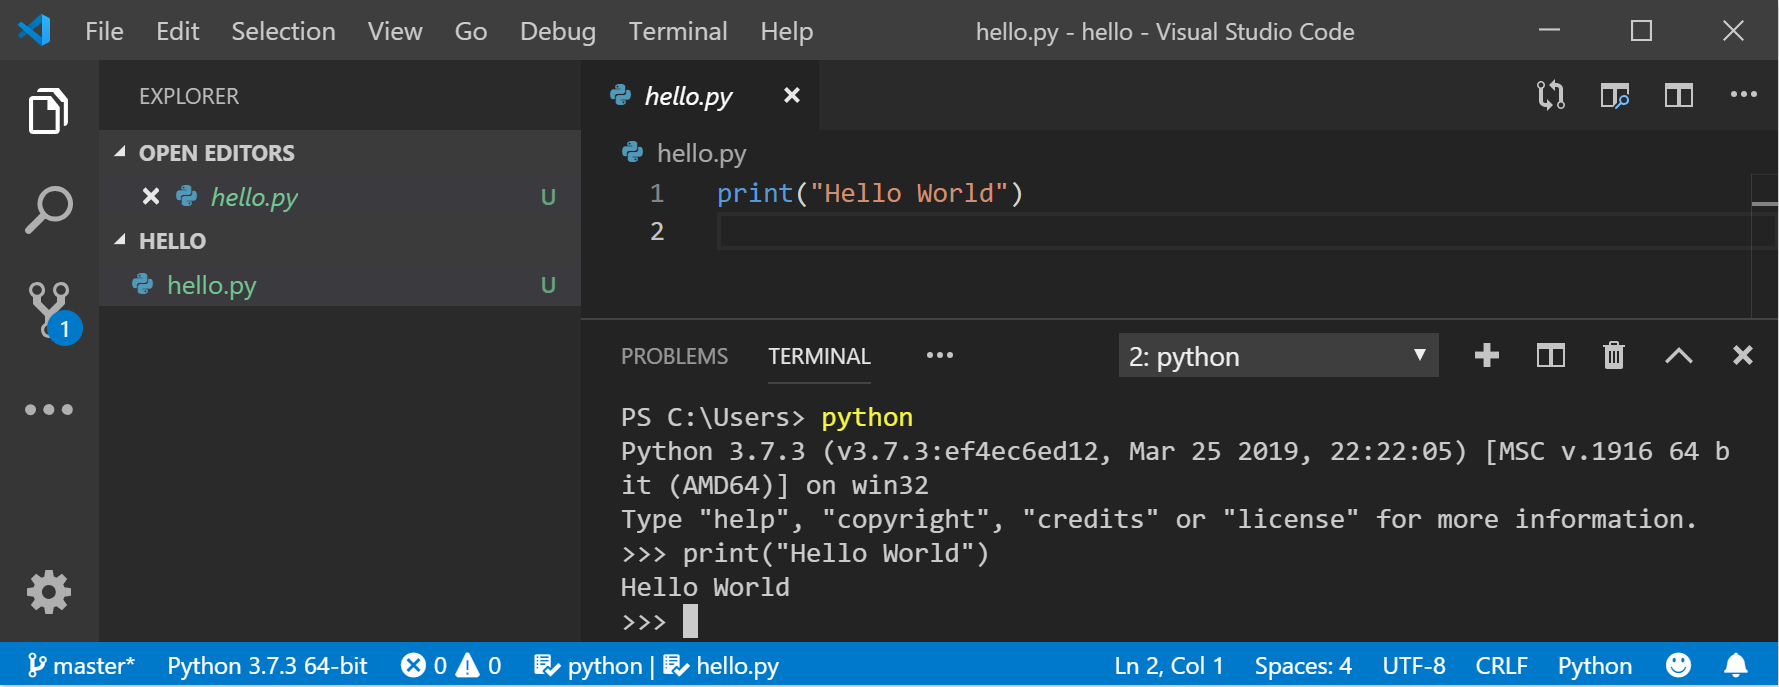
To open the terminal in VS Code, select View > Terminal, or alternatively use the shortcut Ctrl+` (using the backtick character). The default terminal is PowerShell.
Inside your VS Code terminal, open Python by simply entering the command: python
Try the Python interpreter out by entering: print(«Hello World») . Python will return your statement «Hello World».
Install Git (optional)
If you plan to collaborate with others on your Python code, or host your project on an open-source site (like GitHub), VS Code supports version control with Git. The Source Control tab in VS Code tracks all of your changes and has common Git commands (add, commit, push, pull) built right into the UI. You first need to install Git to power the Source Control panel.
Download and install Git for Windows from the git-scm website.
An Install Wizard is included that will ask you a series of questions about settings for your Git installation. We recommend using all of the default settings, unless you have a specific reason for changing something.
If you’ve never worked with Git before, GitHub Guides can help you get started.
Hello World tutorial for some Python basics
Python, according to its creator Guido van Rossum, is a “high-level programming language, and its core design philosophy is all about code readability and a syntax which allows programmers to express concepts in a few lines of code.”
Python is an interpreted language. In contrast to compiled languages, in which the code you write needs to be translated into machine code in order to be run by your computer’s processor, Python code is passed straight to an interpreter and run directly. You just type in your code and run it. Let’s try it!
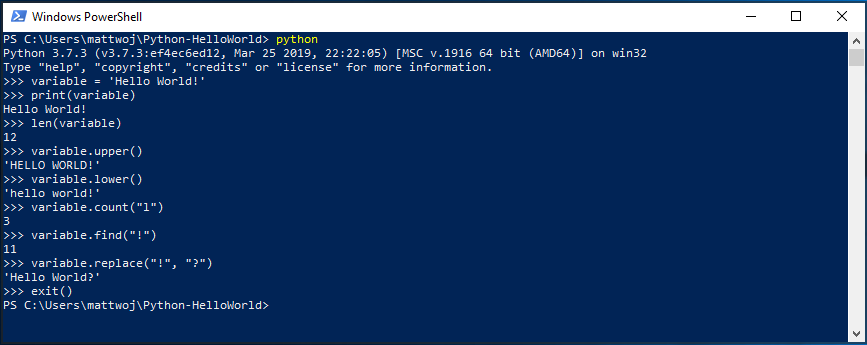
With your PowerShell command line open, enter python to run the Python 3 interpreter. (Some instructions prefer to use the command py or python3 , these should also work). You will know that you’re successful because a >>> prompt with three greater-than symbols will display.
There are several built-in methods that allow you to make modifications to strings in Python. Create a variable, with: variable = ‘Hello World!’ . Press Enter for a new line.
Print your variable with: print(variable) . This will display the text «Hello World!».
Find out the length, how many characters are used, of your string variable with: len(variable) . This will display that there are 12 characters used. (Note that the blank space it counted as a character in the total length.)
Convert your string variable to upper-case letters: variable.upper() . Now convert your string variable to lower-case letters: variable.lower() .
Count how many times the letter «l» is used in your string variable: variable.count(«l») .
Search for a specific character in your string variable, let’s find the exclamation point, with: variable.find(«!») . This will display that the exclamation point is found in the 11th position character of the string.
Replace the exclamation point with a question mark: variable.replace(«!», «?») .
To exit Python, you can enter exit() , quit() , or select Ctrl-Z.
Hope you had fun using some of Python’s built-in string modification methods. Now try creating a Python program file and running it with VS Code.
Hello World tutorial for using Python with VS Code
The VS Code team has put together a great Getting Started with Python tutorial walking through how to create a Hello World program with Python, run the program file, configure and run the debugger, and install packages like matplotlib and numpy to create a graphical plot inside a virtual environment.
Open PowerShell and create an empty folder called «hello», navigate into this folder, and open it in VS Code:
Once VS Code opens, displaying your new hello folder in the left-side Explorer window, open a command line window in the bottom panel of VS Code by pressing Ctrl+` (using the backtick character) or selecting View > Terminal. By starting VS Code in a folder, that folder becomes your «workspace». VS Code stores settings that are specific to that workspace in .vscode/settings.json, which are separate from user settings that are stored globally.
Continue the tutorial in the VS Code docs: Create a Python Hello World source code file.
Create a simple game with Pygame
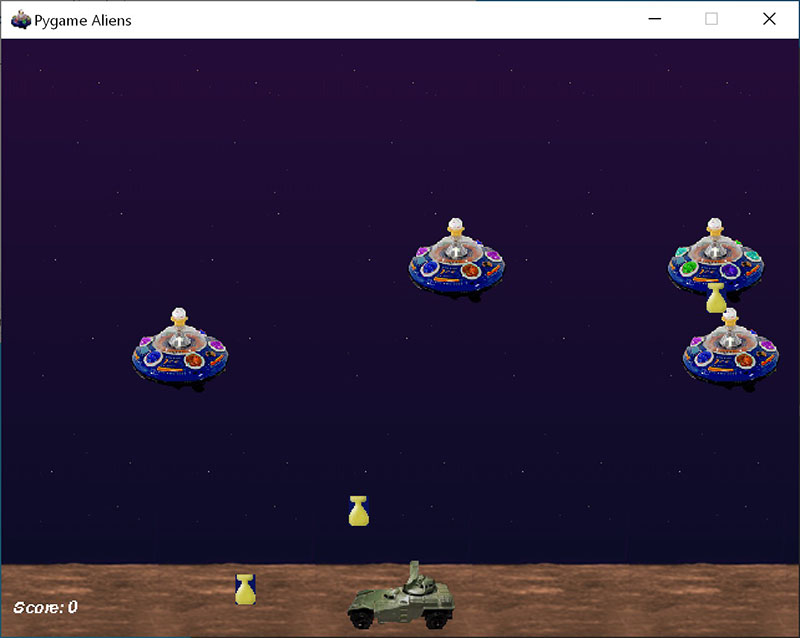
Pygame is a popular Python package for writing games — encouraging students to learn programming while creating something fun. Pygame displays graphics in a new window, and so it will not work under the command-line-only approach of WSL. However, if you installed Python via the Microsoft Store as detailed in this tutorial, it will work fine.
Once you have Python installed, install pygame from the command line (or the terminal from within VS Code) by typing python -m pip install -U pygame —user .
Test the installation by running a sample game : python -m pygame.examples.aliens
All being well, the game will open a window. Close the window when you are done playing.
Here’s how to start writing your own game.
Open PowerShell (or Windows Command Prompt) and create an empty folder called «bounce». Navigate to this folder and create a file named «bounce.py». Open the folder in VS Code:
Using VS Code, enter the following Python code (or copy and paste it):
Save it as: bounce.py .
From the PowerShell terminal, run it by entering: python bounce.py .
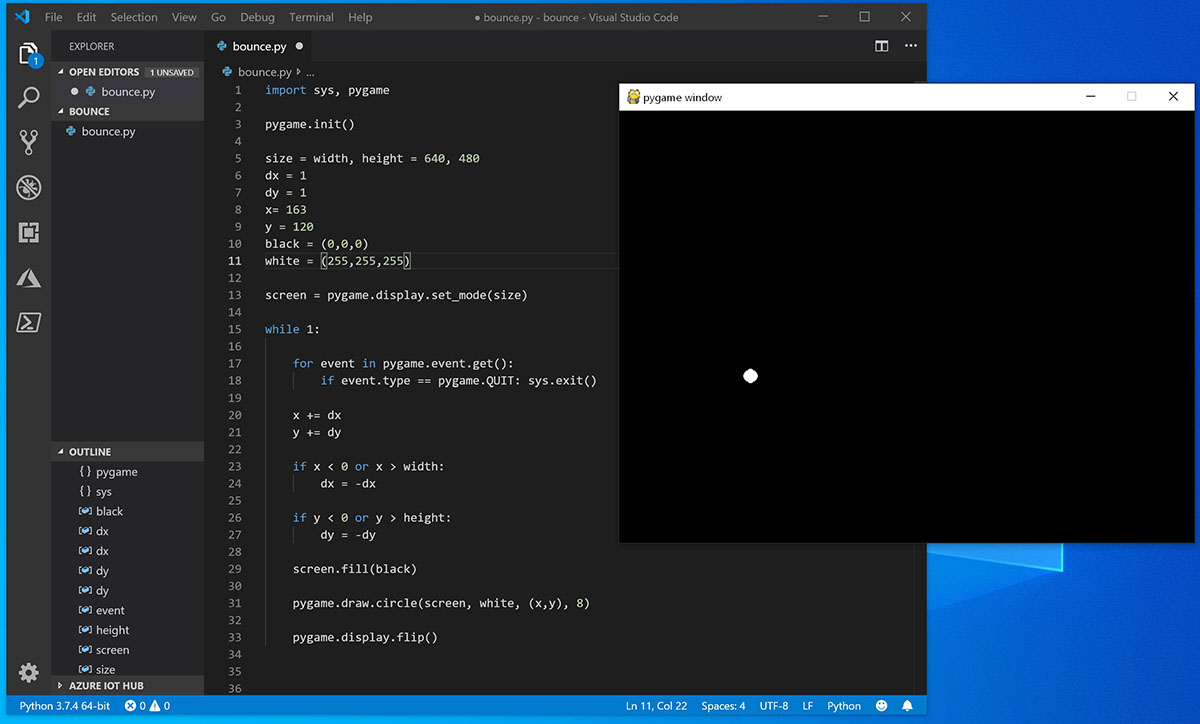
Try adjusting some of the numbers to see what effect they have on your bouncing ball.
Read more about writing games with pygame at pygame.org.
Resources for continued learning
We recommend the following resources to support you in continuing to learn about Python development on Windows.
Online courses for learning Python
Introduction to Python on Microsoft Learn: Try the interactive Microsoft Learn platform and earn experience points for completing this module covering the basics on how to write basic Python code, declare variables, and work with console input and output. The interactive sandbox environment makes this a great place to start for folks who don’t have their Python development environment set up yet.
Python on Pluralsight: 8 Courses, 29 Hours: The Python learning path on Pluralsight offers online courses covering a variety of topics related to Python, including a tool to measure your skill and find your gaps.
LearnPython.org Tutorials: Get started on learning Python without needing to install or set anything up with these free interactive Python tutorials from the folks at DataCamp.
The Python.org Tutorials: Introduces the reader informally to the basic concepts and features of the Python language and system.
Learning Python on Lynda.com: A basic introduction to Python.
Working with Python in VS Code
Editing Python in VS Code: Learn more about how to take advantage of VS Code’s autocomplete and IntelliSense support for Python, including how to customize their behavior. or just turn them off.
Linting Python: Linting is the process of running a program that will analyse code for potential errors. Learn about the different forms of linting support VS Code provides for Python and how to set it up.
Debugging Python: Debugging is the process of identifying and removing errors from a computer program. This article covers how to initialize and configure debugging for Python with VS Code, how to set and validate breakpoints, attach a local script, perform debugging for different app types or on a remote computer, and some basic troubleshooting.
Unit testing Python: Covers some background explaining what unit testing means, an example walkthrough, enabling a test framework, creating and running your tests, debugging tests, and test configuration settings.
How to Run Your Python Scripts
Table of Contents
Watch Now This tutorial has a related video course created by the Real Python team. Watch it together with the written tutorial to deepen your understanding: Running Python Scripts
One of the most important skills you need to build as a Python developer is to be able to run Python scripts and code. This is going to be the only way for you to know if your code works as you planned. It’s even the only way of knowing if your code works at all!
This step-by-step tutorial will guide you through a series of ways to run Python scripts, depending on your environment, platform, needs, and skills as a programmer.
You’ll have the opportunity to learn how to run Python scripts by using:
- The operating system command-line or terminal
- The Python interactive mode
- The IDE or text editor you like best
- The file manager of your system, by double-clicking on the icon of your script
This way, you’ll get the knowledge and skills you’ll need to make your development cycle more productive and flexible.
Free Download: Get a sample chapter from Python Tricks: The Book that shows you Python’s best practices with simple examples you can apply instantly to write more beautiful + Pythonic code.
Take the Quiz: Test your knowledge with our interactive “How to Run Your Python Scripts” quiz. Upon completion you will receive a score so you can track your learning progress over time:
Scripts vs Modules
In computing, the word script is used to refer to a file containing a logical sequence of orders or a batch processing file. This is usually a simple program, stored in a plain text file.
Scripts are always processed by some kind of interpreter, which is responsible for executing each command sequentially.
A plain text file containing Python code that is intended to be directly executed by the user is usually called script, which is an informal term that means top-level program file.
On the other hand, a plain text file, which contains Python code that is designed to be imported and used from another Python file, is called module.
So, the main difference between a module and a script is that modules are meant to be imported, while scripts are made to be directly executed.
In either case, the important thing is to know how to run the Python code you write into your modules and scripts.
What’s the Python Interpreter?
Python is an excellent programming language that allows you to be productive in a wide variety of fields.
Python is also a piece of software called an interpreter. The interpreter is the program you’ll need to run Python code and scripts. Technically, the interpreter is a layer of software that works between your program and your computer hardware to get your code running.
Depending on the Python implementation you use, the interpreter can be:
- A program written in C, like CPython, which is the core implementation of the language
- A program written in Java, like Jython
- A program written in Python itself, like PyPy
- A program implemented in .NET, like IronPython
Whatever form the interpreter takes, the code you write will always be run by this program. Therefore, the first condition to be able to run Python scripts is to have the interpreter correctly installed on your system.
The interpreter is able to run Python code in two different ways:
- As a script or module
- As a piece of code typed into an interactive session
How to Run Python Code Interactively
A widely used way to run Python code is through an interactive session. To start a Python interactive session, just open a command-line or terminal and then type in python , or python3 depending on your Python installation, and then hit Enter .
Here’s an example of how to do this on Linux:
The standard prompt for the interactive mode is >>> , so as soon as you see these characters, you’ll know you are in.
Now, you can write and run Python code as you wish, with the only drawback being that when you close the session, your code will be gone.
When you work interactively, every expression and statement you type in is evaluated and executed immediately:
An interactive session will allow you to test every piece of code you write, which makes it an awesome development tool and an excellent place to experiment with the language and test Python code on the fly.
To exit interactive mode, you can use one of the following options:
- quit() or exit() , which are built-in functions
- The Ctrl + Z and Enter key combination on Windows, or just Ctrl + D on Unix-like systems
Note: The first rule of thumb to remember when using Python is that if you’re in doubt about what a piece of Python code does, then launch an interactive session and try it out to see what happens.
If you’ve never worked with the command-line or terminal, then you can try this:
On Windows, the command-line is usually known as command prompt or MS-DOS console, and it is a program called cmd.exe . The path to this program can vary significantly from one system version to another.
A quick way to get access to it is by pressing the Win + R key combination, which will take you to the Run dialog. Once you’re there, type in cmd and press Enter .
On GNU/Linux (and other Unixes), there are several applications that give you access to the system command-line. Some of the most popular are xterm, Gnome Terminal, and Konsole. These are tools that run a shell or terminal like Bash, ksh, csh, and so on.
In this case, the path to these applications is much more varied and depends on the distribution and even on the desktop environment you use. So, you’ll need to read your system documentation.
On Mac OS X, you can access the system terminal from Applications → Utilities → Terminal.
How Does the Interpreter Run Python Scripts?
When you try to run Python scripts, a multi-step process begins. In this process the interpreter will:
Process the statements of your script in a sequential fashion
Compile the source code to an intermediate format known as bytecode
This bytecode is a translation of the code into a lower-level language that’s platform-independent. Its purpose is to optimize code execution. So, the next time the interpreter runs your code, it’ll bypass this compilation step.
Strictly speaking, this code optimization is only for modules (imported files), not for executable scripts.
Ship off the code for execution
At this point, something known as a Python Virtual Machine (PVM) comes into action. The PVM is the runtime engine of Python. It is a cycle that iterates over the instructions of your bytecode to run them one by one.
The PVM is not an isolated component of Python. It’s just part of the Python system you’ve installed on your machine. Technically, the PVM is the last step of what is called the Python interpreter.
The whole process to run Python scripts is known as the Python Execution Model.
Note: This description of the Python Execution Model corresponds to the core implementation of the language, that is, CPython. As this is not a language requirement, it may be subject to future changes.
How to Run Python Scripts Using the Command-Line
A Python interactive session will allow you to write a lot of lines of code, but once you close the session, you lose everything you’ve written. That’s why the usual way of writing Python programs is by using plain text files. By convention, those files will use the .py extension. (On Windows systems the extension can also be .pyw .)
Python code files can be created with any plain text editor. If you are new to Python programming, you can try Sublime Text, which is a powerful and easy-to-use editor, but you can use any editor you like.
To keep moving forward in this tutorial, you’ll need to create a test script. Open your favorite text editor and write the following code:
Save the file in your working directory with the name hello.py . With the test script ready, you can continue reading.
Using the python Command
To run Python scripts with the python command, you need to open a command-line and type in the word python , or python3 if you have both versions, followed by the path to your script, just like this:
If everything works okay, after you press Enter , you’ll see the phrase Hello World! on your screen. That’s it! You’ve just run your first Python script!
If this doesn’t work right, maybe you’ll need to check your system PATH , your Python installation, the way you created the hello.py script, the place where you saved it, and so on.
This is the most basic and practical way to run Python scripts.
Redirecting the Output
Sometimes it’s useful to save the output of a script for later analysis. Here’s how you can do that:
This operation redirects the output of your script to output.txt , rather than to the standard system output ( stdout ). The process is commonly known as stream redirection and is available on both Windows and Unix-like systems.
If output.txt doesn’t exist, then it’s automatically created. On the other hand, if the file already exists, then its contents will be replaced with the new output.
Finally, if you want to add the output of consecutive executions to the end of output.txt , then you must use two angle brackets ( >> ) instead of one, just like this:
Now, the output will be appended to the end of output.txt .
Running Modules With the -m Option
Python offers a series of command-line options that you can use according to your needs. For example, if you want to run a Python module, you can use the command python -m .
The -m option searches sys.path for the module name and runs its content as __main__ :
Note: module-name needs to be the name of a module object, not a string.
Using the Script Filename
On recent versions of Windows, it is possible to run Python scripts by simply entering the name of the file containing the code at the command prompt:
This is possible because Windows uses the system registry and the file association to determine which program to use for running a particular file.
On Unix-like systems, such as GNU/Linux, you can achieve something similar. You’ll only have to add a first line with the text #!/usr/bin/env python , just as you did with hello.py .
For Python, this is a simple comment, but for the operating system, this line indicates what program must be used to run the file.
This line begins with the #! character combination, which is commonly called hash bang or shebang, and continues with the path to the interpreter.
There are two ways to specify the path to the interpreter:
- #!/usr/bin/python : writing the absolute path
- #!/usr/bin/env python : using the operating system env command, which locates and executes Python by searching the PATH environment variable
This last option is useful if you bear in mind that not all Unix-like systems locate the interpreter in the same place.
Finally, to execute a script like this one, you need to assign execution permissions to it and then type in the filename at the command-line.
Here’s an example of how to do this:
With execution permissions and the shebang line properly configured, you can run the script by simply typing its filename at the command-line.
Finally, you need to note that if your script isn’t located at your current working directory, you’ll have to use the file path for this method to work correctly.
How to Run Python Scripts Interactively
It is also possible to run Python scripts and modules from an interactive session. This option offers you a variety of possibilities.
Taking Advantage of import
When you import a module, what really happens is that you load its contents for later access and use. The interesting thing about this process is that import runs the code as its final step.
When the module contains only classes, functions, variables, and constants definitions, you probably won’t be aware that the code was actually run, but when the module includes calls to functions, methods, or other statements that generate visible results, then you’ll witness its execution.
This provides you with another option to run Python scripts:
You’ll have to note that this option works only once per session. After the first import , successive import executions do nothing, even if you modify the content of the module. This is because import operations are expensive and therefore run only once. Here’s an example:
These two import operations do nothing, because Python knows that hello has already been imported.
There are some requirements for this method to work:
- The file with the Python code must be located in your current working directory.
- The file must be in the Python Module Search Path (PMSP), where Python looks for the modules and packages you import.
To know what’s in your current PMSP, you can run the following code:
Running this code, you’ll get the list of directories and .zip files where Python searches the modules you import.
Using importlib and imp
In the Python Standard Library, you can find importlib , which is a module that provides import_module() .
With import_module() , you can emulate an import operation and, therefore, execute any module or script. Take a look at this example:
Once you’ve imported a module for the first time, you won’t be able to continue using import to run it. In this case, you can use importlib.reload() , which will force the interpreter to re-import the module again, just like in the following code:
An important point to note here is that the argument of reload() has to be the name of a module object, not a string:
If you use a string as an argument, then reload() will raise a TypeError exception.
Note: The output of the previous code has been abbreviated ( . ) in order to save space.
importlib.reload() comes in handy when you are modifying a module and want to test if your changes work, without leaving the current interactive session.
Finally, if you are using Python 2.x, then you’ll have imp , which is a module that provides a function called reload() . imp.reload() works similarly to importlib.reload() . Here’s an example:
In Python 2.x, reload() is a built-in function. In versions 2.6 and 2.7, it is also included in imp , to aid the transition to 3.x.
Note: imp has been deprecated since version 3.4 of the language. The imp package is pending deprecation in favor of importlib .
Using runpy.run_module() and runpy.run_path()
The Standard Library includes a module called runpy . In this module, you can find run_module() , which is a function that allows you to run modules without importing them first. This function returns the globals dictionary of the executed module.
Here’s an example of how you can use it:
The module is located using a standard import mechanism and then executed on a fresh module namespace.
The first argument of run_module() must be a string with the absolute name of the module (without the .py extension).
On the other hand, runpy also provides run_path() , which will allow you to run a module by providing its location in the filesystem:
Like run_module() , run_path() returns the globals dictionary of the executed module.
The file_path parameter must be a string and can refer to the following:
- The location of a Python source file
- The location of a compiled bytecode file
- The value of a valid entry in the sys.path , containing a __main__ module ( __main__.py file)
Hacking exec()
So far, you’ve seen the most commonly used ways to run Python scripts. In this section, you’ll see how to do that by using exec() , which is a built-in function that supports the dynamic execution of Python code.
exec() provides an alternative way for running your scripts:
This statement opens hello.py , reads its content, and sends it to exec() , which finally runs the code.
The above example is a little bit out there. It’s just a “hack” that shows you how versatile and flexible Python can be.
Using execfile() (Python 2.x Only)
If you prefer to use Python 2.x, you can use a built-in function called execfile() , which is able to run Python scripts.
The first argument of execfile() has to be a string containing the path to the file you want to run. Here’s an example:
Here, hello.py is parsed and evaluated as a sequence of Python statements.
How to Run Python Scripts From an IDE or a Text Editor
When developing larger and more complex applications, it is recommended that you use an integrated development environment (IDE) or an advanced text editor.
Most of these programs offer the possibility of running your scripts from inside the environment itself. It is common for them to include a Run or Build command, which is usually available from the tool bar or from the main menu.
Python’s standard distribution includes IDLE as the default IDE, and you can use it to write, debug, modify, and run your modules and scripts.
Other IDEs such as Eclipse-PyDev, PyCharm, Eric, and NetBeans also allow you to run Python scripts from inside the environment.
Advanced text editors like Sublime Text and Visual Studio Code also allow you to run your scripts.
To grasp the details of how to run Python scripts from your preferred IDE or editor, you can take a look at its documentation.
How to Run Python Scripts From a File Manager
Running a script by double-clicking on its icon in a file manager is another possible way to run your Python scripts. This option may not be widely used in the development stage, but it may be used when you release your code for production.
In order to be able to run your scripts with a double-click, you must satisfy some conditions that will depend on your operating system.
Windows, for example, associates the extensions .py and .pyw with the programs python.exe and pythonw.exe respectively. This allows you to run your scripts by double-clicking on them.
When you have a script with a command-line interface, it is likely that you only see the flash of a black window on your screen. To avoid this annoying situation, you can add a statement like input(‘Press Enter to Continue. ‘) at the end of the script. This way, the program will stop until you press Enter .
This trick has its drawbacks, though. For example, if your script has any error, the execution will be aborted before reaching the input() statement, and you still won’t be able to see the result.
On Unix-like systems, you’ll probably be able to run your scripts by double-clicking on them in your file manager. To achieve this, your script must have execution permissions, and you’ll need to use the shebang trick you’ve already seen. Likewise, you may not see any results on screen when it comes to command-line interface scripts.
Because the execution of scripts through double-click has several limitations and depends on many factors (such as the operating system, the file manager, execution permissions, file associations), it is recommended that you see it as a viable option for scripts already debugged and ready to go into production.
Conclusion
With the reading of this tutorial, you have acquired the knowledge and skills you need to be able to run Python scripts and code in several ways and in a variety of situations and development environments.
You are now able to run Python scripts from:
- The operating system command-line or terminal
- The Python interactive mode
- The IDE or text editor you like best
- The file manager of your system, by double-clicking on the icon of your script
These skills will make your development process much faster, as well as more productive and flexible.
Take the Quiz: Test your knowledge with our interactive “How to Run Your Python Scripts” quiz. Upon completion you will receive a score so you can track your learning progress over time:
Watch Now This tutorial has a related video course created by the Real Python team. Watch it together with the written tutorial to deepen your understanding: Running Python Scripts
Get a short & sweet Python Trick delivered to your inbox every couple of days. No spam ever. Unsubscribe any time. Curated by the Real Python team.

About Leodanis Pozo Ramos

Leodanis is an industrial engineer who loves Python and software development. He’s a self-taught Python developer with 5+ years of experience.
Each tutorial at Real Python is created by a team of developers so that it meets our high quality standards. The team members who worked on this tutorial are:
![]()
![]()

Master Real-World Python Skills With Unlimited Access to Real Python

Join us and get access to hundreds of tutorials, hands-on video courses, and a community of expert Pythonistas:
Master Real-World Python Skills
With Unlimited Access to Real Python
Join us and get access to hundreds of tutorials, hands-on video courses, and a community of expert Pythonistas:
What Do You Think?
Real Python Comment Policy: The most useful comments are those written with the goal of learning from or helping out other readers—after reading the whole article and all the earlier comments. Complaints and insults generally won’t make the cut here.
What’s your #1 takeaway or favorite thing you learned? How are you going to put your newfound skills to use? Leave a comment below and let us know.
Related Tutorial Categories: basics python


