- How to Run Mac On Windows -XP,7,8,8.1,10
- Methods to Dual Boot Mac alongside Windows on PC or Laptop
- Requirements to Run Mac On Windows
- Tools Needed to Install Mac On Windows PC or laptop
- How To Run Mac On Windows [Guide]
- How to Run Mac on windows, using VirtualBox – Complete Guide.
- Run mac on windows.
- Run virtual mac on windows – VirtualBox.
- How to Run Mac OS X Inside Windows Using VirtualBox
- Introduction: How to Run Mac OS X Inside Windows Using VirtualBox
- Step 1: Requirements
- Step 2: Install and Set Up VirtualBox
- Step 3: Install OS X in VirtualBox
- Step 4: Smooth Out the Rough Edges — Part 1 (Fix Audio With Multibeast)
- Step 5: Smooth Out the Rough Edges — Part 2 (Boot OS X Without HackBoot)
- Step 6: Smooth Out the Rough Edges — Part 3 (Get Higher-Resolution Virtual Machine)
- Step 7: Finalise
How to Run Mac On Windows -XP,7,8,8.1,10
Mac OS X is an advanced operating system, easy to use and extremely stable when used daily, and sometimes one would prefer to have OSX on PC rather than using Windows 7 or latest Windows 10. Well we have brought something interesting for you – The Guide to Run OSX on Windows which means users can Run Mac OS alongside Windows 7,8,8.1. The aim of installing Mac On Windows will be achieved by Virtual Technology. Many users aspire to buy Apple powered Macbook or any other premium Mac OS X running Apple device, but as we know that all can’t afford it, but atleast one can make ends meet by getting Mac OSx experience on Windows with very few steps.
Here is the glimpse of the result that you will see after you install mac on windows 7 on laptop :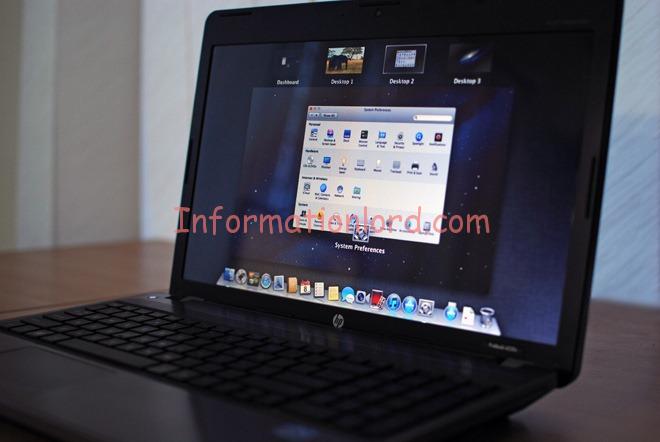
Methods to Dual Boot Mac alongside Windows on PC or Laptop
We actually have two methods by which you will be able to use Mac On Windows PC –
- Buy Apple’s Macbook which will cost you three times you buy a new Window powered Laptop.
- Use this tutorial and little tech work which will cost you nothing but will give you a feeling of self-satisfaction that you have installed Mac OS on PC without spending even a penny.
So I would like to go by procedure 2 as that is very easy and hope you will not mind it 😛 So now the basic question that arises is – How to Run Mac On Windows -XP,7,8,8.1,10 – Follow up this easy tutorial to Install or Run OSX on Windows PC without losing important data or compromising with the Speed of your PC.
Requirements to Run Mac On Windows
The Basic Requirements to Run MAC on PC or Laptop or to Install Mac OS X (10.5 and above) on Virtual Machine VMWare. As VMWare is a virtual machine so it runs alongside windows and unlike other Operating System which we run using VMware, we need little more hardware requirements to run Mac on Vmware.
- 8 GB RAM will give you more than enough speed to cope up with the load of Mac OS on Virtual Machine
- Intel Core i3, i5, i7 will work like a charm.
- 128 GB of storage available on the hard disk to make Mac run without errors on PC.
It is not compulsory to have the above requirements. But lower than this will result into slow performance by the VMWare Workstation while loading MAC. But one can always give it a try to Run OSX on Windows with whatever config you have.
Tools Needed to Install Mac On Windows PC or laptop
To run mac on windows VMware one need to have few essentials that will equip you up to Run MAC OS-X alongside windows smoothly.first and the foremost software we require is the VMWare Virtual Machine itself. Download
First and the foremost software we require is the VMWare Virtual Machine itself. Download VMware Workstation from here.
VMWare is not the only one software required to Install MAC on Windows 7,8 or 10; You require an essential Unlocker as well. Download Latest MaC Unlocker required to Install Mac OSX on Windows from link in the Social Locker Below. [Like/+1/Tweet in order to Download latest Mac Unlocker]
Now Download the Essential VMDK Disk image of OSX that you will be using for running mac on windows from here and extract the same with xnohat as password 🙂
How To Run Mac On Windows [Guide]
- Step 1: Install the latest virtual technology powered VMWare Workstation which can be done easily by following on-screen instructions.
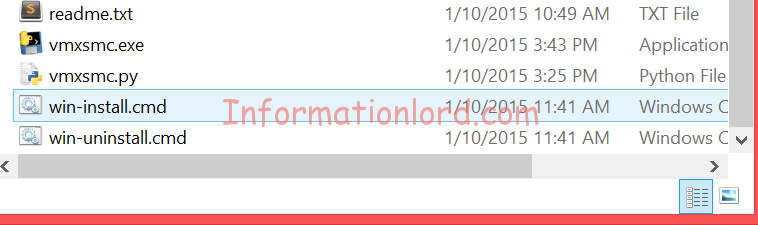
- Step 2: Now the real task starts here- Unzip the Unlocker 2.0.8 which you downloaded from second link and then Run the file named “win-install.cmd“. We would recommend that you run the file as Administrator.

You can hereafter link your CD Drive, Internet connection etc via editing settings of the Virtual Machine! If you are facing any problem to run OS-X on windows or if you want to share your views, do comment here, We will be at your service!
Running Mac OS X on Windows via Dual Boot is not a very hard task as well, but then the procedure mentioned here to Install Mac alongside Windows using VMware is of much use compared to totally formatting the system for Hackintosh. Do let us know if you are looking for Hackintosh tutorials in the comments section. This setup is all for free to get Mac Os X running on your Windows pc with all official udpates.
How to Run Mac on windows, using VirtualBox – Complete Guide.

It’s 2018, and numerous of the operating system, available on the internet. No doubt in this, Windows is the most widely used operating system. But it doesn’t mean that other Operating Systems are not Good. If you are planning to switch from Windows to Mac, then maybe you are looking for a way, to try Mac OS. Or maybe you want to use some mac software, which isn’t available for Windows. Whatever your reason is, at the end, you want to run Mac on Windows.
The first time, when I thought to install MacOS on Windows, First thing that came to my mind was – Is it possible?. Officially Apple doesn’t provide any ISO file of Mac OS, But you can get it from some third-party sites. There are two ways to install and run MacOS on Windows PC.
IMPORTANT – Before you try any method, the first thing you should know that – Apple’s license for macOS, not allows it to be installed on the non-apple hardware.
First Method – Build a Hackintosh.
What is Hackintosh?.
A Hackintosh is a non-apple hardware, that act like Apple hardware and made to run macOS. It could be manufacture made, or can be built computer personally.
After setting up hardware, the next thing is – Create a bootable drive to install Mac OS.
Note: But you can create bootable drive only using MacOS, with the help of UniBeast. That’s why I don’t prefer this method to run Mac OS on PC.
Second Method – Create MacOS X virtual machine.
This is the best method to run Mac on Windows, you don’t need a Mac or MacOS hardware. And, the best part about creating the virtual machine is, you don’t need to remove your current OS and no external drive required.
What things you”ll need, to run MacOS on Windows PC.
– PC with 64-bit windows, dual-core processor (Intel/AMD) and minimum 4GB of RAM. (VT-x support required)
– Virtualization Software – You can use VirtualBox or VMware Workstation. (check out my article on – VMware vs VirtualBox)
– MacOS X ISO File. (Check the link in the comment section.)
Run mac on windows.
This method will work with all Mac OS ISO file, And in this article, I am using Mac OS Sierra 10.12.
Run virtual mac on windows – VirtualBox.
Step: 1 Download and Install VirtualBox software on your Windows Computer. Now open it, and then click on the new button to create a new virtual machine.
Step: 2 Virtual machine installation setup will ask you to enter machine name, OS type, and version.
You can enter anything in name, but in OS type and version choose this –
Mac OS X
Mac OS X 10.11 El Capitan (64 bit)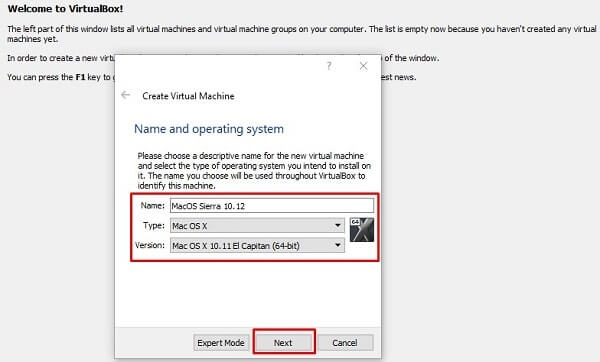
Note : Always choose the lower version of available ISO file. And if you have 32-bit OS ISO then choose 32-bit version. Here I have Mac OS X Sierra 10.12 version, that’s why I am selecting 10.11 version to run OS smoothly.
Step: 3 In next windows, the virtual software will ask you to select RAM for the virtual machine.
The minimum RAM required to run Mac on Windows is, 4GB. But if your computer has total 4GB RAM then you can allocate 2GB (2048 MB) to the virtual machine.
Step: 4 After selecting the RAM, now time to create a virtual hard disk. Select “Create a virtual hard disk now” option and then click on Create button.
– Choose VDI (VirtualBox Disk Image) and click on next.
– Choose Dynamically allocated and click on next.
Now, setup will ask you to allocate hard disk size, You can select between 50 to 100 GB, then click on next.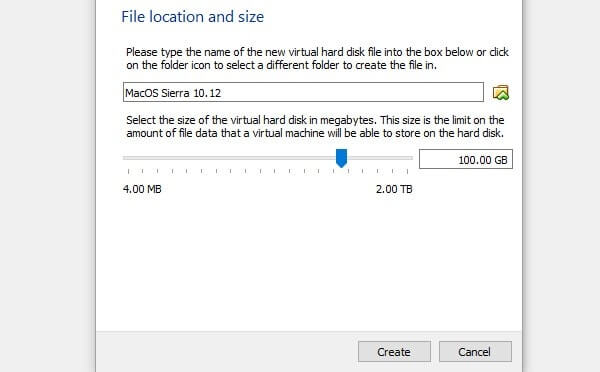
Step: 5 Right-click on created Mac OS virtual machine, and then select settings option.
– First, Click on system and unmark floppy option.
– Then click on the processor and choose 2 CPU. (Dual core required to run Mac OS)
– After selecting 2 CPU, Go to display settings section and select 128 MB video memory.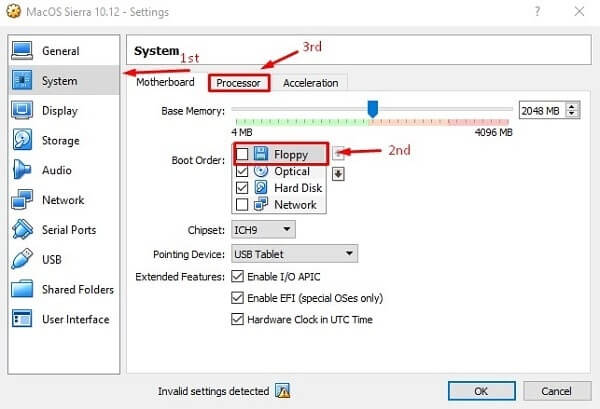
Step: 6 Add ISO File – Click on storage devices then you can see the empty option, right click on it and then choose “remove attachment” option.
– Click on “+” icon to add new storage controller and then select Add SATA Controller to add.
– Then choose the third option to add new storage and then choose “Add Optical Drive”.
– Now use “Choose Disk” option to select Mac OS ISO file that you have downloaded, Click on OK.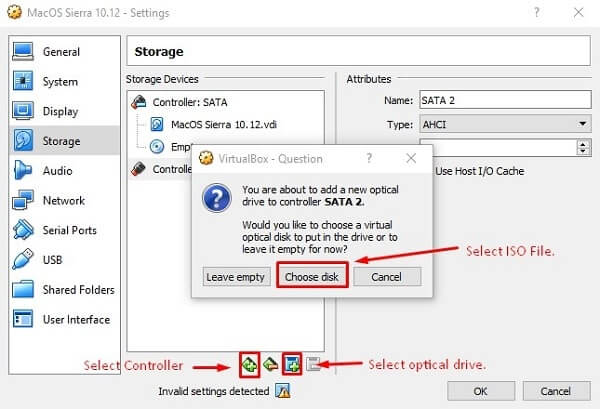
If you have download MacOS files from my link then you”ll get VirtualBox VM settings text file. To run Mac OS without any error you need to apply settings mentioned in that text file.
Apply VirtualBox Settings.
How to Run Mac OS X Inside Windows Using VirtualBox

Introduction: How to Run Mac OS X Inside Windows Using VirtualBox


NOTE: This tutorial is now considered outdated and I’ve published a new instructable with a newer, better and more efficient method to install Mac OS X on your PC, not RUN it! Please refrain from using this tutorial and follow theNew One!
Even if you’re a Windows user, you’ve probably thought about trying the Mac OS X. Maybe you’d like to test OS X before buying a Mac or building a Hackintosh, or maybe you just want to run an app on your Windows machine which is only exclusive for the Mac OS X. Whatever your reason is, you can actually install and run OS X on any Intel-based Windows PC with a program called VirtualBox. Here’s how.
Running OS X on your Windows desktop will take a bit of work, but it’s pretty easy to do and the final product is quite outstanding. Thanks to Macbreaker and Lifehacker for providing the original instructions! To cut to the chase, here’s how to do this.
Step 1: Requirements
Before you start the installation process, you’ll want to gather the following:
— A PC running 64-bit Windows with at least a dual-core processor and 4GB of RAM. Mountain Lion is 64-bit, and thus requires your copy of Windows to be 64-bit. If you’re on a 32-bit version of Windows, you can install Snow Leopard instead (Google it as this instructable is for Mountain Lion not Snow Leopard). Note that your processor also needs to support VT-x. This list should help you find out whether yours does.
— VirtualBox and the VirtualBox Extension Pack: VirtualBox is my favourite virtualisation tool for Windows, and it’s completely free. VirtualBox doesn’t officially support OS X, but it’s actually very easy to get up and running. You should download the main program and the Extension Pack, which will give you support for USB devices.
— A hacked Mountain Lion disc image. Sadly, this won’t work with a vanilla Mountain Lion installer, so you’ll have to find a compatible hacked version. The hacking group Olarila has put a great installation ISO together, and you can find it by searching Google. If that doesn’t fit well with you, you can head over to the Mac App Store and buy a legit copy for yourself, so you can at least pirate with a clear conscience.
— The HackBoot 1 and HackBoot 2 ISO files. Each one has it’s own function which you’ll know later. However, both will help you boot into the installation.
— Mulitbeast 4, which will help you get audio and other things working correctly after installation. You’ll need to register for a free account over at Tonymacx86.com to download this. Make sure to download MultiBeast 4 — it’s labelled “Lion”, but for our purposes the Lion version works better than the Mountain Lion version.
Step 2: Install and Set Up VirtualBox
Before we install OS X, we’ll need to set up VirtualBox so the OS X install disc can boot correctly. Here’s what you need to do:
Step 1: Launch VirtualBox and click the New button. Give your new virtual machine a name (I just called it “Mac OS X”) and set the operating system to “Mac OS X Server (64-bit)”. See the picture of step number one.
Step 2: Click Next and choose how much RAM to give your virtual machine. This depends on how much RAM is in your system — you can get away with 2GB, but if you have more, give it more. 4GB of RAM should be a good amount, though I gave mine 4GB, you can set it till 6GB if you have spare. See the picture of step number two.
Step 3: Click Next again and choose “Create New Disk”. Create your new disk in VDI format and with dynamically allocated storage. When you’re done, VirtualBox should take you back to the main screen. This step is easy, so it does not need a picture.
Step 4: From here, right-click on your OS X machine in the left sidebar and click Settings. Head to the “System” section and uncheck “Enable EFI”. Same as step 3, it’s easy, so it does not need a picture.
Step 5: Click on the Storage section of the settings and click on the CD icon that says “Empty” under Storage Type. Then, click the CD icon next to the “CD/DVD Drive” dropdown list and select “Choose a Virtual CD/DVD Disk File”. Choose the HackBoot 1 ISO and click OK. See the picture of step number five.
Now your virtual machine is ready to boot for the first time. Make sure you have your Mountain Lion ISO ready to go and proceed to the next step.
Step 3: Install OS X in VirtualBox
The next step involves actually installing OS X to your new virtual machine. When you’re ready, start up VirtualBox and follow these instructions:
Step 1: Select your OS X virtual machine in VirtualBox’s left sidebar and click the Start button in the toolbar. It will bring you to the HackBoot boot screen, with one icon in the middle labelled HackBoot. See the picture of step number one.
Step 2: Click on the CD icon at the bottom of the VirtualBox window and select “Choose a Virtual CD/DVD Disk File”. This time, choose your hacked Mountain Lion ISO. This step is pretty easy, so it does not need a picture.
Step 3: Go back to the HackBoot boot screen and press F5. It should reload the boot menu, this time showing you an “OS X Install DVD”. Select this option and press Enter. After a moment, it will take you to the OS X Installation screen. Also this step is easy, so it does not need a picture.
Step 4: After you choose your language and agree to the terms and conditions, you’ll see that OS X doesn’t detect any valid hard drives. To fix this problem, head up to the menu bar and go to Utilities > Disk Utility. This step is pretty simple, so it does not need a picture.
Step 5: Click on your VirtualBox hard drive in the left sidebar, then click the Erase tab in Disk Utility’s main panel. Give your drive a name (like “Macintosh HD”) and click “Erase”. See the picture of step number five.
Step 6: Once Disk Utility has finished formatting your drive, you should see it show up in the left sidebar. When you do, exit Disk Utility and continue with the OS X installation as normal. This step is so easy, so it does not need a picture as well.
The rest of the installation should be largely self-explanatory and should go off without a hitch. It took me about 20 minutes to install OS X. When it finishes, it will take you to a black screen with white text. At this point, you can click the “X” in the upper-right corner of the window to power off the virtual machine.
Step 4: Smooth Out the Rough Edges — Part 1 (Fix Audio With Multibeast)
You’re almost there! You’ve installed OS X, but you will still need to tweak a few things to get audio and graphics working properly. Here’s what you need to do.
— Fix Audio with MultiBeast
Step 1: Open up VirtualBox and right-click on your OS X virtual machine in the left sidebar. Head back to its Settings and go to the Storage section. Once again, click on the disc icon on the right side of the window, this time choosing the HackBoot 2 ISO. This step is simple, therefore it does not need a picture.
Step 2: Click the Start button to reboot your virtual machine. You should see the HackBoot menu again, this time with an option to boot into your new virtual machine. Select that option and press Enter. See the picture of step number two.
Step 3: After a minute, you should see the Mountain Lion desktop with the familiar galaxy wallpaper. Open up Safari, head to Tonymacx86.com, and download MultiBeast as described in the “Requirements” step. This step is easy as well, so it does not need a picture.
Step 4: Open up System Preferences —> Security. Click the lock in the bottom left-hand corner, enter your password, and set the “Allow Applications” preference to “Anywhere”. This will let you run apps from untrusted developers, which includes Multibeast. This is step is quite easy, so it does not need a picture as well.
Step 5: Launch Multibeast. When you get to the Installation Type section, Choose the options pictured in the picture of step number five. After that, click continue and finish the Multibeast installation. It may take a few minutes.
Your audio won’t work just yet, but we have a few other things we need to do before we restart.
Step 5: Smooth Out the Rough Edges — Part 2 (Boot OS X Without HackBoot)
In order to boot OS X without the HackBoot CD, we’ll need to delete a problematic kext. You can do this with the following steps:
Step 1: Open up the Finder and select Go > Go to Folder from the menu bar. Type in «/System/Library/Extensions» (without the quotations) and press Enter. Of course does not need a picture.
Step 2: In this folder, find the «AppleGraphicsControl.kext» (without the quotations) file and delete it. This will allow your virtual machine to boot up without the HackBoot ISO. See the picture of step number two (main image).
Step 3: Click on the disc icon at the bottom of VirtualBox’s window and uncheck the HackBoot 2 ISO, since you won’t need it anymore. Of course does not need a picture.
Step 6: Smooth Out the Rough Edges — Part 3 (Get Higher-Resolution Virtual Machine)
Lastly, you may have noticed that your Virtual Machine is running at a pretty low resolution. That’s totally lame, so we’re going to make it run at the same resolution as our monitor with a few tweaks:
Step 1: Head back to Go —> Go to Folder and go to «/Extra/» (without the quotations). Double-click on the «org.Chameleon.boot.plist» (without the quotations) file and add the following to the bottom of the file, above the line:
Graphics Mode
1920x1080x32
Save the file and close TextEdit. This allows OS X to start up with a higher resolution. Note that you can set whatever resolution you want; just replace «1920×1080» (without the quotations) with the resolution you want.
Step 2: If the resolution you picked is bigger than 1280×1024 and/or is widescreen, you’ll need to do one last thing to get it working properly. Shut down your virtual machine and open Windows’ Command Prompt. Type the following commands, hitting enter after each one:
cd «C:\Program Files\Oracle\VirtualBox»
vboxmanage setextradata «MyVirtualMachine» «CustomVideoMode1» «1920x1080x32»
Replace the first line with the path to your VirtualBox program folder. In the second line, replace MyVirtualMachine with the name of your machine (in our case, “Mac OS X”), and 1920x1080x32 with the same resolution you added to your Chameleon plist.
Step 7: Finalise
When you’re done, restart your OS X virtual machine and you should be greeted with a full-res desktop and working audio. You can now continue to install your favourite apps, set up your keyboard and mouse, and do anything else you like. You’ve got a fully working virtual Mac on your Windows desktop!
*DISCLAIMER: The eyed-apple logo is a copyrighted image that belongs to tonymacx86.com and does not belong to me by any way, as I’m just using it to for reference to guide the installation.*
*DISCLAIMER: This instructable should be done on your OWN responsibility. I will not tolerate any damage (software damage) regarding this instructable if you do not follow the steps wisely. This was tested several times before on Intel-based PCs and it worked, so if you do not follow the steps wisely, I’m not tolerating any problems or damage that you may cause to your PC due to inattention or neglecting any step implemented in this instructable.*
Later on, I will be making computer instructables (tutorials) such as this instructable. I will be making newer and more easier methods to install the Mac OS X (all versions such as Lion and Snow Leopard) on your PC. Some methods require that you already have an existing OS X. I’ll also be making some instructables on Hackintoshing your PC. Stay tuned!


