- Visual Studio Code on macOS
- Installation
- Launching from the command line
- Alternative manual instructions
- Touch Bar support
- Mojave privacy protections
- Updates
- Preferences menu
- Next steps
- Common questions
- Why do I see «Visual Studio Code would like access to your calendar.»
- VS Code fails to update
- Does VS Code run on Mac M1 machines?
- Как вызвать редактор кода VS из терминала / командной строки
- Mac OS X
- Linux
- Integrated Terminal
- Managing terminals
- Grouping
- Customizing Tabs
- Terminal profiles
- Configuring profiles
- Removing built-in profiles
- Configuring the task/debug profile
- Working directory
- Terminal process reconnection
- Links
- Local echo
- Terminal appearance
- Copy & Paste
- Using the mouse
- Right-click behavior
- Alt click
- Keybindings and the shell
- Chord keybindings in the terminal
- Send text via a keybinding
- Run selected text
- Automating launching of terminals
- Next steps
- Common questions
- I’m having problems launching the terminal
- Can I use the integrated terminal with the Windows Subsystem for Linux?
- Why is VS Code shortcut X not working when the terminal has focus?
- Can I use Cmder’s shell with the terminal on Windows?
- Why is Cmd+k/Ctrl+k not clearing the terminal?
- Why is nvm complaining about a prefix option when the integrated terminal is launched?
- Can I use Powerline fonts in the integrated terminal?
- How do I configure zsh on macOS to jump words with Ctrl+Left/Right arrow?
- Why does macOS make a ding sound when I resize terminal split panes?
- Why is my terminal showing a multi-colored triangle or a completely black rectangle?
- Why are there duplicate paths in the terminal’s $PATH environment variable and/or why are they reversed?
- I’m having problems with the terminal rendering, what can I do?
Visual Studio Code on macOS
Installation
- Download Visual Studio Code for macOS.
- Open the browser’s download list and locate the downloaded archive.
- Extract the archive contents. Use double-click for some browsers or select the ‘magnifying glass’ icon with Safari.
- Drag Visual Studio Code.app to the Applications folder, making it available in the macOS Launchpad.
- Add VS Code to your Dock by right-clicking on the icon to bring up the context menu and choosing Options, Keep in Dock.
Launching from the command line
You can also run VS Code from the terminal by typing ‘code’ after adding it to the path:
- Launch VS Code.
- Open the Command Palette ( Cmd+Shift+P ) and type ‘shell command’ to find the Shell Command: Install ‘code’ command in PATH command.

- Restart the terminal for the new $PATH value to take effect. You’ll be able to type ‘code .’ in any folder to start editing files in that folder.
Note: If you still have the old code alias in your .bash_profile (or equivalent) from an early VS Code version, remove it and replace it by executing the Shell Command: Install ‘code’ command in PATH command.
Alternative manual instructions
Instead of running the command above, you can manually add VS Code to your path, to do so run the following commands:
Start a new terminal to pick up your .bash_profile changes.
Note: The leading slash \ is required to prevent $PATH from expanding during the concatenation. Remove the leading slash if you want to run the export command directly in a terminal.
Note: Since zsh became the default shell in macOS Catalina, run the following commands to add VS Code to your path:
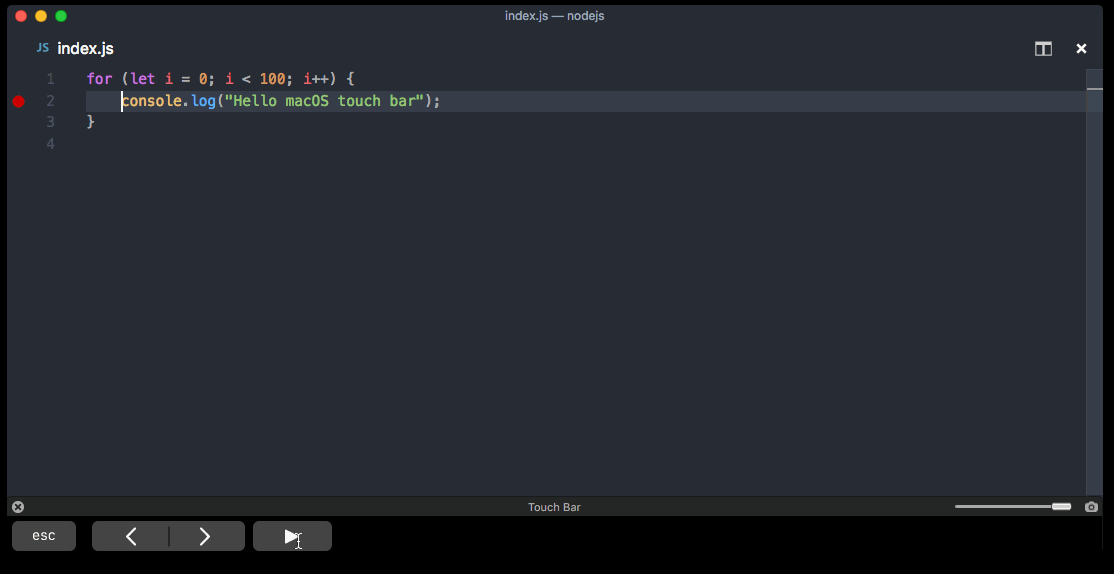
Touch Bar support
Out of the box VS Code adds actions to navigate in editor history as well as the full Debug tool bar to control the debugger on your Touch Bar:
Mojave privacy protections
After upgrading to macOS Mojave version, you may see dialogs saying «Visual Studio Code would like to access your
Updates
VS Code ships monthly releases and supports auto-update when a new release is available. If you’re prompted by VS Code, accept the newest update and it will get installed (you won’t need to do anything else to get the latest bits).
Note: You can disable auto-update if you prefer to update VS Code on your own schedule.
Preferences menu
You can configure VS Code through settings, color themes, and custom keybindings available through the Code > Preferences menu group.
You may see mention of File > Preferences in documentation, which is the Preferences menu group location on Windows and Linux. On a macOS, the Preferences menu group is under Code, not File.
Next steps
Once you have installed VS Code, these topics will help you learn more about VS Code:
- Additional Components — Learn how to install Git, Node.js, TypeScript, and tools like Yeoman.
- User Interface — A quick orientation around VS Code.
- User/Workspace Settings — Learn how to configure VS Code to your preferences settings.
Common questions
Why do I see «Visual Studio Code would like access to your calendar.»
If you are running macOS Mojave version, you may see dialogs saying «Visual Studio Code would like to access your
VS Code fails to update
If VS Code doesn’t update once it restarts, it might be set under quarantine by macOS. Follow the steps in this issue for resolution.
Does VS Code run on Mac M1 machines?
Yes, VS Code supports macOS ARM64 builds that can run on Macs with the Apple M1 chip. You can install the Universal build, which includes both Intel and Apple Silicon builds, or one of the platform specific builds.
Источник
Как вызвать редактор кода VS из терминала / командной строки
Вопрос говорит сам за себя.
Как открыть редактор VS Code из
- окна cmd
- терминал linux и mac
например для блокнота ++ я пишу
> start notepad++ test.txt
Кстати, редактор отличный (кроссплатформенный)! Спасибо, Наделла!
Вы можете скачать его с сайта Microsoft
Используйте команду, code /path/to/file/or/directory/you/want/to/open чтобы открыть файл в VS Code.
В Windows и Linux code команда должна быть установлена автоматически. В macOS его нужно установить вручную:
Запустите VS Code. Теперь откройте палитру команд (F1) и введите, shell command чтобы найти Shell Command: Install ‘code’ command in PATH command . Перезагрузите терминал.
Mac OS X
- Загрузите Visual Studio Code для Mac OS X.
- Дважды щелкните VSCode-osx.zip, чтобы развернуть содержимое.
- Перетащите Visual Studio Code.app в папку «Приложения», сделав его доступным на панели запуска.
- Добавьте код VS в свою док-станцию, щелкнув правой кнопкой мыши значок и выбрав «Параметры», «Сохранить в доке».
Совет : если вы хотите запустить VS Code из терминала, добавьте следующее в файл
/ .zshrc, если вы используете zsh).
Теперь вы можете просто ввести код. в любой папке, чтобы начать редактирование файлов в этой папке.
Наконечник : Вы также можете добавить его в сборку VS Code Insiders, изменив «com.microsoft.VSCodeInsiders». Также, если вы не набираете весь текстовый код, просто измените его на c.
Linux
- Загрузите Visual Studio Code для Linux.
- Создайте новую папку и извлеките VSCode-linux-x64.zip внутри этой папки.
- Дважды щелкните Код, чтобы запустить код Visual Studio.
Совет : если вы хотите запустить VS Code из терминала, создайте следующую ссылку, заменив / path / to / vscode / Code на абсолютный путь к исполняемому файлу кода.
Теперь вы можете просто ввести код. в любой папке, чтобы начать редактирование файлов в этой папке.
Источник
Integrated Terminal
Visual Studio Code includes a fully featured integrated terminal that conveniently starts at the root of your workspace. It provides integration with the editor to support features like links and error detection.
To open the terminal:
- Use the ⌃` (Windows, Linux Ctrl+` ) keyboard shortcut with the backtick character.
- Use the View >Terminal menu command.
- From the Command Palette ( ⇧⌘P (Windows, Linux Ctrl+Shift+P ) ), use the View: Toggle Integrated Terminal command.

Note: Open an external terminal with the ⇧⌘C (Windows, Linux Ctrl+Shift+C ) keyboard shortcut if you prefer to work outside VS Code.
Managing terminals
The terminal tabs view is on the right side of the terminal view. Each terminal has an entry with its name, icon, color, and group decoration (if any).

Tip: Change the tabs location using the terminal.integrated.tabs.location setting.
Terminal instances can be added by clicking the + icon on the top-right of the TERMINAL panel, selecting a profile from the terminal dropdown, or by triggering the ⌃⇧` (Windows, Linux Ctrl+Shift+` ) command. This action creates another entry in the tab list associated with that terminal.
Remove terminal instances by hovering a tab and selecting the Trash Can button, selecting a tab item and pressing Delete , by using Terminal: Kill Active the Active Terminal Instance command, or via the right-click context menu.
Navigate between terminal groups using focus next ⇧⌘] (Windows, Linux Ctrl+PageDown ) and focus previous ⇧⌘[ (Windows, Linux Ctrl+PageUp ) .
Icons may appear to the right of the terminal title on the tab label when a terminal’s status changes. Some examples are on bell (macOS) and for tasks, displaying a check mark when there are no errors and an X otherwise. Hover the icon to read status information, which may contain actions.
Grouping
Split the terminal by:
- On hover, selecting the inline split button.
- Right-clicking the context menu and selecting the Split menu option.
- Alt click on a tab, the + button, or the single tab on the terminal panel.
- Triggering the ⌘\ (Windows, Linux Ctrl+Shift+5 ) command.
Navigate between terminals in a group by focusing the previous pane, ⌥⌘← (Windows, Linux Alt+Left ) , and focusing the next pane, ⌥⌘→ (Windows, Linux Alt+Right ) .
Tabs support drag and drop to allow rearranging, dragging an entry in a terminal group into the empty will remove it from the group (for example, unsplit), dragging a tab into the main terminal area allows joining a group.
Unsplit a split terminal by triggering the Terminal: Unsplit Terminal command.
Customizing Tabs
Change the terminal’s name, icon, and tab color via the right-click context menu or by triggering the following commands:
| Command | Command ID |
|---|---|
| Terminal: Rename | workbench.action.terminal.rename |
| Terminal: Change Icon | workbench.action.terminal.changeIcon |
| Terminal: Change Color | workbench.action.terminal.changeColor |
Tip: Go back to the old version by setting terminal.integrated.tabs.enabled:false

Terminal profiles
Terminal profiles are platform-specific shell configurations comprised of an executable path, arguments, and other customizations.
Configure your default integrated terminal by running the Terminal: Select Default Profile command, which is also accessible via the terminal dropdown.

The terminal’s shell defaults to $SHELL on Linux and macOS and PowerShell on Windows. VS Code will automatically detect most standard shells that can then be configured as the default.
Configuring profiles
To create a new profile, run the Terminal: Select Default Profile command and activate the configure button on the right side of the shell to base it on. This will add a new entry to your settings that can be tweaked manually in your settings.json file.
Profiles can be created using either a path or a source , as well as a set of optional arguments. A source is available only on Windows and can be used to let VS Code detect the install of either PowerShell or Git Bash . Alternatively a path pointing directly to the shell executable can be used. Here are some example profile configurations:
Other arguments supported in profiles include:
- overrideName : A boolean indicating whether or not to replace the dynamic terminal title that detects what program is running with the static profile name.
- env : A map defining environment variables and their values, set the variable to null to delete it from the environment. This can be configured for all profiles using the terminal.integrated.env.
setting.
The default profile can be defined manually with the terminal.integrated.defaultProfile.* settings. This should be set to the name of an existing profile:
Tip: The integrated terminal shell is running with the permissions of VS Code. If you need to run a shell command with elevated (administrator) or different permissions, use platform utilities such as runas.exe within a terminal.
Removing built-in profiles
To remove entries from the terminal dropdown, set the name of the profile to null . For example, to remove the Git Bash profile on Windows, use this setting:
Configuring the task/debug profile
By default, the task/debug features will use the default profile. To override that, use the terminal.integrated.automationShell.
Working directory
By default, the terminal will open at the folder that is opened in the Explorer. The terminal.integrated.cwd setting allows specifying a custom path to open instead:
Split terminals on Windows will start in the directory that the parent terminal started with. On macOS and Linux, split terminals will inherit the current working directory of the parent terminal. This behavior can be changed using the terminal.integrated.splitCwd setting:
There are also extensions available that give more options such as Terminal Here.
Terminal process reconnection
Local and remote terminal processes are restored on window reload, such as when an extension install requires a reload. The terminal will be reconnected and the UI state of the terminals will be restored, including the active tab and split terminal relative dimensions.
We’ve added an experimental setting terminal.integrated.persistentSessionReviveProcess , which determines when the previous terminal session contents should be restored and processes be recreated after a terminal process has been shutdown (eg. on window or application close). Restoring of the process current working directory depends on whether it is supported by the shell.
Links
The terminal features link detection, showing an underline when files or URLs are hovered with the mouse that will go to the target when Ctrl / Cmd is held. If a file or URL cannot be detected, they are still surfaced as «low confidence» links, which only show an underline when is held. These low confidence links will search the workspace for the term, opening the match if one is found.
Clicking a file link will either open that document in an editor or produce a Quick Pick with all matches.
Extensions make use of links in the terminal, such as GitLens, to identify branches.

Local echo
On some remote connections, there’s a delay between typing and seeing the characters on the terminal, as a result of the round trip the data has to make from VS code to the process. Local echo attempts to predict modifications and cursor movements made locally in the terminal in order to decrease this lag.
When enabled, dimmed characters appear as you type. The dimmed style can be changed using the setting terminal.integrated.localEchoStyle .
To disable the feature, set terminal.integrated.localEchoLatencyThreshold to -1 . To enable it all of the time, set it to 0 .
Terminal appearance
Customize the terminal’s appearance using the following settings:
- Font: family, size, and weight
- Spacing: line height and letter spacing
- Cursor: style, width, and blinking
Copy & Paste
The keybindings for copy and paste follow platform standards:
- Linux: Ctrl+Shift+C and Ctrl+Shift+V , selection paste is available with Shift+Insert
- macOS: Cmd+C and Cmd+V
- Windows: Ctrl+C and Ctrl+V
Using the mouse
Right-click behavior
The right-click behavior differs based on the platform:
- Linux: Show the context menu.
- macOS: Select the word under the cursor and show the context menu.
- Windows: Copy and drop selection if there is a selection, otherwise paste.
This can be configured using the terminal.integrated.rightClickBehavior setting.
Alt click
Alt left click will reposition the cursor to underneath the mouse. This works by simulating arrow key strokes, which may fail for some shells or programs. This feature can be disabled.
Keybindings and the shell
While focus is in the integrated terminal, many key bindings will not work as the keystrokes are passed to and consumed by the terminal itself. There is a hardcoded list of commands, which skip being processed by the shell and instead get sent to the VS Code keybinding system. Customize this list with the terminal.integrated.commandsToSkipShell setting. Commands can be added to this list by adding the command name to the list, and removed by adding the command name to the list prefixed with a — .
Look at the setting details to see the complete list of default commands.
Tip: To override terminal.integrated.commandsToSkipShell and send keybindings to the shell instead of the workbench, set terminal.integrated.sendKeybindingsToShell .
Chord keybindings in the terminal
By default, when a chord keybinding is the highest priority keybinding, it will always skip the terminal shell (bypassing terminal.integrated.commandsToSkipShell ) and be evaluated by VS Code instead of the terminal. This is typically the desired behavior unless you’re on Windows/Linux and want your shell to use ctrl+k (for bash this cuts the line after the cursor). This can be disabled with the following setting:
Send text via a keybinding
The workbench.action.terminal.sendSequence command can be used to send a specific sequence of text to the terminal, including escape sequences. This enables things like sending arrow keys, enter, cursor moves, etc. For example, the below sequence jumps over the word to the left of the cursor ( Ctrl+Left ) and presses backspace:
Note that the command only works with the \u0000 format for using characters via their character code (not \x00 ). Read more about these hex code and the sequences terminals work with on the following resources:
The integrated terminal has find functionality that can be triggered with ⌘F (Windows, Linux Ctrl+F ) .
If you want Ctrl+F to go to the shell instead of launching the Find control on Linux and Windows, you will need to add the following to your settings.json which will tell the terminal not to skip the shell for keybindings matching the workbench.action.terminal.focusFind command:
Run selected text
To use the runSelectedText command, select text in an editor and run the command Terminal: Run Selected Text in Active Terminal via the Command Palette ( ⇧⌘P (Windows, Linux Ctrl+Shift+P ) ):

The terminal will attempt to run the selected text.

If no text is selected in the active editor, the line that the cursor is on is run in the terminal.
Tip: Also run the active file using the command workbench.action.terminal.runActiveFile .
Automating launching of terminals
The Tasks feature can be used to automate the launching of terminals, for example the following .vscode/tasks.json file will launch a Command Prompt and PowerShell terminal in a single terminal group when the window starts:
This file could be committed to the repository to share it with other developers or alternatively created as a user task via the workbench.action.tasks.openUserTasks command.
Next steps
The basics of the terminal have been covered in this document, read on to find out more about:
- Tasks — Tasks let you integrate with external tools and leverage the terminal heavily.
- Mastering VS Code’s Terminal — An external blog with plenty of power user tips for the terminal.
- Explore the rest of the terminal commands by browsing your keybindings.json file within VS Code.
Common questions
I’m having problems launching the terminal
There’s a dedicated troubleshooting guide for these sorts of problems.
Can I use the integrated terminal with the Windows Subsystem for Linux?
Yes. Select the Windows Subsystem for Linux (WSL) bash shell as your terminal default. If you have WSL enabled (through Windows Features), select WSL Bash from the terminal Select Default Shell dropdown. See Developing in WSL for details on working in WSL and the Remote — WSL extension.
Why is VS Code shortcut X not working when the terminal has focus?
Currently the terminal consumes many key bindings, preventing Visual Studio Code from reacting to them. An example of this is Ctrl+B to open the Side Bar on Linux and Windows. This is necessary as various terminal programs and/or shells may respond to these key bindings themselves. Use the terminal.integrated.commandsToSkipShell setting to prevent specific key bindings from being handled by the terminal.
Can I use Cmder’s shell with the terminal on Windows?
Yes, to use the Cmder shell in VS Code, you need to add the following settings to your settings.json file:
You may refer to Cmder’s wiki for more information.
Why is Cmd+k/Ctrl+k not clearing the terminal?
Normally Cmd+k / Ctrl+k clears the terminal on macOS/Windows, but this can stop working when chord keybindings are added either by the user or extensions. The Cmd+k / Ctrl+k keybindings rely on the VS Code keybinding priority system that defines which keybinding is active at any given time (user > extension > default). In order to fix this, you need to redefine your user keybinding that will have priority, preferably at the bottom of your user keybindings.json file:
Why is nvm complaining about a prefix option when the integrated terminal is launched?
nvm (Node Version Manager) users often see this error for the first time inside VS Code’s integrated terminal:
This is mostly a macOS problem and does not happen in external terminals. The typical reasons for this are the following:
- npm was globally installed using another instance of node that is somewhere in your path (such as /usr/local/bin/npm ).
- In order to get the development tools on the $PATH , VS Code will launch a bash login shell on start up. This means that your
/.bash_profile has already run and when an integrated terminal launches, it will run another login shell, reordering the $PATH potentially in unexpected ways.
To resolve this issue, you need to track down where the old npm is installed and remove both it and its out of date node_modules. Find the nvm initialization script and running which npm before it runs, which should print the path when you launch a new terminal.
Once you have the path to npm, find the old node_modules by resolving the symlink by running a command something like this:
This will give you the resolved path at the end:
From there, removing the files and relaunching VS Code should fix the issue:
Can I use Powerline fonts in the integrated terminal?
Yes. Specify Powerline fonts with the terminal.integrated.fontFamily setting.
Note that you want to specify the font family, not an individual font like Meslo LG M DZ Regular for Powerline where Regular is the specific font name.
How do I configure zsh on macOS to jump words with Ctrl+Left/Right arrow?
By default, Ctrl+Left/Right arrow will jump words in bash. Configure the same for zsh by adding these keybindings:
Why does macOS make a ding sound when I resize terminal split panes?
The keybindings ⌃⌘← and ⌃⌘→ are the defaults for resizing individual split panes in the terminal, while they work they also cause a system «invalid key» sound to play due to an issue in Chromium. The recommended workaround is to tell macOS to no-op for these keybindings by running this in your terminal:
Why is my terminal showing a multi-colored triangle or a completely black rectangle?
The terminal can have problems rendering in some environments, for example you might see a big multi-colored triangle instead of text. This is typically caused by driver/VM graphics issues and the same also happens in Chromium. Work around these issues by launching code with the —disable-gpu flag or by using the setting «terminal.integrated.gpuAcceleration»: «off» to avoid using the canvas in the terminal.
Why are there duplicate paths in the terminal’s $PATH environment variable and/or why are they reversed?
This can happen on macOS because of how the terminal launches using VS Code’s environment. When VS Code launches for the first time, in order to source your «development environment», it launches your configured shell as a login shell, which runs your
/.zprofile scripts. Now when the terminal launches, it also runs as a login shell, which will put the standard paths to the front (for example, /usr/local/bin:/usr/bin:/bin:/usr/sbin:/sbin ) and reinitialize your shell environment.
To get a better understanding, you can simulate what is happening by launching an inner login shell within your operating system’s built-in terminal:
Unfortunately, unlike in Linux, standalone macOS terminals all run as login shells by default, since macOS does not run a login shell when the user logs into the system. This encourages «bad behavior», like initializing aliases in your profile script when they should live in your rc script as that runs on non-login shells.
There are two direct fixes for this. The first is to set «terminal.integrated.inheritEnv»: false , which will strip most environment variables from the terminal’s environment, except for some important ones (like HOME , SHELL , TMPDIR , etc.).
The other fix is to no longer run a login shell in the terminal by creating a terminal profile and setting its args to [] . If you go with this fix, you will want to make sure any aliases in your profile scripts are moved over to your
/.zshrc file since aliases only apply to the shell they’re set in.
I’m having problems with the terminal rendering, what can I do?
By default, the integrated terminal will render using GPU acceleration on most machines. It does this using multiple elements, which are better tuned than the DOM for rendering interactive text that change often. The terminal actually features 3 renderers which fallback if they are detected to perform poorly in this order:
- WebGL — This is the fastest renderer that truly unlocks the GPU’s power to render the terminal quickly.
- Canvas — This will be used if the WebGL context fails to load (for example, hardware/environment incapabilities), its performance may vary depending on your environment but in general it’s much faster than the DOM renderer.
- DOM — This is the slowest by quite a bit but arguably the most reliable since it just uses the DOM. If the canvas renderer is detected to run slowly the DOM renderer will be activated.
Источник


