- Windows Firewall service does not start in Windows 10
- Windows Firewall service does not start
- 1] Scan for malware
- 2] Run SFC and DISM
- 3] Check Firewall Services status
- 4] Check Firewall-related Driver status
- 5] Run Group Policy Result Tool
- 6] Run Windows Firewall Troubleshooter
- 7] Reset Windows Firewall settings
- 4 ways to start the Windows Firewall
- 1. Start the Windows Firewall using the search
- 2. Start the Windows Firewall using Control Panel
- 3. Start the Windows Firewall using the Run window
- 4. Start the Windows Firewall using Command Prompt or PowerShell
- How do you prefer to start the Windows Firewall?
- Best practices for configuring Windows Defender Firewall
- Keep default settings
- Understand rule precedence for inbound rules
- Create rules for new applications before first launch
- Inbound allow rules
- Known issues with automatic rule creation
- Establish local policy merge and application rules
- Know how to use «shields up» mode for active attacks
- Create outbound rules
- Document your changes
Windows Firewall service does not start in Windows 10
Windows Firewall acts as the first layer of defense against malware, so it is always advisable to keep it turned ‘ON’ – unless you are using third-party firewall software. If for some unknown reason if you find your Windows Firewall does not start automatically at startup, then here are a few troubleshooting steps you may want to try out.
Windows Firewall service does not start
The error messages you could receive are:
- Windows Firewall is not the default firewall
- Windows Firewall does not start
- Windows could not start the Windows Firewall
If Windows Firewall fails to start, the other errors you could see on your Windows system are:
- The Windows Firewall service terminated with service-specific error 87 (0x57)
- Error 0x80004015: The class is configured to run as a security id different from the caller.
- The Windows Firewall service terminated with service-specific error 6801 (0x1A91).
- Event ID: 7024 – The Windows Firewall service terminated with service-specific error 5 (0x5)
- Windows could not start the Base Filtering Engine service on Local Computer. Error 5: Access is denied.
- Windows could not start the IPsec Policy Agent service on Local Computer. Error 1068: The dependency service or group failed to start.
- Windows could not start the Network Location Awareness on Local Computer.
- “net start mpssvc” in cmd.exe returns the system error 1297.
We suggest you try the following troubleshooting:
- Scan for malware
- Run SFC and DISM
- Check Firewall Services status
- Check Firewall-related Driver status
- Run Group Policy Result Tool
- Run Windows Firewall Troubleshooter
- Reset Windows Firewall settings.
1] Scan for malware
First, scan your machine for malware using good antivirus software. If you have installed a 3rd party firewall or a Security Suite, then that could also be the cause of the problem. Many times, third-party security software can disable the Windows Firewall and even prevent it from starting up.
2] Run SFC and DISM
Run System File Checker or sfc /scannow . You may also want to Run DISM and see if that helps.
3] Check Firewall Services status
Next, type services.msc in Windows Start Search and hit Enter to open up Services. Here ensure that the Windows Firewall Service is started and set on Automatic. You do this by clicking on the Start button. Also, ensure that the Remote Procedure Call Service & the Base Filtering Engine Service is started and set on Automatic.
4] Check Firewall-related Driver status
Now you also have to ensure that the Windows Firewall Authorization Driver (mdsdrv.sys) is running properly.
To do so, type devmgmt.msc in the search bar and hit enter to open Device Manager. In the Views tab, check on Show Hidden Devices and also show Devices By Connection.
Locate Windows Firewall Authorization Driver in the list and double-click on it to open its Properties box. Click on the Driver tab and ensure that the process is started, and the startup type is Demand. Click OK.
Reboot. Hopefully, your Windows Firewall should be working OK now.
5] Run Group Policy Result Tool
If it does not help then run the Group Policy Result Tool to check if there is a Firewall policy blocking it. Open an elevated command prompt window, type gpresult -z and hit Enter. Check under Resultant Set Of Policies For Computer, esp under Security Options.
6] Run Windows Firewall Troubleshooter
Run the Windows Firewall Troubleshooter and see if it helps you. This ATS from Microsoft will help you repair and fix Windows Firewall problems automatically. See if it is available for your Windows or if it is built-in.
7] Reset Windows Firewall settings
Incidentally, drifting a bit away from the main topic, should you need to access the following panels easily, you can type the following Run commands and hit Enter
- Firewall Settings: FirewallSettings
- Firewall Control Panel: FirewallControlPanel
- Windows Firewall with Advanced Security: wf.msc
TIP: How to Configure the Windows Firewall may also interest you.
4 ways to start the Windows Firewall
Windows offers a powerful built-in firewall application named Windows Firewall. In Windows 10 the name has been changed to Windows Defender Firewall, but it is the same app with almost the same features across all Windows versions. Checking on its status is a good idea, either to make sure it is running to protect your PC or to make sure it is stopped if you have a third-party solution installed. Whatever your reason is for checking on the Windows Firewall, let’s see all the methods to open it so that you can choose the one that is handy for you:
NOTE: This guide covers Windows 10, Windows 7, and Windows 8.1. If you do not know the version of Windows that you have, read this tutorial: What version of Windows do I have installed?.
1. Start the Windows Firewall using the search
The easiest way to access Windows Firewall is to look for it using the search feature in Windows. Type “firewall” in the search box from your Windows PC, and click or tap the Windows Defender Firewall search result in Windows 10, or Windows Firewall in Windows 7 or Windows 8.1.
2. Start the Windows Firewall using Control Panel
The Windows Firewall can be accessed from the Control Panel. Open the Control Panel and go to System and Security.
Click or tap on Windows Defender Firewall in Windows 10, or Windows Firewall in Windows 7 or Windows 8.1.
Alternatively, you can search for the text “firewall” in the Control Panel search box from the top-right corner.
In the list of search results, click or tap Windows Defender Firewall if you use Windows 10, or Windows Firewall if you use Windows 7 or Windows 8.1.
3. Start the Windows Firewall using the Run window
Press the Win + R keys on your keyboard, to open the Run window. Then, type “control firewall.cpl” in the Open field and hit Enter or press OK.
You can also type “control /name Microsoft.WindowsFirewall” in the Open field to open Windows Firewall.
4. Start the Windows Firewall using Command Prompt or PowerShell
If you are a fan of the command line, you can use the Command Prompt or PowerShell to open the Windows Firewall. Type the same command as the one used in the Run window – “control firewall.cpl” – and hit Enter on the keyboard.
You can also use the command “control /name Microsoft.WindowsFirewall” for the same result.
How do you prefer to start the Windows Firewall?
You have learned four different ways to open the Windows Firewall. Before closing this tutorial, tell us whether you like using the Windows Firewall if you find it easy to open, and what you would like Microsoft to improve about it? Comment below and let’s discuss.
Best practices for configuring Windows Defender Firewall
Applies to
Windows operating systems including WindowsВ 10
Windows Server Operating Systems
Windows Defender Firewall with Advanced Security provides host-based, two-way network traffic filtering and blocks unauthorized network traffic flowing into or out of the local device. Configuring your Windows Firewall based on the following best practices can help you optimize protection for devices in your network. These recommendations cover a wide range of deployments including home networks and enterprise desktop/server systems.
To open Windows Firewall, go to theВ StartВ menu, selectВ Run, typeВ WF.msc, and then selectВ OK. See also Open Windows Firewall.
Keep default settings
When you open the Windows Defender Firewall for the first time, you can see the default settings applicable to the local computer. The Overview panel displays security settings for each type of network to which the device can connect.
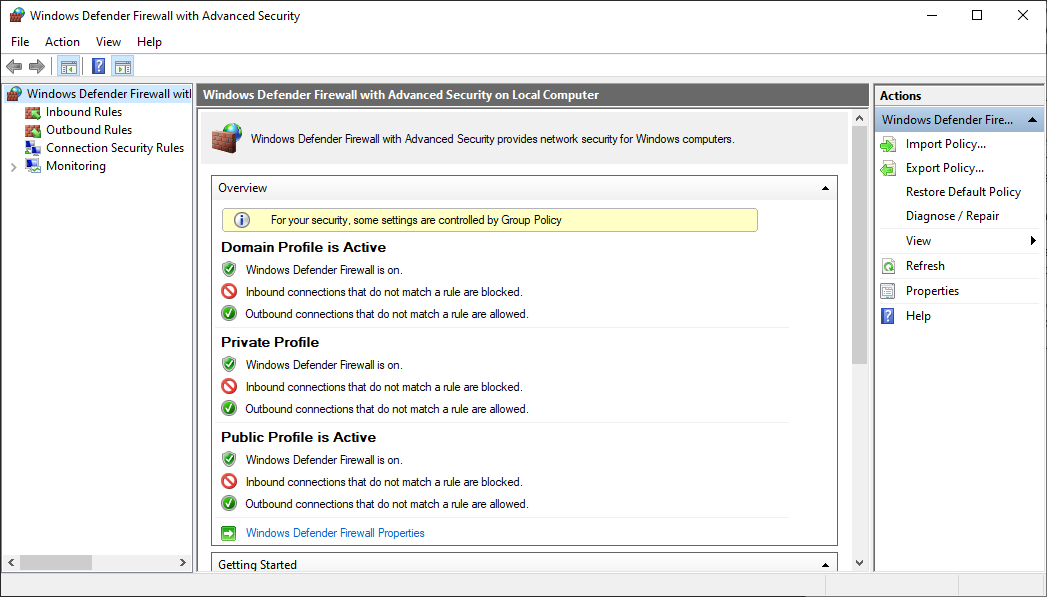
Figure 1: Windows Defender Firewall
Domain profile: Used for networks where there is a system of account authentication against a domain controller (DC), such as an Azure Active Directory DC
Private profile: Designed for and best used in private networks such as a home network
Public profile: Designed with higher security in mind for public networks like Wi-Fi hotspots, coffee shops, airports, hotels, or stores
View detailed settings for each profile by right-clicking the top-level Windows Defender Firewall with Advanced Security node in the left pane and then selecting Properties.
Maintain the default settings in Windows Defender Firewall whenever possible. These settings have been designed to secure your device for use in most network scenarios. One key example is the default Block behavior for Inbound connections.

Figure 2: Default inbound/outbound settings
To maintain maximum security, do not change the default Block setting for inbound connections.
Understand rule precedence for inbound rules
In many cases, a next step for administrators will be to customize these profiles using rules (sometimes called filters) so that they can work with user apps or other types of software. For example, an administrator or user may choose to add a rule to accommodate a program, open a port or protocol, or allow a predefined type of traffic.
This can be accomplished by right-clicking either Inbound Rules or Outbound Rules, and selecting New Rule. The interface for adding a new rule looks like this:
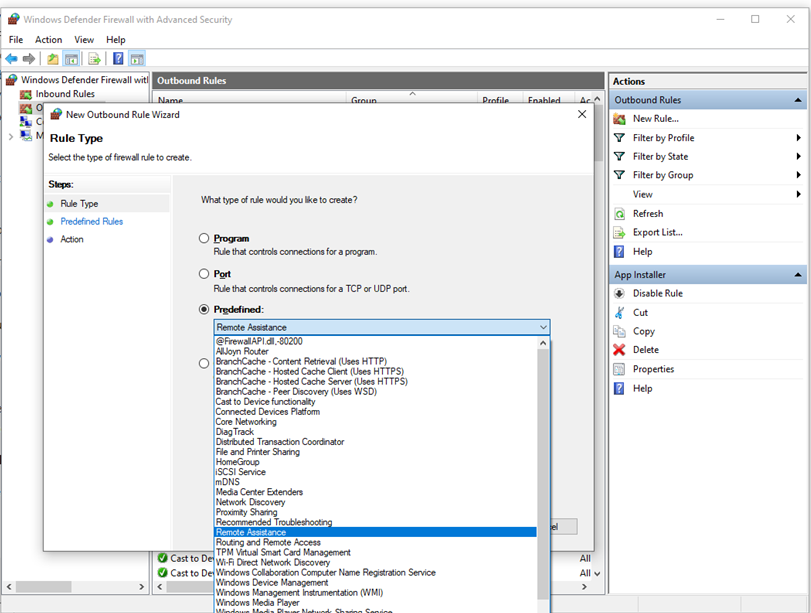
Figure 3: Rule Creation Wizard
This article does not cover step-by-step rule configuration. See the Windows Firewall with Advanced Security Deployment Guide for general guidance on policy creation.
In many cases, allowing specific types of inbound traffic will be required for applications to function in the network. Administrators should keep the following rule precedence behaviors in mind when allowing these inbound exceptions.
Explicitly defined allow rules will take precedence over the default block setting.
Explicit block rules will take precedence over any conflicting allow rules.
More specific rules will take precedence over less specific rules, except in the case of explicit block rules as mentioned in 2. (For example, if the parameters of rule 1 includes an IP address range, while the parameters of rule 2 include a single IP host address, rule 2 will take precedence.)
Because of 1 and 2, it is important that, when designing a set of policies, you make sure that there are no other explicit block rules in place that could inadvertently overlap, thus preventing the traffic flow you wish to allow.
A general security best practice when creating inbound rules is to be as specific as possible. However, when new rules must be made that use ports or IP addresses, consider using consecutive ranges or subnets instead of individual addresses or ports where possible. This avoids creation of multiple filters under the hood, reduces complexity, and helps to avoid performance degradation.
Windows Defender Firewall does not support traditional weighted, administrator-assigned rule ordering. An effective policy set with expected behaviors can be created by keeping in mind the few, consistent, and logical rule behaviors described above.
Create rules for new applications before first launch
Inbound allow rules
When first installed, networked applications and services issue a listen call specifying the protocol/port information required for them to function properly. As there is a default block action in Windows Defender Firewall, it is necessary to create inbound exception rules to allow this traffic. It is common for the app or the app installer itself to add this firewall rule. Otherwise, the user (or firewall admin on behalf of the user) needs to manually create a rule.
If there are no active application or administrator-defined allow rule(s), a dialog box will prompt the user to either allow or block an application’s packets the first time the app is launched or tries to communicate in the network.
If the user has admin permissions, they will be prompted. If they respond No or cancel the prompt, block rules will be created. Two rules are typically created, one each for TCP and UDP traffic.
If the user is not a local admin, they will not be prompted. In most cases, block rules will be created.
In either of the scenarios above, once these rules are added they must be deleted in order to generate the prompt again. If not, the traffic will continue to be blocked.
The firewall’s default settings are designed for security. Allowing all inbound connections by default introduces the network to various threats. Therefore, creating exceptions for inbound connections from third-party software should be determined by trusted app developers, the user, or the admin on behalf of the user.
Known issues with automatic rule creation
When designing a set of firewall policies for your network, it is a best practice to configure allow rules for any networked applications deployed on the host. Having these rules in place before the user first launches the application will help ensure a seamless experience.
The absence of these staged rules does not necessarily mean that in the end an application will be unable to communicate on the network. However, the behaviors involved in the automatic creation of application rules at runtime requires user interaction.
To determine why some applications are blocked from communicating in the network, check for the following:
A user with sufficient privileges receives a query notification advising them that the application needs to make a change to the firewall policy. Not fully understanding the prompt, the user cancels or dismisses the prompt.
A user lacks sufficient privileges and is therefore not prompted to allow the application to make the appropriate policy changes.
Local Policy Merge is disabled, preventing the application or network service from creating local rules.
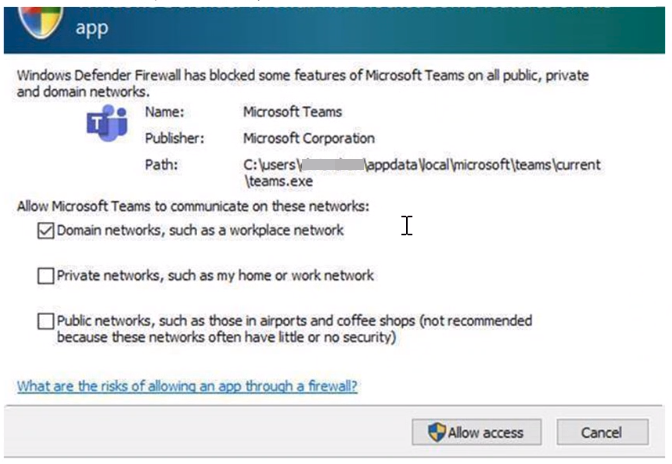
Figure 4: Dialog box to allow access
Establish local policy merge and application rules
Firewall rules can be deployed:
- Locally using the Firewall snap-in (WF.msc)
- Locally using PowerShell
- Remotely using Group Policy if the device is a member of an Active Directory Name, System Center Configuration Manager (SCCM), or Intune (using workplace join)
Rule merging settings control how rules from different policy sources can be combined. Administrators can configure different merge behaviors for Domain, Private, and Public profiles.
The rule merging settings either allow or prevent local admins from creating their own firewall rules in addition to those obtained from Group Policy.
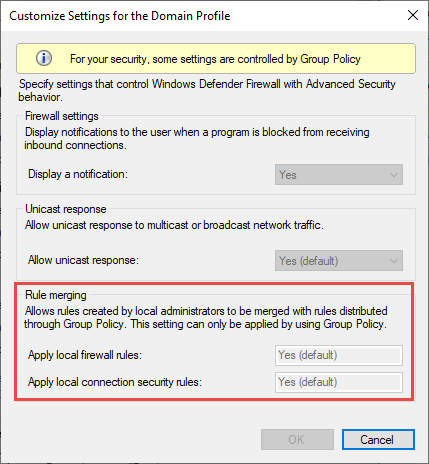
Figure 5: Rule merging setting
In the firewall configuration service provider, the equivalent setting is AllowLocalPolicyMerge. This setting can be found under each respective profile node, DomainProfile, PrivateProfile, and PublicProfile.
If merging of local policies is disabled, centralized deployment of rules is required for any app that needs inbound connectivity.
Admins may disable LocalPolicyMerge in high security environments to maintain tighter control over endpoints. This can impact some apps and services that automatically generate a local firewall policy upon installation as discussed above. For these types of apps and services to work, admins should push rules centrally via group policy (GP), Mobile Device Management (MDM), or both (for hybrid or co-management environments).
Firewall CSP and Policy CSP also have settings that can affect rule merging.
As a best practice, it is important to list and log such apps, including the network ports used for communications. Typically, you can find what ports must be open for a given service on the app’s website. For more complex or customer application deployments, a more thorough analysis may be needed using network packet capture tools.
In general, to maintain maximum security, admins should only push firewall exceptions for apps and services determined to serve legitimate purposes.
The use of wildcard patterns, such as C:*\teams.exe is not supported in application rules. We currently only support rules created using the full path to the application(s).
Know how to use «shields up» mode for active attacks
An important firewall feature you can use to mitigate damage during an active attack is the «shields up» mode. It is an informal term referring to an easy method a firewall administrator can use to temporarily increase security in the face of an active attack.
Shields up can be achieved by checking Block all incoming connections, including those in the list of allowed apps setting found in either the Windows Settings app or the legacy file firewall.cpl.
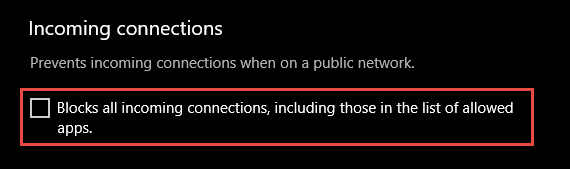
Figure 6: Windows settings App/Windows Security/Firewall Protection/Network Type

Figure 7: Legacy firewall.cpl
By default, the Windows Defender Firewall will block everything unless there is an exception rule created. This setting overrides the exceptions.
For example, the Remote Desktop feature automatically creates firewall rules when enabled. However, if there is an active exploit using multiple ports and services on a host, you can, instead of disabling individual rules, use the shields up mode to block all inbound connections, overriding previous exceptions, including the rules for Remote Desktop. The Remote Desktop rules remain intact but remote access will not work as long as shields up is activated.
Once the emergency is over, uncheck the setting to restore regular network traffic.
Create outbound rules
What follows are a few general guidelines for configuring outbound rules.
The default configuration of Blocked for Outbound rules can be considered for certain highly secure environments. However, the Inbound rule configuration should never be changed in a way that Allows traffic by default.
It is recommended to Allow Outbound by default for most deployments for the sake of simplification around app deployments, unless the enterprise prefers tight security controls over ease-of-use.
In high security environments, an inventory of all enterprise-spanning apps must be taken and logged by the administrator or administrators. Records must include whether an app used requires network connectivity. Administrators will need to create new rules specific to each app that needs network connectivity and push those rules centrally, via group policy (GP), Mobile Device Management (MDM), or both (for hybrid or co-management environments).
For tasks related to creating outbound rules, see Checklist: Creating Outbound Firewall Rules.
Document your changes
When creating an inbound or outbound rule, you should specify details about the app itself, the port range used, and important notes like creation date. Rules must be well-documented for ease of review both by you and other admins. We highly encourage taking the time to make the work of reviewing your firewall rules at a later date easier. AndВ neverВ create unnecessary holes in your firewall.


