- Test on an Android device or emulator
- Run on a real Android device
- Enable your device for development
- Run your app on the device
- Run your app on a virtual Android device using an emulator
- Enable virtualization support
- Emulator for native development with Android Studio
- Emulator for cross-platform development with Visual Studio
- Install Android emulator with Visual Studio
- Run apps on a hardware device
- Set up a device for development
- Connect to your device using USB
- Connect to your device using Wi-Fi
- Troubleshoot device connection with the Connection Assistant
- Resolve USB connection issues
- Check that Android Studio can connect to the Android Emulator
- Check the USB cable
- Check if the device is set up for development
- RSA security key
Test on an Android device or emulator
There are several ways to test and debug your Android application using a real device or emulator on your Windows machine. We have outlined a few recommendations in this guide.
Run on a real Android device
To run your app on a real Android device, you will first need to enable your Android device for development. Developer options on Android have been hidden by default since version 4.2 and enabling them can vary based on the Android version.
Enable your device for development
For a device running a recent version of Android 9.0+:
- Connect your device to your Windows development machine with a USB cable. You may receive a notification to install a USB driver.
- Open the Settings screen on your Android device.
- Select About phone.
- Scroll to the bottom and tap Build number seven times, until You are now a developer! is visible.
- Return to the previous screen, select System.
- Select Advanced, scroll to the bottom, and tap Developer options.
- In the Developer options window, scroll down to find and enable USB debugging.
For a device running an older version of Android, see Set Up Device for Development.
Run your app on the device
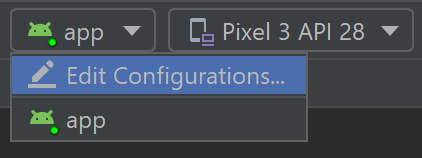
In the Android Studio toolbar, select your app from the run configurations drop-down menu.
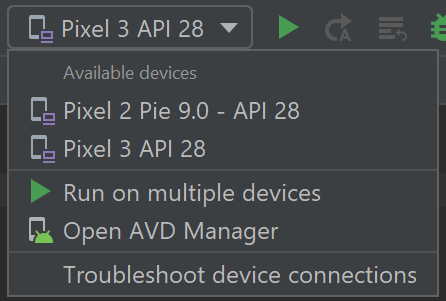
From the target device drop-down menu, select the device that you want to run your app on.
Select Run в–·. This will launch the app on your connected device.
Run your app on a virtual Android device using an emulator
The first thing to know about running an Android emulator on your Windows machine is that regardless of your IDE (Android Studio, Visual Studio, etc), emulator performance is vastly improved by enabling virtualization support.
Enable virtualization support
Before creating a virtual device with the Android emulator, it is recommended that you enable virtualization by turning on the Hyper-V and Windows Hypervisor Platform (WHPX) features. This will allow your computer’s processor to significantly improve the execution speed of the emulator.
To run Hyper-V and Windows Hypervisor Platform, your computer must:
- Have 4GB of memory available
- Have a 64-bit Intel processor or AMD Ryzen CPU with Second Level Address Translation (SLAT)
- Be running Windows 10 build 1803+ (Check your build #)
- Have updated graphics drivers (Device Manager > Display adapters > Update driver)
If your machine doesn’t fit this criteria, you may be able to run Intel HAXM or AMD Hypervisor. For more info, see the article: Hardware acceleration for emulator performance or the Android Studio Emulator documentation.
Verify that your computer hardware and software is compatible with Hyper-V by opening a command prompt and entering the command: systeminfo

In the Windows search box (lower left), enter «windows features». Select Turn Windows features on or off from the search results.
Once the Windows Features list appears, scroll to find Hyper-V (includes both Management Tools and Platform) and Windows Hypervisor Platform, ensure that the box is checked to enable both, then select OK.
Restart your computer when prompted.
Emulator for native development with Android Studio
When building and testing a native Android app, we recommend using Android Studio. Once your app is ready for testing, you can build and run your app by:
In the Android Studio toolbar, select your app from the run configurations drop-down menu.
From the target device drop-down menu, select the device that you want to run your app on.
Select Run в–·. This will launch the Android Emulator.
Once your app is installed on the emulator device, you can use Apply Changes to deploy certain code and resource changes without building a new APK.
Emulator for cross-platform development with Visual Studio
There are many Android emulator options available for Windows PCs. We recommend using Google’s Android emulator, as it offers access to the latest Android OS images and Google Play services.
Install Android emulator with Visual Studio
If you don’t already have it installed, download Visual Studio 2019. Use the Visual Studio Installer to Modify your workloads and ensure that you have the Mobile development with .NET workload.
Create a new project. Once you’ve set up the Android Emulator, you can use the Android Device Manager to create, duplicate, customize, and launch a variety of Android virtual devices. Launch the Android Device Manager from the Tools menu with: Tools > Android > Android Device Manager.
Once the Android Device Manager opens, select + New to create a new device.
You will need to give the device a name, choose the base device type from a drop-down menu, choose a processor, and OS version, along with several other variables for the virtual device. For more information, Android Device Manager Main Screen.
In the Visual Studio toolbar, choose between Debug (attaches to the application process running inside the emulator after your app starts) or Release mode (disables the debugger). Then choose a virtual device from the device drop-down menu and select the Play button в–· to run your application in the emulator.
Run apps on a hardware device
When building an Android app, it’s important that you always test your app on a real device before releasing it to users. This page describes how to set up your development environment and Android device for testing and debugging over an Android Debug Bridge (ADB) connection.
Note: Use the Android emulator to test your app on different versions of the Android platform and different screen sizes. Also consider using Firebase Test Lab to run your app on a wide variety of real devices hosted in a cloud-based infrastructure.
Set up a device for development
Before you can start debugging on your device, decide if you want to connect the device to using a USB cable or Wi-Fi. Then do the following:
On the device, open the Settings app, select Developer options, and then enable USB debugging (if applicable).
Set up your system to detect your device.
- Chrome OS: No additional configuration required.
- macOS: No additional configuration required.
Ubuntu Linux: There are two things that need to be set up correctly: each user that wants to use adb needs to be in the plugdev group, and the system needs to have udev rules installed that cover the device.
plugdev group: If you see an error message that says you’re not in the plugdev group, you’ll need to add yourself to the plugdev group:
Note that groups only get updated on login, so you’ll need to log out for this change to take effect. When you log back in, you can use id to check that you’re now in the plugdev group.
udev rules: The android-sdk-platform-tools-common package contains a community-maintained default set of udev rules for Android devices. To install:
Windows: Install a USB driver for ADB (if applicable). For an installation guide and links to OEM drivers, see the Install OEM USB drivers document.
Connect to your device using USB
When you are set up and plugged in over USB, you can click Run in Android Studio to build and run your app on the device.
You can also use adb to issue commands, as follows:
- Verify that your device is connected by running the adb devices command from your android_sdk /platform-tools/ directory. If connected, you’ll see the device listed.
- Issue any adb command with the -d flag to target your device.
Connect to your device using Wi-Fi
Android 11 (and later) supports deploying and debugging your app wirelessly from your workstation via Android Debug Bridge (adb). For example, you can deploy your debuggable app to multiple remote devices without physically connecting your device via USB and contending with common USB connection issues, such as driver installation.
To use wireless debugging, you need to pair your device to your workstation using a pairing code. Your workstation and device must be connected to the same wireless network. To connect to your device, follow these steps:
- On your workstation, update to the latest version of the SDK Platform-Tools.
- Enable the Wireless debugging option under Developer options.
- On the dialog that asks Allow wireless debugging on this network?, click Allow.
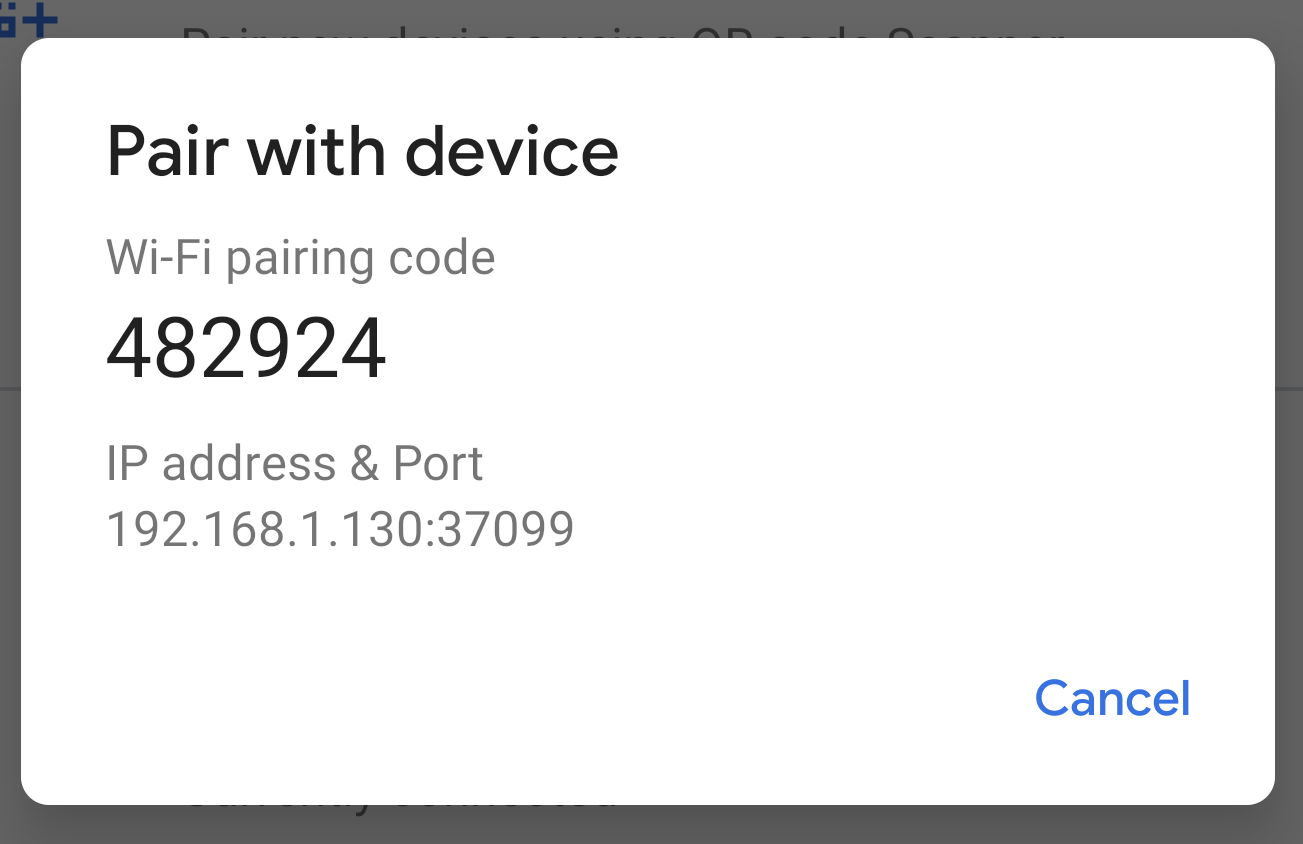
- Select Pair device with pairing code. Take note of the pairing code, IP address, and port number displayed on the device (see image).
- On your workstation, open a terminal and navigate to android_sdk /platform-tools .
- Run adb pair ipaddr : port . Use the IP address and port number from step 3.
When prompted, enter the pairing code that you received in step 4. A message should indicate that your device has been successfully paired.
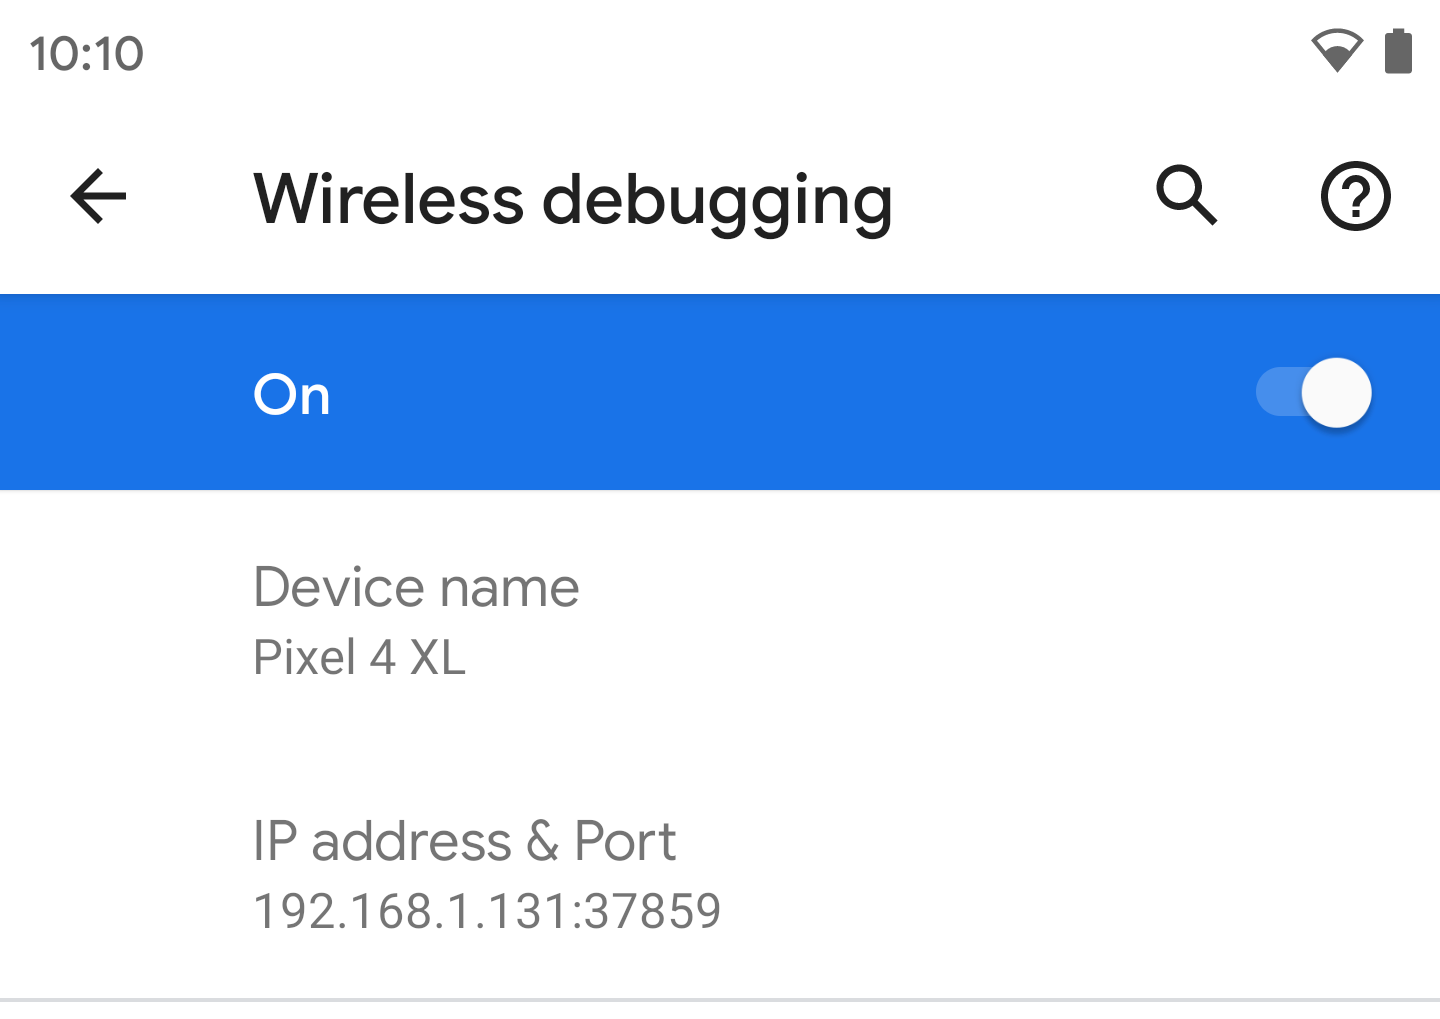
(For Linux or Microsoft Windows only) Run adb connect ipaddr : port . Use the IP address and port under Wireless debugging (see image below).
Troubleshoot device connection with the Connection Assistant
The Connection Assistant provides step-by-step instructions to help you set up and use a device over the ADB connection.
To start the assistant, choose Tools > Connection Assistant.
The Connection Assistant provides instructions, in-context controls, and a list of connected devices in a series of pages in the Assistant panel. Use the Next and Previous buttons at the bottom of the Assistant panel to work through the pages as needed:
- Connect your device over USB: The Connection Assistant begins by prompting you to connect your device over USB, and it provides a Rescan USB devices button with which you can start a new scan for connected devices.
- Enable USB debugging: The Connection Assistant then tells you how to enable USB debugging in the on-device developer options.
- Restart the ADB server: Finally, if you still don’t see your device on the list of available devices, you can use the Restart ADB server button on the last page of the Connection Assistant. Restarting the ADB server also causes ADB to scan for devices again. If you still don’t see your device on the list of available devices, try the troubleshooting steps in the next section of this page.
Resolve USB connection issues
If the Connection Assistant is not detecting your device over USB, you can try the following troubleshooting steps to resolve the issue:
Check that Android Studio can connect to the Android Emulator
To check if the issue is being caused by a connection problem between Android Studio and the Android Emulator, follow these steps:
- Open the AVD Manager.
- Create a new AVD if you don’t already have one.
- Run the emulator using your AVD.
- Do one of the following:
- If Android Studio can’t connect to the emulator, download the latest SDK Platform Tools and then try again.
- If the emulator starts successfully, check the USB cable.
Check the USB cable
To check if the issue is being caused by a faulty USB cable, follow the steps in this section.
If you have another USB cable:
- Connect the device using the secondary cable.
- Check if the Connection Assistant can now detect the device.
- If the device is not detected, try the primary cable again.
- If the device still isn’t detected, assume that the problem is with the device and check if the device is set up for development.
If you don’t have another USB cable but you do have another Android device:
- Connect the secondary device to your computer.
If the Connection Assistant can detect the secondary device, assume that the problem is with the primary device and check if the device is set up for development.
If the secondary device is not detected, the problem might be with the USB cable.
Check if the device is set up for development
To check if the issue is being caused by settings on the device, follow these steps:
- Follow the steps in the Set up a device for development section.
- If this does not resolve the problem, contact the device OEM’s customer support for help. Tell the customer support representative that the device won’t connect to Android Studio using ADB.
RSA security key
When you connect a device running Android 4.2.2 (API level 17) or higher to your computer, the system shows a dialog asking whether to accept an RSA key that allows debugging through this computer. This security mechanism protects user devices because it ensures that USB debugging and other adb commands cannot be executed unless you’re able to unlock the device and acknowledge the dialog.
Content and code samples on this page are subject to the licenses described in the Content License. Java is a registered trademark of Oracle and/or its affiliates.


