- Running Windows on Mac is Easy with these Software
- Performance
- Great for developers
- Windows works best on Mac
- Reduced costs
- Parallels
- VMware Fusion
- Boot Camp
- VirtualBox
- CrossOver
- PlayOnMac
- Conclusion
- The 5 Best Ways to Run Windows on Your Mac
- Find out which option best fits you
- Boot Camp
- Virtualization
- How to Run Windows 10X on Your PC (Latest Build)
- Run Windows 10X on Your PC (2021)
- Things to Know
- Set Up Hyper-V
- Run Windows 10X on Your PC
- Run Windows 10X Virtual Machine on AMD GPU
- Windows 10X First Impressions
- Install Windows 10X on Windows 10 and Experience the New UI
- 20 COMMENTS
Running Windows on Mac is Easy with these Software
![]()
Mac users can resonate with the awesome experience it provides to its users.
But it’s also true that nothing in the world can be 100% effective or flawless. That means your precious Mac also has some shortcomings.
The tech giant Apple prefers to go with things in its own style, and in the process of doing so, it might annoy its customers.
Modern-day businesses are dominated by Windows computers. Many important applications and programs that a number of industries use can only run on Microsoft Windows.
Example – the Microsoft Office for Windows has the Access database, which is not available for Mac.
Understanding this, Apple offers its users the choice between macOS or Windows for that matter.
Fortunately, there are different ways you can run Windows on Mac in order to access all those professional applications, software tools, Access, and mind-boggling Windows games.
So, when you feel the urgency for switching to Windows, you can invest a few dollars on buying software, which allows you to run Windows instead of buying another laptop or desktop.
There are many benefits; let’s explore them.
Performance

When you first install Windows on your Mac and start working on it, you could feel a bump in its performance. If you want to use the system for utilizing useful software tools or applications, it will work wonders for you.
Additionally, if you want to play high-end video games on it, you can enjoy a smooth gaming experience for hours without a hitch.
Great for developers
Developing websites, applications or software is tricky, and testing them is more time-consuming and frustrating. Developers know the pain of finding errors, bugs, or other complications that require their immediate attention and fixation.
Besides, they have to check their functionality across different operating systems, which further burden them. So, if they do not separate macOS and Windows computers, they can install Windows on their Mac and test the programs.
Windows works best on Mac
This is hard, but true!
Windows works best on Mac computers because of the robustness of Apple and powerful performance like greater graphics, fewer lags, and high frame rates of Windows. Both technologies make Windows on Mac work smooth like butter and fast like lightning.
Reduced costs
You don’t require investing in a Windows computer. Hence, it cuts down extra expenses, which is a huge relief for individual or small business.
Are you convinced yet?
Let’s explore some of the software you can use to run Windows on your Mac computer.
Parallels
An application that delivers fast performance and easy to use is desirable. And Parallels has got it covered for you!
Run Windows on your Mac system without rebooting it. It includes over 30 utilities that simplify your tasks on both Windows and Mac.
Keep accessing and using data and apps from any operating system and device from anywhere. You can develop and test across different OSes for Mac in a VM, access MS Office for Internet Explorer and Windows. Move your files, applications, etc. quickly from a PC to your Mac.

The software is compatible with various Mac versions, including MacBook Pro, MacBook, iMac Pro, Mac Pro, or Mac mini. Share files, copy & paste images as well as text, drag & drop files from Windows applications and Mac seamlessly.
Parallels are easy to set up and offer fast performance, with apps running effortlessly with no slowdowns. You can select your view and utilize features like:
- Greater flexibility of working with Windows 7, 8.1, and 10, OS X, Linux, macOS Server, and Unix
- Touch Bar to get instant access as well as customization
- Works well with Boot Camp
- 1-click tuning to optimize VM performance and settings for software development, testing, design, productivity, and games
- Free upgrades for the latest versions
What’s more – students can save 50% through a special Parallel academic version for desktop. It includes 40+ 1-click productivity tools where you can minimize distractions, take screenshots, etc. you also get 30-day premium support 24/7 through phone and emails.
VMware Fusion
With VMware Fusion, you can choose 100s of operating systems that are supported on it. It includes the latest Windows 10, latest macOS, and even Linux distributions.
The common platform of VMware lets you connect with ESXi, vSphere as well as Workstation servers to manage, launch and control the physical hosts and virtual machines alike. You can transfer VMs easily from the data center of vSphere to your Mac desktop to run it in Fusion.

Additionally, Fusion Pro also has a RESTful API for integrating with advanced development tools such as Docker, Ansible, Chef, Vagrant, and more.
Hence, VMware is capable of aligning with modern DevOps-oriented and Agile-based production pipelines. Its features are:
- Run any OS on macOS 10.15 Catalina and avoid rebooting
- Supports Dark Mode
- Sidecar feature to drive Windows using iPad
- It uses the graphics technology – Apple Metal for accelerated 3-D graphics
- Supports complex and GPU-intensive apps and games
- Unity View Mode to hide your Windows desktop, allowing to use Windows applications same as Mac applications
Boot Camp
Boot Camp is a Mac utility, allowing you to switch between Windows and macOS. If you want to use Windows on your Mac, just download a Windows 10 copy and let the utility do the rest. The Boot Camp Assistant helps you install the operating system.

Boot Camp is also referred to as dual-booting that makes you run macOS and Windows on a single hard drive side by side. This method offers better performance as compared to virtual machines as Windows can leverage all the resources of the system.
The steps involved in Windows installation powered by Boot Camp Assistant:
- Create a Windows partition and set its size based on your requirements. Note: You cannot change the size later
- Format your Boot camp partition
- Now, install the Windows
- After Windows installation, follow the instruction on the screen to install Windows drivers and Boot Camp
VirtualBox
VirtualBox is one of the powerful virtualization products that both enterprises and home users can leverage.
The feature-rich, Open Source software is an Intel64/AMD64 and x86 virtualization product and exhibits high performance. It is licensed under GNU GPL.
It supports multiple guest OS, including Windows 7, 8, 10, Vista, XP, 2000, Server 2003, and NT 4.0 along with Linux 4.x, 3.x, 2.6, and 2.4; DOS/Windows 3.x, OpenSolaris, Solaris, OpenBSD, and OS/2.
VirtualBox is constantly evolving with frequent releases, features, platforms on which it runs, support for OS, etc. It is as a result of dedicated effort by the community boosted with encouragement to contribute more. And Oracle always ensures that VirtualBox meets quality criteria to continue serving the consumers.
CrossOver
Run Windows smoothly on your Mac using CrossOver. It runs 1000s of Windows applications on Mac, including software for utility, productivity, design, games, and more.
With CrossOver, you require no VMs or Windows licenses. Just enjoy native functionalities like keyboard shortcuts, copy and paste, mission control, etc.

CrossOver is simple to set up with 1-click installation and use applications at top speed. Available at a starting price of just $39.95, the software is an economical choice. It also saves plenty of your computer resources and occupies only the space the Windows programs need while saving you from hassles of rebooting.
It is compatible with popular accounting software such as Quicken, office and business software like MS Office, gaming software such as Steam, and many more. Its features are:
- Compatible with Catalina
- works at native speed
- Simple installation
- Integrates seamlessly with a desktop environment
- ‘Bottles’ – a CrossOver feature that allows individual Windows environments such as Windows 7, XP, etc. for getting packaged and contained with your existing programs.
PlayOnMac
PlayOnMac lets you install and then use multiple software and games easily that are designed to run on Windows.
The software is FREE as compared to other solutions like VMs and Boot Camp, whose licenses require you to invest hefty money on them. It is user-friendly and does not compromise on performance. In addition, it integrates seamlessly with different OS types and requires no reboot.
Many alternatives for running Windows on Mac use Windows OS for running Windows-based programs. However, Wine stands out from the league. It is a kind of compatibility layer that allows you to run your Windows applications on different POSIX-compliant OS like macOS, BSD, and Linux.

Are you wondering why it is named as ‘wine’?
Originally, ‘Wine’ is an acronym used in the place of “Wine Is Not an Emulator”.
So, as the name suggests, Wine translates API calls of Windows into POSIX calls on-the-go, rather than simulating the internal logic of Windows like an emulator or virtual machine. Consequently, the memory and performance penalties associated with other methods arise.
Hence, by using Wine, you can integrate your Windows applications cleanly into your macOS. For improved experience and convenience, you can also try Wine with a 3rd-party WineBottler.
Conclusion
To all the Mac users wanting to leverage the power of Windows on the same computer, try any of the above-explained software. Choose the one based on your requirements and budget and keep enjoying all sorts of software compatible on both macOS and Windows.
The 5 Best Ways to Run Windows on Your Mac
Find out which option best fits you
While macOS is made to run using Mac hardware, it is not the only operating system that can run on a Mac computer.
Plenty of other operating systems, including Window and Linux, will work on a Mac device. That makes the Mac among the most versatile computers you can buy. Here’s what we’d use to install Windows on a Mac.
Boot Camp
:max_bytes(150000):strip_icc()/BootCampPartition-5849de633df78c491eaf721b.jpg)
Supports Windows 7, 8.1, and 10
Windows runs natively on Mac hardware for best performance
Requires a full Windows license for the initial install.
Cannot run Windows and Mac OS concurrently.
Perhaps the best-known option for running Windows on a Mac is Boot Camp. Included free with your Mac, Boot Camp allows you to install Windows and then choose between Mac and Windows on startup.
Because Boot Camp runs Windows directly on your Mac’s hardware (there is no virtualization or emulation to be performed) Windows can run at the best possible speed your Mac is able to deliver.
Installing Windows on your Mac is no more difficult than installing Windows on a PC. Apple even provides the Boot Camp Assistant to partition the startup drive to make room for Windows as well as to install all the drivers Windows needs for special Apple hardware.
Virtualization
:max_bytes(150000):strip_icc()/ParallelsWizard-576f016d5f9b585875b92396.jpg)
Run both macOS and a guest OS side-by-side.
Not limited to Windows; a large number of guest operating systems are supported.
Performance tuning and customization needed to achieve the best performance.
May impact the performance of your Mac.
Virtualization allows several operating systems to run on computer hardware at the same time. Virtualization abstracts the hardware layer, making it look like each operating system has its own processor, RAM, graphics, and storage.
Virtualization on the Mac makes use of a software layer called a hypervisor to emulate all of the underlying hardware. As a result, the guest operating system running on the virtual machine does not run as fast as in Boot Camp. But unlike Boot Camp, both the Mac operating system and the guest operating system run at the same time.
There are three primary virtualization apps for Mac:
- Parallels: The first to bring virtualization to the Mac. Parallels supports a wide range of guest OS, including Windows, Linux, and Mac.
- VMWare Fusion: Fusion is the Mac virtualization app offered by VMWare — a leader in virtualization tech. Fusion supports the installation of many different operating systems, including Windows, Linux, and macOS.
- VirtualBox: Oracle supports an open source virtualization app known as VirtualBox. This free virtualization app runs on multiple computer systems, including Mac. Like the other virtualization apps, VirtualBox can be used to run many different operating systems, including Windows, Linux, and macOS.
Installing the virtualization apps is similar to any other Mac app. Guest OS may be more involved with some customization required to obtain the best performance. All three apps have lively forums and support services to help with tuning the performance.
How to Run Windows 10X on Your PC (Latest Build)
It’s 2021 and Microsoft has almost finalized the Windows 10X build for public release. Many reports suggest that Windows 10X is OEM-ready and it’s going to be shipped later this year. So if you have been waiting to try the latest build of Windows 10X then we have got good news for you. The near-final build of Windows 10X has been leaked and you can run it on your PC right now. In fact, we tested the latest build of Windows 10X (20279) on our PC and it worked quite well. So if you are also interested then go ahead and find out how to run Windows 10X on your PC from our detailed guide below.
Run Windows 10X on Your PC (2021)
Here, we have explained all the steps in great detail so anyone can run Windows 10X Build 20279 on their PC. I would recommend you to go through all the points to get a better idea about the installation process. You can click on the link below to move to the relevant part.
Things to Know
- We are not going to install Windows 10X on physical hardware as the ISO image is not out yet. However, we can try the nearly-final build of Windows 10X through a virtual machine. Unlike the official emulator, the performance is much better on the virtual machine.
- We are going to use a VHDX file (Hard disk image file) which can only be used on Microsoft’s Hyper-V application and it’s only available on Windows 10 Pro. So in tandem, you need Windows 10 Pro, Enterprise, or Education to run Windows 10X on your PC.
- Currently, you can’t run Windows 10X on third-party virtual machine applications such as VirtualBox, VMware, QEMU, etc.
- Hardware virtualization support is mandatory through BIOS or UEFI.
- If you have an AMD GPU then you can’t run Windows 10X virtual machine. However, we have found a workaround and you can find the solution below.
Set Up Hyper-V
1. First off, you need to enable virtualization from your BIOS settings. While rebooting your PC, you need to press the BIOS key which will open the BIOS settings page. You can find the BIOS key from our below table. If the below key is not working then look for the specific BIOS key for your PC manufacturer on the internet.
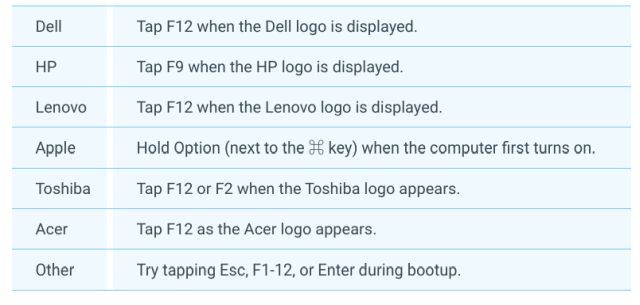
2. Once you are on the BIOS page, you need to enable “Virtualization”. Every PC has a different name for the virtualization technology so look for “Intel VT-x”, “Intel VT-d” or anything on similar lines. Move between different menus and enable virtualization and save the changes by pressing the F10 key.
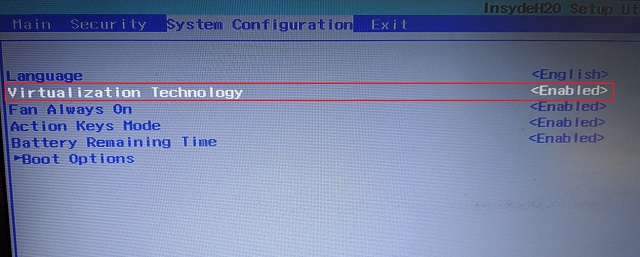
3. Once you have done that, your computer will reboot to Windows 10. Now, we have to enable Hyper-V on your Windows 10 computer. To do so, press Windows and R keys at once to open a Run window. Now, type optionalfeatures.exe and hit enter.
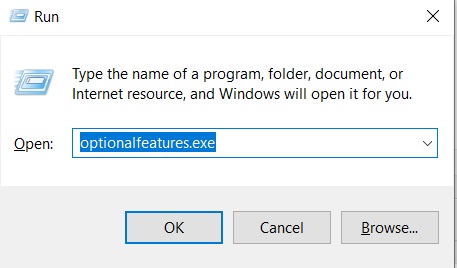
4. Here, scroll down and look for Hyper-V. Now, enable all the checkboxes under Hyper-V and hit the OK button. It will start installing the necessary packages and will ask you to restart the computer once the installation is done.
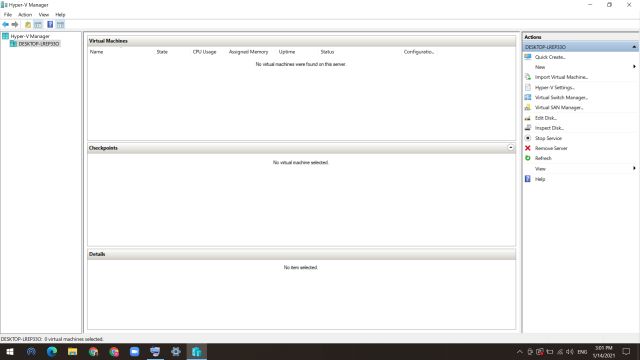
5. You have successfully enabled Hyper-V on your Windows 10 computer. To open it, just press the Windows key once and type “Hyper-V” in the search bar and you would find the application on top. Click on it.

6. This is how Hyper-V will look like.
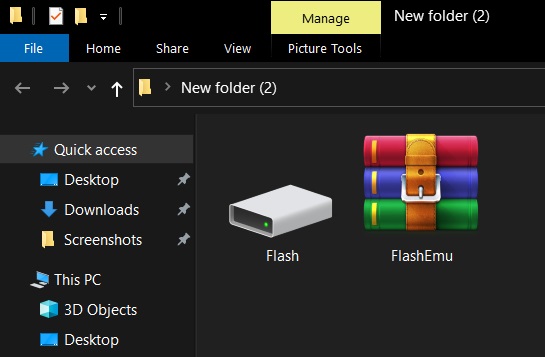
7. Now, you need to download the VHDX file created by thebookisclosed on Twitter. You can click here to download the file directly.
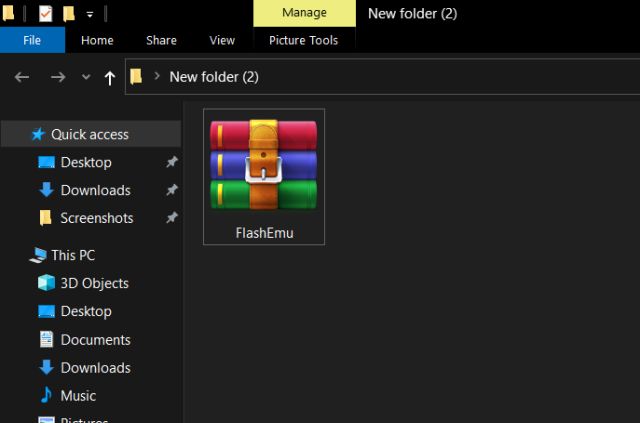
8. After downloading the file, extract the ZIP file and move the Flash.vhdx file to an accessible location like Desktop. I would recommend you to save it where there is ample storage available.
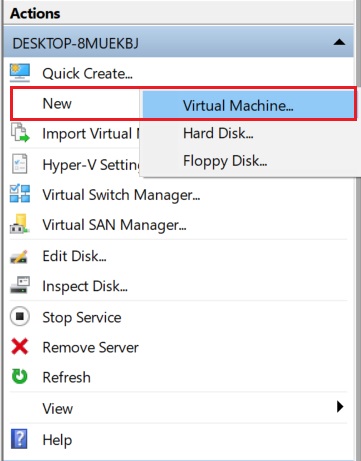
9. Now, come back to Hyper-V and click on “New” and select “Virtual Machine” from the top-right pane.
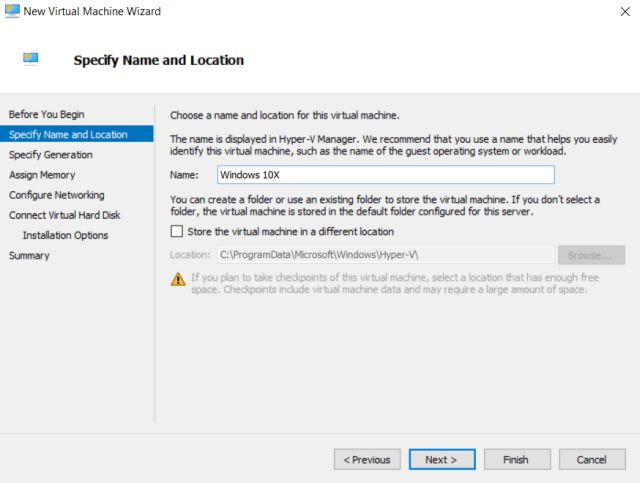
10. After that, give a name to the virtual machine. I have named it “Windows 10X”, but you can choose your own.
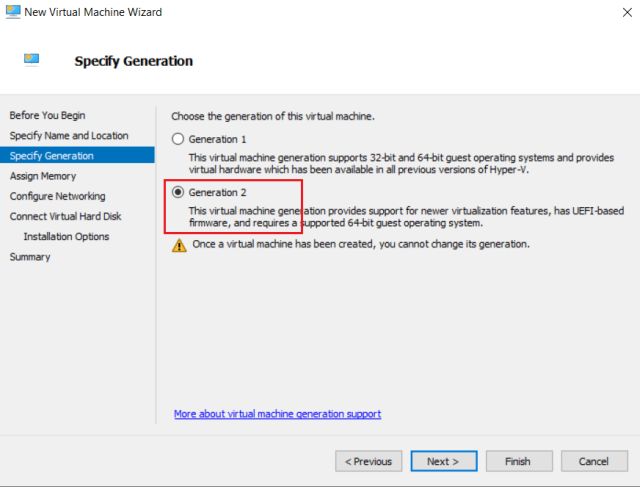
11. Next, choose “Generation 2” and hit the “Next” button.
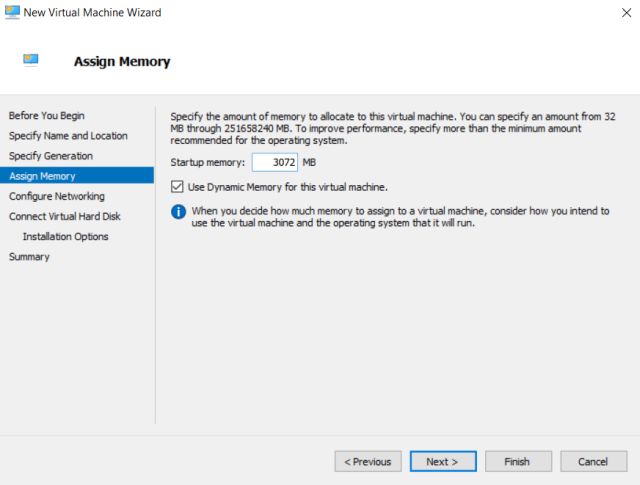
12. After that, allot RAM to the Windows 10X virtual machine. I would recommend you to allot 3GB (3072MB) or more for better performance.
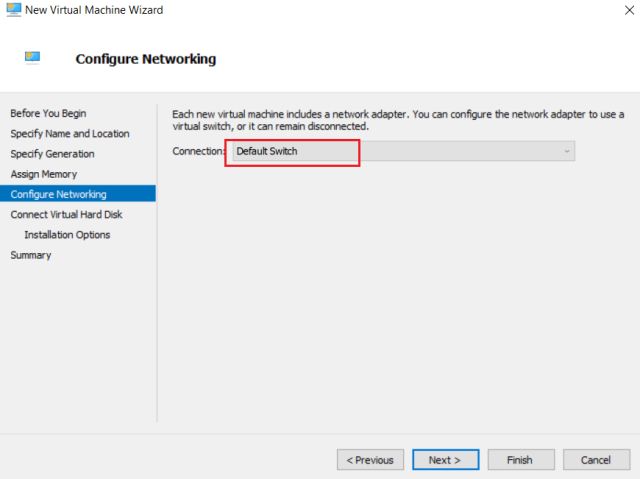
13. On the next page, choose “Default Switch” from the drop-down menu and hit “Next”.
14. Finally, click on “Use an existing virtual hard disk” and select the “Flash.vhdx” file by clicking on the “Browse” button.
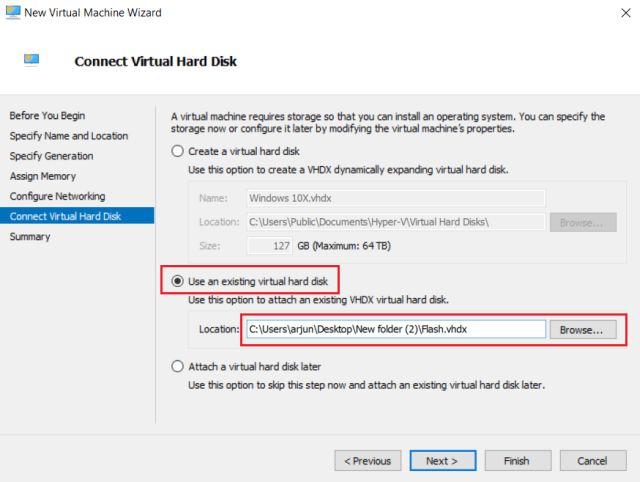
15. Finally, click on “Finish“.
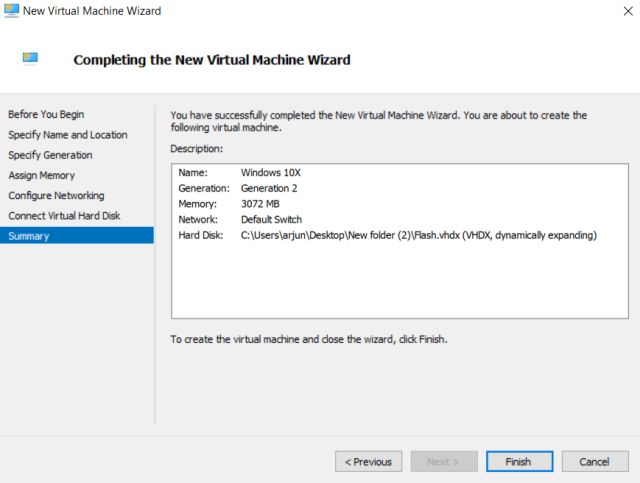
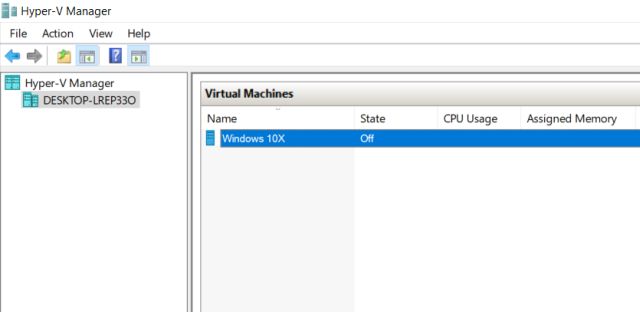
16. Now, this is the virtual machine that we will use to run the latest version of Windows 10X on our PC.
Run Windows 10X on Your PC
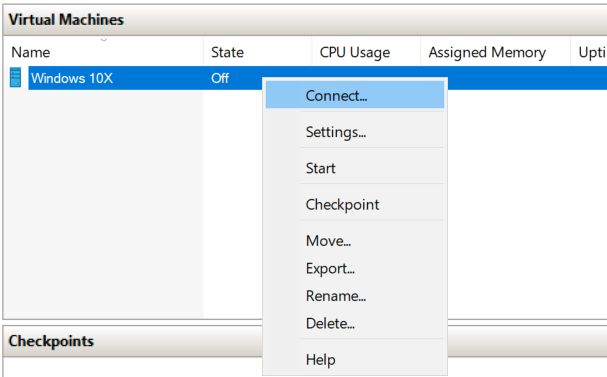
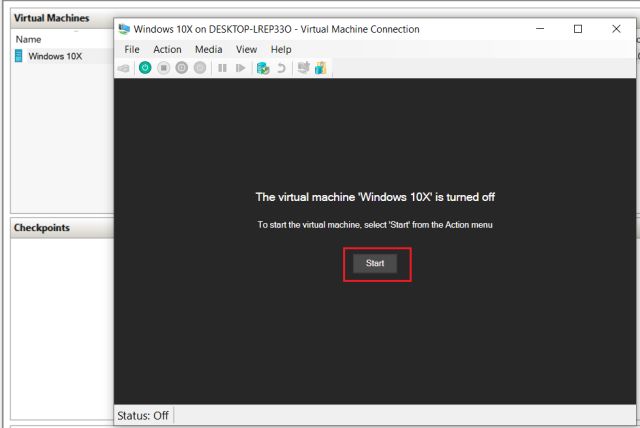
1. Right-click on the virtual machine and choose “Connect“.
2. After that, click on “Start” and Hyper-V will start the Windows 10X virtual machine directly from the VHDX file. On the first run, it will take some time to process all the files and information.
Note: Even after 30 minutes, if the VM is stuck on a black screen then you are most likely using an AMD GPU. Go through our next guide to find a solution.
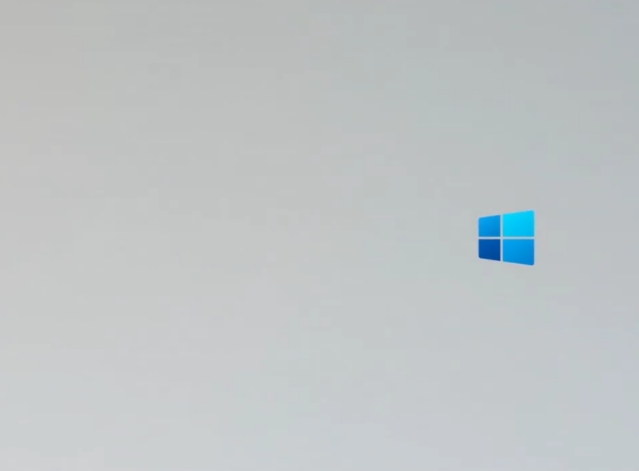
3. Finally, you will be greeted with a Windows 10X boot animation.
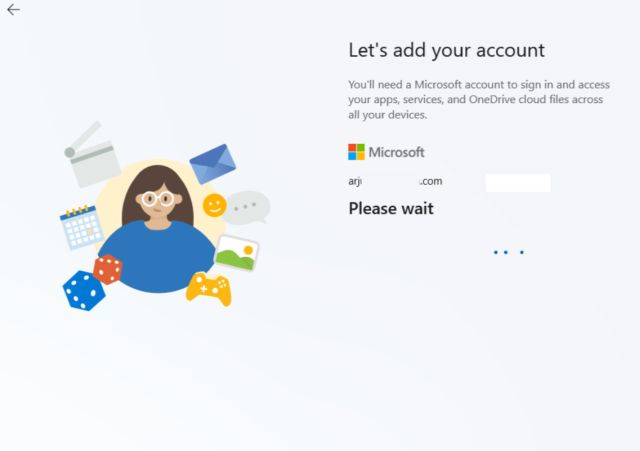
4. Now, go through all the on-screen instructions and login with your Microsoft account. You can also create a PIN during the initial setup.
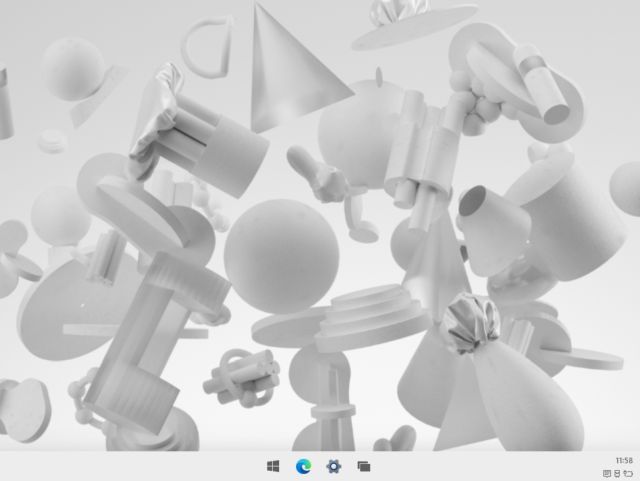
5. Now this is what the nearly-ready Windows 10X looks like on a single screen. It looks quite promising, right? To learn more about the final build of Windows 10X, go through our first impressions below.
6. If you want to stop the virtual machine then click on “Action” at the top-row menu and choose “Turn off“.
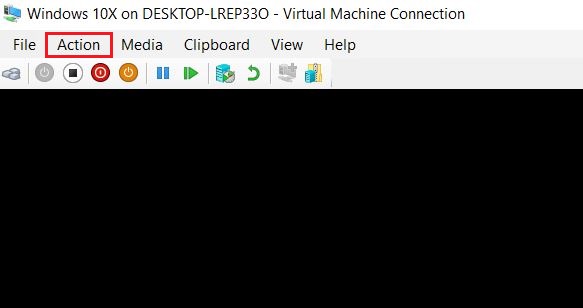
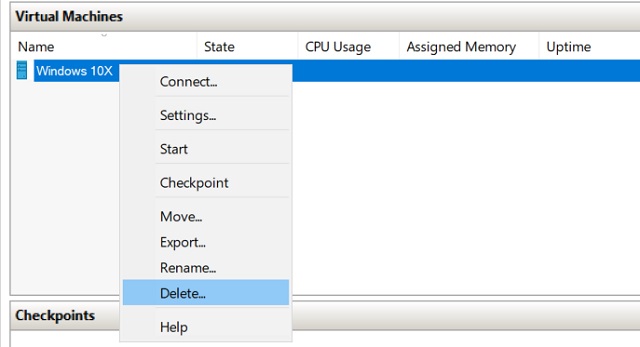
7. And if you want to delete the Windows 10X virtual machine then right-click on the VM and choose “Delete“. That’s it.
Run Windows 10X Virtual Machine on AMD GPU
Currently, there is no way to run the Windows 10X VM without disabling the AMD GPU altogether. You will have to use the integrated GPU that comes with the Intel chipset to run Windows 10X. And yes, the performance will take a hit due to the lack of a powerful GPU. Nevertheless, if you want to taste the finalized version of Windows 10X on an AMD GPU then here is how to go about it.
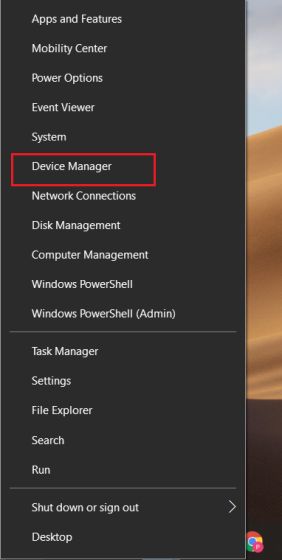
1. Right-click on the Start Menu and open “Device Manager“.
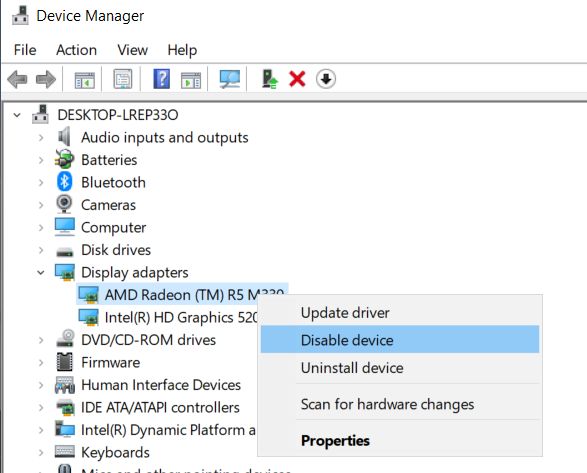
2. Here, expand the “Display adapters” menu. Now, right-click on the AMD GPU and disable it.
3. Finally, start the VM in Hyper-V Manager and this time, Windows 10X should boot fine.
Windows 10X First Impressions
Windows 10X, in its near-final version, is unlike anything that we have experienced in a Microsoft product. It’s polished right from the boot screen to the onboarding setup. In terms of design and aesthetics, Microsoft has really done a great job and developed a consistent UI across the board. Some would say that it looks like Chrome OS and that would be partly true. However, I am happy that Microsoft ventured to bring a lightweight OS to the masses.


Now coming to the million-dollar question: does the final build of Windows 10X support Win32 apps? Unfortunately, there is no support for legacy Windows apps on Windows 10X. It’s surprising though. In an earlier build of Windows 10X, there was support for Win32 apps through the container so why Microsoft removed it is beyond our understanding.
Also, it’s hilarious that you can run legacy Windows apps on Chromebook via Wine, but can’t run native Windows apps on Windows 10X. Hopefully, before the final release or a year down the line, we might get legacy app support through improved x86 emulation. For now, I can say that it performs really well, has beautiful UI and animations, but the lack of Win32 apps (even containerized) might push the much-hyped OS to oblivion just like Window 10S.
Install Windows 10X on Windows 10 and Experience the New UI
So that is how you can run Windows 10X on your Windows 10 PC and explore the new UI that is most likely coming to Windows 10 users through the Sun Valley update. Since I use Chromebook as my daily driver, I found the Windows 10X experience strikingly similar to Chrome OS. And that is not a bad thing.
I just hope either Win32 apps make a comeback in the near future or Microsoft pushes developers to release new build of their apps which are compatible with Windows 10X. Anyway, that is all from us. If you are facing any issues then let us know in the comment section below. We will surely try to help you out.
20 COMMENTS
When I start the Virtual Machine connection it’s shows this error: “Not enough memory in the system to start the Virtual machine Windows 10X.”
“Could not initialize memory: Not enough memory resources are available to complete this operation”
But I wonder I have 87gb space free but why it’s shows error and what it’s mean. Please help me to fix this error, Thank you 😔
hey! i don’t work here but just wanted to help you out.
you didn’t provide enough memory to the virtual machine for it to run.
memory is your RAM, and is different from your storage. go back to step 12 to check out what i’m talking about!
I just don’t like how is look this Windows 10X, Windows it should be Windows and there how I see is a less control for user. Also must to be and multiple Windows and tabs as how is it now.
Any chance with this working with VMware workstation?
FYI: Hyper-V is also available on Windows 8.1 Pro 64-bit.
I got it working just fine.
Is there a way to rip iso from vhdx?
Yes I Daily Drive Windows 8.1 Pro and I am very happy to hear that Windows 10X works There
Answering ur question : no because the vhdx structure is different from iso
The contents of the VHDX file is the installed one, nobody can get the official installer from only the installed files.
Thank you for making this tutorial – I just have one thing to say, which is about the dropped support for Win32 apps. If you head to Update & Security > For developers and enable Developer Mode, you can see that there is an option for Win32 development, so I am guessing that there is a way you can run Win32 apps on Windows 10X, but Microsoft disabled it by default to probably keep it as a light OS.
Also I was able to use it on an AMD processor, so I’m considering myself lucky.
First of all, thank you for making this step-by-step guide
Second of all, I am happening to be using an AMD GPU (AMD Radeon HD 5000 Series), and I was able to run Windows 10X without disabling the GPU with no major issues (apart from the time-to-time short period input lag), so maybe there is a small chance that 10X can run on AMD GPUs?
Either way, thanks for the guide – I really appreciate it.
First of all, thank you for making this step-by-step guide
Second of all, I am happening to be using an AMD GPU (AMD Radeon HD 5000 Series), and I was able to run Windows 10X without disabling the GPU with no major issues (apart from the time-to-time short period input lag)
Hi is there anyway for me to resize or change the resolution of the VM
Is it possible to make a backup of this emulation and then load and run it on a normal PC?
Yeah, just close it and restart. It’ll work then!
Sor there is no hyper-v option in my laptop .what I should do to download it
You need Windows 10 Pro (not home) to get HyperV. If you don’t have it, upgrade to pro or find a way to get HyperV on home.
#TeamBeebom #Beebom
Loved it, was a fun experience .
Tip : Win 10 Home/Enterprise users can manually install Hyper-V. I can assure it’ll work.
Installing Hyper-V Manually : https://itechtics.com/enable-hyper-v-windows-10-home/
(Not my work, I found it tried and tested)
When I start the Virtual Machine connection it’s shows this error: “Not enough memory in the system to start the Virtual machine Windows 10X.”
“Could not initialize memory: Not enough memory resources are available to complete this operation”
But I wonder I have 87gb space free but why it’s shows error and what it’s mean. Please help me to fix this error, Thank you 😔
The 87GB free you’re referring to is the disk’s remaining space, but when Hyper-V displays the “Not enough memory in the system to start the Virtual machine Windows 10X.” error, the “memory” it’s referring to is your RAM.
The only fix I can think of is by closing any running tasks that are taking up a substantial amount of your RAM. You can do this by holding down Ctrl + Shift + Esc (opens Task Manager) and end any running tasks that you don’t need by right-clicking on the task’s entry and selecting “End task”. Be wary though as some tasks cannot be closed like “Antimalware Service Executable” for instance as they’re an essential part of your system, in this case “Antimalware Service Executable” is the task which Windows Defender depends on to keep your PC free from any threats as such.
You’ll know if you’ve ended enough tasks if the RAM that has been freed up matches or exceeds the amount of RAM you’ve allocated. In my case, I was able to get Windows 10X up and running with 2GB of my 6GB of RAM.
Hopefully this solves your issue!
My VM stucked on black screen but i don’t use amd i’m using nvidia


