- Install Windows from a USB Flash Drive
- What you need
- Step 1 — Format the drive and set the primary partition as active
- Step 2 — Copy Windows Setup to the USB flash drive
- Step 3 — Install Windows to the new PC
- If your Windows image is larger than 4GB
- Как загрузить с USB флэш-накопитель с установщиком Windows * Server 2016 после создания объема рейда в режиме Эфи?
- How to Run/Boot Windows 10 from USB Drive
- Why do you need a bootable USB drive
- Notable benefits of running or booting Windows 10 from a USB drive
- The useful tool you need
- Guide to run or boot Windows 10 from the USB hard drive
- Windows Server 2008 R2 – Создание загрузочного USB накопителя
- How-to Create Bootable Windows Server 2016 USB Thumb Drive for Installing OS
- Create Boot USB with Windows Server 2016 – Here are the steps:
Install Windows from a USB Flash Drive
Here’s how to create a bootable Windows installation USB drive starting with a Windows .iso file or a Windows Setup DVD.
If you’re looking for an easy way to create a bootable USB Windows installation drive, use the media creation tool.
What you need
- Windows 10 install .iso or DVD
- USB flash drive with at least 5GB free space. This drive will be formatted, so make sure it doesn’t have any important files on it.
- Technician PC — Windows PC that you’ll use to format the USB flash drive
- Destination PC — A PC that you’ll install Windows on
Step 1 — Format the drive and set the primary partition as active
Connect the USB flash drive to your technician PC.
Open Disk Management: Right-click on Start and choose Disk Management.
Format the partition: Right-click the USB drive partition and choose Format. Select the FAT32 file system to be able to boot either BIOS-based or UEFI-based PCs.
Set the partition as active: Right-click the USB drive partition and click Mark Partition as Active.
If Mark Partition as Active isn’t available, you can instead use diskpart to select the partition and mark it active.
Step 2 — Copy Windows Setup to the USB flash drive
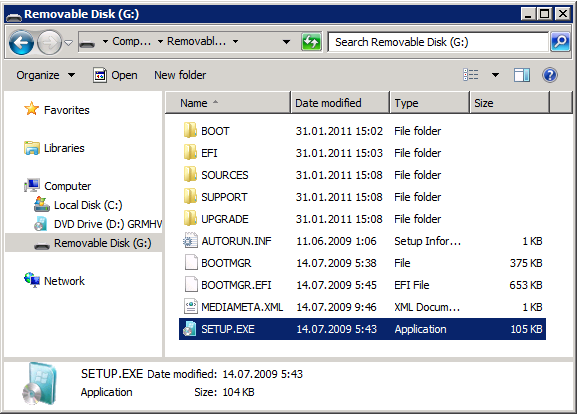
Use File Explorer to copy and paste the entire contents of the Windows product DVD or ISO to the USB flash drive.
Optional: add an unattend file to automate the installation process. For more information, see Automate Windows Setup.
Step 3 — Install Windows to the new PC
Connect the USB flash drive to a new PC.
Turn on the PC and press the key that opens the boot-device selection menu for the computer, such as the Esc/F10/F12 keys. Select the option that boots the PC from the USB flash drive.
Windows Setup starts. Follow the instructions to install Windows.
Remove the USB flash drive.
If your Windows image is larger than 4GB
Windows USB install drives are formatted as FAT32, which has a 4GB filesize limit. If your image is larger than the filesize limit:
Copy everything except the Windows image file (sources\install.wim) to the USB drive (either drag and drop, or use this command, where D: is the mounted ISO and E: is the USB flash drive.)
Split the Windows image file into smaller files, and put the smaller files onto the USB drive:
Как загрузить с USB флэш-накопитель с установщиком Windows * Server 2016 после создания объема рейда в режиме Эфи?
Проверено. Это решение проверено нашими клиентами с целью устранения ошибки, связанной с этими переменными среды
Тип материала Установка и настройка
Идентификатор статьи 000029317
Последняя редакция 22.05.2019
Система не подскажет загрузку с большого пальца с универсального серийного автобуса (USB) с установщиком Windows * Server 2016 для установки этой операционной системы (OS).
Intel® Рейд модуль RMSP3CD080F
Intel® Сервер Совета S2600WFT
Другие:
* Bootable рейд 1 объем успешно созданный в рамках ППП.
* USB Stick признается в БИОС борту, в соответствии с конфигурацией USB меню.
Убедитесь, что устройство USB форматируется в новой технологии файловой системы (НЦТ) и глобально уникального идентификатора (GUID) раздела таблицы (GPT) для унифицированного интерфейса прошивки (Эфи). Для этого, вы можете использовать утилиты, такие как Руфус; НажмитеЗдесь для получения дополнительной информации.
- Убедитесь, что USB флэш-накопитель имеет резервный массив независимых дисков (рейд) водитель карты.
- Как я могу включить режим загрузки Эфи, чтобы таким образом установить ОС?
- Не пытайтесь в режиме «наследие» вместо Эфи, потому что RMSP3CD080F рейд модуль® Intel не поддерживает его. Это указано на странице 14 руководства пользователя оборудования.
Информация в этой статье была ИСПОЛЬЗОВАНА нашими клиентами, но не ПРОТЕСТИРОВАНА, полностью РЕПЛИЦИРОВАНА или подтверждена корпорацией Intel. ИНДИВИДУАЛЬНЫЕ РЕЗУЛЬТАТЫ МОГУТ ВАРЬИРОВАТЬСЯ. ВСЕ проводки и использование содержимого на этом сайте ПОДЧИНЯЮТСЯ условиям и условиям использования сайта.
How to Run/Boot Windows 10 from USB Drive
Why do you need a bootable USB drive
As many users have experienced, Windows system sometimes is prone to be corrupted and then crash and stop working due to various reasons. As a result, the PC fails to boot and the hard drive data becomes inaccessible. This problem usually makes users who are urgent to work with their PC or view their important data crazy!В В
What if you have a Windows bootable USB drive? Congratulations! Just go to BIOS, change the boot sequence, and then you can start your PC properly from the removable disk.В
There are the things you need to pay attention to:
- Use an external hard drive to create a bootable USB drive. The USB flash drive and pen drive are not able to help.
- Only the first partition of the USB flash drive or pen drive can be recognized by the Windows, while the second and subsequent partition drive letters cannot be allocated.
- For almost 99% of the Windows systems must have two partitions, the system partition, and the boot partition. If you clone Windows 10/8/7 to a USB flash drive or pen drive, only the first partition can be accessed. In this case, it cannot boot at all. So you must use an external hard drive!!
- Besides, the USB hard drive must have enough free space which is bigger than the system drive space!
Notable benefits of running or booting Windows 10 from a USB drive
Searching online, we can see that there are always some users ask for help on how to run Windows 10 from a USB hard drive as they can get so many notable benefits from the operation, for example:В
- Getting their PC boot properly from the bootable USB hard drive even if Windows cannot be accessed from internal hard drive due to certain reasons.В
- Install large programs on the USB hard drive so that they can to save internal disk space or use these programs on any other computers.
Are you one of such users who is seeking ways to boot Windows 10 from an external device? Read on, and you will find a step-by-step guide teaching you how to get the job done using Windows 10 USB bootable software.
The useful tool you need
Even though Microsoft offers users a Windows media creation tool that allows them to create Windows ISO image files on a USB or DVD to manage the job, it is still too difficult for «computer idiocy» to operate. Here, you needВ third-party backup software which can make the job easier.
First, EaseUS backup software is easy to operate. All you need to do is open the software and clone the system to your external hard drive. It is easy and fast.
Second, it can create a bootable Windows 10 USB hard drive that contains not only the operating system but also some installed application or even some personal data which guarantees that you can directly work with a computer without doing extra jobs after running Windows 10 from the external device.В
Download thisВ system clone software and boot Windows 10 from the USB.
Support Windows 10/8.1/8/7/Vista/XP
Guide to run or boot Windows 10 from the USB hard drive
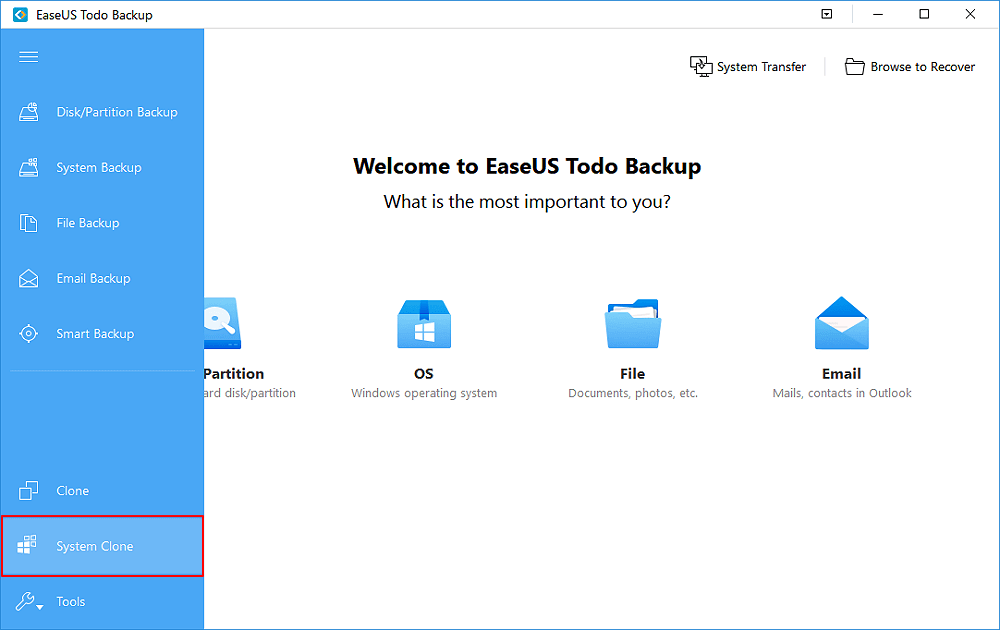
Step 1. Connect the USB drive to your PC and run EaseUS Todo Backup. Click «System Clone».В
The current system partition (Windows 10) and boot partition will be automatically selected.
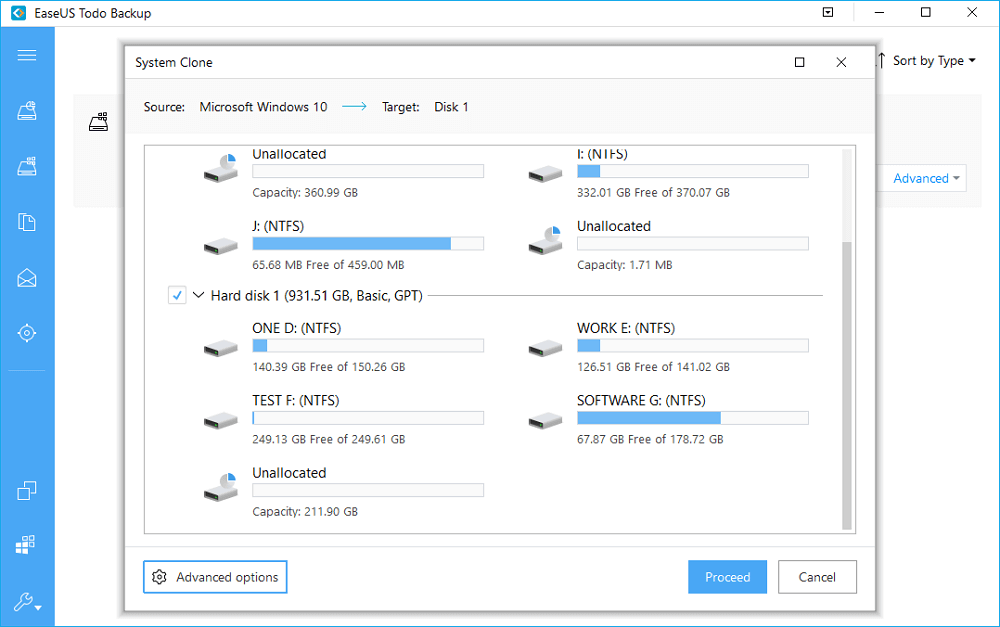
Step 2. Select the destination disk — USB drive to clone system drive (system and boot partition) to.
(Here you can identify whether your USB drive storage space is big enough or not.)
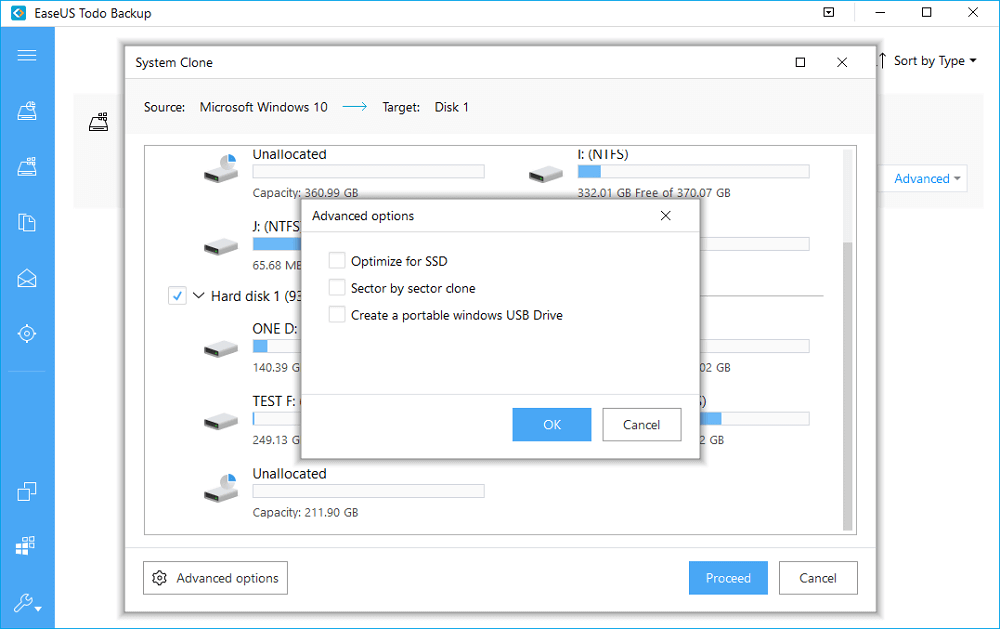
Step 3. Click on Advanced options and tick Create a Portable Windows USB drive.

Step 4. Click Proceed to start cloning Windows 10 to USB.
After creating the bootable USB drive, you can use it to run Windows 10 on a PC whenever you want. But remember that you should first set the USB hard drive or external devices as the first boot device in BIOS.В
- Connect your bootable USB to your computer and press F2 when you start the PC.
- In theВ BIOS interface, choose the bootable device as yourВ first boot device.
Windows Server 2008 R2 – Создание загрузочного USB накопителя
 Возникла ситуация, когда пришлось мануально устанавливать ОС Hyper-V Server 2008 R2 на сервер, не имеющий DVD привода. Решил проверить метод, описанный в заметке x(perts)64 Blog — Charlie Russel — HowTo: Make a Bootable USB Disk . Итак, поехали…
Берём USB накопитель (в моём случае это Kingston DataTravel II 2Gb)…
В DVD привод устанавливаем загрузочный диск с дистрибутивом Hyper-V Server 2008 R2. Открываем командную строку с правами Администратора и с помощью утилиты DISKPART подготавливаем флэш-накопитель последовательностью команд:
# Входим в режим работы с утилитой
DISKPART
# Получаем листинг управляемых дисков
DISKPART> LIST DISK
# Выбираем флэш накопитель
DISKPART> SELECT DISK 2
# Производим очистку флэш накопителя
DISKPART> CLEAN
# Создаем на первичный раздел на всю ёмкость флэш накопителя
DISKPART> CREATE PARTITION PRIMARY
# Выбираем созданный раздел
DISKPART> SELECT PARTITION 1
# Делаем выбранный раздел активный
DISKPART> ACTIVE
# Форматируем активный раздел в формат NTFS
DISKPART> FORMAT FS=NTFS QUICK
# Назначаем имя диска в системе
DISKPART> ASSIGN
# Завершаем работу утилиты
DISKPART> EXIT
Результат работы утилиты должен выглядеть примерно так:

После того как флэш накопитель подготовлен, с помощью утилиты BOOTSECT с дистрибутивного диска с ОС производим запись загрузочного сектора в активном разделе накопителя командой:
D:BOOTBOOTSECT.EXE /nt60 G:
В этом примере диск D: это DVD диск с дистрибутивом, а G: это USB накопитель.
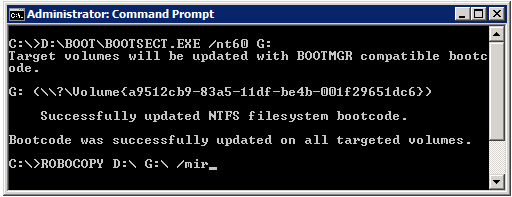
Обратите внимание на то, что для 64-битных образов ОС утилита BOOTSECT.EXE должна выполняться в 64-битной среде.
Далее с помощью утилиты ROBOCOPY копируем всё содержимое дистрибутива ОС с DVD диска на USB накопитель командой:
После завершения процедуры копирования, мы получим готовый к использованию загрузочный USB флэш накопитель:
В BIOS сервера выставляем загрузку с USB, и если всё сделано правильно, то мы сможем, загрузившись с накопителя, произвести быструю установку ОС. В моём случае полное время установки ОС Hyper-V Server 2008 R2 с учетом перезагрузки сервера заняло 12 минут
How-to Create Bootable Windows Server 2016 USB Thumb Drive for Installing OS
Microsoft has released the final version of Windows Server 2016. I thought that it might be a good idea to create a USB stick that can be used as a source to install the Windows Server 2016 OS to other servers/workstations.
There are many free tools that can be used to do the job, but sometimes you just don’t have that option or simply you do not want to use any free tools for this job. It is not so difficult to create a bootable USB, and this post will teach you how to do that in 6 easy steps.
This process works on any version of Windows Server or Windows Desktop version 8 or above. It uses Microsoft Diskpart tool present on those systems. It’s a command line tool, which is invoked by simply typing “Diskpart” from within a command prompt.
This How-To should also work on versions earlier than Windows 10, Windows 8, Windows Server 2012, Windows 7 and Windows Vista, and Windows Server 2008 or Windows Server 2008 R2.
This post will teach you this process without any freeware/shareware. The article does not use any downloadable programs or nor is it executable from anywhere. It uses only programs already present in the Windows system. All you need to have is the Microsoft ISO and have a laptop/workstation running Windows 8 or higher, with a free USB slot.
If you do not have the ISO of Windows Server 2016, you will need to download it. To download Windows Server 2016 eval 180 days, go to this link. Microsoft will also make this download available through usual subscription services.
Create Boot USB with Windows Server 2016 – Here are the steps:
Step 1. The first thing to do is to mount the ISO of Windows Server 2016 you just downloaded. Double-click the ISO file to mount it. Check the drive letter and make note of the drive letter. In my case, it is drive D:
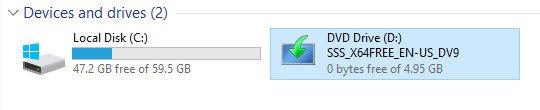
Step 2. Put in the USB Key on your computer and make note of the drive letter and the size of the disk. In my case, it is E: and 10gb. Your environment will certainly be different than mine. You will need at least an 8gb USB thumb drive as the process will require 4.9gb.
Step 3. Run Elevated command prompt – Start > type cmd > Right-click cmd at the top of the menu > Run as Administrator and accept the elevation request

Important NOTE: The following commands will completely wipe out your disk without warning, so make sure you select the proper disk. You can also disconnect all external drives or other USBs currently connected to your system to limit possible mistakes.
 | StarWind HyperConverged Appliance is a turnkey, entirely software-defined hyperconverged platform purpose-built for intensive virtualization workloads. Bringing the desired performance and reducing downtime, the solution can be deployed by organizations with limited budgets and IT team resources. Also, it requires only one onsite node to deliver HA for your applications that makes the solution even more cost-efficient. |
| Find out more about ➡ StarWind HyperConverged Appliance |
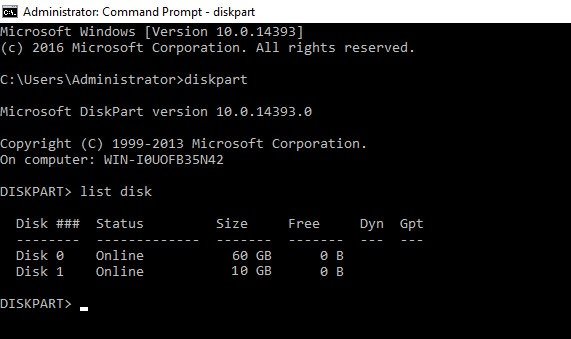
Step 4. Next, you will run the program called Diskpart to prepare the disk for the OS.
in my case, I’ll do Select Disk 1 as Disk 1 is my 10Gb USB disk.
Please Note: after you run list disk again, the selected drive should be prefaced with the asterisks “*”. This is a small hint because I know the CLI isn’t everyone’s favorite.
Attention! Watch out: the next line is the one that wipes the drive completely. It cleans the drive.
create partition primary
select partition 1
format fs=ntfs quick label=”2016Server”
Step 5. Now we need to copy the boot sector. Make sure that you are still within the command prompt window
Note: Run “bootsect /help” for detailed usage instructions.
Target volumes will be updated with BOOTMGR compatible bootcode.
Bootcode was successfully updated on all targeted volumes.
Step 6. Now we just need to copy the files… (STILL Within the DOS window)
It is a xCopy command to copy files. The syntax is basically xCopy (source) (destination) with some switches (I won’t go into details). You’ll need to replace drive letters below with your drive letters.
NOTE: There is a very large file called install.wim which will get copied. So when it copies the install.wim file, it will take a very, very long time. This is just to let you know. This file is very large (4gb), but the copy command should finish without error.
Step 7. There is no step 7… You’re done. Once the copy finishes, you can boot Off the USB drive to install a new system on some server. It is usually handy to have such a USB if you’re an admin/technician and use it for systems that do not have a CD/DVD drive installed.
NOTE: Don’t forget to change your BIOS settings concerning the boot order. You must put USB first, then Hard disk as second. Usually, you’ll do that through F2 or F12, or DEL key on your keyboard. But this varies from one manufacturer to another.


