- How to Run a Program as SYSTEM (LocalSystem) Account in Windows
- Method to run a program under the SYSTEM account:
- How to Run Programs as SYSTEM (LocalSystem account)
- Using PsExec.exe from Windows Sysinternals
- Using Advanced Run from Nirsoft
- Run as SYSTEM via the right-click menu
- Using Process Hacker
- Using NirCmd.exe from NirSoft
- Context menu implementation
- Using RunAsSystem from Uwe Sieber
- Context menu implementation
- Using “NSudo” from M2Team
- NSudo: Command-line support
- Context menu addition
- One small request: If you liked this post, please share this?
- About the author
- 2 thoughts on “How to Run a Program as SYSTEM (LocalSystem) Account in Windows”
- Windows service running as local service — input files?
- 1 Answer 1
- Not the answer you’re looking for? Browse other questions tagged c# windows service or ask your own question.
- Related
- Hot Network Questions
- Subscribe to RSS
- .NET Core Workers as Windows Services
- Create a worker
- Create a Worker in Visual Studio
- Create a Worker on the command line
- Run as a Windows Service
- Install the Worker
- Logging
- Future Work
- Why running a service as Local System is bad on windows?
- 5 Answers 5
How to Run a Program as SYSTEM (LocalSystem) Account in Windows
Many Windows system files, registry keys, and services are owned by the SYSTEM (a.k.a LocalSystem) account, which has a high privilege level. If you need to modify a registry key owned by the SYSTEM account, there are at least two options.
The first option that comes to your mind is to take ownership of the corresponding registry key, assign yourself Full Control permissions. Once the registry key or the values are updated, revert the permissions and ownership to SYSTEM .
There is, however, an easier option. You can run the program — e.g., the Command Prompt or the Registry Editor under the SYSTEM account directly and update the registry values.
This article lists six different methods using which you can run programs under the SYSTEM or LocalSystem account in any version of Windows, including Windows 10. You can also add a Run as SYSTEM right-click menu option for .exe files.
Method to run a program under the SYSTEM account:
Before proceeding, understand that the terms SYSTEM , LocalSystem , and NT AUTHORITY\SYSTEM are one and the same.
How to Run Programs as SYSTEM (LocalSystem account)
To run a program under the SYSTEM account, use one of the following tools:
Using PsExec.exe from Windows Sysinternals
Use PsExec.exe console tool from Microsoft’s Windows Sysinternals to run a program under the SYSTEM context. Follow these instructions:
- Download PsExec from Microsoft Sysinternals.
- Unzip and extract the tool to a permanent folder — e.g., d:\tools
- Open an elevated or admin Command Prompt window.
- To start the Registry Editor under the SYSTEM account, type the following command, and press ENTER :
The above PsExec command-line starts the Registry Editor under LOCALSYSTEM account so that you can modify protected areas in the registry.
Note: If you launch Command Prompt ( cmd.exe ) using PsExec.exe under the SYSTEM account, it spawns a new Command Prompt window. And, any program you launch from that Command Prompt window would run under the SYSTEM (LocalSystem) account, which is a high privileged account. You must be cautious when running programs under the SYSTEM account so that you don’t accidentally run an undesired program as SYSTEM .
Using Advanced Run from Nirsoft
AdvancedRun is a simple tool for Windows that allows you to run a program with different settings that you choose, including – low or high priority, start directory, main window state (Minimized/Maximized), run the program with different user or permissions, Operating system compatibility settings, and environment variables. You can also save the desired settings into a configuration file and then run the program automatically from the command-line with the desired settings.
Using Advanced Run, you also launch a program under SYSTEM or a different user context.
Type in the program name to run and choose SYSTEM user in the Run As dropdown box, and click Run.
You can also create a desktop shortcut to run a program as SYSTEM. Here is the command-line syntax you use:
/RunAs 4 instructs to start the program under the LocalSystem account. The possible value data for the /RunAs switch are below:
- 1 – Run as current user (elevate)
- 2 – Run as current user (no elevation)
- 3 – Run as Administrator (force elevation)
- 4 – Run as SYSTEM
- 8 – Run as TrustedInstaller
This starts the program under the LocalSystem account, which you can verify in the Task Manager Details tab.
Run as SYSTEM via the right-click menu
To launch a program under the SYSTEM account (with Advanced Run) from the right-click context menu, make a .reg file from the following contents and run the file.
Change the path to AdvancedRun.exe in the .reg file if necessary.
This adds the Run as SYSTEM command to the right-click menu for .exe files and its shortcuts.
Using Process Hacker
Process Hacker is an excellent process manager that looks similar to Sysinternals Process Explorer. This tool has a unique feature that allows you to launch a program under the same account as a running process or service.
- Run Process Hacker as administrator.
- Locate a program or service which is currently running under NT AUTHORITY\SYSTEM .
- Right-click on the process, click Miscellaneous, and click Run as this user…
Now the program (e.g., cmd.exe) would run as SYSTEM ( NT AUTHORITY\SYSTEM )
The above method can also be used to launch any program under TrustedInstaller.
Using NirCmd.exe from NirSoft
NirCmd is a multipurpose command-line tool which we’ve covered in this site before.
NirCmd can start a program elevated as well as launch it under the SYSTEM account.
Use this command-line to start the Registry Editor elevated and under the SYSTEM account:
Context menu implementation
Make a .reg file from the following contents and run the file.
Using RunAsSystem from Uwe Sieber
RunAsSystem (from Uwe Sieber) is a console tool that launches a program under the SYSTEM account or context. It also passes the window style and its process priority to the executed process by default. You can override the window size as well as the child process priority using command-line arguments. Uwe Sieber is the one who developed the famous USB Drive Letter Manager program.
It waits for the started process to end and then passes back its return code (aka errorlevel). However, in a batch file, you have to add start /wait .
Usage:
Examples:
Context menu implementation
Make a .reg file from the following contents and run the file.
The above .reg file adds a Run as SYSTEM command in the right-click menu for .exe files. The .reg file assumes that the file RunAsSystem.exe is placed under the d:\tools folder. If not, alter the path accordingly in the .reg file.
Using “NSudo” from M2Team
NSudo (GitHub) is a similar portable utility like Advanced Run, except that it is not digitally signed. It can launch programs under SYSTEM, Current User, Current Process, or the TrustedInstaller account. We’ve earlier seen how to use NSudo to launch programs as TrustedInstaller.
Select the mode (System) from the dropdown, type in the executable path, and click Run.
Optionally, you can also add a predefined set of programs or commands in the Open: drop-down list box by editing the file named NSudo.json located in the same folder as the executable.
To run a program under the SYSTEM context using NSudo command-line, use this syntax:
See below for the full list of command-line arguments supported by this utility.
NSudo: Command-line support
Context menu addition
- Run NSudo with -Install parameter. It copies NSudo to the Windows directory and adds the context menu.
- To remove the context menu, run NSudo with the -Uninstall parameter. It removes NSudo from the Windows directory and the context menu.
Editor’s Pick: Advanced Run for GUI (and CLI), and PsExec for CLI.
One small request: If you liked this post, please share this?
About the author
Ramesh Srinivasan founded Winhelponline.com back in 2005. He is passionate about Microsoft technologies and he has been a Microsoft Most Valuable Professional (MVP) for 10 consecutive years from 2003 to 2012.
Microsoft → Windows → How to Run a Program as SYSTEM (LocalSystem) Account in Windows
2 thoughts on “How to Run a Program as SYSTEM (LocalSystem) Account in Windows”
This is a really useful article and information. Thank you for that!
I use this feature at the login screen by renaming a few files while Windows is offline. While this is a handy feature for technicians like myself, shouldn’t this be a security issue that Microsoft addresses?
Windows service running as local service — input files?
I have a windows service program running in C#. I have configured to run it as a local service with my config files stored in \bin\release\config\configvalues.txt. But, it does not recognize this file path and throws the «System.UnauthorizedAccessException».
I believe its looking for the files in the System32 folder and since it does not have the privilege, throws out the exception. For the workaround, my service is running with «local system» to recognize the System32\config folder. To run as a local service, which file path should the config folder be available?
1 Answer 1
Check the location of your project folder. Most likely, you’ll find that it is inside your User profile folders, which the local service account does not have access to.
Deploy your project to a folder outside of any User profiles and you’ll have better luck.
Not the answer you’re looking for? Browse other questions tagged c# windows service or ask your own question.
Related
Hot Network Questions
Subscribe to RSS
To subscribe to this RSS feed, copy and paste this URL into your RSS reader.
site design / logo © 2021 Stack Exchange Inc; user contributions licensed under cc by-sa. rev 2021.4.16.39093
By clicking “Accept all cookies”, you agree Stack Exchange can store cookies on your device and disclose information in accordance with our Cookie Policy.
.NET Core Workers as Windows Services
In .NET Core 3.0 we are introducing a new type of application template called Worker Service. This template is intended to give you a starting point for writing long running services in .NET Core. In this walkthrough we will create a worker and run it as a Windows Service.

Create a worker
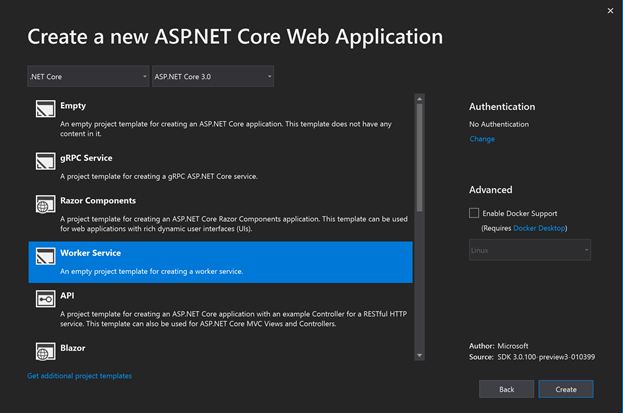
Preview Note: In our preview releases the worker template is in the same menu as the Web templates. This will change in a future release. We intend to place the Worker Service template directly inside the create new project wizard.
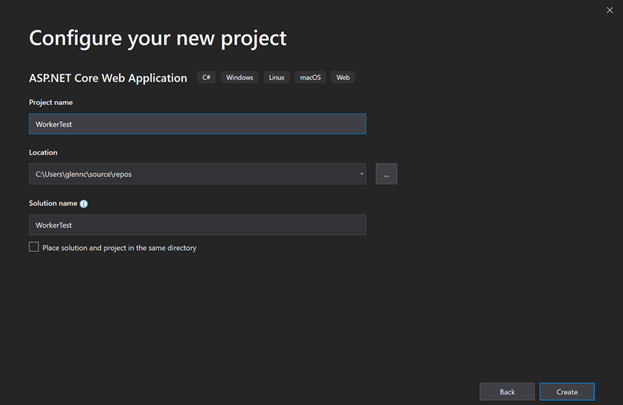
Create a Worker in Visual Studio
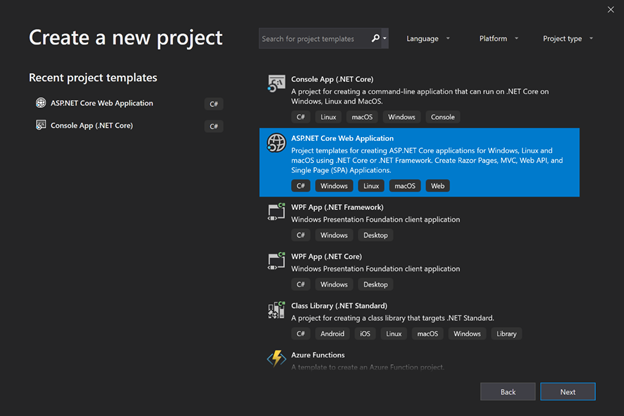
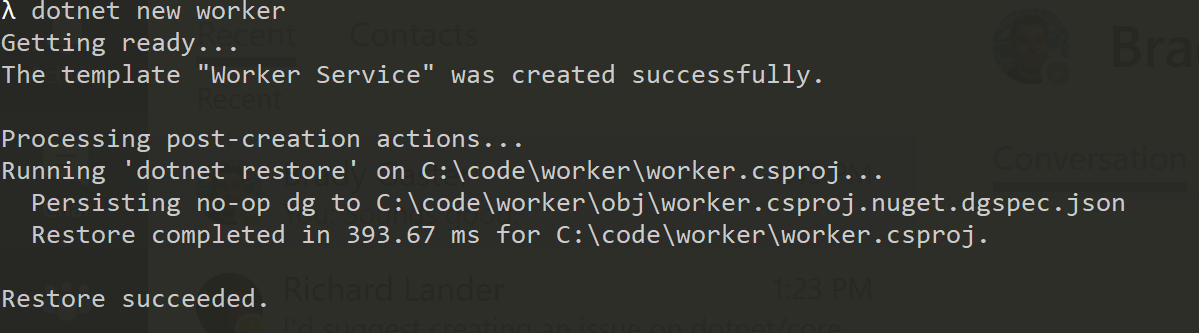
Create a Worker on the command line
Run dotnet new worker
Run as a Windows Service
In order to run as a Windows Service we need our worker to listen for start and stop signals from ServiceBase the .NET type that exposes the Windows Service systems to .NET applications. To do this we want to:
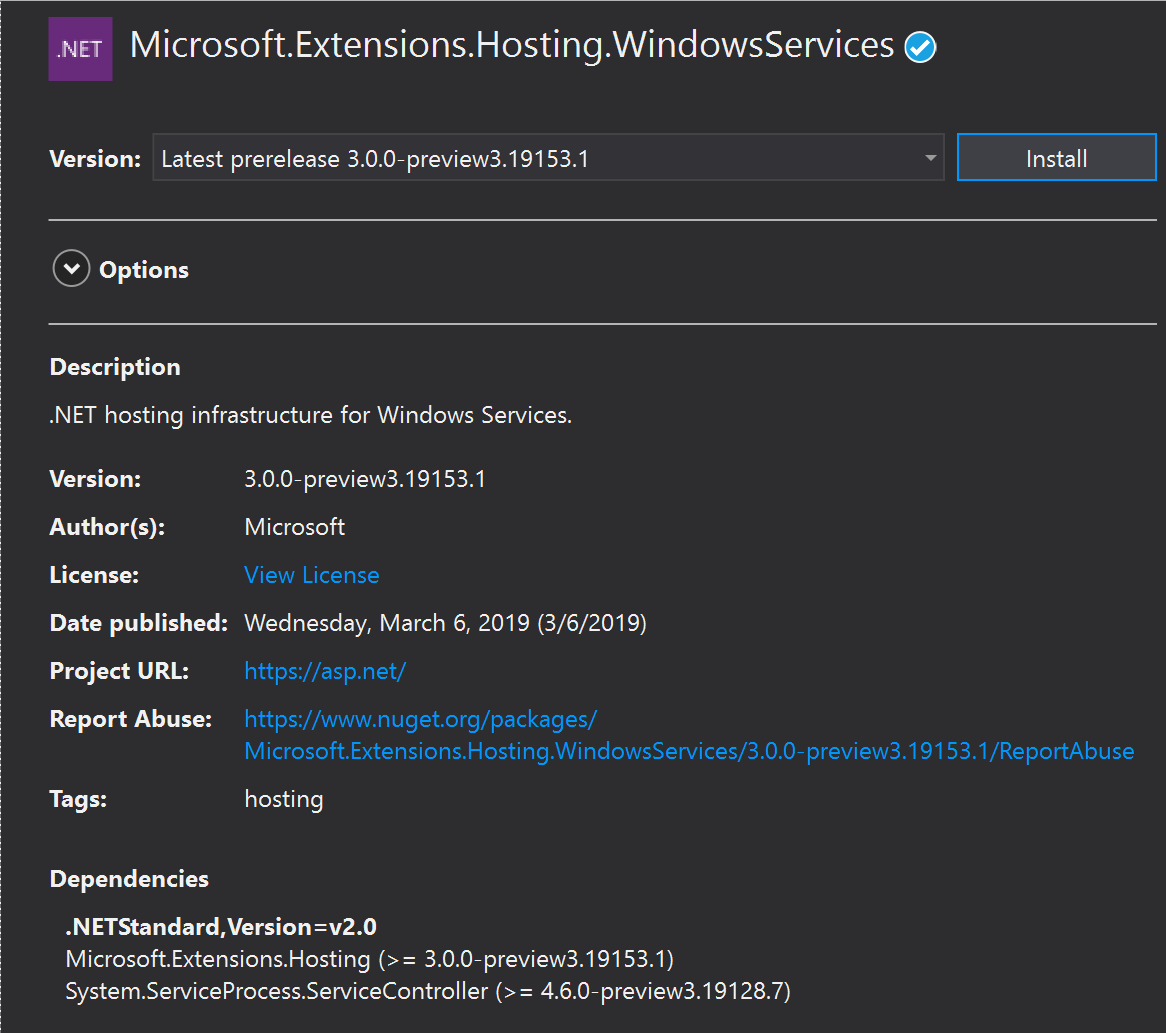
Add the Microsoft.Extensions.Hosting.WindowsServices NuGet package
Add the UseServiceBaseLifetime call to the HostBuilder in our Program.cs
This method does a couple of things. First, it checks whether or not the application is actually running as a Windows Service, if it isn’t then it noops which makes this method safe to be called when running locally or when running as a Windows Service. You don’t need to add guard clauses to it and can just run the app normally when not installed as a Windows Service.
Secondly, it configures your host to use a ServiceBaseLifetime . ServiceBaseLifetime works with ServiceBase to help control the lifetime of your app when run as a Windows Service. This overrides the default ConsoleLifetime that handles signals like CTL+C.
Install the Worker
Once we have our worker using the ServiceBaseLifetime we then need to install it:
First, lets publish the application. We will install the Windows Service in-place, meaning the exe will be locked whenever the service is running. The publish step is a nice way to make sure all the files I need to run the service are in one place and ready to be installed.
Then we can use the sc utility in an admin command prompt

Security note: This command has the service run as local system, which isn’t something you will generally want to do. Instead you should create a service account and run the windows service as that account. We will not talk about that here, but there is some documentation on the ASP.NET docs talking about it here: https://docs.microsoft.com/en-us/aspnet/core/host-and-deploy/windows-service?view=aspnetcore-2.2
Logging
The logging system has an Event Log provider that can send log message directly to the Windows Event Log. To log to the event log you can add the Microsoft.Extensions.Logging.EventLog package and then modify your Program.cs :
Future Work
In upcoming previews we plan to improve the experience of using Workers with Windows Services by:
- Rename UseWindowsServiceBaseLifetime to UseWindowsService
- Add automatic and improved integration with the Event Log when running as a Windows Service.
Why running a service as Local System is bad on windows?
I am trying to find out the difference between difference service account types. I tumbled upon this question.
The answer was because it has powerful access to local resources, and Network Service should be used if possible.
But still I am not able to understand that if it has powerful access to local resources, how attacker can access the account? What are the ways to compromise the account? I understood it is all about security, but I don’t know how. It could be dark hacker’s world, however anybody could explain, in simple terms, why network service account is better than local account ?
Thanks in advance.
5 Answers 5
Every program you run increases the attack surface of your server.
You have to assume that a determined, malicious actor can exploit bugs or loopholes in your program to make it do anything. You mitigate that by executing your programs with the least privileges required to do their jobs.
Some of these exploits include:
Luring attacks, in which an attacker tricks your program into executing their code under the program’s elevated privileges.
Buffer Overrun Attacks, in which extra data sent to a method is written into adjacent memory, which may be the target of control flow logic.
Man in the Middle attacks, where an attacker falsifies messages to your program.
Often, a given service isn’t obviously vulnerable to any of these. Running under network service (or another account with reduced permissions) is a ‘better safe than sorry’ strategy that acknowledges two important facts of software development: programmers are fallible and attackers are inventive.
The LocalSystem account is the Windows equivilant of the *nix root account. It’s even more privileged than an administrator account. When you run as LocalSystem, you have full access to every resource on the machine.
As others have written, you should write your code to run with the least possible privileges.
The primary difference between LocalService and NetworkService is that services running as NetworkService have the ability to authenticate to other machines in the domain (as the machine account I believe).
Please note that the LocalService and NetworkService accounts both have the «Impersonate» privilege which is a potentially dangerous privilege — it allows the service to impersonate the user who is calling into the service. If that user is an administrator, then even though your code is running in a low privileged service, it can do anything that the administrator does. If an attacker can exploit a buffer overflow in your least privilege service, they can hook out the APIs you use to impersonate your caller and wait until a high privileged caller calls into your service. This technique is known as «Token Kidnapping» and the MSRC has a great blog post describing the issue (and contains links that describe how to mitigate many of the other risks associated with using LocalService and NetworkService accounts).


