- Win10 All Settings — простое изменение настроек, режим бога и управление доступными параметрами Windows 10
- Загрузка Win10 All Settings и русский язык интерфейса
- Использование Win10 All Settings, доступные параметры и инструменты
- Видео обзор
- Open Advanced System Setting in Windows 10 (three solutions)!
- Find and open the Advanced System Setting in Windows 10 or Server 2016, to change important System Properties!
- 1.) . Start the Advanced System Setting in Windows 10 via RUN-Command. 2.) . Run Advanced System Setting via Windows-10 Desktop and This PC. 3.) . Open Advanced System Setting via Control Panel! ◄ Not for Win-10 from 2019 / 2020 4.) . Info About Advanced System Setting!
- 1.) Start the Advanced System Setting in Windows 10 via RUN-Command.
- 2.) Run Advanced System Setting via Windows-10 Desktop and This PC.
- 3.) Open Advanced System Setting via Control Panel!
- 4.) . Info About Advanced System Setting!
- How to run Windows 10 Settings app as administrator?
- 2 Answers 2
- Why it’s happening
- How to change group policy for non-administrators
- Configure and allow Windows 10 to run Specified Programs only
- Run only specified Windows Applications
Win10 All Settings — простое изменение настроек, режим бога и управление доступными параметрами Windows 10
 Различные настройки, параметры, системные инструменты администрирования Windows 10 не всегда просто найти и нельзя сказать, чтобы они были организованы наилучшим образом: часть доступны в параметрах, часть — в панели управления, некоторые отображаются лишь при определенных параметрах вида, существуют и другие проблемы. Win10 All Settings — простая бесплатная программа, которая предоставляет действительно удобный доступ ко всему перечисленному и не только.
В этом обзоре о возможностях программы, о том, как скачать и «установить» её, включить русский язык интерфейса и дополнительная информация, которая может оказаться полезной.
Загрузка Win10 All Settings и русский язык интерфейса
Утилита Win10 All Settings не требует установки на компьютер и прав администратора: достаточно просто скачать её с официального сайта разработчика https://www.wintools.info/index.php/win10-all-settings и запустить её. Если вы планируете использовать инструмент регулярно, рекомендую скопировать файл программы в удобное место (чтобы не лежал на рабочем столе или в «Загрузках»), а затем, при желании включить автоматический запуск при старте Windows в параметрах.
Обновление: в программе появился русский язык интерфейса. У вас есть две возможности, чтобы программа была на русском:
- Нажать правой кнопкой мыши по значку программы в области уведомлений (появится после запуска), выбрать пункт «Languages» (языки), затем — «Translate» и самостоятельно использовать встроенный инструмент перевода для того, чтобы перевести все пункты меню.

- Скачать подготовленный мной перевод программы Win10 All Settings на русский язык: заходим на страницу https://pastebin.com/wMyBPs4y, нажимаем кнопку «Download» и сохраняем файл под именем win10settings-lang.txt в ту же папку, где находится win10settings.exe. Перезапускаем программу (выход через правый клик — Exit и повторный запуск), а затем в меню «Languages» выбираем «Custom». Готово, теперь программа на русском языке.

Использование Win10 All Settings, доступные параметры и инструменты
Как уже было отмечено выше, после запуска Win10 All Settings в области уведомлений Windows 10 появляется значок программы, по простому нажатию на который по умолчанию (можно изменить в параметрах программы) открывается папка «Режим бога» со всеми доступными элементами панели управления и средств администрирования системы.

Если нажать по значку программы правой кнопкой мыши мы попадем в простое меню (пожалуй, примерно такой и должна быть «Панель управления»), в которой обнаружатся следующие пункты:
- Простые инструменты персонализации с возможностью загрузки других утилит для оформления Windows 10, о некоторых из которых я уже писал на сайте.
- Открытие папки «Режим бога» как при простом нажатии на значок.
- Все элементы панели управления.
- Почти все инструменты администрирования Windows 10.
- Быстрый доступ к параметрам Windows 10 (те, которые открываются по клавишам Win+I).
- В разделе «Инструменты» — несколько системных инструментов самой Windows 10, создание папки «Режим бога» на рабочем столе (не будет требовать для работы запущенной программы, будет отображаться без имени) и возможность загрузки нескольких системных утилит от разработчика.
- В параметрах Win10 All Settings вы можете включить автоматический запуск программы, незначительно изменить внешний вид меню программы.


Видео обзор
Как итог: утилита показалась мне очень удобной и достойной того, чтобы опробовать и, если вы постоянно используете какие-либо элементы управления Windows 10, она может оказаться полезной и вам. В контексте темы интересным могут быть полезными материалы: Настройка Windows 10 в Winaero Tweaker, Встроенные системные утилиты Windows, о которых многие не знают.
А вдруг и это будет интересно:
Почему бы не подписаться?
Рассылка новых, иногда интересных и полезных, материалов сайта remontka.pro. Никакой рекламы и бесплатная компьютерная помощь подписчикам от автора. Другие способы подписки (ВК, Одноклассники, Телеграм, Facebook, Twitter, Youtube, Яндекс.Дзен)
29.08.2020 в 17:17
Добрый день,
может подскажете, где можно увеличить этот шрифт —
(скриншот)
30.08.2020 в 13:03
29.08.2020 в 22:00
Спасибо. Интересная и нужная софтина, для простого и быстрого доступа к настройкам и управлению системы.
30.08.2020 в 11:51
Спасибо большое! Очень полезная статья!
30.08.2020 в 13:41
Благодарю. Всё так подробно рассказываете и показываете. Хорошая утилита. Удачи Вам.
30.08.2020 в 14:36
Предпочитаю более простой способ, которым пользуюсь начиная с Windows 7. Создаём в любом угодном месте папку, обзываем её любым именем, после вставляем
Уверен — очень удобная программа! Но русифицировать её не получилось.
31.08.2020 в 17:42
30.08.2020 в 15:07
Здравствуйте Dmitry,
вероятно, предложенные Вами программы, могут быть полезны.
К сожалению, именно то, что мне нужно, в них — не нашёл.
Благодарю Вас за попытку помочь.
31.08.2020 в 13:26
Всё скачал, а не могу руссифицировать.
31.08.2020 в 13:30
02.09.2020 в 09:09
Большущее спасибо за информацию и, конечно же, за русификацию!
06.09.2020 в 11:20
Все сделал по инструкции, однако программа русифицироваться не хочет.
07.09.2020 в 09:22
В системе включен показ расширений файлов? Проверьте — https://remontka.pro/file-extensions/ и, если не включен, включите и посмотрите, чтобы у файла языкового было не .txt.txt а один раз .txt
06.09.2020 в 11:28
Получилось русифицировать. Создается файл win10settings-lang.txt с английским языком, а скачанный файл переименовывает в win10settings-lang.txt.txt. Необходимо английский файл удалить, а русский переименовать.
07.09.2020 в 09:22
Ну вот, то что я и писал не ваш комментарий предыдущий.
Open Advanced System Setting in Windows 10 (three solutions)!
Find and open the Advanced System Setting in Windows 10 or Server 2016, to change important System Properties!
1.) . Start the Advanced System Setting in Windows 10 via RUN-Command.
2.) . Run Advanced System Setting via Windows-10 Desktop and This PC.
3.) . Open Advanced System Setting via Control Panel! ◄ Not for Win-10 from 2019 / 2020
4.) . Info About Advanced System Setting!
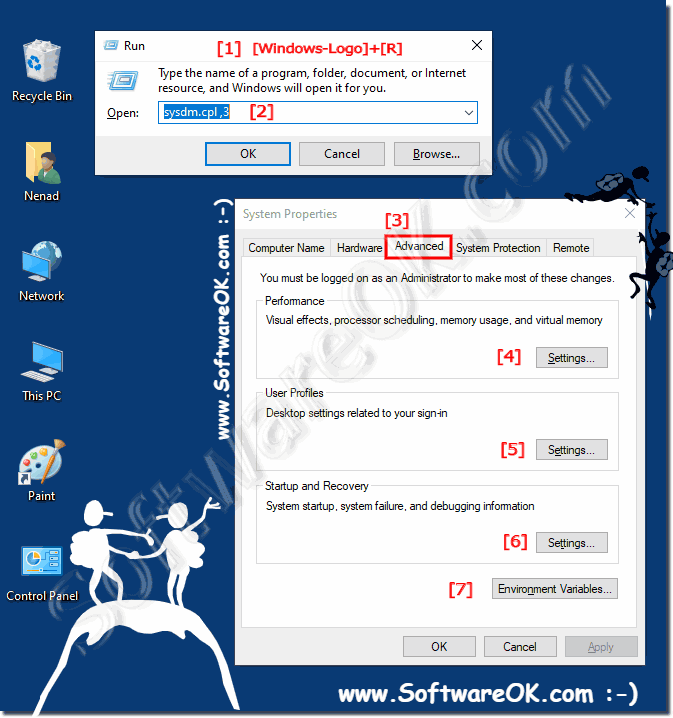
1.) Start the Advanced System Setting in Windows 10 via RUN-Command.
1. Please run the command sysdm.cpl via Run Dialog in Windows 10.
(For example via Windows-Logo + R Keyboard Shortcut)
2. In Window-10 System Properties , please select the Tab Advanced .
PS: You can also use the direct command sysdm.cpl ,3 to directly switch to Advanced Tab!
| (Image-1) RUN-Command-Advanced System Setting in Windows 10! |
 |

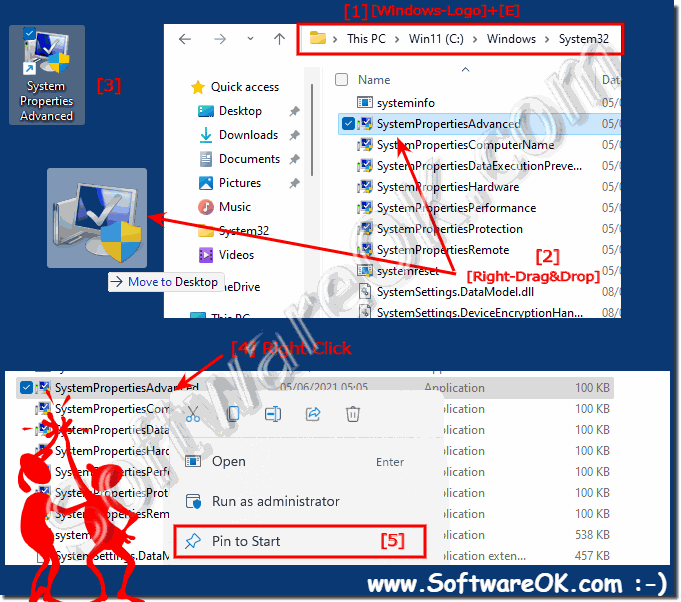
2.) Run Advanced System Setting via Windows-10 Desktop and This PC.
Please use Windows-Logo + D Keyboardschortcut to see thee Windows 10 Desktop and via mouse Right-Click on This-PC select properties in System click the text Advanced System Setting . (. see Image-2 Arrow-1 and 2)
| (Image-2) Windows-10 Advanced System Setting via Desktop and This PC! |
 |
3.) Open Advanced System Setting via Control Panel!
1. Please click on Windows-10 Logo Button with right mouse or use Keyboard Shortcut Windows-Logo + X
2. And now in System click Advanced System Setting (. see Image-3 Arrow-3)
| (Image-3) Windows-10 Open Advanced System Setting via Control Panel! |
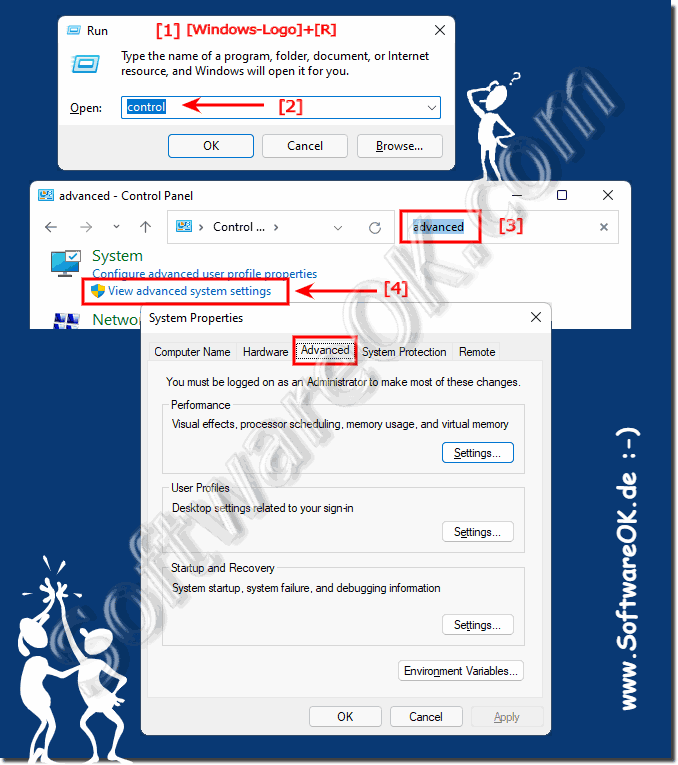 |
The advanced system settings is the right tool to change the system properties, here are settings of visual effects, virtual memory, system startup, etc. this examples are also suitable for Windows Server 2016 and Web 2012 R2.
4.) . Info About Advanced System Setting!
You must be logged on as an Administrator on Windows to make most of these changes in system settings or as an account with admin rights. Here are three ways ergo solutions for Desktop PC, Tablets and famous MS Surface PRO or GO This is good if you non want to Create Desktop Shortcut for Advanced System Properties or Windows GodMode! The Advanced System is are almost as important as the advanced file management!
How to run Windows 10 Settings app as administrator?
In Windows 7 I created two users: a regular user that I log in as and an administrative user that I enter the password for whenever I did anything that required elevation. This seems to work well enough in the past, the Control Panel prompted me with a UAC prompt every time I changed system-wide settings.
Now after I upgraded to Windows 10 the Settings app seems to gray out most options that are not changeable by regular users. (e.g. uninstall apps, Windows Defender real-time protection, wifi metered connection status, etc). Is there a way of running the entire Settings app as Administrator so I can use it to change the settings without going to the trouble of switching users and starting a new session as Administrator? I tried right clicking on the app icon in the start screen but it did not display the «run as Administrator» option.
2 Answers 2
Why it’s happening
This isn’t the problem of not running the Settings app as an Administrator. Those settings are controlled by Group Policy.
It appears by default regular users cannot change these settings (it does make sense).
I actually tried running the app as an Administrator from an elevated command prompt, Windows Powershell ( Start-Process «ms-settings» -runas /user:Administrator ), and also by right clicking and choosing «Run as Admin» on the actual SystemSettings application located at C:\Windows\ImmersiveControlPanel . Nothing worked
The answer to your question is basically because you’re on a normal user account.
How to change group policy for non-administrators
So if you do want normal users to be able to access the greyed out settings I recommend you follow the following tutorial:
Yes, it says Windows 7 but most likely this will work for Windows 10. Here’s a summary:
1. Open the Start Menu, type mmc.exe in the search box, and press Enter. NOTE: In Windows 8, you could press Windows+R keys to open the Run dialog, then type mmc.exe, and click/tap on OK instead.
2. If prompted by UAC, then click on Yes (Windows 7/8/10) or Continue (Vista).
3. In the MMC Console window, click on File (Menu bar) and Add/Remove Snap-in.
4. In the left pane, select Group Policy Object Editor, and click on the Add button.
5. Click on the Browse button.
6. Click on the Users tab, select an Non-Administrators, and click on OK.
7. Click on the Finish button.
8. Click on OK.
9. In the MMC Console window, click on File (Menu bar) and Save As.
10. Select to save to your Desktop, type in a name (ex: Non-Administrators-Group-Policy) that you would like to have for this «all users except administrators» group policy MSC file, then click on the Save button. NOTE: You can use any name you like, but it would make it easier for you to know what user (ex: Test) or group this «specific» group policy MMC console was for later if you included the user or group name.
Configure and allow Windows 10 to run Specified Programs only
In certain situations, you might want to allow others to run only programs you specify on your computer. What you need is the Windows Group Policy Editor (which is available in Professional and above versions of Windows). To open Group Policy Editor, press the Start button, type gpedit.msc, and press Enter.
Run only specified Windows Applications
Explore down to User Configuration > Administrative Templates > System in the left pane.
Now double click Run only specified Windows Applications.
From the checkbox, select Enabled. To set the allowed applications, click Show from under Options.
Now click right next to the star (*) under Value and enter the name of the applications which you want to run. For example if you want to run Firefox, enter firefox.exe.
This setting will limit the Windows programs that users have permission to run on the computer. If you enable this setting, users can only run programs that you add to the List of Allowed Applications.
Click OK and you are done. Now the user will only be able to open the programs you specify this way.
Do note that this setting only prevents users from running programs that are started by the Windows Explorer process. It does not prevent users from running programs such as Task Manager, which are started by the system process or by other processes. Also, if users have access to the command prompt, Cmd.exe, this setting does not prevent them from starting programs in the command window that they are not permitted to start by using Windows Explorer.
Incidentally, you might want to check out Windows Program Blocker, a free App or Application blocker software to block software from running on Windows 10/8/7.


