- How to Run/Boot Windows 10 from USB Drive
- Why do you need a bootable USB drive
- Notable benefits of running or booting Windows 10 from a USB drive
- The useful tool you need
- Guide to run or boot Windows 10 from the USB hard drive
- WinSetupFromUSB
- Install Windows from USB with WinSetupFromUSB, multiboot and a lot more
- Downloads
- Как записать образ Windows 7 на флешку через WinSetupFromUSB
- Ключевые возможности программы
- Плюсы и минусы WinSetupFromUSB
- Доступные платформы
- WinSetupFromUSB: инструкция для Windows 7
- Скачать по прямым ссылкам
- Скачать торрент
- Видео-инструкция
How to Run/Boot Windows 10 from USB Drive
Why do you need a bootable USB drive
As many users have experienced, Windows system sometimes is prone to be corrupted and then crash and stop working due to various reasons. As a result, the PC fails to boot and the hard drive data becomes inaccessible. This problem usually makes users who are urgent to work with their PC or view their important data crazy!В В
What if you have a Windows bootable USB drive? Congratulations! Just go to BIOS, change the boot sequence, and then you can start your PC properly from the removable disk.В
There are the things you need to pay attention to:
- Use an external hard drive to create a bootable USB drive. The USB flash drive and pen drive are not able to help.
- Only the first partition of the USB flash drive or pen drive can be recognized by the Windows, while the second and subsequent partition drive letters cannot be allocated.
- For almost 99% of the Windows systems must have two partitions, the system partition, and the boot partition. If you clone Windows 10/8/7 to a USB flash drive or pen drive, only the first partition can be accessed. In this case, it cannot boot at all. So you must use an external hard drive!!
- Besides, the USB hard drive must have enough free space which is bigger than the system drive space!
Notable benefits of running or booting Windows 10 from a USB drive
Searching online, we can see that there are always some users ask for help on how to run Windows 10 from a USB hard drive as they can get so many notable benefits from the operation, for example:В
- Getting their PC boot properly from the bootable USB hard drive even if Windows cannot be accessed from internal hard drive due to certain reasons.В
- Install large programs on the USB hard drive so that they can to save internal disk space or use these programs on any other computers.
Are you one of such users who is seeking ways to boot Windows 10 from an external device? Read on, and you will find a step-by-step guide teaching you how to get the job done using Windows 10 USB bootable software.
The useful tool you need
Even though Microsoft offers users a Windows media creation tool that allows them to create Windows ISO image files on a USB or DVD to manage the job, it is still too difficult for «computer idiocy» to operate. Here, you needВ third-party backup software which can make the job easier.
First, EaseUS backup software is easy to operate. All you need to do is open the software and clone the system to your external hard drive. It is easy and fast.
Second, it can create a bootable Windows 10 USB hard drive that contains not only the operating system but also some installed application or even some personal data which guarantees that you can directly work with a computer without doing extra jobs after running Windows 10 from the external device.В
Download thisВ system clone software and boot Windows 10 from the USB.
Support Windows 10/8.1/8/7/Vista/XP
Guide to run or boot Windows 10 from the USB hard drive
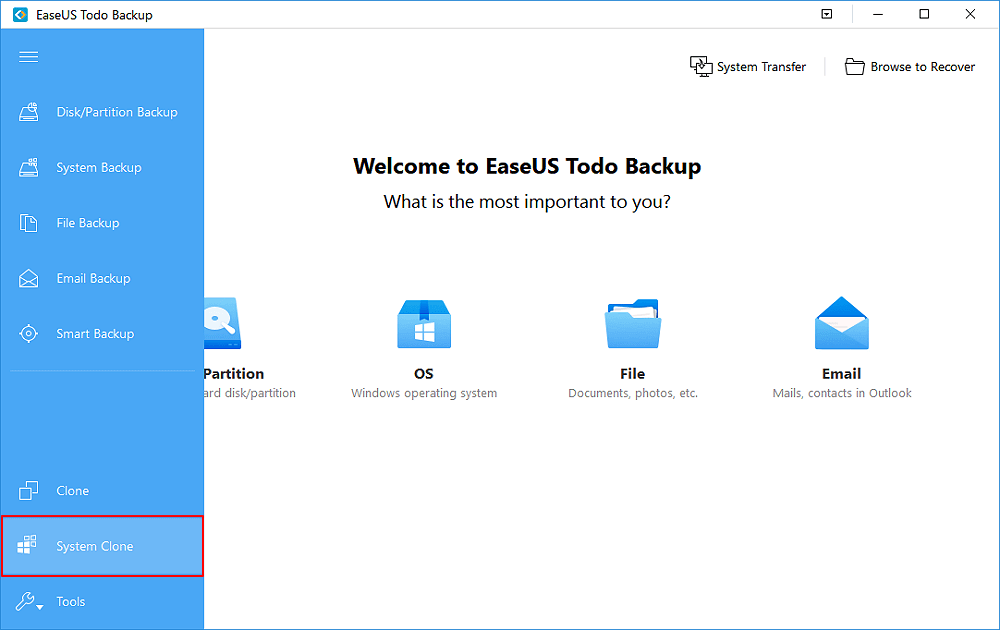
Step 1. Connect the USB drive to your PC and run EaseUS Todo Backup. Click «System Clone».В
The current system partition (Windows 10) and boot partition will be automatically selected.
Step 2. Select the destination disk — USB drive to clone system drive (system and boot partition) to.
(Here you can identify whether your USB drive storage space is big enough or not.)
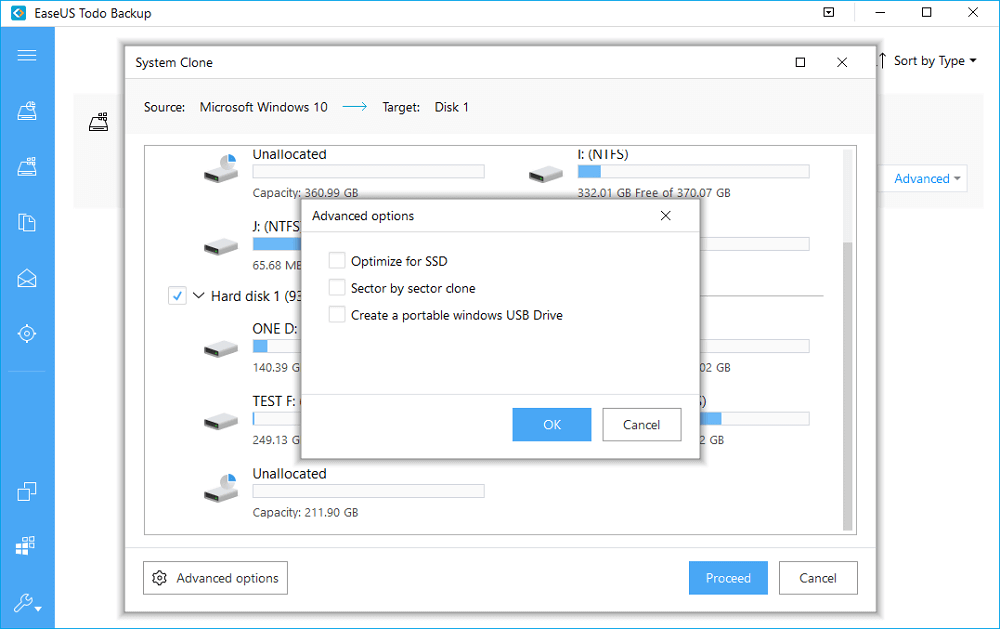
Step 3. Click on Advanced options and tick Create a Portable Windows USB drive.

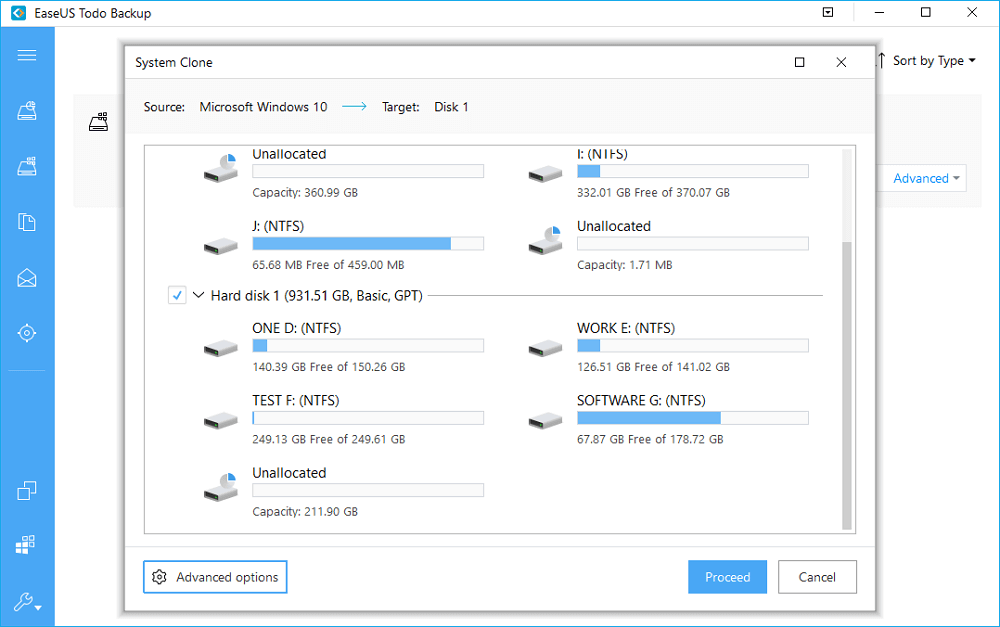
Step 4. Click Proceed to start cloning Windows 10 to USB.
After creating the bootable USB drive, you can use it to run Windows 10 on a PC whenever you want. But remember that you should first set the USB hard drive or external devices as the first boot device in BIOS.В
- Connect your bootable USB to your computer and press F2 when you start the PC.
- In theВ BIOS interface, choose the bootable device as yourВ first boot device.
WinSetupFromUSB
Install Windows from USB with WinSetupFromUSB, multiboot and a lot more
Downloads
Here you can download WinSetupFromUSB and updates of the tools included.
Please do not hotlink files, use this page if you want to post a link to the program. If you need to link to a specific version, you could use version number like this:
Note: A few antivirus programs keep detecting a couple of the included files as viruses. This is false positive . These vendors were informed numerous times and the serious companies such as DrWeb and Kaspersky, update their signatures to remove the false detection within a few hours after being informed. Others, such as McAfee, despite all the efforts and contacts, don’t do anything to update their signatures. For a few unknown ones, which use third party signatures, there is no way to contact them or they simply don’t respond. This program will never knowingly distribute any kind of malware.
- added support for multi-version/dual Windows ISOs (32 and 64 bits in one ISO for example). Stock Microsoft dual ISOs are supported and tested, other such sources too, as long as they use unmodified bootmgr and default location for BCD store is in /boot/bcd. Tested in BIOS/UEFI with both Secure Boot on and off, stock Windows 10 dual and single ISO builds 1803, 1809, Server 2016 and 2019.
- added detection of Windows 10 build number which is added to the boot menu names
- updated ImDisk and WimLib
- minor bug fixes
- fixed issue with Windows 10 and recovery option not shown
- fixed issue with persistence file size not set correctly and tooltip for using persistence
- updated some the tools to their latest version- BootIce, ImDisk, WimLib
1) Windows 10 – single ISOs created by Microsoft Media Creation Tool or downloaded from Microsoft should work. Dual ISOs made by the same tool (x32 and x64 in a single ISO) are NOT supported yet due to the changed structure. Such source can still be added using the previous versions which dump entire contents as they are, 1.0 beta8 for example. Limitations- such source needs to be added first, and any other sources of the same type,but not the same x32+x64, has to be added using 1.6 beta 2 or later.
- disabled superfloppy check due to issues with latest Windows 10 builds
- increased input timeouts to 45 seconds
- fixed issue with Swedish locale and bcdedit
- added check if imdisk is an old version
1) Windows 10 – single ISOs created by Microsoft Media Creation Tool or downloaded from Microsoft should work. Dual ISOs made by the same tool (x32 and x64 in a single ISO) are NOT supported yet due to the changed structure. Such source can still be added using the previous versions which dump entire contents as they are, 1.0 beta8 for example. Limitations- such source needs to be added first, and any other sources of the same type,but not the same x32+x64, has to be added using 1.6 beta 2 or later.
- updated imdisk package for compatibility with latest Windows 10 versions
- Added Windows 10 in all GUI elements
1) Windows 10 – single ISOs created by Microsoft Media Creation Tool or downloaded from Microsoft should work. Dual ISOs made by the same tool (x32 and x64 in a single ISO) are NOT supported yet due to the changed structure. Such source can still be added using the previous versions which dump entire contents as they are, 1.0 beta8 for example. Limitations- such source needs to be added first, and any other sources of the same type,but not the same x32+x64, has to be added using 1.6 beta 2 or later.
2) If program is run on latest Windows 10 builds, seconds source can no longer be added due to incorrectly detected superfloppy format of the USB disk. This is due to changed by Microsoft WMI call results or structure. Fix is being worked on and will be released as soon as it’s ready.
- Fixed missing EFI boot menu for Windows 10 sources
Note: Windows 10 – single ISOs created by Microsoft Media Creation Tool or downloaded from Microsoft should work. Dual ISOs made by the same tool (x32 and x64 in a single ISO) are NOT supported yet due to the changed structure. Such source can still be added using the previous versions which dump entire contents as they are, 1.0 beta8 for example. Limitations- such source needs to be added first, and any other sources of the same type,but not the same x32+x64, has to be added using 1.6 beta 2 or later.
Как записать образ Windows 7 на флешку через WinSetupFromUSB
Времена, когда переустановить операционную систему на компьютере, ноутбуке или планшете мог только специально обученный человек давно прошли. Сегодня многие пользователи ПК (даже неопытные) способны выполнить подобную операцию, имея под рукой лишь флешку с нужным дистрибутивом. Правда, не все понимают, как именно создать такой загрузочный USB-накопитель, поэтому на данном этапе переустановки, зачастую, возникают проблемы.
WinSetupFromUSB – это настоящее спасение для тех, кто предпочитает самостоятельно менять «винду» на компьютере. Программа бесплатная, поэтому пользуется широкой популярностью среди юзеров. Она предназначена для создания загрузочных флеш-дисков, на которые записывается одна или несколько операционных систем.
Особенно актуальна WinSetupFromUSB в случае, когда отсутствует CD/DVD дисковод, а значит, замена операционной системы может быть выполнена только с загрузочной флешки.
Ключевые возможности программы

- Запись различных вариаций 32-х битной и 64-х битной операционной системы Windows.
- Запись различных вариаций операционной системы Linux.
- Поддержка таких ОС, как BSD, в частности FreeBSD и OpenBSD.
- Формирование аварийного восстанавливающего диска с ISO образа, сделанного на базе Linux и наиболее популярных «антивирусников» (ESET, Avast, Касперский и т.д.).
- Поддержка ISO-образов предустановочной Windows.
- Возможность создания мультизагрузочных дисков.
- Загрузочные виртуальные диски, создаваемые в программе, способны загружаться в режиме UEFI и BIOS.
- Поддержка образов сочетающихся с эмуляцией CD Grub4dos, таких как Ultimate Boot CD.
- Меню загрузки SysLinux на базе источников SysLinux и IsoLinux в качестве основного загрузчика.
- Подробное протоколирование событий в момент выполнения назначенных действий.
к оглавлению ↑
Плюсы и минусы WinSetupFromUSB

Как и многие другие программы, WinSetupFromUSB обладает рядом преимуществ и недостатков. В защиту утилиты, хочется отметить, что если в ней и существуют какие-то недоработки, то они незначительны и на качество создаваемых загрузочных USB-дисков не влияют. Но все-таки, стоит озвучить некоторые плюсы и минусы, чтобы вы знали, с чем предстоит столкнуться во время работы.
- Программа проста и удобна в пользовании.
- Возможность совместить на одной флешке до 10 дистрибутивов.
- Наличие встроенной виртуальной машины QEMU.
- При наличии на USB-диске загрузчика GRUB4DOS он не подлежит перезаписи, а лишь происходит корректировка menu.lst. Это значит, что все настройки меню, дистрибутивы и программы сохраняются.
- Работу загрузочного флеш-накопителя можно протестировать не перегружая компьютер.
- Не требует установки на ПК.
- Бесплатная утилита.
- Отсутствие русскоязычного варианта программы.
- Недобросовестные распространители могут вместе с приложением добавить в архив вирусы, которые заразят ПК.
- Несколько дистрибутивов в корне флешки выдают «некрасивые» папки.
- Длительный процесс записи Windows 7 и Windows 8.
к оглавлению ↑
Доступные платформы

Как было сказано ранее, с помощью программы WinSetupFromUSB можно сделать загрузочную флешку с различными операционными системами. В самой утилите во время создания загрузочного диска можно увидеть пять пунктов, в которых указаны различные дистрибутивы. Давайте же поговорим о каждом по отдельности:
- Windows 2000/XP/2003 Setup. В WinSetupFromUSB записывать Windows можно с версии за 2000 год. Для этого необходимо указать путь к этой операционной системе.
- Windows Vista/7/8/10/Server 2008/2012 based ISO. В этом случае все просто: данный пункт понадобится тем, кто решит записать одну из предложенных ОС на флешку. Не забудьте указать расположение папки с нужным ISO-образом одного из дистрибутивов.
- UBCCD4Win/WinBoilder/Windows FLPC/Bart PE. Эта строка используется для загрузочных USB-дисков, в основе которых лежит WinPE. В ходе работы следует указать путь к папке, включающую в себя папку I
- LinuxISO/Other Grub4dos compatible ISO. Здесь все понятно – пункт для тех, кто желает выполнить запись ОС Linux. Кроме того, выбрав эту строку можно создать ряд программ вроде «Kaspersky Rescue Disk, Hiren’s BootCD , RBCD. Не забываем указывать путь к скачанным ISO-образам.
- SysLinux bootsector/Linux distribution using SysLinux/IsoLinux. Этот пункт также может быть использован для записи Линукс-дистрибутивов, но только в том случае, когда их установка происходит с помощью загрузчика Syslinux. Перед началом записи следует указать путь к папке с содержанием папки «SYSLINUX».
к оглавлению ↑
WinSetupFromUSB: инструкция для Windows 7

Запись ОС Windows на загрузочный флеш-диск через программу WinSetupFromUSB происходит следующим образом:
- Нужно открыть программу W
- Выбрать флешку, которую будем делать загрузочной. Как правило, она отображается в автоматическом режиме в поле «USB disk selection and format tools». Также определение диска можно выполнить при помощи кнопки «Refresh».
- Поставить отметку на позиции «Auto format it with FBinst» и выбрать систему «FAT 32».
- Теперь следует выбрать ISO-образ скачанной системы Виндовс. В соответствующем поле установить галочку и указать путь к образу.
- Нажать кнопку GO.
- Согласиться с тем, что с флешки будет стерта вся информация и принять настройки форматирования – в обоих всплывающих окнах нажать «Да».
- Подождать пока процесс записи закончится.
- После записи, в открывшемся уведомлении нажать «ОК». Выход из программы WinSetupFromUSB выполнить через кнопку «EXIT».
Существует множество способов, как сделать загрузочные виртуальные диски для переустановки ОС. Но не всегда эти способы оказываются действенными. Если вы хотите быстро и легко создать загрузочную или мультизагрузочную флешку, то данная программа станет наилучшим вариантом. Понятный интерфейс, несложный процесс записи, отсутствие лагов, доступность – все это будет в вашем распоряжении, если воспользуетесь утилитой ВинСетапФромЮсб.


