- Run Windows in your MacBook from an external USB Flash Drive in 6 steps
- Step 1 Prepare the hardware
- Step 2 Prepare the software
- Step 3 Create the USB bootable flash drive
- Step 4 Download the Windows support software
- Step 5 Boot up MacBook with the USB flash drive
- Step 6 Enjoy Windows on MacBook
- Install Windows from a USB Flash Drive
- What you need
- Step 1 — Format the drive and set the primary partition as active
- Step 2 — Copy Windows Setup to the USB flash drive
- Step 3 — Install Windows to the new PC
- If your Windows image is larger than 4GB
- How to Run/Boot Windows 10 from USB Drive
- Why do you need a bootable USB drive
- Notable benefits of running or booting Windows 10 from a USB drive
- The useful tool you need
- Guide to run or boot Windows 10 from the USB hard drive
- Write a Windows desktop app based on the WinUSB template
- Prerequisites
- Creating a WinUSB application
- Building, deploying and debugging the project
- To debug the application
- Template code discussion
- Getting the instance path for the device — see RetrieveDevicePath in device.cpp
- Creating a file handle for the device
- Release the device handles — see CloseDevice in device.cpp
- Next steps
Run Windows in your MacBook from an external USB Flash Drive in 6 steps

Aug 15, 2018 · 3 min read

We all love MacBooks, the macOS is fast, highly optimized for the hardware and constantly updated by Apple. However, there are times when we need to use Windows OS for tasks that cannot be completed with macOS, like using Windows-only software and playing PC games. The most common ways of using Windows in MacBook are either having a Virtual Windows Machine or installing a guest OS on top of your MacBook via the Boot Camp Assistant. I am not a fan of these two as either solution will consume a certain amount of my precious SSD.
In t h is article, I am going to introduce another solution to install your Windows workspace in an external drive by leveraging the Windows To Go feature, so you can use Windows in your MacBook without installing any additional software or guest OS on it.
Step 1 Prepare the hardware
- An Intel-based MacBook
- A machine running Windows 7 or later (You can use Virtual Machines if you does not have one)
- A fast USB Flash Drive with at least 64GB storage ( I am using a SanDisk Ultra Fit 128GB)
- A USB thumb drive (Optional)
Step 2 Prepare the software
- A Windows Disk Image, you can use your MacBook to download one from the Microsoft Windows Disk Image Download page.
- Rufus, the Windows software to creates a bootable USB flash drive.
- Boot Camp Assist, it comes with macOS and we use it to download the Windows support software that needs to be installed in your Windows workspace
Step 3 Create the USB bootable flash drive
- Transfer the Windows Disk Image from your MacBook to Windows machine via the USB Flash Drive or the USB thumb drive.
- Launch Rufus application, locate USB Flash Drive from the Device drop-down list
- Select the Windows Disk Image iso file from the Boot Selection option
- Tick Windows To Go in the advanced format option, this is an important step, otherwise, Rufus will create a bootable flash drive for standard Windows installation on hard disk.
- Leave the rest of the options as default and hit the START button.
- Grab a coffee as the progress will take around 20–30 minutes
Step 4 Download the Windows support software
Before we go ahead and boot into Windows, let us download the Windows support software so the MacBook has the necessary drivers to work with the Windows OS
- Launch Boot Camp Assist from the Launchpad
- Click on the Download Windows Support Software from the Action menu

- Choose the download destination and transfer the downloaded files to the USB thumb drive
Step 5 Boot up MacBook with the USB flash drive
- Shut down your MacBook completely
- Insert the USB Flash Drive, hold the option key and press the power button, this allows you to choose the Startup disk instead of booting right into the default disk
- Click on the EFI Boot, so it will be used as the Startup disk

Step 6 Enjoy Windows on MacBook
And that is it, you now have a working Windows OS running entirely from an external USB Flash Drive with your MacBook.
Install Windows from a USB Flash Drive
Here’s how to create a bootable Windows installation USB drive starting with a Windows .iso file or a Windows Setup DVD.
If you’re looking for an easy way to create a bootable USB Windows installation drive, use the media creation tool.
What you need
- Windows 10 install .iso or DVD
- USB flash drive with at least 5GB free space. This drive will be formatted, so make sure it doesn’t have any important files on it.
- Technician PC — Windows PC that you’ll use to format the USB flash drive
- Destination PC — A PC that you’ll install Windows on
Step 1 — Format the drive and set the primary partition as active
Connect the USB flash drive to your technician PC.
Open Disk Management: Right-click on Start and choose Disk Management.
Format the partition: Right-click the USB drive partition and choose Format. Select the FAT32 file system to be able to boot either BIOS-based or UEFI-based PCs.
Set the partition as active: Right-click the USB drive partition and click Mark Partition as Active.
If Mark Partition as Active isn’t available, you can instead use diskpart to select the partition and mark it active.
Step 2 — Copy Windows Setup to the USB flash drive
Use File Explorer to copy and paste the entire contents of the Windows product DVD or ISO to the USB flash drive.
Optional: add an unattend file to automate the installation process. For more information, see Automate Windows Setup.
Step 3 — Install Windows to the new PC
Connect the USB flash drive to a new PC.
Turn on the PC and press the key that opens the boot-device selection menu for the computer, such as the Esc/F10/F12 keys. Select the option that boots the PC from the USB flash drive.
Windows Setup starts. Follow the instructions to install Windows.
Remove the USB flash drive.
If your Windows image is larger than 4GB
Windows USB install drives are formatted as FAT32, which has a 4GB filesize limit. If your image is larger than the filesize limit:
Copy everything except the Windows image file (sources\install.wim) to the USB drive (either drag and drop, or use this command, where D: is the mounted ISO and E: is the USB flash drive.)
Split the Windows image file into smaller files, and put the smaller files onto the USB drive:
How to Run/Boot Windows 10 from USB Drive
Why do you need a bootable USB drive
As many users have experienced, Windows system sometimes is prone to be corrupted and then crash and stop working due to various reasons. As a result, the PC fails to boot and the hard drive data becomes inaccessible. This problem usually makes users who are urgent to work with their PC or view their important data crazy!В В
What if you have a Windows bootable USB drive? Congratulations! Just go to BIOS, change the boot sequence, and then you can start your PC properly from the removable disk.В
There are the things you need to pay attention to:
- Use an external hard drive to create a bootable USB drive. The USB flash drive and pen drive are not able to help.
- Only the first partition of the USB flash drive or pen drive can be recognized by the Windows, while the second and subsequent partition drive letters cannot be allocated.
- For almost 99% of the Windows systems must have two partitions, the system partition, and the boot partition. If you clone Windows 10/8/7 to a USB flash drive or pen drive, only the first partition can be accessed. In this case, it cannot boot at all. So you must use an external hard drive!!
- Besides, the USB hard drive must have enough free space which is bigger than the system drive space!
Notable benefits of running or booting Windows 10 from a USB drive
Searching online, we can see that there are always some users ask for help on how to run Windows 10 from a USB hard drive as they can get so many notable benefits from the operation, for example:В
- Getting their PC boot properly from the bootable USB hard drive even if Windows cannot be accessed from internal hard drive due to certain reasons.В
- Install large programs on the USB hard drive so that they can to save internal disk space or use these programs on any other computers.
Are you one of such users who is seeking ways to boot Windows 10 from an external device? Read on, and you will find a step-by-step guide teaching you how to get the job done using Windows 10 USB bootable software.
The useful tool you need
Even though Microsoft offers users a Windows media creation tool that allows them to create Windows ISO image files on a USB or DVD to manage the job, it is still too difficult for «computer idiocy» to operate. Here, you needВ third-party backup software which can make the job easier.
First, EaseUS backup software is easy to operate. All you need to do is open the software and clone the system to your external hard drive. It is easy and fast.
Second, it can create a bootable Windows 10 USB hard drive that contains not only the operating system but also some installed application or even some personal data which guarantees that you can directly work with a computer without doing extra jobs after running Windows 10 from the external device.В
Download thisВ system clone software and boot Windows 10 from the USB.
Support Windows 10/8.1/8/7/Vista/XP
Guide to run or boot Windows 10 from the USB hard drive
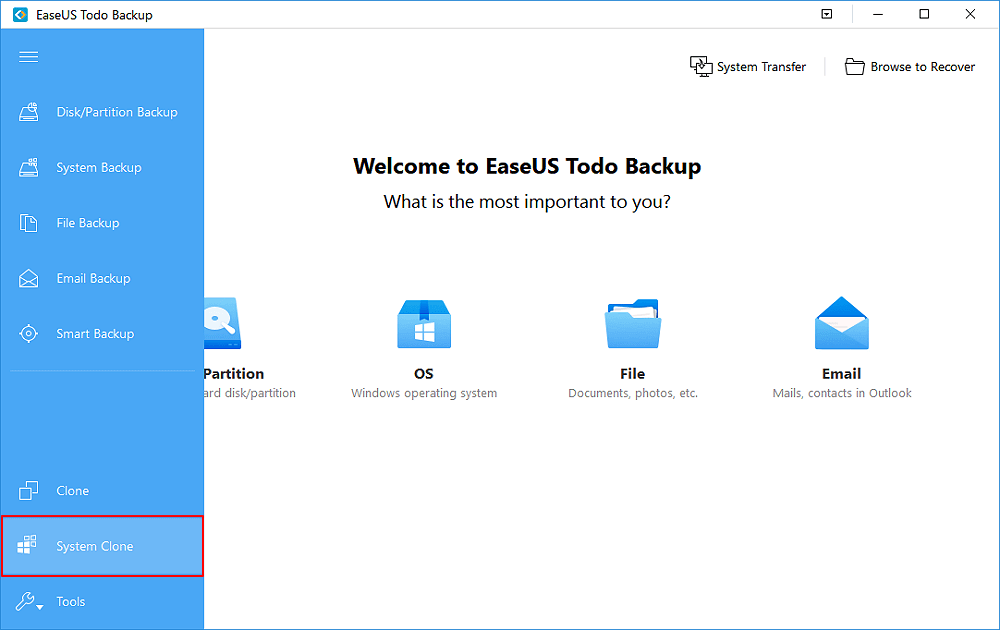
Step 1. Connect the USB drive to your PC and run EaseUS Todo Backup. Click «System Clone».В
The current system partition (Windows 10) and boot partition will be automatically selected.
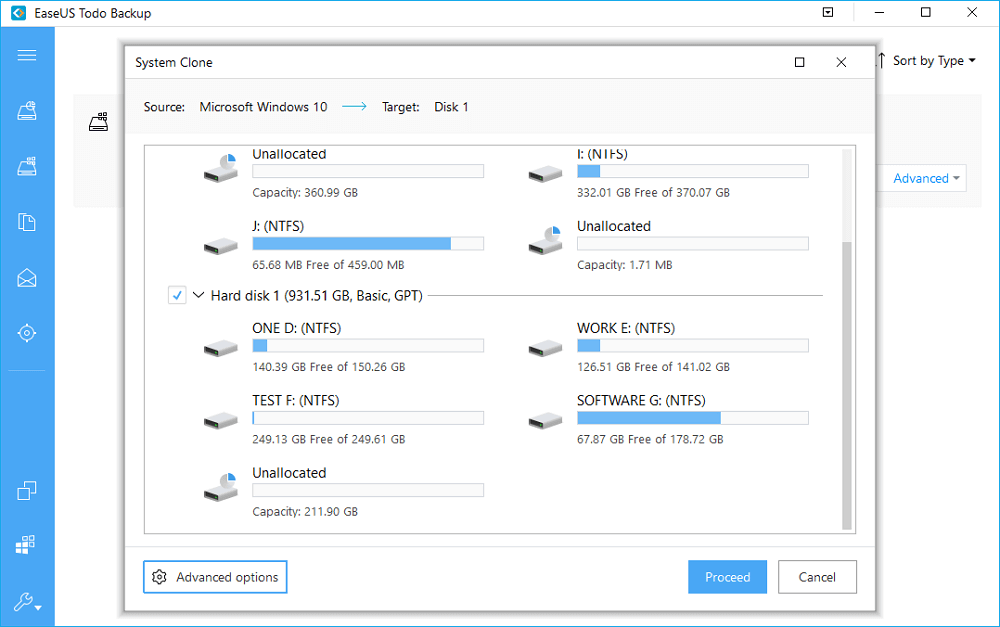
Step 2. Select the destination disk — USB drive to clone system drive (system and boot partition) to.
(Here you can identify whether your USB drive storage space is big enough or not.)
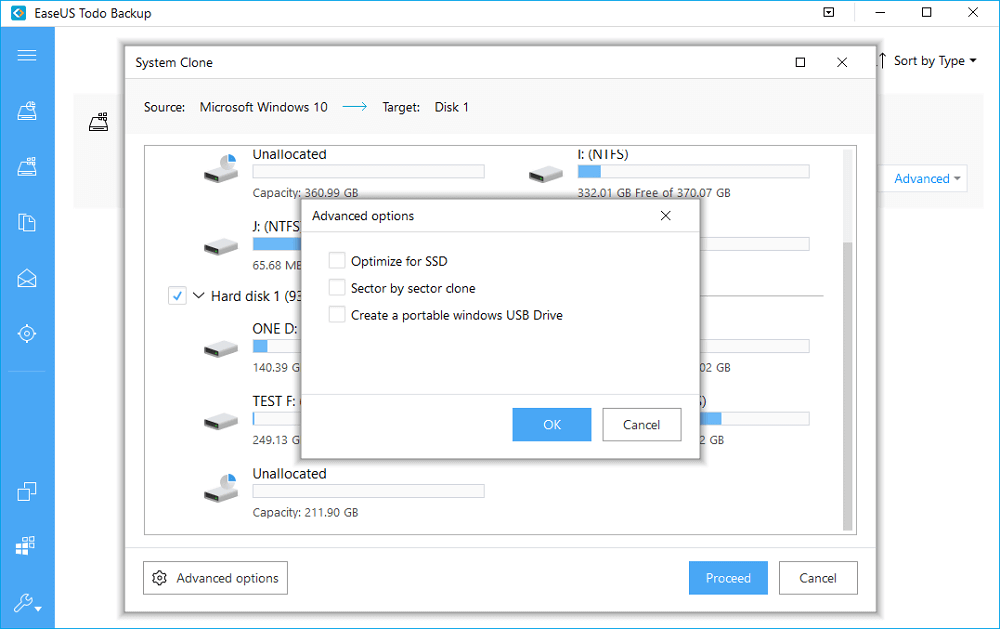
Step 3. Click on Advanced options and tick Create a Portable Windows USB drive.

Step 4. Click Proceed to start cloning Windows 10 to USB.
After creating the bootable USB drive, you can use it to run Windows 10 on a PC whenever you want. But remember that you should first set the USB hard drive or external devices as the first boot device in BIOS.В
- Connect your bootable USB to your computer and press F2 when you start the PC.
- In theВ BIOS interface, choose the bootable device as yourВ first boot device.
Write a Windows desktop app based on the WinUSB template
The easiest way to write a Windows desktop app that communicates with a USB device, is by using the C/C++ WinUSB template. For this template, you need an integrated environment with the Windows Driver Kit (WDK) (with Debugging Tools for Windows) and Microsoft Visual Studio (Professional or Ultimate). You can use the template as a starting point.
Prerequisites
- To set up the integrated development environment, first install Microsoft Visual Studio Ultimate 2019 or Microsoft Visual Studio Professional 2019 and then install the WDK. You can find information about how to set up Visual Studio and the WDK on the WDK download page.
- Debugging Tools for Windows are included when you install the WDK. For more information, see Download and Install Debugging Tools for Windows.
Creating a WinUSB application
To create an application from the template:
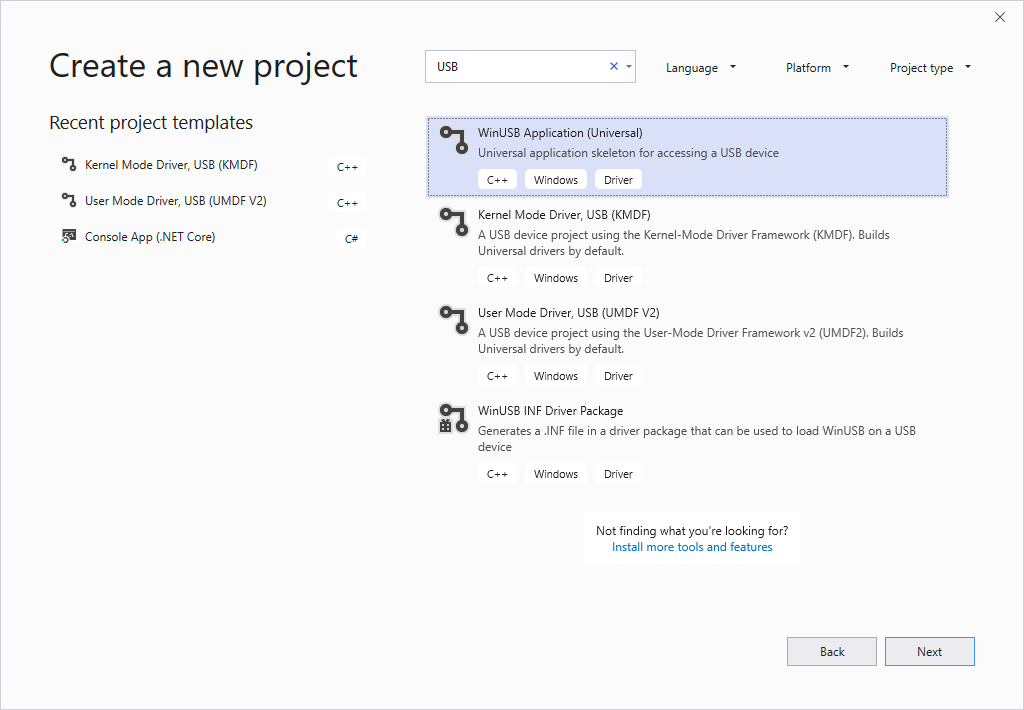
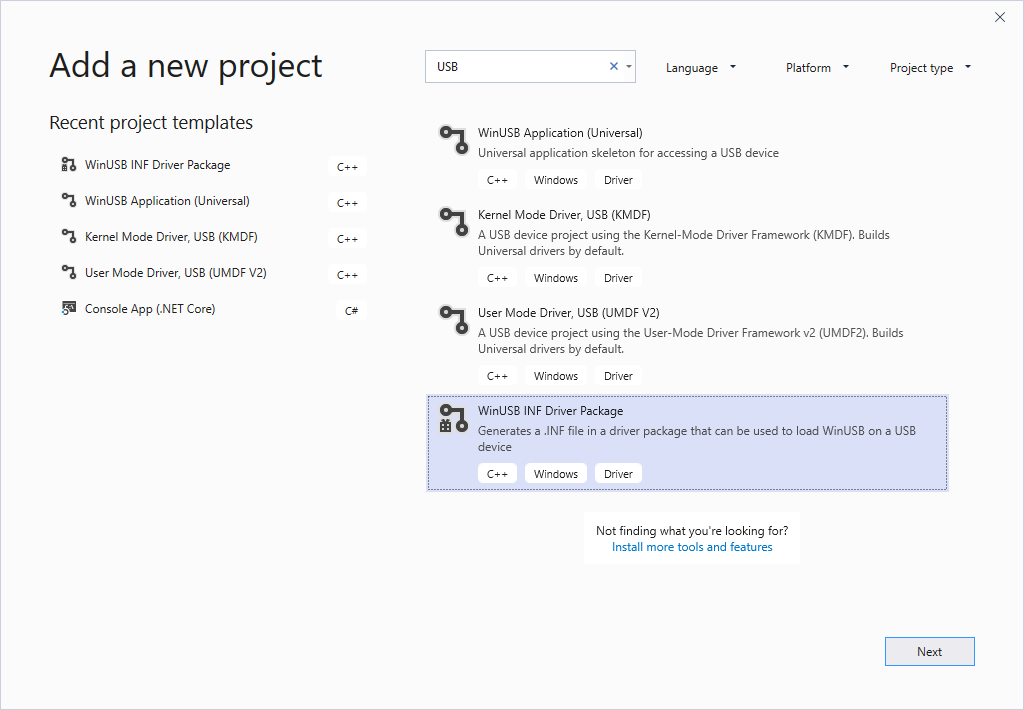
In the New Project dialog box, in the search box at the top, type USB.
In the middle pane, select WinUSB Application (Universal).
Select Next.
Enter a project name, choose a save location, and select Create.
The following screenshots show the New Project dialog box for the WinUSB Application (Universal) template.

This topic assumes that the name of the Visual Studio project is USB Application1.
Visual Studio creates one project and a solution. You can see the solution, the project, and the files that belong to the project in the Solution Explorer window, as shown in the following screen shot. (If the Solution Explorer window is not visible, choose Solution Explorer from the View menu.) The solution contains a C++ application project named USB Application1.
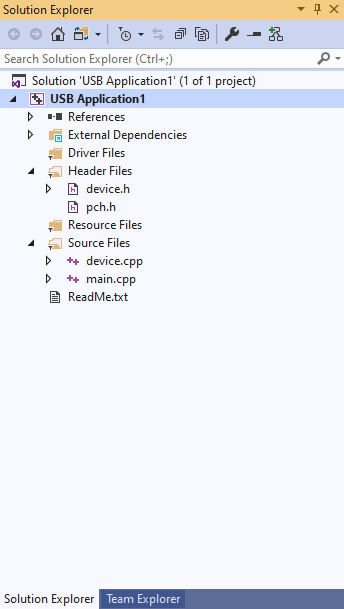
The USB Application1 project has source files for the application. If you want to look at the application source code, you can open any of the files that appear under Source Files.
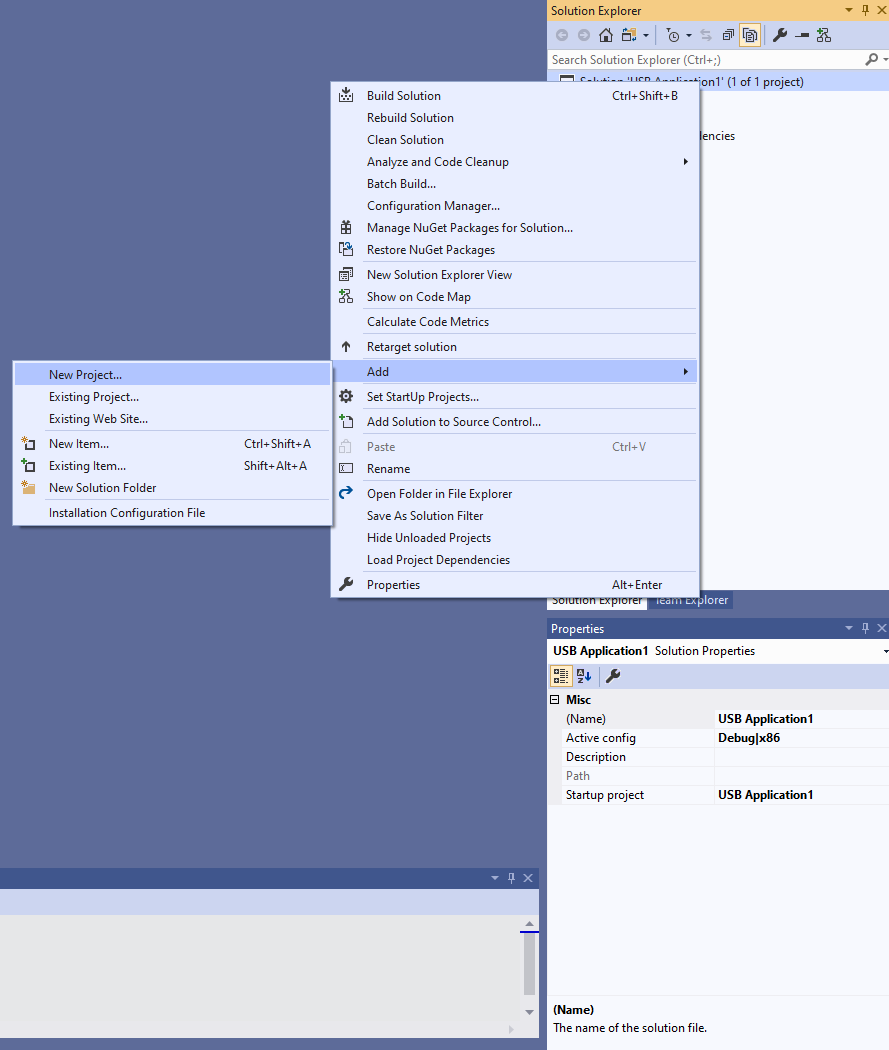
Add a driver package project to the solution. Select and hold (or right-click) the solution (Solution ‘USB Application1’), then select Add > New Project as shown in the following screenshot.
In the New Project dialog box, in the search box at the top, once again type USB.
In the middle pane, select WinUSB INF Driver Package.
Select Next.
Enter a project name, then select Create.
The following screenshots show the New Project dialog box for the WinUSB INF Driver Package template.
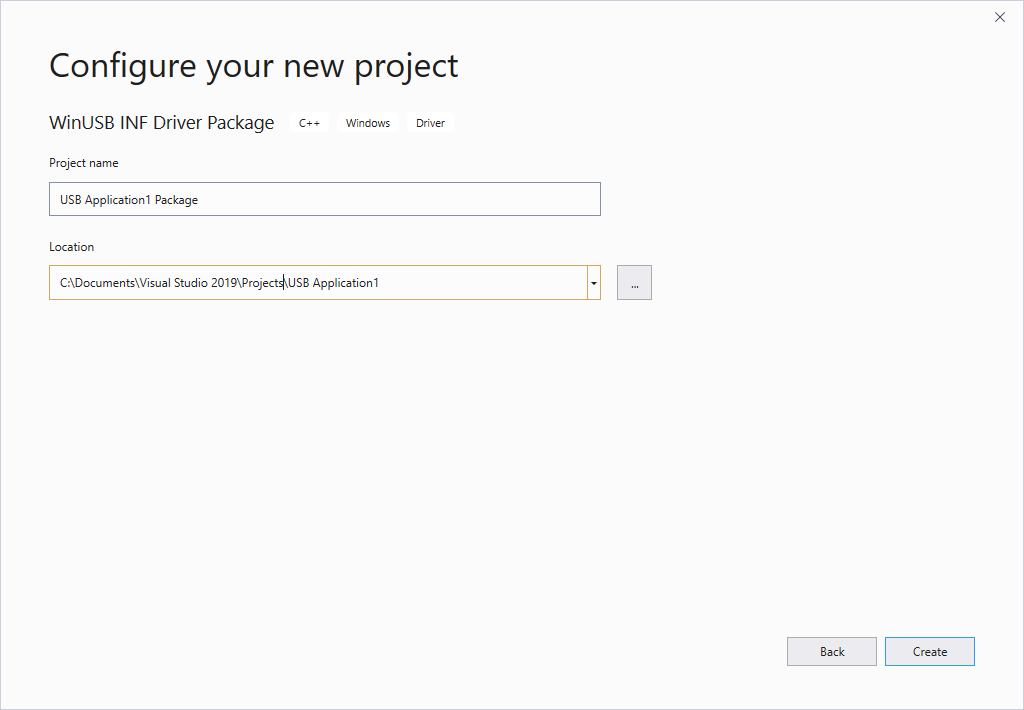
This topic assumes that the name of the Visual Studio project is USB Application1 Package.
The USB Application1 Package project contains an INF file that is used to install Microsoft-provided Winusb.sys driver as the device driver.
Your Solution Explorer should now contain both projects, as shown in the following screenshot.
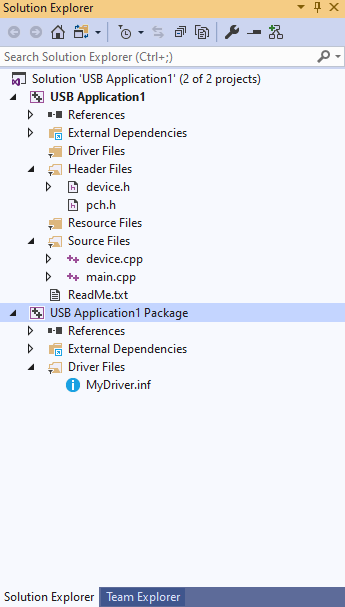
In the INF file, USBApplication1.inf, locate this code: %DeviceName% =USB_Install, USB\VID_vvvv&PID_pppp
Replace VID_vvvv&PID_pppp with the hardware ID for your device. Get the hardware ID from Device Manager. In Device Manager, view the device properties. On the Details tab, view the Hardware Ids property value.
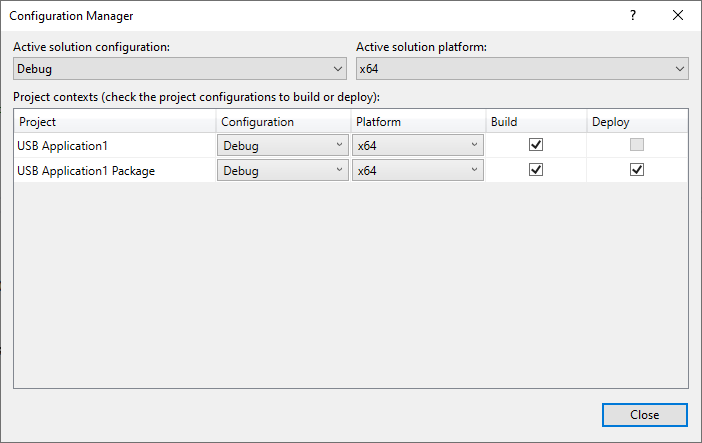
In the Solution Explorer window, select and hold (or right-click) Solution ‘USB Application1’ (2 of 2 projects), and choose Configuration Manager. Choose a configuration and platform for both the application project and the package project. In this exercise, we choose Debug and x64, as shown in the following screen shot.
Building, deploying and debugging the project
So far in this exercise, you’ve used Visual Studio to create your projects. Next you need to configure the device to which the device is connected. The template requires that the Winusb driver is installed as the driver for your device.
Your testing and debugging environment can have:
Two computer setup: the host computer and the target computer. You develop and build your project in Visual Studio on the host computer. The debugger runs on the host computer and is available in the Visual Studio user interface. When you test and debug the application, the driver runs on the target computer.
Single computer setup: Your target and host run on one computer. You develop and build your project in Visual Studio, and run the debugger and the application.
You can deploy, install, load, and debug your application and the driver by following these steps:
Two computer setup
- Provision your target computer by following the instructions in Provision a computer for driver deployment and testing. Note: Provisioning creates a user on the target machine named, WDKRemoteUser. After provisioning is complete you will see the user switch to WDKRemoteUser.
- On the host computer, open your solution in Visual Studio.
- In main.cpp add this line before the OpenDevice call.
The line causes the application to pause when launched. This is useful in remote debugging.
- In pch.h, include this line:
This include statement is required for the system() call in the preceding step.
In the Solution Explorer window, select and hold (or right-click) USB Application1 Package, and choose Properties.
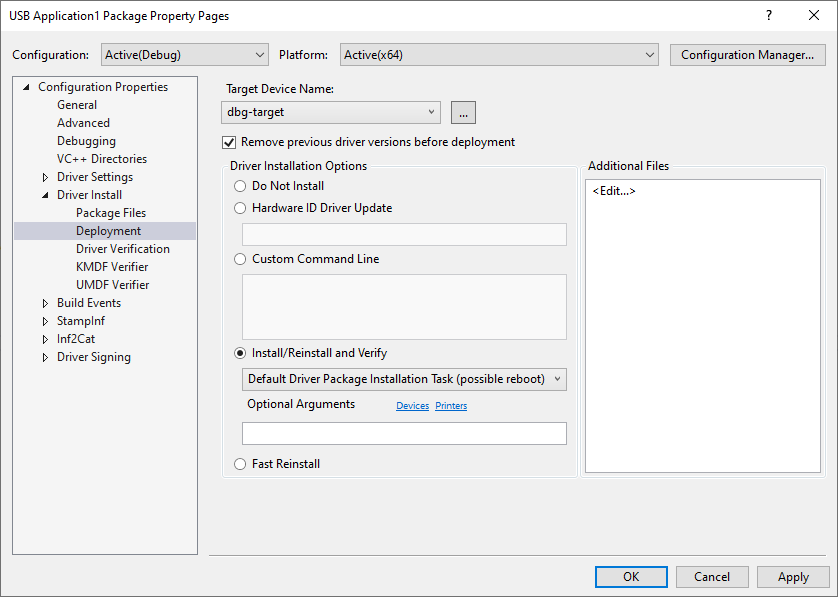
In the USB Application1 Package Property Pages window, in the left pane, navigate to Configuration Properties > Driver Install > Deployment, as shown in the following screen shot.
Check Remove previous driver versions before deployment.
For Remote Computer Name, select the name of the computer that you configured for testing and debugging. In this exercise, we use a computer named dbg-target.
Select Install/Reinstall and Verify. Select Apply.
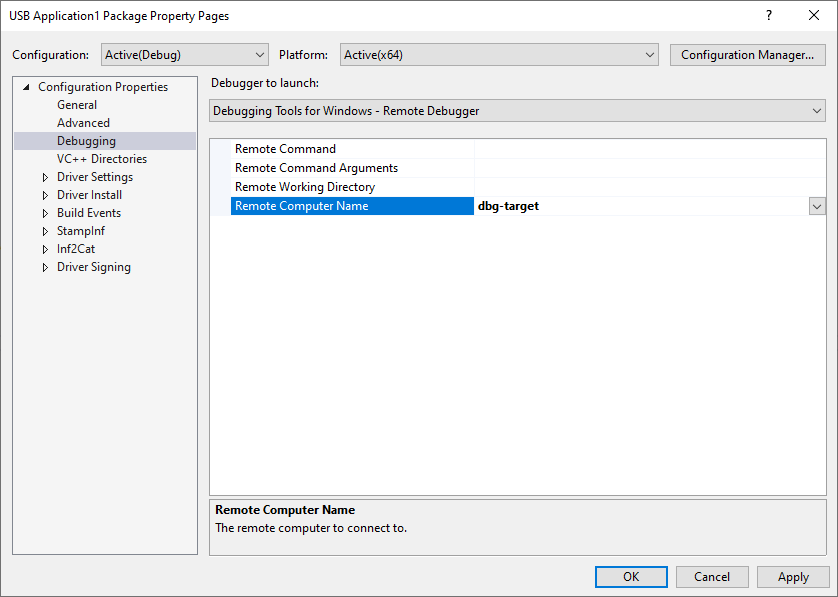
In the property page, navigate to Configuration Properties > Debugging, and select Debugging Tools for Windows – Remote Debugger, as shown in the following screen shot.
Select Build Solution from the Build menu. Visual Studio displays build progress in the Output window. (If the Output window is not visible, choose Output from the View menu.) In this exercise, we’ve built the project for an x64 system running Windows 10.
Select Deploy Solution from the Build menu.
On the target computer, you will see driver install scripts running. The driver files are copied to the %Systemdrive%\drivertest\drivers folder on the target computer. Verify that the .inf, .cat, test cert, and .sys files, and any other necessary files, are present %systemdrive%\drivertest\drivers folder. The device must appear in Device Manager without errors.
On the host computer, you will see this message in the Output window.
To debug the application
On the host computer, navigate to x64 > Win8.1Debug in the solution folder.
Copy the application executable, UsbApplication1.exe to the target computer.
On the target computer launch the application.
On the host computer, from the Debug menu, select Attach to process.
In the window, select Windows User Mode Debugger (Debugging Tools for Windows) as the transport and the name of the target computer, in this case dbg-target, as the qualifier as shown in this image.
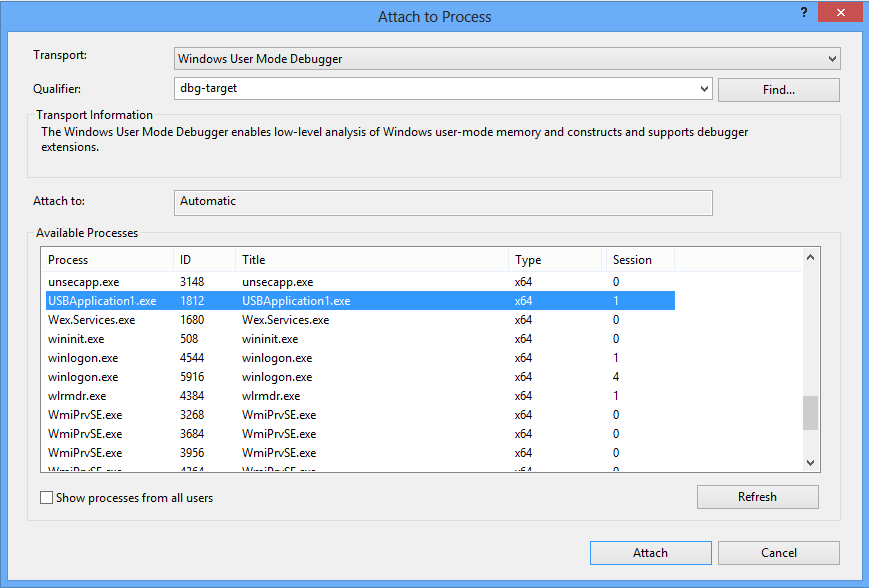
Select the application from the list of Available Processes and select Attach. You can now debug using Immediate Window or by using the options in Debug menu.
The preceding instructions debug the application by using Debugging Tools for Windows – Remote Debugger. If you want to use the Remote Windows Debugger (the debugger that is included with Visual Studio), then follow these instructions:
- On the target computer, add msvsmon.exe to the list of apps allowed through Firewall.
- Launch Visual Studio Remote Debugging Monitor located in C:\DriverTest\msvsmon\msvsmon.exe.
- Create a working folder, such as, C:\remotetemp.
- Copy the application executable, UsbApplication1.exe to the working folder on the target computer.
- On the host computer, in Visual Studio, right-click the USB Application1 Package project, and select Unload Project.
- Select and hold (or right-click) the USB Application1 project, in project properties expand the Configuration Properties node and select Debugging.
- Change Debugger to launch to Remote Windows Debugger.
- Change the project settings to run the executable on a remote computer by following the instructions given in Remote Debugging of a Project Built Locally. Make sure that Working Directory and Remote Command properties reflect the folder on the target computer.
- To debug the application, in the Build menu, select Start Debugging, or press F5.
- An initialized caller-allocated SP_DEVICE_INTERFACE_DATA structure that has its cbSize member set to the size of the structure.
- The HDEVINFO handle from step 1.
- The device interface GUID that you defined in the INF file.
- Calls SetupDiGetDeviceInterfaceDetail with DeviceInterfaceDetailData parameter set to NULL. The function returns the correct buffer size in the requiredlength parameter. This call fails with the ERROR_INSUFFICIENT_BUFFER error code. This error code is expected.
- Allocates memory for a SP_DEVICE_INTERFACE_DETAIL_DATA structure based on the correct buffer size that is retrieved in the requiredlength parameter.
- Calls SetupDiGetDeviceInterfaceDetail again and passes it a reference to the initialized structure in the DeviceInterfaceDetailData parameter. When the function returns, the structure is filled with detailed information about the interface. The device path is in the SP_DEVICE_INTERFACE_DETAIL_DATA structure’s DevicePath member.
- The app calls CreateFile to create a file handle for the device by specifying the device path retrieved earlier. It uses the FILE_FLAG_OVERLAPPED flag because WinUSB depends on this setting.
- By using the file handle for the device, the app creates a WinUSB interface handle. WinUSB Functions use this handle to identify the target device instead of the file handle. To obtain a WinUSB interface handle, the app calls WinUsb_Initialize by passing the file handle. Use the received handle in the subsequent calls to get information from the device, and to send I/O requests to the device.
- CloseHandle to release the handle that was created by CreateFile, as described in the Create a File Handle for the Device section of this walkthrough.
- WinUsb_Free to release the WinUSB interface handle for the device, which is returned by WinUsb_Initialize.
Single computer setup:
To build your application and the driver installation package, choose Build Solution from the Build menu. Visual Studio displays build progress in the Output window. (If the Output window is not visible, choose Output from the View menu.) In this exercise, we’ve built the project for an x64 system running Windows 10.
To see the built driver package, navigate in Windows Explorer to your USB Application1 folder, and then navigate to x64 > Debug > USB Application1 Package. The driver package contains several files: MyDriver.inf is an information file that Windows uses when you install the driver, mydriver.cat is a catalog file that the installer uses to verify the test signature for the driver package. These files are shown in the following screen shot.

Note There is no driver file included in the package. That is because the INF file references the in-box driver, Winusb.sys, found in Windows\System32 folder.
Manually install the driver. In Device Manager, update the driver by specifying the INF in the package. Point to the driver package located in the solution folder, shown in the preceding section. Note If you see the error DriverVer set to a date in the future , set INF Package project settings > Inf2Cat > General > Use Local Time > Yes.
Select and hold (or right-click) the USB Application1 project, in project properties expand the Configuration Properties node and select Debugging.
Change Debugger to launch to Local Windows Debugger.
Select and hold (or right-click) the USB Application1 Package project, and select Unload Project.
To debug the application, in the Build menu, select Start Debugging, or press F5.
Template code discussion
The template is a starting point for your desktop application. The USB Application1 project has source files device.cpp and main.cpp.
The main.cpp file contains the application entry point, _tmain. The device.cpp contains all helper functions that open and close the handle to the device.
The template also has a header file named device.h. This file contains definitions for the device interface GUID (discussed later) and a DEVICE_DATA structure that stores information obtained by the application. For example, it stores the WinUSB interface handle obtained by OpenDevice and used in subsequent operations.
Getting the instance path for the device — see RetrieveDevicePath in device.cpp
To access a USB device, the application creates a valid file handle for the device by calling CreateFile. For that call, the application must obtain the device path instance. To obtain the device path, the app uses SetupAPI routines and specifies the device interface GUID in the INF file that was used to install Winusb.sys. Device.h declares a GUID constant named GUID_DEVINTERFACE_USBApplication1. By using those routines, the application enumerates all devices in the specified device interface class and retrieves the device path of the device.
In the preceding function, the application gets the device path by calling these routines:
SetupDiGetClassDevs to get a handle to the device information set, an array that contains information about all installed devices that matched the specified device interface class, GUID_DEVINTERFACE_USBApplication1. Each element in the array called a device interface corresponds to a device that is installed and registered with the system. The device interface class is identified by passing the device interface GUID that you defined in the INF file. The function returns an HDEVINFO handle to the device information set.
SetupDiEnumDeviceInterfaces to enumerate the device interfaces in the device information set and obtain information about your device interface.
This call requires the following items:
SetupDiEnumDeviceInterfaces looks up the device information set array for the specified index of the device interface and fills the initialized SP_DEVICE_INTERFACE_DATA structure with basic data about the interface.
Note To enumerate all the device interfaces in the device information set, call SetupDiEnumDeviceInterfaces in a loop until the function returns FALSE and the error code for the failure is ERROR_NO_MORE_ITEMS. The ERROR_NO_MORE_ITEMS error code can be retrieved by calling GetLastError. With each iteration, increment the member index.
Alternately, you can call SetupDiEnumDeviceInfo that enumerates the device information set and returns information about device interface elements, specified by the index, in a caller-allocated SP_DEVINFO_DATA structure. You can then pass a reference to this structure in the DeviceInfoData parameter of the SetupDiEnumDeviceInterfaces function.
SetupDiGetDeviceInterfaceDetail to get detailed data for the device interface. The information is returned in a SP_DEVICE_INTERFACE_DETAIL_DATA structure. Because the size of the SP_DEVICE_INTERFACE_DETAIL_DATA structure varies, SetupDiGetDeviceInterfaceDetail is called twice. The first call gets the buffer size to allocate for the SP_DEVICE_INTERFACE_DETAIL_DATA structure. The second call fills the allocated buffer with detailed information about the interface.
Creating a file handle for the device
See OpenDevice in device.cpp.
To interact with the device, the needs a WinUSB interface handle to the first (default) interface on the device. The template code obtains the file handle and the WinUSB interface handle and stores them in the DEVICE_DATA structure.
Release the device handles — see CloseDevice in device.cpp
The template code implements code to release the file handle and the WinUSB interface handle for the device.
Next steps
Next, read these topics to send get device information and send data transfers to the device:
Learn about querying the device for USB-specific information such as device speed, interface descriptors, related endpoints, and their pipes.
Transfer data to and from isochronous endpoints of a USB device.


