- Digital Inception: Here’s how to run Android, Chrome OS, and Windows on your Mac
- Windows 10
- Windows 11
- Android
- Chrome OS
- Conclusion
- How to Install Chrome OS on Your PC
- Open source software helps you create your own version of a Chromebook
- What to Know
- How to Create a CloudReady Chromium OS Installer on a USB Drive
- What If You Only Have a Mac or Chromebook?
- How to Run CloudReady From a USB Drive
- Optional: Run CloudReady From USB Without Permanently Installing It
- Chrome OS vs. Chromium OS
- What Is CloudReady?
Digital Inception: Here’s how to run Android, Chrome OS, and Windows on your Mac
— Jul. 12th 2021 10:25 am PT
Lots of folks like to think of the Mac as just another product in Apple’s precious walled garden, but many don’t know that you can actually run virtually any operating system on a Mac with a little bit of work. It’s fairly easy to get the three biggest platforms that aren’t made by Apple up and running on a Mac, even at the same time. Here’s how to do it.
Windows 10
First and foremost, Windows. Apple has offered Boot Camp since it first introduced Intel Macs back in the mid-2000s. Boot Camp comes built into macOS on Intel Macs and makes it dead simple to install a copy of Windows on a separate partition on your Mac. Boot Camp keeps Windows entirely separate from your installation of macOS. But some users might want to use the two operating systems at the same time. That’s what Parallels is for. Parallels allows you to run Windows within a window in macOS and allows you to add Windows apps to your Mac dock.
Both options will cost you, but Parallels is more expensive because you have to purchase both a Parallels license and a Windows license. If you want to install Windows 10 on an M1 Mac, you’ll need to use Parallels. Parallels starts at $79.99 for the basic standard edition. Boot Camp, though, only requires a Windows license. Before you get started, keep in mind that a legitimate copy of Windows 10 Home costs $139. If you want to use Windows 10 Pro, that will cost you $199.
- Download your preferred Windows 10 ISO file from Microsoft’s website
- Head over to your Mac’s Applications folder and launch Boot Camp Assistant
- Import your Windows 10 ISO file by clicking the “choose” button
- Choose how much storage space you want Windows to have
- Click “install” to partition your Mac
- Your Mac will restart and show the Windows installer
- After installing Windows, you’ll want to allow the Boot Camp to install the proper drivers
Once your Mac has installed Windows and the necessary drivers, your Mac will be up and running with Windows 10. Now, you might think that you’re finished and that you somehow installed Windows 10 for free, but nope you still need to purchase a Windows 10 product key. Once you sign in to your Microsoft account (create one if you don’t own one), you can launch the Microsoft Store and search for Windows 10 Home or Pro. Then you can enter your credit card details and purchase a legitimate copy of Windows 10. Once you’ve done that, you can use Windows entirely and indefinitely. When you want to switch back to macOS, just turn off your Mac and then hold down the option key when pressing the power button.
Windows 11
I suspect that many of you are wondering if you can install Windows 11 on your Mac. Technically, you can with some workarounds, but Microsoft isn’t officially supporting Macs with Windows 11. This is because Apple doesn’t enable the TPM 2.0 chip that comes with Intel processors inside of its Intel-based machines. For now, it looks like the only official way that Windows 11 might be able to work on an Intel Mac is with a virtual machine. Microsoft has, fortunately, announced that it is working with Parallels to enable support for Windows 11 on the Mac.
You can read our first impressions of the new design in Windows 11 here.
Android
There are millions of Android apps that you might want to run on your Mac. Luckily, as Dr. Ian Malcolm once said, “Life finds a way.” Bluestacks is a free emulator for both macOS and Windows that allows you to use Android apps on your laptop or desktop. Keep in mind that Bluestacks uses a much older version of Android, but it still works with most apps. It’s based on Android 7, otherwise known as Nougat.
Bluestacks is primarily for gaming, but it works well for any kind of Android app. Bluestacks even comes with Google Play and Google services. Once you sign in to a Google account, you can download and use Google’s own apps right on your computer through Bluestacks. The app comes with its own launcher that’s a simple grid, but you can install any other Android app launcher like Nova launcher or Microsoft launcher.
If you’re really crazy, you can even run Android through Bluestacks inside of Windows 10 on a Mac.
Chrome OS
Google’s other operating system can technically be installed on a Mac, but it can be hit or miss. You can’t actually install stock Chrome OS, but you can install a variation of it called CloudReady Neverware. That might sound scary, but CloudReady is now owned by Google, so it’s totally legit. The company was created to give new life to old Macs and PCs by installing a Chromium-based operating system on them.
This means you can install Chrome OS on old Macs and PCs, but you’ll need to check if your machine is officially compatible with CloudReady. You can also attempt to install it on a non-certified machine, but your mileage may vary.
To install CloudReady, you should download the USB Maker. You’ll want to have a compatible USB stick with 8GB or more. CloudReady won’t work with Sandisk drives, so avoid those. Once you’ve got the USB stick set up with CloudReady, you can turn your Mac off. Plug in the USB stick and hold option when turning your Mac on. Then boot up from your USB stick.
You can also attempt to install CloudReady in a virtual machine, but it’s not officially supported. You’ll need two things. The first is the OVA file of CloudReady. Head over to this link to download it. Unfortunately, popular VM app VirtualBox won’t work properly with CloudReady due to graphics compatibility issues. CloudReady recommends installing a version of VMware. Compatible versions are listed on CloudReady’s website.
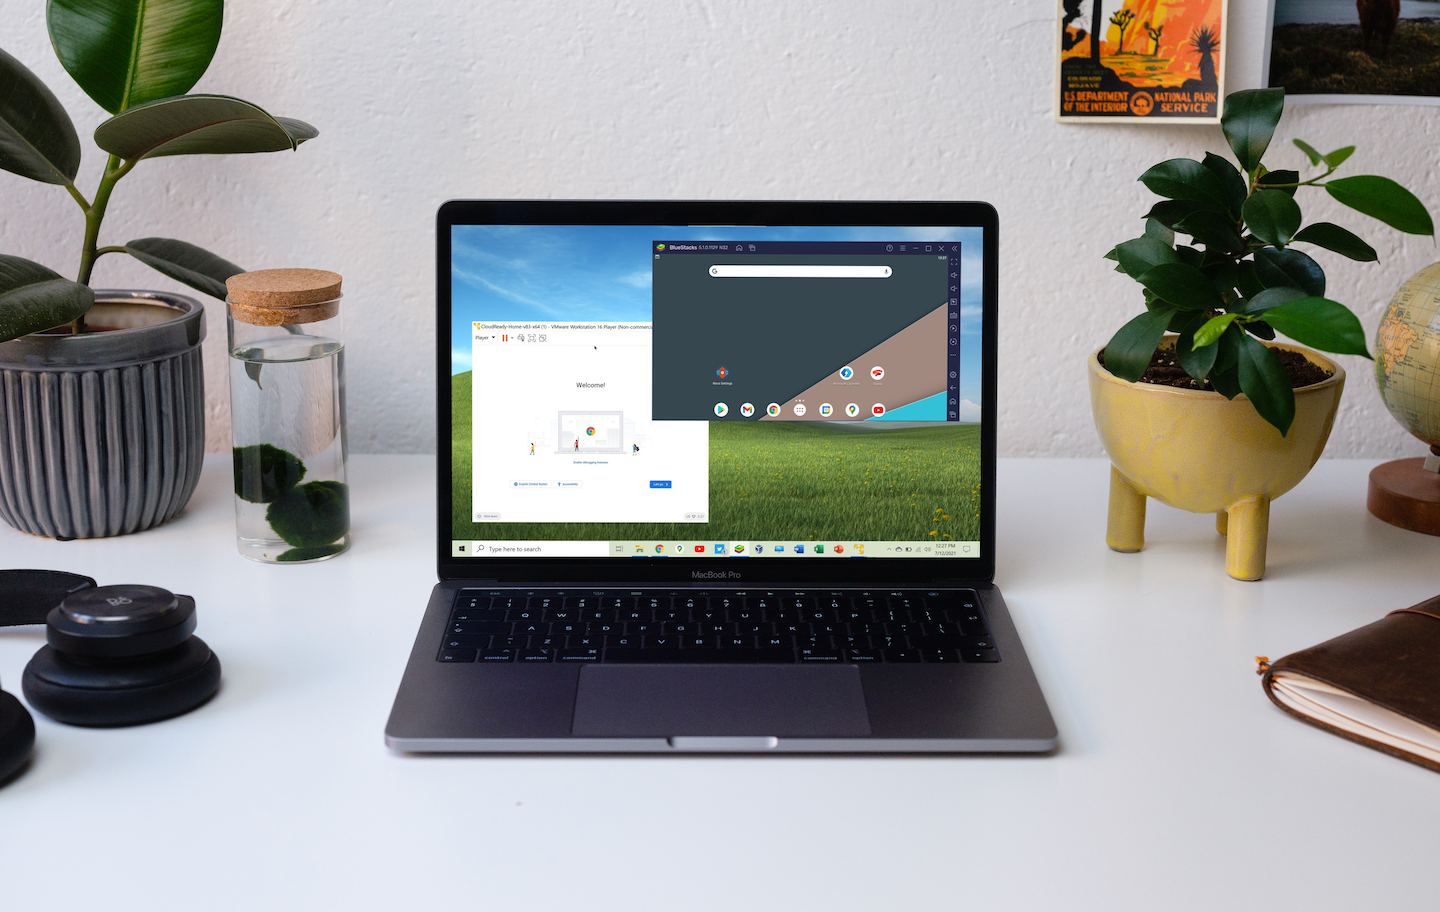
With the virtual machine workaround, you can run Chrome OS inside of Windows on a Mac. Throw Bluestacks into the equation, and you can run Android, Chrome OS, and Windows on an Intel Mac at the same time.
Conclusion
Long story short, it’s quite easy to get all three of these other platforms up and running on an Intel Mac. You can, of course, install both Bluestacks and CloudReady on macOS, but it’s a lot more fun to install them both on Windows through Boot Camp creating a complete Frankenstein of a Mac.
Let us know if you end up installing any of these on your machine and how it went in the comments below!
FTC: We use income earning auto affiliate links. More.
Источник
How to Install Chrome OS on Your PC
Open source software helps you create your own version of a Chromebook
:max_bytes(150000):strip_icc()/JeremyLaukkonen-1bb154ef56254c2896eae37b5f535144.jpg)
Jeremy Laukkonen is automotive and tech writer for numerous major trade publications as well as the creator of a popular blog and video game startup. A fan of EVs since the early 2000s, he stays up-to-date on the myriad complex systems that power battery electric vehicles.
What to Know
- You can’t install Chrome OS, but CloudReady Chromium OS offers a similar experience.
- To install and use, create a CloudReady installation file on a USB drive.
- Boot CloudReady from the USB drive.
This article explains how to install Neverware’s CloudReady version of Chromium OS on your Windows, Mac, or Chrome computer using an 8- or 16GB USB flash drive.
How to Create a CloudReady Chromium OS Installer on a USB Drive
This process is a little different on Windows than it is on MacOS and Chrome OS, and Neverware recommends that you use Windows for this step even if you aren’t planning on installing CloudReady on a Windows computer.
If you have access to a Windows computer, the first step is to download the CloudReady USB maker from Neverware:
Scroll down to Get the Free Version and select it.
:max_bytes(150000):strip_icc()/ChromeOS1-32fe08c68d534a2db13754d62f3f94ad.jpg)
Select Install the Home Edition.
:max_bytes(150000):strip_icc()/ChromeOS2-727017389fb34e7d8f58c4524f79ebf1.jpg)
Select Download USB Maker.
:max_bytes(150000):strip_icc()/ChromeOS3-17cd129ad401466a847381cd66a0e1c7.jpg)
Once you have downloaded the USB maker, you’re ready to create the USB installer. You will need an 8 or 16GB USB stick for this step. You will lose any data that’s stored on the USB stick, so back it up before you create your USB installer.
Neverware recommends that you don’t use SanDisk USB sticks, but if that’s all you have, it should work.
Here’s how to create a USB installer for CloudReady:
Launch the CloudReady USB maker program that you downloaded from Neverware.
Click or tap Next.
:max_bytes(150000):strip_icc()/CloudReady1-b663fd8dc8d64deb9a2c8fbcc5892e42.jpg)
Select 64-bit or 32-bit, and click or tap Next.
:max_bytes(150000):strip_icc()/CloudReady2-7e03771eb3cc499b97501070d9e7429e.jpg)
Insert your USB stick and click or tap Next.
:max_bytes(150000):strip_icc()/CloudReady3-516bae9926f845b791b30c26bea51521.jpg)
Do not proceed if you have any important data on your USB stick. Back up any important data first.
Select the USB stick that you want to use, and click or tap Next.
:max_bytes(150000):strip_icc()/CloudReady4-70986a919f3c4ef5883539f1e1048338.jpg)
Wait for the installation to complete, and click or tap Finish.
Once you have finished making your CloudReady USB stick, you’re ready to try it out.
What If You Only Have a Mac or Chromebook?
If you don’t have a Windows computer, you can still make a CloudReady USB installer. The process is a little more complicated, and Neverware recommends you use Windows instead, but it is possible.
The first step is to download a CloudReady image to place on your USB stick:
Navigate to Neverware.com.
Scroll down and select Get the Free Version.
Click or tap Install the Home Edition.
Click or tap Download 64-BIT or Download 32-BIT.
Use the 64-bit version unless you’re going to install CloudReady on an older 32-bit computer.
The next step requires you to have Chrome installed on your computer. This is a given if you’re using a Chromebook, but if you only have a Mac, and you don’t already have Chromium, you will need to install it before you proceed.
Add the Chromebook recovery app:
Navigate to the Chromebook Recovery Utility on the Google Play Store.
Click or tap ADD TO CHROME > Add app.
:max_bytes(150000):strip_icc()/CloudReadyMac1-fd0fa090264f44fea8a19014991fde27.jpg)
Open the Chromebook Recovery Utility.
Click or tap the gear icon > Use local image.
:max_bytes(150000):strip_icc()/CloudReadyMac2-bad4f45095e04524aed40ac516b31ac8.jpg)
Select the CloudReady .iso that you downloaded from Neverware.
If you have a Mac, Neverware recommends that you unzip the .iso using the Unarchiver utility. If you don’t, the USB installer creation process may not work.
Click or tap continue.
Wait for the process to finish, and click or tap Done.
How to Run CloudReady From a USB Drive
Once you have finished creating a CloudReady installation USB drive, you’re almost ready to go. The last thing you need to do is shut down the computer you want to use CloudReady on, and make sure that it is capable of booting from USB.
If you insert the USB stick in your computer, and it boots to its normal operating system, you will need to change the boot order. Check out our guide to changing boot order in BIOS if you are unsure how to accomplish this. On a Mac, just hold down the option key when booting up and you’ll be given a choice of which device to use to boot your Mac.
Here’s how to run Chromium OS from a USB stick via CloudReady:
Select a computer that you want to use with CloudReady.
You can use a laptop, desktop, Windows, Mac, or even Linux computer. The hardware may not be perfectly compatible, but you won’t know until you try.
Make sure the computer is off.
Locate a USB port on the computer and insert your CloudReady installation USB.
Turn the computer on.
If it boots to its normal operating system, you will need to change the boot order.
Wait for the welcome screen to appear.
Click Let’s go.
:max_bytes(150000):strip_icc()/RunCloudReadyFromUSB1-e9b44ce028d547a49a852b3824bda14d.jpg)
Check your internet connection.
:max_bytes(150000):strip_icc()/RunCloudReadyFromUSB2-028c6fc185d1429bb92411672cc9ea0f.jpg)
If you aren’t connected to ethernet, plug in an ethernet cable, or click Add other Wi-Fi network.
If adding a Wi-Fi network, click on your network, or enter the SSID and click Connect. Skip this step if you are connected via ethernet.
Click Next > CONTINUE.
Enter your Gmail address or email that’s associated with your Google account, and click Next.
:max_bytes(150000):strip_icc()/RunCloudReadyFromUSB3-ee526621f6e24c3dace392c514647316.jpg)
If you don’t already have a Google account, click More options and follow the on-screen instructions.
Enter your Gmail or Google account password, and click Next.
If prompted, enter your two-factor authentication code and click Next.
This will complete the setup of CloudReady. It’s ready to use in this state, and you can immediately start browsing the internet with Chrome, access your Google Drive files, and anything else you would normally do with a Chromebook.
Optional: Run CloudReady From USB Without Permanently Installing It
If you don’t want to permanently replace your existing operating system with CloudReady, you can simply leave the USB stick in your computer. Every time you turn it on, it will boot to CloudReady instead of the original operating system. If you ever want to use the original operating system, just turn off the computer, remove the USB stick, and turn the computer back on.
If you don’t install CloudReady permanently, you will not receive updates. CloudReady receives regular, automatic updates from Neverware once it has been installed. You will need to periodically create a new CloudReady USB stick to take advantage of updates to the operating system if you choose to not permanently install it.
Installing CloudReady deletes your original operating system and all of the files on your computer. After you install it, your computer will have a version of Chromium OS on it instead of the original operating system. The rest of the data on the computer, including any images or videos you have saved, will also be gone.
Before you install CloudReady permanently, you will need to back up all of your files to the cloud or an external hard drive. You should then boot up CloudReady using the method that was described in the previous section.
If your computer doesn’t operate normally when running CloudReady from the USB installer, permanently installing CloudReady won’t magically fix the problem. Make sure that all of your devices, including the keyboard, mouse or touchpad, Wi-Fi, and everything else functions normally.
CloudReady is compatible with most computers, but some hardware just isn’t compatible with ChromeOS or CloudReady. If you find that your computer won’t connect to Wi-Fi, CloudReady probably doesn’t have a working driver for your Wi-Fi card. In that case, permanently installing CloudReady would be a bad idea.
If CloudReady works well on your computer, installing it is extremely easy:
Turn your computer on with the CloudReady USB stick already inserted.
Wait for CloudReady to boot up.
Click your user icon in the lower right corner of the system tray.
Click Install CloudReady > INSTALL CLOUDREADY.
:max_bytes(150000):strip_icc()/CloudReadyInstallFromUSB1-8844ffc6e2244474a8031836006c95b4.jpg)
Read and agree to all warnings, and wait for the installation process to finish.
Once the installation process has finished, you can turn the computer off and remove the USB stick. When you turn the computer on the next time, it will boot into CloudReady.
Chrome OS vs. Chromium OS
Chrome OS is based on Chromium OS. Chromium OS is an open-source project that anyone (really) can copy, modify, and use in any way they like. That means you could get pretty close to a Chrome OS experience by installing Chromium OS on a computer. It does take some rather technical expertise, however.
What Is CloudReady?
CloudReady is an operating system that is based on Chromium OS, just like Google’s official Chrome OS. Both Neverware and Google take the base code from the Chromium OS open source project and add their own proprietary code to create a working operating system.
The advantage of CloudReady, in comparison to Chrome OS, is that you can install it on a wide variety of hardware. If you have an old Windows laptop or MacBook that has slowed down over time, you may be able to turn it into a very close approximation of a Chromebook by installing CloudReady.
Because CloudReady isn’t as resource-intensive as modern versions of Windows and MacOS, you may see a performance improvement if you install it on an older computer or laptop.
CloudReady isn’t compatible with all computer hardware. Before you install it on your computer, boot it from a USB drive and make sure that your mouse or touchpad, keyboard, Wi-Fi, and other devices work.
Источник


