- How to get to an MS-DOS prompt or Windows command line
- Get to a Command Prompt in Windows 10
- Get to a Command Prompt in Windows 8
- Get to a Command Prompt in Windows Vista and 7
- Get to a Command Prompt in Windows NT, 2000, and XP
- Get to a Command Prompt in Windows 95, 98, and ME
- How to restart the computer into an MS-DOS prompt
- Getting to MS-DOS
- Get to MS-DOS in Windows 3.x
- Other operating system
- How to run DOS programs in a current version of Windows
- Friday Fun: How To Run DOS Programs Or Games From Windows 7 & Vista
- Screencast: Run DOS games on Windows 7 & Vista using DOSBox
- Step 1 – Download & Install DOSBox
- Step 2 – Organize Your DOS Programs Into One Folder
- Step 3 – Start Up DOSBox & Mount Your Folder
- Step 4 – Change To Your Root Directory & List The Contents
- Step 5 – Find And Launch The EXE File Of Your Program
- Enjoy!
- Hotkeys
- Where Can I Download Free DOS Games?
- Running dos from windows
- Install vDos
- The demo ran fine; how to run/test my DOS application
- Start the application by starting vDos
- Roundup, вЂgoing live’
- FILES= and other directives, once in config.sys
- SHARE — Record locking (RL) by multi-user applications
- My application (occasionally) runs slower than before
- No LFN support
- vDos/DOS drive letters are not those of Windows
- vDos full screen mode isn’t real full screen
- Some programs of all I tried out, didn’t run
- DOS/vDos printing
- Troubleshooting
- The COMx port isn’t related to a printer
- Digital printing with stationary (PDF)
How to get to an MS-DOS prompt or Windows command line

Below are steps on getting to an MS-DOS prompt or Windows command line in all versions of Microsoft operating systems.
Get to a Command Prompt in Windows 10
For some commands and options to work in the Windows 10 command line, you must run the command line as administrator. To do this, right-click the cmd icon and select Run as administrator.
Get to a Command Prompt in Windows 8
- Get to the Start screen
- Type cmd and press Enter .
- Move the mouse pointer to the very bottom-left corner of the screen and right-click, or press Windows key + X .
- In the power user task menu, select either Command Prompt or Command Prompt (Admin).
Get to a Command Prompt in Windows Vista and 7
For some commands and options to work in the Windows Vista and 7 command line, you must run the command line as administrator. To do this, right-click the cmd icon and select Run as administrator.
If you’re attempting to get into an MS-DOS prompt to troubleshoot the computer, boot the computer into Safe Mode.
Get to a Command Prompt in Windows NT, 2000, and XP
- Click Start.
- Click Run.
- Type cmd or command and press Enter .
- What is the difference between COMMAND.COM and CMD.EXE?
If you are attempting to get into an MS-DOS prompt to troubleshoot the computer, boot the computer into Safe Mode.
Windows 2000 and XP users who cannot boot the computer into Normal Windows mode or Safe Mode can also enter and use the Recovery Console to manage their computer from a prompt. See: How to use the Windows Recovery Console.
Finally, if you are experiencing issues getting into Windows NT, 2000, or XP, it may be necessary to run troubleshooting steps from an MS-DOS prompt. We recommend the Network Administrator gain access either using a standard MS-DOS boot diskette or the ERD diskettes created after the installation of Windows NT. Also, they may access MS-DOS by booting from a Windows XP CD.
Get to a Command Prompt in Windows 95, 98, and ME
If you can get into Windows 95, 98 or ME, you can get to an MS-DOS prompt by following the steps below.
Following the steps above opens an MS-DOS shell. However, if you are attempting to troubleshoot an issue with the computer and are using Microsoft Windows 95 or Windows 98, we suggest you restart the computer into MS-DOS. To do this, follow the steps below.
How to restart the computer into an MS-DOS prompt
- Click Start.
- Click Shutdown.
- Choose the option to restart the computer to an MS-DOS prompt.
If you cannot get into Windows 95 or Windows 98 to get to an MS-DOS prompt, follow the instructions below (Windows ME does not have this option).
- Reboot the computer
- As the computer is booting, press the F8 key when you hear a beep or when you see «Starting Windows 95» or «Starting Windows 98.» Windows 98 users sometimes may find it easier to press and hold the left Ctrl key as the computer is booting.
- If done properly, the user should get to a screen similar to the below screen.
- Select the option for Safe mode command prompt only.
Getting to MS-DOS
If you are running MS-DOS with no other operating systems, the computer should be booting into an MS-DOS prompt automatically, unless you have a shell or other program loading automatically.
If the computer cannot load MS-DOS, reboot the computer and as the computer is booting, press the F5 key when you see the message «Starting MS-DOS» or the MS-DOS version. Pressing this key should load the default settings for MS-DOS.
If this opens an MS-DOS prompt and you want to prevent further occurrences, edit the autoexec.bat or the config.sys files and remark any bad lines.
Get to MS-DOS in Windows 3.x
If you are running Windows 3.x, it is likely that the computer is booting into Windows automatically and bypassing the MS-DOS prompt. If the computer loads successfully into Windows, to exit to an MS-DOS prompt, from the Program Manager, click the file menu and select Exit.
If the computer cannot load MS-DOS, reboot the computer and as the computer is booting, press the F5 key when you see the message «Starting MS-DOS» or the MS-DOS version. Pressing this key should load the default settings for MS-DOS.
If you do not want Windows 3.x to load automatically into Windows 3.x, edit the autoexec.bat file and remove the «win» line.
Other operating system
If you want a command line, you more than likely want to access the Shell or Terminal for your operating system, not MS-DOS.
How to run DOS programs in a current version of Windows


Today’s Best Tech Deals
Picked by PCWorld’s Editors
Top Deals On Great Products
Picked by Techconnect’s Editors
Kenneth M. Frith is moving away from Windows XP (as he should). But he still has some old DOS programs he’s either unwilling or unable to give up. Can they run in Windows 8?
The big question is: Does your new PC run the 32- or 64-bit version of Windows 7 or 8? If you have the 32-bit version (referred to as x86 for historical reasons), you should have no trouble with many (but not all) DOS programs. But if you’re using the 64-bit version (x64), running a DOS program is officially impossible.
But that doesn’t mean it can’t be done.
[Have a tech question? Ask PCWorld Contributing Editor Lincoln Spector. Send your query to answer@pcworld.com.]
Some DOS programs will not work in any current version of Windows. Generally, these are utilities that work close to the hardware, such as defraggers and diagnostic tools. But really, you shouldn’t be running outdated versions of these tools, anyway.
Some DOS games also run close to the hardware, and these might not work in Windows, either. But these will probably work in a virtual machine. I discuss that option below.
If you don’t know if your PC is running a 32- or 64-bit version of Windows, now is the time to find out. In Windows 7, click Start, right-click Computer, and select Properties. In Windows 8’s Search charm, type pc info , and select PC info. Either way, you’ll find the answer in the System Type field.
Identifying a 64-bit version of Windiws 8.
If you’re running the 32-bit version, you can launch a DOS program by simply selecting the .com file. The first time you do this in Windows 8, you’ll probably be asked about installing a feature called NTVDM; click Install this feature.
If the program fails to run, or if you’re running Windows 8 x64, try running it in DOSBox. This simple, free program runs DOS in a virtual machine that comes reasonably close to emulating an old-fashioned computer.
But there’s one tricky part about setting up DOSBox: You need to create a “drive” for it.
First, in Windows Explorer (File Explorer in Windows 8), create a folder as close as possible to the root of a real drive or partition, and give it a short name without spaces or punctuation. I recommend C:\DOSfiles . Put your DOS programs and files in that folder.
Then, in the Start menu’s Search field, or in Windows 8’s Search charm, type dosbox and select DOSBox 0.74 Options (the number might change). This will bring up a rather large file in Notepad. Scroll to the bottom. Below the flag [autoexec], type in mount a c:\dosfiles . Save the file.
From then on, when you launch DOSBox, it will see the C:\DOSfiles folder as drive A:.
Friday Fun: How To Run DOS Programs Or Games From Windows 7 & Vista

 Do you have a favorite application, but it was only designed to run on DOS? Windows 7 doesn’t include support for DOS games, but you can get around it by using a virtual DOS machine on your computer. The solution is called DOSBox, and it’s a groovy little program that simulates a DOS computer within a Window on your computer.
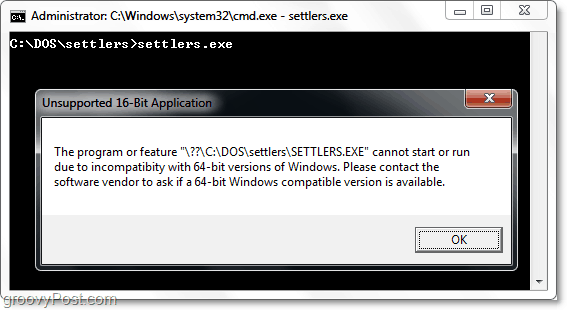
Just to reiterate, when you normally try to load a DOS program in Windows 7, you’ll see a message like the one in the screenshot below saying “The version of this file is not compatible with the version of Windows you’re running…” blah blah blah.

Also, if you try to run the DOS program from the command prompt (CMD) in Windows, you’ll run into another “unsupported 16-bit application” error message. We’re going to fix that.
To kick things off, we will first demonstrate the DOSBox process with a screencast then follow it up with the standard Step-by-Step groovyPost.
Screencast: Run DOS games on Windows 7 & Vista using DOSBox
Step 1 – Download & Install DOSBox
If you are running Windows* you can pick it up directly from the SourceForge download site.
If you are on Linux or MAC, you’ll want to check the download page on the DOSBox official website.
*Note the installer says “win32, ” but it will work just fine with 64-bit versions of Windows.

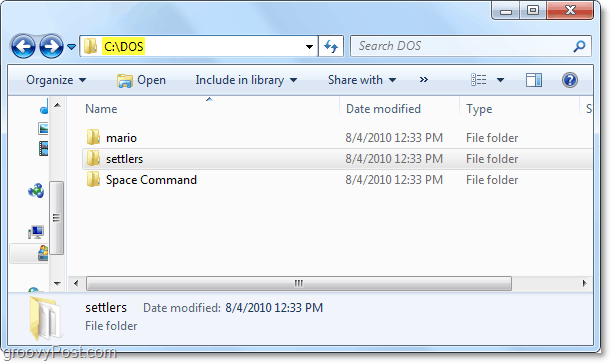
Step 2 – Organize Your DOS Programs Into One Folder
DOSBox works by turning a single mounted folder into a virtual C: drive. The best way to do this is to put all of your DOS programs into a single folder such as C:DOS or something similar. You can just mash all of your files into the one main folder, or if you want to stay tidy, you can organize them using sub-folders. Be sure to use short folder names so that later on it will be easier to navigate to these folders inside of DOSBox.
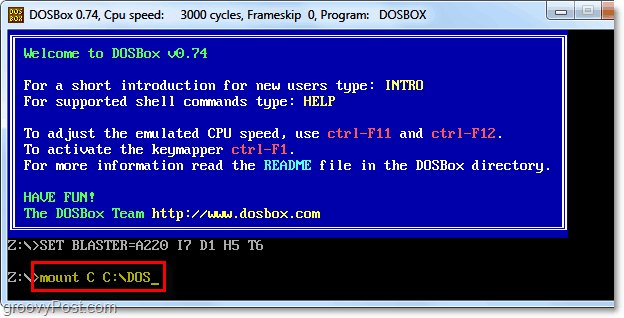
Step 3 – Start Up DOSBox & Mount Your Folder
Start the DOSBox application from your start menu or desktop shortcut. In the DOSBox command line Type in mount (drive letter of your choice) (folder location). For example, I used the command:
mount C C:DOS
This is because I want my virtual drive letter to be C: and I stored my DOS programs in the C:DOS folder.
The rest of these steps 4-5 are just basic DOS navigation commands, if you are familiar with DOS then you can skip ahead and load up your program right now!
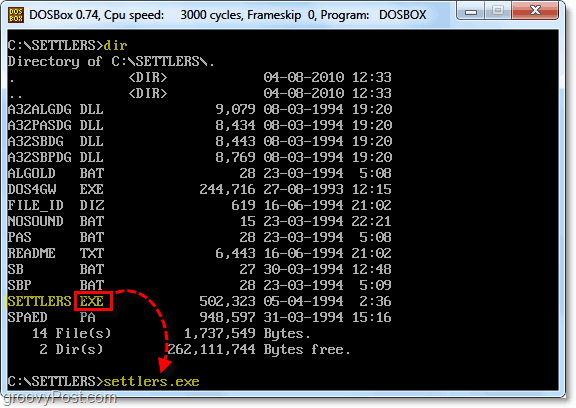
Step 4 – Change To Your Root Directory & List The Contents
Now that you have the C: drive virtually mounted you can change to it. Type c: to go to your C: root and then Type dir to see a listing of its contents. If your program is in a sub-folder you’ll need to Type cd (folder name) to open that folder, otherwise just skip to step 5.
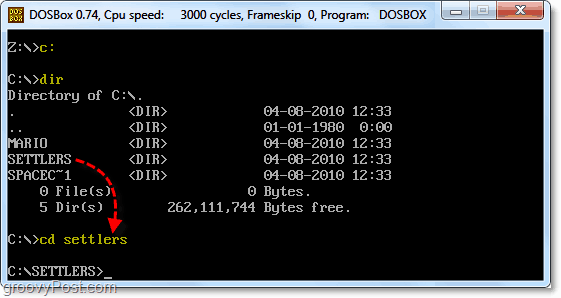
Step 5 – Find And Launch The EXE File Of Your Program
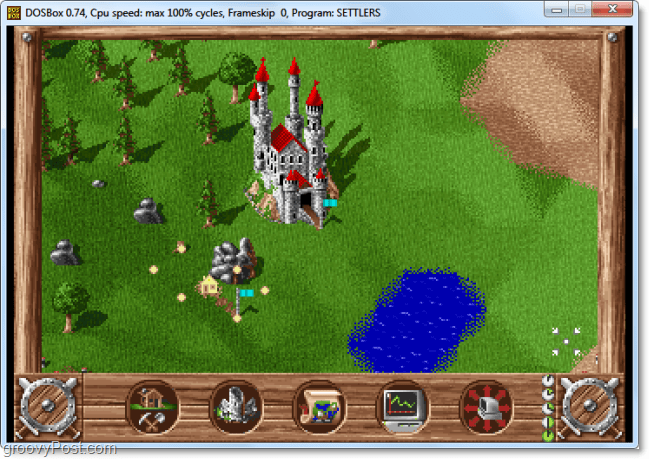
If you’re in the folder that you know your program is saved in, run dir and list the contents to get the exact file name. The file you want to load is in the .exe file format so look for the one that has EXE after the name. Once you’ve found the EXE just Type the filename in the command line. For example, I had to Type settlers.exe to launch the program.
Enjoy!
Once you’ve launched the .exe file, your program should open up and start running just as if it was in the good OLD 16-bit DOS that we know and love from the 1990’s.
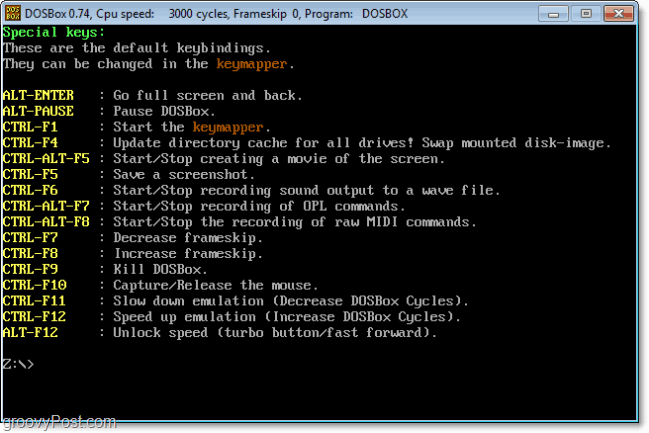
Hotkeys
While you are using DOSBox, there are a few hotkeys you might want to know about to help optimize your emulated DOS experience. The defaults are shown in the image below.
Where Can I Download Free DOS Games?
As I mentioned above in the video, one website from where you can get your hands on free game ROMs for DOSBox is DOS Games Archive. Even though DOS Games Archive is great, you may want to try some different websites too. Here are a few of our favorites:
Now just a note here: some of the games you download may have bugs, and you may run into unplayable levels. Some games might not even work at all. This is an emulator, after all, so you can’t expect every single game out there to work. Downloading games is easy – just download the ZIP files from any of the MS-DOS ROMs websites and extract all the files to an empty folder (as explained in the video).
Tell us, what is your favorite MS-DOS game? If you enjoyed this groovy old-school gaming article, you might also like, “How To Play Super Nintendo Games on Your Computer for Free.”
Running dos from windows
Before a new version of vDos is released, vDosSetup and vDos are submitted to www.virustotal.com, there tested by some 70 anti-virus programs. Eventual false positives are then reported to those anti-virus companies.
But it seems an anti-virus program could still later on mistrust the same vDosSetup it once approved of; Windows Defender (once/twice?) did.
If your anti-virus program complains about vDosSetup; first make sure its virus database is up-to-date. Eventually go to www.virustotal.com, and check vDosSetup.exe yourself.
Install vDos
When you run the downloaded vDosSetup installation program, it will offer to create a vDos folder on your C: drive. You can select another location, but C:\vDos is a good starting point for a first-time impression and testing.
vDosSetup doesn’t modify anything to your Windows system internals. It only creates that vDos folder and a shortcut on the desktop. There’s even no uninstall option. If vDos doesn’t work for you, you’ll have to delete those items by hand!
The vDos folder will contain these files:
The demo ran fine; how to run/test my DOS application
Once your application ran in DOS, then it was migrated to Windows 32-bit.
Now you’re facing vDos, it is вЂmerely’ a Windows program that should enable you to run that DOS application (with additional features) in Windows 32 or 64-bit.
For now, we’re in a testing phase, and assume vDos is installed to the default Windows C:\vDos folder.
Start the application by starting vDos
Roundup, вЂgoing live’
We assumed you copied the application folder(s) temporary to Windows C:\vDos. And the application was started by autoexec.txt with:
USE F: C:\vDos\
F:
CALL DosApp\start.bat
EXIT
To start the application with the вЂlive’ data, change the folder reference in the first line to where the DosApp is actually located. For instance:
USE F: D:\DOS\
or
USE F: \\server\share\
That’s it.
If you have more than one DOS application:
FILES= and other directives, once in config.sys
BUFFERS=nn
This was a kind of basic local disk caching, but has no meaning anymore. vDos isn’t the operating system (DOS once was) controlling the drive, any caching would be a disaster for your data on the drive, waiting to happen.
DOS=HIGH,UMB
DOS in vDos is simulated outside the virtual PC. It is no longer some 16-bit code executed by the (emulated) CPU. So this directive is also meaningless in vDos; there is no DOS code in the virtual PC/memory.
DEVICE =whatever
vDos doesn’t need device drivers. For instance ansi.sys is built-in.
FILES=nn
The number of global DOS file handles in vDos is 255. The maximum, since DOS file handle numbers are bytes.
STACKS=nn,nn
Simulated DOS in vDos has no use for this directive.
SHARE — Record locking (RL) by multi-user applications
In the DOS days, RL was provided by the SHARE program. If more than one need to access the same data, the (mostly a database) program occasionally requires exclusive access to some parts of files (RL data and indexes). “I’m going to modify those, can’t have someone else messing around with that while doing so”.
The operating system (OS) in control of the disk maintains a table of file regions granted a RL request by a program. DOS is since Windows NT no longer that OS, SHARE useless: Its functionality provided by Windows, or the OS managing the network drive. vDos ensures RL is functioning for a drive, then mostly just forwards RL requests to Windows. RL by database programs is more complex, but this will do.
Some DOSBox mods ‘support’ RL, but turn out to be a disaster. Besides exclusive access, the internal program data has to match what’s actually on disk that moment. DOSBox (mods) caches file operations, possibly outdated data lurking all around (the network). One DOSBox mod вЂsolution’ first updates the caches with RL. That doesn’t do it either: Local caches at other PC’s will still destroy the delicate database structures. Especially indexes are vulnerable due to the very compact and structured organization.
My application (occasionally) runs slower than before
To overcome Windows 64-bit not able to execute 16-bit programs, vDos emulates a 80386 CPU in software. A single emulated CPU instruction will result in many instructions to the actual CPU. The operating state, internal registers of the emulated CPU are maintained in relatively slow memory, and more technical stuff.
In raw processing power the emulated CPU can be up to 40 times slower than the real thing! The emulated CPU got over 100% faster the last years, but no further significant improvements should be expected.
DOS applications however don’t run that much slower. They frequently call BIOS and DOS functions, mostly executing faster than before (simulated in 32-bit mode). Reading from and writing data to disk is the real bottleneck for a program, that also is at least as fast. On average DOS programs will operate only a few times slower than on a real DOS PC or Windows 32-bit/NTVDM. Shouldn’t be that an issue: With user interaction, a program is still constantly waiting for user input. Whether she/he then has to wait 0.01 or 0.05 seconds before the program responds, isn’t noticeable.
But w/o user interaction, few BIOS/DOS calls, little disk access, lengthy CPU intensive tasks. Like sorting database records in memory, the slowness of the emulated CPU will become more profound. You just have to life with that.
No LFN support
DOS was originally restricted to 8.3 filenames; 1-8 characters for the name, 1-3 characters for an optional extension. Windows came along with «Long File Names» (LFN), supporting up to 255 characters. Microsoft also came up with a scheme so DOS programs could access those LFN files: «Short File Names» (SFN).
vDos doesn’t support LFN: Those are optionally used by only a few (mainly utility) DOS programs. A Zip/Unzip program version, ditto file manager, and other obscure examples, just silly to be started in vDos. You have genuine Windows program for that! A list of LFN aware DOS programs.
vDos/DOS drive letters are not those of Windows
Once you could have a DOS system, dedicated to run DOS programs and store its data. That DOS PC got replaced by a Windows PC. For simplicity we forgo Windows 3.x — 98 (mainly DOS programs), and skip to Windows NT/XP.
Microsoft had to make sure DOS programs would still run, and integrated NTVDM (New Technology Virtual DOS Machine) in Windows 32-bit. DOS programs could be started, largely as before in DOS. But that integration came at a cost: The Windows PC is surely no longer dedicated to run DOS programs. The Internet is surfed, email checked, MS Office used, and a lot more Windows specific stuff. Most folders and files have no meaning to DOS programs.
DOS programs got access to all Windows drives (letters) and directories, while there is no need for that. Certainly not the root of Windows boot drive C:. Windows even doesn’t like that. DOS programs need drive letters, these then have to be created for non-local drives in Windows, while Windows (programs) doesn’t need those.
Although you might be accustomed to DOS drive letters being those of Windows: Forget about that. The vDos USE command allows to only make available those regions of Windows filesystem your DOS program needs accessing. Even if you don’t want to forgo for instance a Windows F: drive being mapped to a network share; don’t do USE F: F:\ . That is a (possibly confusing, even troublesome) roundabout. Instead do the direct USE F: \\server\share\ .
vDos full screen mode isn’t real full screen
PC monitors evolved since DOS; CRT to LCD/LED, 4:3 to 16:9 widescreen. So did TV’s, occasionally a popular old serial (DOS) is rerun, 4:3 content however doesn’t fit a 16:9 sized modern TV (PC monitor). You get bars alongside, or a stretched image:

Some programs of all I tried out, didn’t run
DOS/vDos printing
Printing by a DOS application differs completely from Windows printing. vDos should by default mostly determine correctly how to handle that. So just start with what that will bring.
One major exception will be if you print to an actual old-style DOS printer. vDos supports that also, but you might consider to switch to Windows printing. So you can use any printer supported by Windows (for instance also PDF).
Keep in mind, the DOS LPT/COM port/device in vDos isn’t that of Windows. With that you were only able to print to actual DOS printers. Even if you convinced Windows to print to an USB or network printer instead.
Troubleshooting
The printing capabilities/options of vDos are covered by the Printing.pdf document in the vDos folder. If printing doesn’t work as expected: Read that document. Many questions in the past just came from not reading (anything).
vDos creates two files before the actual printing process starts: #LPTx/#COMx.asc (x being the port number), and a .txt version of that. Those however have no value for vDos itself whatsoever. The .txt version is mostly a means to export (large amounts of) data, to be imported by a Windows program (the DOS ASCII text is translated to Windows Unicode). The .asc version contains the data stream as sent by your program to the printer. It is generated to facilitate an eventual third-party DOS-to-Windows print processor, and for debugging purposes.
If you have an issue with printing: Submit a copy of the generated .asc file, so the problem can be reproduced and investigated (that’s the debugging part).
The COMx port isn’t related to a printer
By default, writing to LPTx/COMx ports (DOS, BIOS or direct hardware) is considered to be a printing task.
If COMx however is supposed to access some serial device; use the COMx = «COMy»: directive in config.txt. Mind the trailing colon, it is mandatory. You also have to initialize the (Windows) COMy device before starting vDos. By the MODE COMy command, or the device manager.
Support of serial devices is basic. To add further support, I would to have such a port, hardware device, and DOS software using those. I don’t and gave up communicating with those (initially) willing to do some testing. Though that basic support should mostly work, as reported so far.
Digital printing with stationary (PDF)
Documents are more and more stored and sent digitally, instead of printed out on paper. Sending documents to clients by email, you want those to resemble closely the former printouts on your stationary. vDos internal print processor doesn’t support bitmap graphics, but that actually is of no concern to produce high quality digital documents.


