- Linux in RAM: debirf way 2018
- Changelog:
- You must know before running this tutorial:
- you can replace:
- Steps to preparing
- Up to start:
- Install debirf
- Prepare debirf working directory
- And configure /root/Projects/debirf/rescue/debirf.conf
- Create LiR
- Test it
- Test sample
- Install grub to flash drive and copy LiR on it
- Create bootable iso (optional)
- Check result
- Customize it: Create custom debirf module
- Ramroot – Run Arch Linux Entirely From RAM!
- Run Arch Linux From RAM Using Ramroot
- Display Ramroot help
- Remove Ramroot
- Conclusion
- You May Also Like
- How To Ignore A Package From Being Upgraded.
- How To Browse And Read Entire Arch Wiki.
- How To Convert DEB Packages Into Arch Linux.
- Retrieve Latest Mirror List Using Reflector In Arch.
- Install MATE Desktop Environment in Arch Linux
- How To Fix “pacman: error while loading shared.
- 9 comments
- dreamlayers
- Monday, October 22, 2012
- Running Linux from RAM
Linux in RAM: debirf way 2018
Do you want to have absolute disk speed nowadays, don’t you? Let’s revise how it could be done with versioning and automation in 2018.
От модератора: нам в Песочницу пришла статья на английском языке. Мы её прочитали и и в качестве пятничного эксперимента решили опубликовать. Не судите строго, всем peace and happy Friday! Let’s come together! Короче, фром зе боттом оф ауа хартс.
Changelog:
You must know before running this tutorial:
you can replace:
Steps to preparing
They are (optional) enable non-free components for basic installation. In addition, I think, you will need the non-free repository.
- open line number 107 of file /usr/bin/debirf like nano +107 $(which debirf)
- find function create_debootstrap
- find line like local OPTS=»
- add —components main,contrib,non-free in brackets
Up to start:
Let’s imagine, our flash drive:
- must to be fast, so it is recommended to use 8+ class, or booting will take enough time
- /dev/sdb
- formated
- mounted at /media/root/8B46-1189 .
- our working directory /root/Projects/debirf/
Install debirf
- mtools needed for create iso via debirf (not working, but needed)
- genisoimage needed for create real working iso (optional)
Prepare debirf working directory
And configure /root/Projects/debirf/rescue/debirf.conf
Create LiR
Test it
The command to start the virtual machine:
Test sample

Install grub to flash drive and copy LiR on it
I recommend you use bios legacy boot and package grub-pc. Not tested with UEFI, but must work. Next lines will be do:
- create mount point (on GUI-powered systems enabled auto-mount it isn’t needed)
- mount usb key to mount point (on GUI-powered systems enabled auto-mount it isn’t needed)
- install grub
- copy grub file
- copy initramfs (system)
- copy vmlinuz (kernel)
- unmount usb key
- remove mount point
Create bootable iso (optional)
- download isolinux.bin
- create isolinux config file
- create iso
Check result
minute you will see many lines. after it ends — press enter to see welcome message
Customize it: Create custom debirf module
Module — executable sh script for running during LiR creating
- create module file
- the order of file’s names is important. In file network the resolving file will be changed to the system-resolved, and you can’t work with the network;
- lines from 1 to 3 must be present, line 3 must present file name
- if you want install package — use construction #DEBIRF_PACKAGE>+
- if you want work with rootfs — use $DEBIRF_ROOT
- if you want to run command in fakeroot — use debirf_exec
Источник
Ramroot – Run Arch Linux Entirely From RAM!
As you already know, everyday there are hundreds of new additions to the GitHub repository. But, many good projects go unnoticed, and never receive the attention they deserve. Today, I stumbled upon a cool project named Ramroot. Using Ramroot, we can run Arch Linux entirely from RAM! Yes, you read that right.
Ramroot loads the entire root filesystem into RAM at system boot. It is specially designed for Arch Linux. I tried it in Ubuntu, but It didn’t work. I hope the developer will make it to work on other Linux distributions as well.
Run Arch Linux From RAM Using Ramroot
Ramroot is available in AUR, so you can install it using any AUR helper programs, for example Paru or Yay.
Then, enable Ramroot using command:
Sample output:
If it doesn’t work for any reason, grab the Ramroot binary from GitHub repository and run it as described below.
Git clone the Ramroot repository using command:
The above command will create a folder named «ramroot» in the current working directory and save all contents of Ramroot project in it.
Then, go to the Ramroot bin directory:
Make the following files a executable:
Finally, run the following command to enable the Ramroot.
Enter your sudo or root password when prompted.
Now, reboot the system. At boot process, you will be prompted to load the filesystem into RAM. Type «Yes» to proceed.

Load root filesystem to RAM
Please note that this prompt (y/N) defaults to yes with a 15 second timeout if 4G or more of RAM is detected. Since, I have 2GiB RAM, I had to type «Y» to continue.
Wait for a while to finish the loading process. It will take several minutes to load the entire root filesystem into RAM. Make sure you have sufficient RAM installed on your system.
If you want to maintain faster RAM sync times, try to keep a clean and trimmed down system. Remove old and unnecessary packages, and keep your package cache folder clean.
Update:
If you use the most recent Ramroot version, the installed RAM size should be at least 500MB more than the size of root filesystem. If there is at least 500MB more RAM than the size of the filesystem, the user will be prompted to load the root filesystem to RAM. If the size of the root filesystem is less than the installed memory, the latest Ramroot version won’t load the Root filesystem in your RAM. It won’t even prompt you whether it should load filesystem into RAM or not. The filesystem will be mounted in your local disk automatically and the Arch Linux will boot normally.
Once root filesystem is loaded into the RAM, you will be landed into rootfs prompt. Please note that nothing will be saved after reboot. Because our Arch Linux is entirely loading from RAM, not from the local disk.
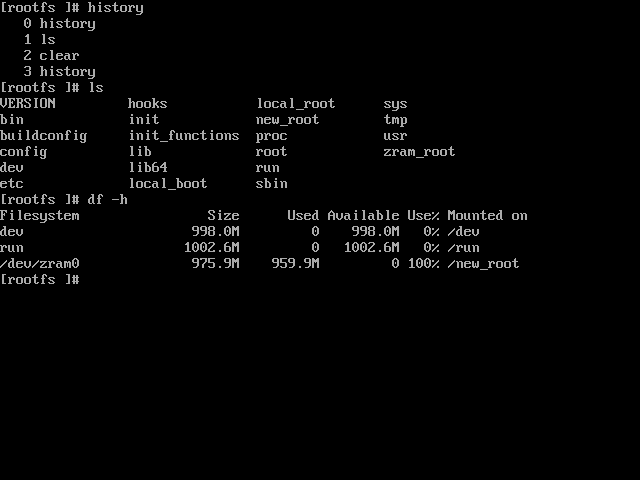
Root filesystem loaded into RAM
Display Ramroot help
To display Ramroot help section, run:
Sample output:
Remove Ramroot
Reboot your system, and type «n» when it asks to load the filesystem to RAM to login normally to your Arch Linux system. Go to the ramroot/bin folder and make the following files as executable.
Finally, remove Ramroot from your Arch Linux system using commands:
If you have installed Ramroot from AUR, remove it using commands:
And, finally remove the Ramroot package:
Conclusion
Ramroot might be helpful for those who wants to do some testing on their Arch Linux box. Also, if you want a private session to learn Linux commands, Ramroot is definitely helpful. Give it a try, and don’t forget to share your thoughts about this project in the comment section below.
Resource:
I am Senthil Kumar, more commonly known as SK to my friends, from India. I love to read, write and explore topics on Linux, Unix and all other technology related stuff.
Tuxdrive – A Commandline Google Drive Client For Linux
HSTR – Easily View, Navigate, Search And Manage Your Commandline History
You May Also Like
How To Ignore A Package From Being Upgraded.
How To Browse And Read Entire Arch Wiki.
How To Convert DEB Packages Into Arch Linux.
Retrieve Latest Mirror List Using Reflector In Arch.
Install MATE Desktop Environment in Arch Linux
How To Fix “pacman: error while loading shared.
9 comments
Questions:
Does it CREATE or REPLACE the GRUB entry?
Can you setup a user session?
Can you mount HDD and SDD drives? so then save things
Question 1 – No, it doesn’t change anything. It simply loads the filesystem into RAM
Question 2 – You can set user session and switch to the new user.
Question 3 – I haven’t tested this yet. I suppose it should work.
The logic dictates that any Linux that can mount a filesystem on read & write can do changes to such filesystem.
Since your question 3 is ambiguos (what thigs to be saved?) i answer with what i thing it could be… actually i will investigate this “ramroot” as soon as i can… it seems to be just what i am most interested upon years (be able to run a full distro on my 64GiB Ryzen 7 2700X fully from RAM), yes i did not recieve yet all pieces of my new computer but i was searching for howto since years, prior to buy the hardware, even prior than the hardware even exists… other main goal i was looking for was loading VirtualBOX from RAM with Winodws10 virtual disk image file on RAM (more than 32GiB).
Answering to your question 3: Yes and No.
If you mount a filesystem you can save files, so downloaded PDFs can be saved to such filesystem, etc… just DATA.
But if you pretend to save applications configuration changes, or new installed apps, i am afraid will NOT be saved upon reboot, this does not seem like some LiveCD that uses a special file to save your session among reboots.
This must be much more powerfull from what i can thing of its uses:
1.- Boot with all your system on ram is equivalent to make system inmutable, so you can intentionally infect your system with a VIRUS (just the concept as a drastic example, i know how impossible is for a Linux to be infected) and on next boot no change persist, it will boot as it did, nothing had changed since all changes where done on RAM… except what you change by mounting filesystem in read & write mode… for example you can work with Gimp, Blender, LibreOffice or whatever, your work will be saved, but changes on such programs configurations will not persist upon a reboot (like historical opened/saved files, etc.)
2.You can chroot to system on real storage and there make changes, like install packages, etc… very usefull because you can prepare an install script, tested (see what fail, fix it, etc) on your RAM root, once you have it working (you can use reboots to test it multiple times) then you can chroot and run it there with the confidence it will do the same as when on RAM root… so you can failsafe install things on your system because you can try them on inmutable copy of your system (without the need to clone/restore since on boot it copies all to ram)… great use, since some installs can ruin a system; warning: anything that needs reboot will void this idea until a persistent next boot could be implemented.
3.-Also copy to ram VirtualBOX machines and run them enterly from ram, after shutdown just be sure to copy back to physical media from ram drive or you loose all changes… again one more extra use of this, no need to make inmutable disk image on VirtualBOX and loose disk speed, since if you want it to be inmutable, you just do not save the modified image… very usefull for Windows guest updates that fails and ruin Windows system, not to mention the disk speed, it will be RAM speed, not such very slow NVMe that can write 5Gib/s, yes RAM is a lot more fast than the fastest NVMe.
4.-Also if you want to make changes to installed apps, etc, there is the option to boot normal, without copy to ram.
I want to test it as soon as i can, it will help me a lot… if it does what it say it does… copy the whole root onto RAM and run from there.
Extra: Some motherboards let you how-swap SATA drives, some has SIX ports, imagine SIX fast SSD in LVM2 Striped (i know cost is arround 500 €), at each boot you only read from them and at speeds near best NVMe gives, but after boot you can put out them from your PC (with NVMe you can not, at least actually i do not know of any hot-swapable NVMe motherboard), so after that no matter what command is run, such SSD will not be able to be written (since they are not connect to the PC anymore), so you can do whatever ‘dd’ you want being sure you will not damage the data on them, as opposite if you ‘dd’ your NVMe you can ruin it.
SuperExtra: Imagine you boot fully to RAM and then have no storage space available (no storage connected), you can let your son or an extranger to use your PC, you know whatever do will got lost or not saaved to your storage, since tour storage is far away and off-line… it is similar to use a LiveCD without any storage drive on the system, but tons faster.
I can not wait to put my hands on this piece of softare, it is does such ‘copy root to ram’ and ‘continue to boot from ram’ it would be my best day ever.
Sorry to be so detailed and so happy that finally something like this exists, but most people do not image what the concept of this piece of software allows… i had only commented the top most usefull/importatn ones… like: makeing your system inmutable, ensure no write go to your disks after eject sata drives (if sata ports are hot-swapable) after copy to ram ends, probe new updates / installs prior to deploy them on the real system, etc.
Источник
dreamlayers
Monday, October 22, 2012
Running Linux from RAM
Computers nowadays usually have a lot of memory, and a basic Linux system can fit in RAM. I started out by installing from the Ubuntu 12.10 Minimal CD. There I chose x86, because it’s smaller and the speed difference isn’t very dramatic.
I performed a normal installation into a 1 GB partition. Because of the small size, Lubuntu and even tasksel were out of the question, and manual package selection was necessary. Initially, I was disappointed, because just the minimal install took up over 700 MB. After uninstalling Linux headers, I could easily fit LXDE basics plus Firefox. The hardest part was manually configuring wireless, but that’s another story.
I now had a usable system, and it was time to get it running from RAM. I did that from a shell started by adding init=/bin/sh to the kernel command line. Here is a script. The comments explain what is being done.
# Script to copy / to tmpfs and continue boot from there
# Do not run this from a child shell. Use «. ramify» or exec.
# The shell running this script must be the only process on the system.
#
# Ensure this runs in /
cd /
# Create and mount tmpfs file system for /
mount -t tmpfs tmpfs mnt
# Copy everything from / filesystem to tmpfs
# Tar will restore proper owners and permissions when run as root
# FIXME: This is very slow because it reads / in many small pieces
# TODO: Add —exclude to prevent copying unneeded stuff
tar —one-file-system -c . | tar -C /mnt -x
# Move other mounts
mount —move dev mnt/dev
mount —move proc mnt/proc
mount —move run mnt/run
mount —move sys mnt/sys
# Create fstab with just new root file system
sed -i ‘/^[^#]/d;’ mnt/etc/fstab
echo ‘tmpfs / tmpfs defaults 0 0’ >> mnt/etc/fstab
# Pivot root using instructions from pivot_root(8) man page
cd mnt
mkdir old_root
pivot_root . old_root
# Old root can only be unmounted once sh running from old root
# finishes. Continue startup normally using init.
exec chroot . bin/sh -c «umount old_root ; exec sbin/init»
Источник


