- How to Run Linux on Windows 10
- Defining Bash
- Enabling Linux on Windows
- Use PowerShell
- Use Windows Features
- Downloading a Linux Distro
- Running Linux
- Как выполнять Linux-команды внутри Windows: официальный и сторонние способы
- Содержание
- WSL — официальная подсистема Linux внутри Windows
- CoreUtils — лёгкий инструмент для запуска базовых команд
- Cygwin — запуск команд и Bash-скриптов
- 5 Tools to Help You Run Windows Programs in Linux
- Get the best of both worlds with these Windows emulators
- Plain Classic WINE
- Install WINE
- Install on Fedora
- Install on openSUSE
- Install on Arch Linux and Manjaro
- Lutris
- Install on Ubuntu and Linux Mint
- Install on Debian
- Install on Fedora
- Install on openSUSE
- Install on Arch Linux and Manjaro
- Play On Linux
- Install Play On Linux
- Available Windows Programs
- Crossover
How to Run Linux on Windows 10
Linux users celebrated when it was reported that Bash shell was coming to Windows. And while it was not readily available to all users at first, the Windows 10 Creators Update made Linux on Windows more accessible.
Want to join in on the fun? Here’s how you can have Linux on Windows operating system without having to go through a virtual machine.

Defining Bash
Bash is basically a subsystem for Ubuntu. With Bash, you have a Linux system running inside Windows. It’s the very same Bash you’d find in Linux. You can use it to execute Linux commands without the need for a virtual machine or dual booting.
Using Bash shell, developers can experience Linux natively on a Windows machine.
Enabling Linux on Windows
There are two ways of enabling a Windows subsystem for Linux. One is through PowerShell and the other would be through Windows Features.
Use PowerShell
Search for PowerShell and run it as an administrator. Once open, type this command and press Enter after:
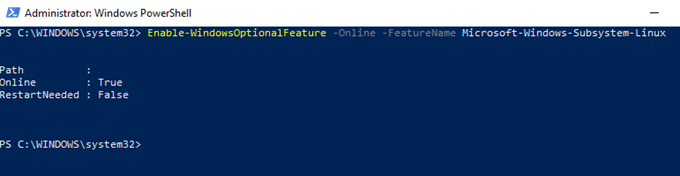
You will be prompted to confirm by hitting Y or N. Press Y to proceed then reboot your computer. If it’s already installed, you won’t have to restart.
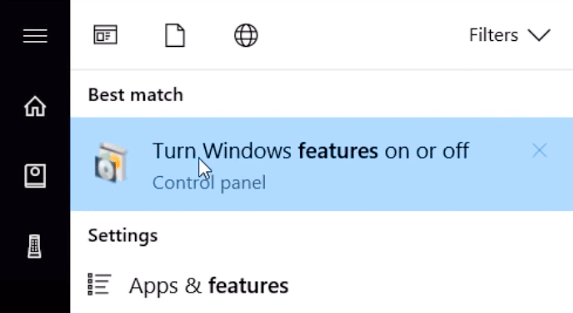
Use Windows Features
Use Search to look for a Control Panel application called Turn Windows Features On or Off.
Note: You can also get to the application by heading directly to Control Panel > Programs > Programs and Features > Turn Windows Features On or Off.
Once open, go through the list of features until you find Windows Subsystem for Linux. Tick the box to enable the option.
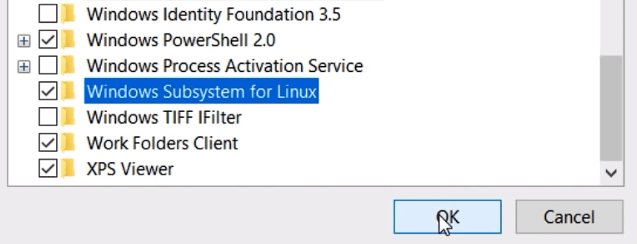
The computer will run and apply some changes. After it’s done, you will be asked to restart your computer.
Downloading a Linux Distro
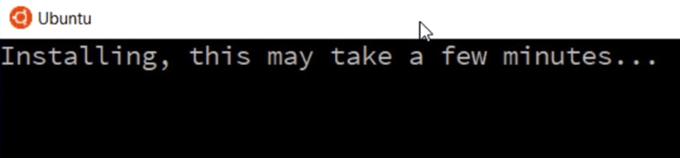
Windows should now be able to run Linux. Now you have to download a Linux distro like Ubuntu for Windows to enter Linux commands.

Simply head on over to the Microsoft Store and download the Linux distro of your choice. You need to be logged in to proceed.
There are multiple systems available, but we’ll install Ubuntu and use it throughout the rest of this post. The download will likely take a while because of the large file size.
Running Linux
The Linux system you installed will run like a regular Windows application. Open Ubuntu. It will perform a one-time installation. You will be able to use Ubuntu Linux faster the next time you open the application.
Once installed, you will be asked to enter a username and a password. Provide all the necessary information.

From here on out, you will be able to go through the directory as you would in Linux. You will need to use SUDO APT to run root commands. You can also use APT-GET, APT INSTALL, AND APT UPDATE. You’re pretty much free to do everything you can do in a Linux terminal.
One thing to remember is that the Windows files system will be located inside the MNT folder.
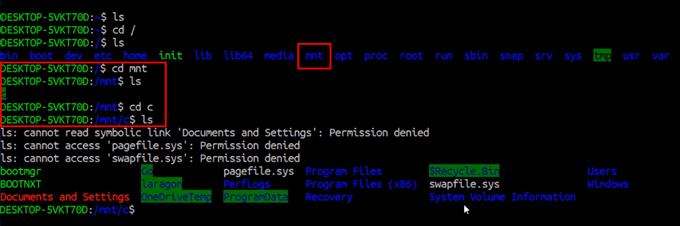
If you want to edit Windows files from the Linux system, you would have to enter CD MNT, do LS then enter CD C and another LS to locate all the files stored inside Windows. Enjoy Linux with Windows 10!
Christopher Jan Benitez is a freelance writer for hire who provides actionable and useful web content to small businesses and startups. In his spare time, he religiously watches professional wrestling and finds solace in listening to ’80s speed metal. Read Christopher’s Full Bio
Как выполнять Linux-команды внутри Windows: официальный и сторонние способы

Под GNU/Linux-дистрибутивы создано огромное количество полезных и удобных инструментов и приложений для обычных пользователей и разработчиков. Далеко не всё из этого доступно на Windows, но, к счастью, для ОС от Microsoft есть решения, исправляющие эту проблему.
Содержание
WSL — официальная подсистема Linux внутри Windows
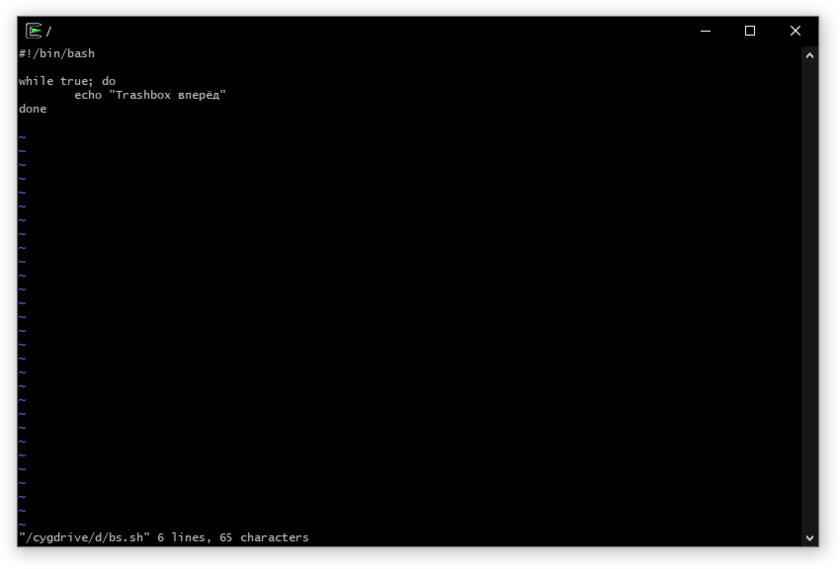
В Windows 10 существует крайне полезная вещь под названием Windows Subsystem for Linux (WSL). Она позволяет использовать GNU/Linux-среду прямо в Windows и запускать не только команды, но и, например, Bash-скрипты. Для использования WSL необходимо следовать инструкции ниже.
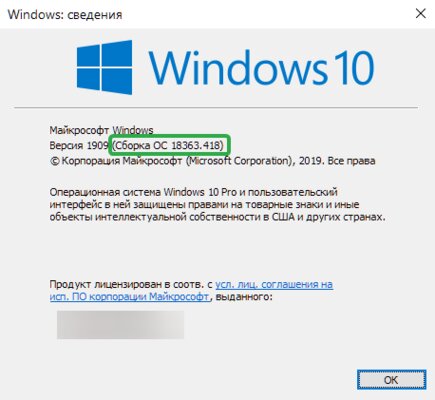
Шаг 1. Проверьте, подходит ли текущая версия Windows требованиям. Для этого нажмите сочетание клавиш Win+R, затем введите winver. Найдите строку «Сборка ОС» — она должна быть свежее версии 14316.
Шаг 2. Запустите стандартную утилиту PowerShell от имени администратора и введите в ней команду для включения WSL:
dism.exe /online /enable-feature /featurename:Microsoft-Windows-Subsystem-Linux /all /norestart
Шаг 3. Если версия Windows, определённая в первом пункте, свежее 18362, вы можете установить WSL 2, который в разы быстрее первой версии и обладает доработанным ядром. Введите команду ниже, если нужно установить WSL 2:
dism.exe /online /enable-feature /featurename:VirtualMachinePlatform /all /norestart
После этого скачайте и установите пакет обновления с официального сайта.
Шаг 4. Перезагрузите компьютер. Если была произведена установка WSL 2, введите в PowerShell от имени администратора следующую команду:
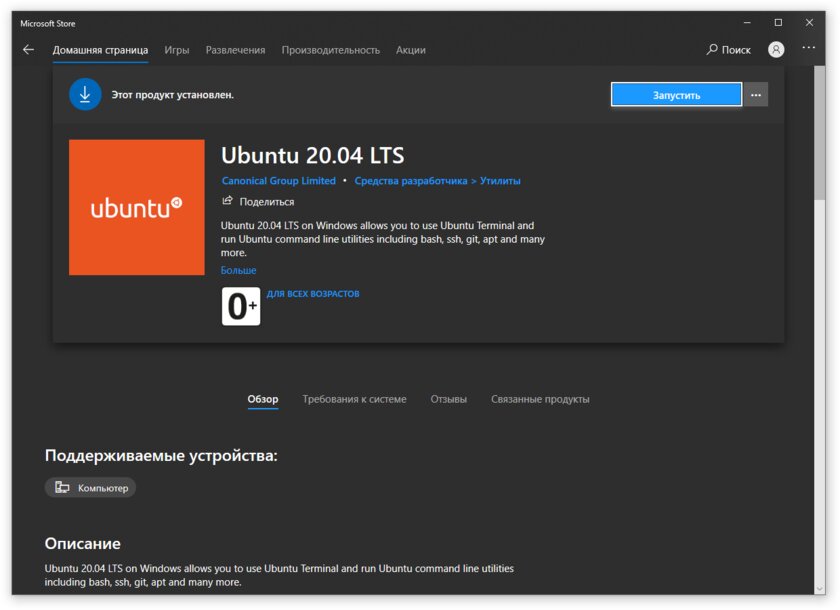
Шаг 5. После перезагрузки откройте фирменный магазин приложений Microsoft Store и найдите подходящий GNU/Linux-дистрибутив. Самым популярным является Ubuntu — вы можете установить любую версию из представленных в Microsoft Store.
Шаг 6. Как только установка завершится, найдите дистрибутив в меню «Пуск» и запустите его.
Шаг 7. Пройдите этап первоначальной настройки, введя имя нового пользователя и придумав пароль.
Шаг 8. Теперь различные GNU/Linux-команды можно выполнять, запустив дистрибутив, либо введя в командной строке wsl . Например, для просмотра всех файлов в текущей директории достаточно в командной строке выполнить wsl ls -a.
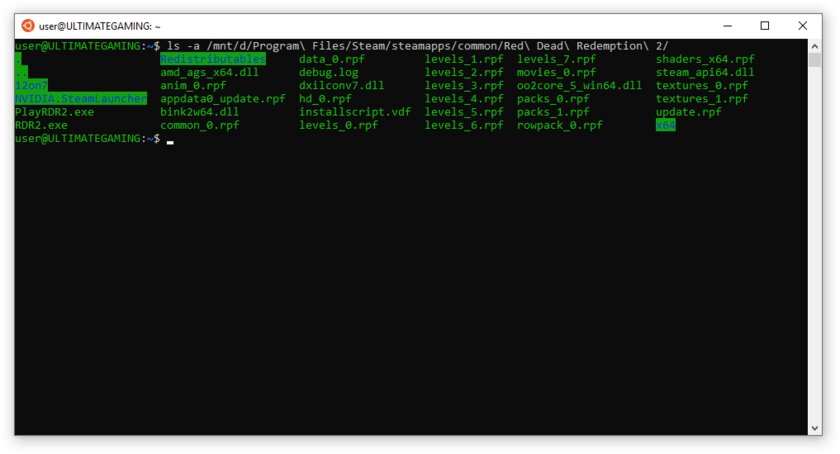
Обращу внимание на то, что путь к дискам в WSL отличается от такового в Windows. Вместо привычного C:/ используйте /mnt/c/. Также не забывайте про экранирование пробелов с помощью символа \ — это также пригодится при вводе путей к файлам.
Помимо выполнения базовых команд, с помощью WSL можно даже запускать приложения с графическим интерфейсом. Правда, рассчитывать на большое количество поддерживаемых подобных программ не стоит.
Шаг 1. Загрузите X-сервер и установите его.
Шаг 2. Запустите его с помощью ярлыка на рабочем столе. В открывшемся окне выберите вариант Multiple windows, затем Start no client. Завершите настройку кнопкой Finish.
Шаг 3. Откройте дистрибутив через меню Пуск и выполните команду export DISPLAY=:0
Шаг 4. Запустив приложение с графическим интерфейсом в WSL, вы увидите новое окно прямо в Windows.
CoreUtils — лёгкий инструмент для запуска базовых команд
Плюс данной утилиты — возможность запуска не только на Windows 10, но и на более старых версиях ОС. Кроме того, она легка и не занимает много места. Не обошлось без недостатков — программа скудна на функционал и не обновлялась очень давно. Она не только не умеет запускать скрипты и приложения с GUI, но и поддерживает лишь самые базовые GNU/Linux-команды. Установка CoreUtils весьма проста.
Шаг 1. Скачайте утилиту с официального сайта.
Шаг 2. Следуйте инструкциям установщика.
Шаг 3. Откройте «Панель управления», в разделе «Система и безопасность» выберите пункт «Система». На панели слева откройте «Дополнительные параметры системы». Нажмите кнопку «Переменные среды» и в открывшемся окне найдите область с заголовком «Системные переменные». В случае, когда там есть переменная Path, выберите её, нажмите «Изменить» и далее создайте новую строку. Содержимым этой строки должен быть путь к папке, который был указан при установке. Если вы ничего не меняли, то введите следующее:
Переменной Path нет? Тогда для начала создайте её кнопкой «Создать», затем в поле имени введите Path, а в поле значения — строку выше.
Шаг 4. Запустите командную строку и выполняйте команды прямо там.
Cygwin — запуск команд и Bash-скриптов
Ещё одна утилита, схожая с CoreUtils, но обладающая более широким функционалом — в том числе и возможностью запуска скриптов. Из минусов — немалый вес и более сложная установка. Разумеется, не идёт ни в какое сравнение с максимально удобным WSL, но для базовых команд вполне подойдёт.
Шаг 1. Загрузите Cygwin и запустите установку.
Шаг 2. Выберите Install from Internet, укажите директории для установки и загрузки пакетов, а также любой подходящий сайт из списка для скачивания файлов.
Шаг 3. В процессе установки можете выбрать необходимые пакеты, либо сразу нажать «Далее», оставив базовый набор.
Шаг 4. Откройте «Панель управления», в разделе «Система и безопасность» выберите пункт «Система». На панели слева откройте «Дополнительные параметры системы». Нажмите кнопку «Переменные среды» и в открывшемся окне найдите область с заголовком «Системные переменные». В случае, когда там есть переменная Path, выберите её, нажмите «Изменить» и далее создайте новую строку. Содержимым этой строки должен быть путь к папке, который был указан при установке. Если вы ничего не меняли, то введите следующее:
Переменной Path нет? Тогда для начала создайте её кнопкой «Создать», затем в поле имени введите Path, а в поле значения — строку выше.
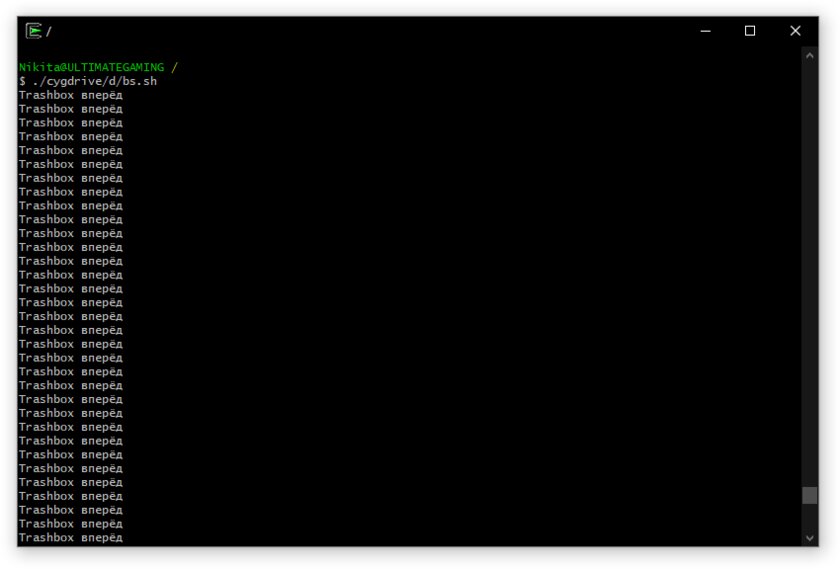
Шаг 5. Команды можно выполнять как через командную строку, так и через специальный терминал.
Шаг 6. Для удаления Cygwin достаточно удалить папку, в которую программа была установлена, а также (по желанию) значение из переменной Path по методу, обратному тому, что был описан в 4 шаге (не удаляйте саму переменную).
5 Tools to Help You Run Windows Programs in Linux
Get the best of both worlds with these Windows emulators
:max_bytes(150000):strip_icc()/image-5e6611aebe974bb7886a24b5070c834f.jpg)
Even though open-source software includes free tools, including email clients, office applications, and media players, you might need a software app that works only on Windows. In this case, use one of the tools listed here to run Windows apps on your Linux PC.
:max_bytes(150000):strip_icc()/wordinlinux-585c16d93df78ce2c3521838-4ce23e34bd934a889951300d7c87b636.png)
These tools are based on or use WINE. Aside from virtual machines, WINE is the only way to run Windows applications on Linux. There are wrappers, utilities, and versions of WINE that make the process easier, though, and choosing the right one can make a difference.
Plain Classic WINE
:max_bytes(150000):strip_icc()/wine-5806ec535f9b5805c2ed4fe5.JPG)
Doesn’t require a Windows license to use Windows applications.
The simple core utility behind these tools.
This is the stable and officially supported version.
It doesn’t always run the latest versions of Windows products.
Some games and applications run sluggishly.
Lacks helper scripts.
Doesn’t have the latest patches and improvements.
WINE stands for Wine Is Not An Emulator. WINE provides a Windows compatibility layer for Linux that makes installing, running, and configuring many popular Windows applications possible.
Install WINE
To install WINE, run whichever of the following fits your Linux distribution.
On Ubuntu, Debian, or Mint:
Import the WINE developer key:
Add the repository. Replace eoan with your Ubuntu release.
On Debian, use the following example, replacing buster with the Debian release.
Update your repositories, and install WINE Staging:
Install on Fedora
Add the repository from the WINE developers. Replace 30 in the address with your Fedora release.
Then, install the latest WINE Staging release using DNF.
Install on openSUSE
openSUSE has WINE Staging in its repositories. To install it:
Install on Arch Linux and Manjaro
WINE Staging is in the official Arch repository. Install it normally.
Lutris
:max_bytes(150000):strip_icc()/lutris-install-gog-9a429954417c45d18cf0aa42a0d1d401.jpg)
Easy to play games.
Manage configurations without hassle.
Get the latest versions of WINE.
Manage games in one place.
Takes a little setup on some distributions.
Focused almost exclusively on games.
When it comes to playing Windows games on Linux, there’s no better option than Lutris. Lutris is relatively new compared to the other entries on this list, but it’s more than earned its spot by making it just as easy to install Windows games on Linux as it is on Windows.
With Lutris, you can play games, like Overwatch, on Linux in only a couple of clicks. There’s no need to know the technical details. Someone already did the hard work for you.
Lutris also integrates with other Linux gaming platforms, like Steam, to keep your game library organized. With Lutris, you can access all your games in one place. Lutris keeps separate configurations for each game, so it can manage multiple versions of WINE at once, using the ideal one for each game.
Installing Lutris is fairly simple too.
Install on Ubuntu and Linux Mint
Install the Lutris PPA:
Update Apt, and install Lutris:
Install on Debian
Add the Lutris repository configuration:
Then, import the Lutris signing key:
Finally, update Apt, and install Lutris:
Install on Fedora
Lutris is available in the default Fedora repositories. Install it with DNF.
Install on openSUSE
openSUSE has Lutris in its repositories too. Install it normally.
Install on Arch Linux and Manjaro
Arch also has Lutris in the main repository:
Play On Linux
:max_bytes(150000):strip_icc()/playonlinux-585c1e5a3df78ce2c3536081.png)
Good gaming support.
Install multiple versions of WINE simultaneously.
Excellent community support.
Starting games in full-screen mode can sometimes cause crashing.
Error reporting is lacking.
Similarly to Lutris, Play On Linux provides a graphical interface for WINE. Play On Linux came before Lutris, and it offers many of the same features. Play On Linux is bare-bones and doesn’t include support for Linux games. It takes a general approach, so you may find better office application support here, even though it’s probably not as good as something like Crossover.
Install Play On Linux
On Ubuntu, Debian, and Mint:
sudo apt install playonlinux
On Fedora and CentOS:
sudo dnf install playonlinux
sudo zypper install playonlinux
On Arch and Manjaro:
sudo pacman -S playonlinux
Available Windows Programs
When you first run Play On Linux, a toolbar appears at the top with options to run, close, install, remove, or configure applications. You’ll also see an installation option in the left panel.
You can choose from a number of applications, including development tools such as Dreamweaver, an assortment of retro classics such as Sensible World of Soccer, modern games such as Grand Theft Auto versions 3 and 4, the Half Life series, and more.
The graphics section includes Adobe Photoshop and Fireworks, and you’ll find browsers in the internet section. The office section is a bit hit and miss. Those apps may not work.
Play On Linux requires you to have the setup files for the programs you are installing, although you can download some of the games from GOG.com.
Software installed via Play On Linux is generally more likely to work than software installed with plain WINE.
You also can install non-listed programs. However, the programs listed have been specifically configured to be installed and run using Play On Linux.
Crossover
:max_bytes(150000):strip_icc()/crossover-585c21c85f9b586e0269ee0d.png)
Streamlined setup makes it easy for Linux newcomers to use Windows programs.
Reliable 24/7 customer support with the premium plan.
Applications take up more space on the hard disk due to how it handles containers.
Free trial is limited to 14 days.
Crossover is the only item on this list that isn’t free. It’s a commercial product based on WINE. Installers are available for Debian, Ubuntu, Mint, Fedora, and Red Hat.
When you first run Crossover, you are presented with a blank screen with an Install Windows Software button at the bottom. When you click the button, a new window appears with the following options:
- Select application
- Select installer
- Select bottle
A bottle in Crossover is like a container that installs and configures each Windows application.
When you choose Select application, you’ll see a search bar from which you can search for the program you wish to install by typing a description.
You also can browse the list of applications. A list of categories appears, and as with Play On Linux, you can choose from an array of packages.
When you choose to install an application, a new bottle suitable for that application is created, and you are asked to provide the installer or setup.exe.
Why use Crossover when Play On Linux is free? Some programs work only with Crossover and not Play On Linux. If you need that program, then this is one option.
While WINE is a great tool, and the other options listed provide extra value for WINE, some programs may not work properly, and some may not work at all. Other options include creating a Windows virtual machine or dual-booting Windows and Linux.


