- Start up your Mac in Windows or macOS with Boot Camp
- Set the default operating system
- Restart in macOS
- The best ways to run Windows 10 on a Mac
- Two business-class virtualization tools, macOS’s own Windows partition feature, and two hobbyist-oriented tools give you plenty of options to have your Windows PC and Mac on one computer.
- Your five options to run Windows on a Mac
- The 5 Best Ways to Run Windows on Your Mac
- Find out which option best fits you
- Boot Camp
- Virtualization
- How to Run Mac On Windows -XP,7,8,8.1,10
- Methods to Dual Boot Mac alongside Windows on PC or Laptop
- Requirements to Run Mac On Windows
- Tools Needed to Install Mac On Windows PC or laptop
- How To Run Mac On Windows [Guide]
- How to get Windows on Mac
- Before you download Windows
- Boot Camp for Mac vs virtualization software
- How to use Boot Camp: Preparing your Mac
- 1. Check the system requirements
- 2. Clean up your hard drive
- 3. Back up your Mac
- How to Install Windows with Boot Camp
- Step 1: Get a Windows disk image
- Step 2: Open Boot Camp Assistant
- Step 3: Create a partition for Windows
- Step 4: Install Windows
- Step 5: Restart your Mac
- How to remove Windows from your Mac
Start up your Mac in Windows or macOS with Boot Camp
After you use Boot Camp Assistant to install Windows on your Intel-based Mac, you can set the default operating system to either macOS or Windows. The default operating system is the one you want to use when you turn on or restart your Mac.
Set the default operating system
In Windows on your Mac, click  in the right side of the taskbar, click the Boot Camp icon
  , then choose Boot Camp Control Panel.
If a User Account Control dialog appears, click Yes.
Select the startup disk that has the default operating system you want to use.
If you want to start up using the default operating system now, click Restart. Otherwise, click OK.
You can’t change your startup volume to an external drive while you’re using Windows.
To learn how to change the default operating system using macOS, see Get started with Boot Camp.
Restart in macOS
In Windows on your Mac, do one of the following:
Restart using Startup Manager: Restart your Mac, then immediately press and hold the Option key. When the Startup Manager window appears, release the Option key, select your macOS startup disk, then press Return.
If you’re using a Mac notebook computer with an external keyboard, make sure you press and hold the Option key on the built-in keyboard.
Restart using Boot Camp Control Panel: Click in the right side of the taskbar, click the Boot Camp icon , then choose Restart in macOS.
This also sets the default operating system to macOS.
For more information about restarting in macOS, see the Apple Support article Restart your Mac in macOS or Windows.
The best ways to run Windows 10 on a Mac
Two business-class virtualization tools, macOS’s own Windows partition feature, and two hobbyist-oriented tools give you plenty of options to have your Windows PC and Mac on one computer.


Executive Editor for Global Content, Computerworld |
Microsoft’s Windows operating system still dominates on computers, but Apple’s macOS is in use by 17% of the global desktop computing population, according to StatCounter — and by 27% of U.S. computers, 29% of British computers, and 25% of Canadian computers. Businesses have long been even more Windows-centric, but macOS has found a place in several key segments: software development, creative and marketing work (such as image editing, video production, and layout), and website design and creation.
The Mac is a solid enterprise computer, despite the Windows bias prevalent in IT. And as more people work from home, the chances that an employee is using a Mac for business are now higher than ever.
But the reality is that Windows is the dominant corporate operating system, and that won’t change. So, can you have your macOS and Windows too? Yes, easily. You just need the right tool.
Your five options to run Windows on a Mac
For business use, you have three good options for running Windows 10, and often other operating systems, on your Mac. Unless otherwise noted, your Mac should be running at least macOS 10.13 High Sierra to use these tools, and your Mac should generally be a 2011 or later model (excluding early Mac Pros). If you plan to install macOS 11.0 Big Sur, due in fall 2020, wait until your chosen Windows-on-Mac tool supports it — an upgrade may be required.
To continue reading this article register now
The 5 Best Ways to Run Windows on Your Mac
Find out which option best fits you
While macOS is made to run using Mac hardware, it is not the only operating system that can run on a Mac computer.
Plenty of other operating systems, including Window and Linux, will work on a Mac device. That makes the Mac among the most versatile computers you can buy. Here’s what we’d use to install Windows on a Mac.
Boot Camp
:max_bytes(150000):strip_icc()/BootCampPartition-5849de633df78c491eaf721b.jpg)
Supports Windows 7, 8.1, and 10
Windows runs natively on Mac hardware for best performance
Requires a full Windows license for the initial install.
Cannot run Windows and Mac OS concurrently.
Perhaps the best-known option for running Windows on a Mac is Boot Camp. Included free with your Mac, Boot Camp allows you to install Windows and then choose between Mac and Windows on startup.
Because Boot Camp runs Windows directly on your Mac’s hardware (there is no virtualization or emulation to be performed) Windows can run at the best possible speed your Mac is able to deliver.
Installing Windows on your Mac is no more difficult than installing Windows on a PC. Apple even provides the Boot Camp Assistant to partition the startup drive to make room for Windows as well as to install all the drivers Windows needs for special Apple hardware.
Virtualization
:max_bytes(150000):strip_icc()/ParallelsWizard-576f016d5f9b585875b92396.jpg)
Run both macOS and a guest OS side-by-side.
Not limited to Windows; a large number of guest operating systems are supported.
Performance tuning and customization needed to achieve the best performance.
May impact the performance of your Mac.
Virtualization allows several operating systems to run on computer hardware at the same time. Virtualization abstracts the hardware layer, making it look like each operating system has its own processor, RAM, graphics, and storage.
Virtualization on the Mac makes use of a software layer called a hypervisor to emulate all of the underlying hardware. As a result, the guest operating system running on the virtual machine does not run as fast as in Boot Camp. But unlike Boot Camp, both the Mac operating system and the guest operating system run at the same time.
There are three primary virtualization apps for Mac:
- Parallels: The first to bring virtualization to the Mac. Parallels supports a wide range of guest OS, including Windows, Linux, and Mac.
- VMWare Fusion: Fusion is the Mac virtualization app offered by VMWare — a leader in virtualization tech. Fusion supports the installation of many different operating systems, including Windows, Linux, and macOS.
- VirtualBox: Oracle supports an open source virtualization app known as VirtualBox. This free virtualization app runs on multiple computer systems, including Mac. Like the other virtualization apps, VirtualBox can be used to run many different operating systems, including Windows, Linux, and macOS.
Installing the virtualization apps is similar to any other Mac app. Guest OS may be more involved with some customization required to obtain the best performance. All three apps have lively forums and support services to help with tuning the performance.
How to Run Mac On Windows -XP,7,8,8.1,10
Mac OS X is an advanced operating system, easy to use and extremely stable when used daily, and sometimes one would prefer to have OSX on PC rather than using Windows 7 or latest Windows 10. Well we have brought something interesting for you – The Guide to Run OSX on Windows which means users can Run Mac OS alongside Windows 7,8,8.1. The aim of installing Mac On Windows will be achieved by Virtual Technology. Many users aspire to buy Apple powered Macbook or any other premium Mac OS X running Apple device, but as we know that all can’t afford it, but atleast one can make ends meet by getting Mac OSx experience on Windows with very few steps.
Here is the glimpse of the result that you will see after you install mac on windows 7 on laptop :
Methods to Dual Boot Mac alongside Windows on PC or Laptop
We actually have two methods by which you will be able to use Mac On Windows PC –
- Buy Apple’s Macbook which will cost you three times you buy a new Window powered Laptop.
- Use this tutorial and little tech work which will cost you nothing but will give you a feeling of self-satisfaction that you have installed Mac OS on PC without spending even a penny.
So I would like to go by procedure 2 as that is very easy and hope you will not mind it 😛 So now the basic question that arises is – How to Run Mac On Windows -XP,7,8,8.1,10 – Follow up this easy tutorial to Install or Run OSX on Windows PC without losing important data or compromising with the Speed of your PC.
Requirements to Run Mac On Windows
The Basic Requirements to Run MAC on PC or Laptop or to Install Mac OS X (10.5 and above) on Virtual Machine VMWare. As VMWare is a virtual machine so it runs alongside windows and unlike other Operating System which we run using VMware, we need little more hardware requirements to run Mac on Vmware.
- 8 GB RAM will give you more than enough speed to cope up with the load of Mac OS on Virtual Machine
- Intel Core i3, i5, i7 will work like a charm.
- 128 GB of storage available on the hard disk to make Mac run without errors on PC.
It is not compulsory to have the above requirements. But lower than this will result into slow performance by the VMWare Workstation while loading MAC. But one can always give it a try to Run OSX on Windows with whatever config you have.
Tools Needed to Install Mac On Windows PC or laptop
To run mac on windows VMware one need to have few essentials that will equip you up to Run MAC OS-X alongside windows smoothly.first and the foremost software we require is the VMWare Virtual Machine itself. Download
First and the foremost software we require is the VMWare Virtual Machine itself. Download VMware Workstation from here.
VMWare is not the only one software required to Install MAC on Windows 7,8 or 10; You require an essential Unlocker as well. Download Latest MaC Unlocker required to Install Mac OSX on Windows from link in the Social Locker Below. [Like/+1/Tweet in order to Download latest Mac Unlocker]
Now Download the Essential VMDK Disk image of OSX that you will be using for running mac on windows from here and extract the same with xnohat as password 🙂
How To Run Mac On Windows [Guide]
- Step 1: Install the latest virtual technology powered VMWare Workstation which can be done easily by following on-screen instructions.
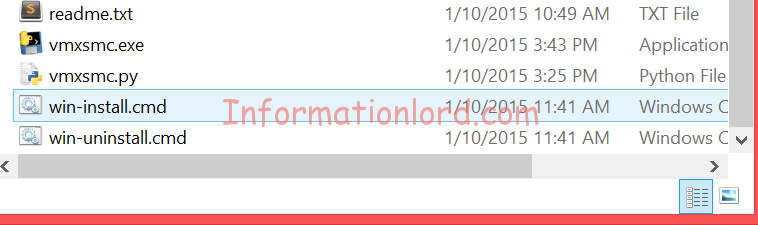
- Step 2: Now the real task starts here- Unzip the Unlocker 2.0.8 which you downloaded from second link and then Run the file named “win-install.cmd“. We would recommend that you run the file as Administrator.

You can hereafter link your CD Drive, Internet connection etc via editing settings of the Virtual Machine! If you are facing any problem to run OS-X on windows or if you want to share your views, do comment here, We will be at your service!
Running Mac OS X on Windows via Dual Boot is not a very hard task as well, but then the procedure mentioned here to Install Mac alongside Windows using VMware is of much use compared to totally formatting the system for Hackintosh. Do let us know if you are looking for Hackintosh tutorials in the comments section. This setup is all for free to get Mac Os X running on your Windows pc with all official udpates.
How to get Windows on Mac

Before you download Windows
Running Windows on a Mac can cause software conflicts. That’s why you may want to check your Mac for outdated apps first.

So here’s a tip: Download a free version of CleanMyMac to find your outdated background apps. You will know how many unwanted apps you’ve got and how much junk they contain. Now, let’s check more ideas and solutions.
Features described in this article refer to the MacPaw site version of CleanMyMac X.
Mac vs Windows. Windows vs Mac. Why choose if you can get the best of both worlds by dual booting? Install Windows on Mac so you can jump back and forth from one operating system to another on the same computer.
By now, the practice is well-established and Windows can work on Mac well. In this article, we’ll have a deep look at installing Windows on Mac. Don’t worry, we’ll have your back the whole way through!

Boot Camp for Mac vs virtualization software
If you want to install Windows on your Mac, you have two options. You can either use Mac Boot Camp, a native feature of the macOS operating system, or you can use a third party virtualization program. Both methods have their own pros and cons, so let’s dive in.
Boot Camp is built into the operating system of all Macs. If you go to your Applications > Utilities folder, you’ll see the Boot Camp Assistant app. It makes the separate partition on your hard drive for installing and running Windows. Once Windows is installed in Boot Camp, every time you turn on your Mac, you will be asked to choose the operating system you want to run. This means that in order to switch from macOS to Windows, you need to reboot your computer.
- built into your operating system
- easy to use — Boot Camp Assistant guides you through the installation process
- puts less strain on your Mac’s memory and processing power
- completely free (not Windows of course)
- easy to update
- you need to reboot your computer to switch between the systems
- transferring data between operating systems isn’t easy
Virtualization programs are third-party applications that allow to install a separate operating system on one machine. They run like any other app on your Mac, so you can see the entire Windows desktop within a window on your computer.
Among the most popular virtualization programs are VirtualBox, Parallels, and VMware. Each one has its peculiarities, but we’ll try to sum up what they have in common.
- you can run both operating systems at the same time
- easy file integration between systems
- you need at least 8 GB of RAM for Mac to run smoothly
- virtualization apps are not cheap
- updates are not free
Depending on your specific needs, you can choose the option that works best for you. But we suggest using Boot Camp. It’s a free native feature of your operating system, running directly on your hardware. Therefore, it will be faster than any other method. And below, you’ll find all information on how to run Boot Camp on your Mac.

How to use Boot Camp: Preparing your Mac
1. Check the system requirements
Some versions of Windows require a certain processor and more hard drive space than the others. Therefore, you have to check the documentation that came with your copy of Windows to learn what you need.
You also need to make sure that your Mac is compatible with the version of Windows you want to install. For instance, Windows 10 is supported on these models:
- MacBook (2015 and later)
- MacBook Pro (2012 and later)
- MacBook Air (2012 and later)
- iMac (2012 and later)
- Mac Mini (2012 and later)
2. Clean up your hard drive
You need to have at least 55 GB of free disk space on your startup drive for installing Windows on a Mac. And if you don’t feel like spending the next several hours cleaning your Mac manually, you can use a powerful utility CleanMyMac X to find and remove all the junk from your startup disk.
CleanMyMac has everything to finish the 3-hour task of cleaning your hard drive in less than 5 minutes. It will scan every inch of your system and remove gigabytes of junk in two clicks. By the way, CleanMyMac finds about 75 GB of junk on average — more than enough for a smooth Windows installation.
Here’s how to clean your Mac with CleanMyMac X:
- Download CleanMyMac here.
- Run the app and click Scan.
- Click Run.

That’s it! Gigabytes of junk are gone from your computer forever.
3. Back up your Mac
Finally, you should also perform a backup of your Mac in case something goes wrong. Although, it happens very rarely, it’s always better to back up your important data. There are a few methods of backing up your Mac, so choose the most convenient one for you.
You can make automatic backups with Time Machine — software that comes with your Mac. It backs up all data, so you can recover individual files or your entire system from your backups. You may also store files in iCloud and access them whenever you need. iCloud comes with 5 GB of free storage but you can upgrade it any time. If you have an external storage device, you can copy some files and folders on it.
We do recommend you to back up your Mac before installing Windows as it minimizes the chance of losing important data.

How to Install Windows with Boot Camp
Here’s how to install Boot Camp. The installation can be a little time consuming, but it is by no means difficult. Check out the details below.
Step 1: Get a Windows disk image
First of all, you need to get the Windows disk image (ISO file) from the Microsoft website. Here’s how to download it:
- Visit the Windows 10 disk image download website.
- Go to the Select edition menu and choose Windows 10.
- Click Confirm.
- Choose the language of installation and click Confirm.
- Click 64-bit Download and then click Save.
The ISO file now will be downloaded to your Mac.
Step 2: Open Boot Camp Assistant
Boot Camp Assistant guides you through installing Windows on your Mac. You just have to follow the onscreen instructions. To launch the Boot Camp Assistant, go to Applications > Utilities folder. Click continue and Boot Camp for Mac will automatically locate the ISO file on your system.
Step 3: Create a partition for Windows
When you are done with the Assistant, your Mac restarts to the Windows installer. When you are asked where you want to install Windows, choose the BOOTCAMP partition and click Format.
*Note that this step is only required if you’re using a flash drive or optical drive to install Windows. In other cases, the right partition will be selected and formatted for you automatically.
Step 4: Install Windows
To finish the installation, you have to follow the onscreen instructions. Take a long breath — the next 12 steps may seem like climbing Everest, but it’s much easier than you think. Here’s how to install Windows on a Mac:
- Choose your ISO file and click the Install button.
- Type your Password and click OK. You will see the Windows Setup screen.
- Select your language.
- Click Install Now.
- Type your product key if you have it. Otherwise, click «I don’t have a product key».
- Select Windows 10 Pro or Windows Home and then click Next.
- Click Drive 0 Partition X: BOOTCAMP.
- Click Next. Windows 10 will be installed.
- When the Setup screen appears, click either Use Express Settings or Customize Your Installation. We recommend you to choose the Customize button and disable most, if not all of the switches.
- Then you’ll be asked to create an account. Type a username. You can also add a password if you want.
- Click Next.
- Choose whether you want to use the Cortana personal assistant or not. You can disable it by clicking Not Now button.
Windows will boot fully so you can use it normally.
On the Welcome to Boot Camp Installer box, click Next and accept the terms in the license agreement. Then click Install to proceed. When the installer completes, click Finish to reboot your machine.
Step 5: Restart your Mac
By default, your Mac will still boot to macOS. To access Windows, you have to turn your Mac off and then turn it on while holding the Option (Alt) key. You will be asked from which drive you’d like to boot.
Note that while in Windows, the Mac’s Command key functions as the Windows key, while the Option key functions as the Alt key. If you have a Touch Bar, you’ll see a complete set of buttons, similar to the Control Strip in macOS.
How to remove Windows from your Mac
If for some reasons you don’t need Windows anymore, you can permanently remove it from your Mac. Follow these steps:
- Boot into macOS, launch Boot Camp Assistant and click Continue.
- Choose «Remove Windows 7 or later version» or «Remove Windows 10 or later version».
- Click Restore when you see the Restore Disk to a Single Volume option.
The Boot Camp Assistant will automatically remove Windows from your Mac.
Warning: All data, including software and files, stored on the Windows partition will be deleted, so make the backup copies first.
That may seem like a lot of steps, but it doesn’t take all that long to install Windows on a Mac. Now you can enjoy two operating systems and switch between them right when you need. Cheers!


