- How to View All Running Apps & Processes in Mac OS X
- At a Glance: Looking at the Dock to See Running Mac Apps
- See All Running Applications / Programs with Forceable Quit Menu
- View All Running Apps & Processes with Activity Monitor
- Advanced: View All Running Processes with Terminal
- View information about Mac processes in Activity Monitor
- View process activity
- Show more columns
- Group processes for easier viewing
- How to View and Kill Processes Using the Terminal in Mac OS X
- About Terminal
- About Activity Monitor
- How to Use Terminal
- Basic Terminal Commands
- To View All Processes
- To Find a Specific Process
- To Terminate (Kill) a Process
- Before you go
How to View All Running Apps & Processes in Mac OS X

There are a variety of ways to see all applications or programs which are running on a Mac, ranging from only seeing “windowed” apps running in the graphical front end, to revealing even the most obscure system-level processes and tasks running at the core of Mac OS. We’ll cover five different ways to view these running apps and processes in Mac OS X, some of which are very user friendly and applicable to all users, and some of which are more advanced methods accessible from the command line. Take the time to learn them all, and you can then use the method most appropriate for your needs.
At a Glance: Looking at the Dock to See Running Mac Apps
The simplest way to see what apps are running at the moment is to just glance at the Mac OS X Dock. If you see a little glowing dot under the application icon, it’s open and running.
Though there’s nothing wrong with using this approach, it’s obviously a bit limited since it only shows what are called “windowed” apps – that is, apps that are running in the GUI front end of Mac OS X – and it’s also limited in that you can’t take direct action with them. Additionally, those little glowing indicators are small and not that obvious, and many people don’t notice them at all. Fortunately, there are better ways to see what’s running on a Mac, and also be able to take direct action if there is a need to quit an app or two.
See All Running Applications / Programs with Forceable Quit Menu
Hit Command+Option+Escape to summon the basic “Force Quit Applications” window, which can be thought of as a simple task manager for Mac OS X. This shows an easy to read list of all active applications running in MacOS X, and what’s visible here is exactly the same as what you’d see in the Dock:
Despite the windows name, you can use this to view actively running programs and apps without actually quitting them.
One obvious advantage to the Command+Option+ESC menu is that it allows you to actually take action on running apps directly, letting you force quit them if they have become errant or are shown in red font, which signifies they are not responding or are crashing. This simplified version is fairly similar to the basic “Control+ALT+DELETE” manager that exists initially in the modern Windows world.
The primary limitation with the Force Quit Menu is that, like the Dock indicators, it is limited to revealing only the “windowed apps” that are actively running in Mac OS X, thus skipping over things like menu bar items and background apps.
View All Running Apps & Processes with Activity Monitor
The most powerful app and process management utility in the Mac OS X GUI, Activity Monitor is a powerful task manager that will reveal not only all running and active applications, but also all active and inactive processes. This includes quite literally everything running on the Mac, including the aforementioned windowed apps, and even background applications (those not visible as running in the Dock or the Force Quit menu), menu bar items, system level processes, processes running under different users, inactive processes, service daemons, quite literally anything and everything that is running as a process in Mac OS X at any level.
The app itself resides in /Applications/Utilities/, but it’s also easy to launch it through Spotlight by hitting Command+Spacebar and typing “Activity” followed by the Return key.
A way to simplify all of the information initially shown in Activity Monitor is to pull down the Process submenu and select according to what you’re looking for, like “All Processes”, “My Processes”, “System Processes”, or “Other User Processes”, among the other options. The “Search” feature is also easy to use and quite powerful, since you can start typing the name of something and it instantly updates according to which processes match the query.
Activity Monitor offers a ton of tools and options, and it’s easily the most advanced way to view extended information about all active processes without jumping into the command line. It let’s you quit processes, kill applications (kill is basically the same as force quitting), inspect and sample processes, sort processes by names, PID, user, CPU, threads, memory usage, and kind, filter processes by user and level, and also search through processes by name or character. Furthermore, Activity Monitor will also reveal general usage stats about CPU, memory, disk activity, and network activity, making it an essential troubleshooting utility for determining everything from inadequate RAM levels to diagnosing why a Mac could be running slow based on the myriad of other possibilities.
As an added bonus, you can also keep Activity Monitor running all the time and turn it’s Dock icon into a live resource usage monitor to see what CPU, RAM, disk activity, or network activity are up to on a Mac.
Advanced: View All Running Processes with Terminal
Delving into the command line, you can use a few more advanced tools to view every single process running on the Mac, ranging from basic user-level apps to even the tiny daemons and core system functions that are otherwise hidden from Mac OS X’s general user experience. In many ways, these tools can be thought of as command line versions of Activity Monitor, and we’ll focus on two in particular: top and ps.
Top will show a list of all running processes and various statistics about each process. It’s usually most helpful to sort by processor usage or memory usage, and to do that you’ll want to use the -o flag:
Sort top by CPU:
top -o cpu
Sort top by memory usage:
top -o rsize
top is updated live, whereas the next tool ‘ps’ is not.
The ps command will default to only displaying terminal processes active under the current user, thus ‘ps’ on it’s own is kind of boring unless you’re living in the command line. By applying a flag or two, you can reveal all processes though, and perhaps the best combination is ‘aux’ used like so:
To see all the output it’s helpful to expand a terminal window full screen, but it can still be a bit overwhelming if tons of stuff is running (which is usually the case), and thus piping it through ‘more’ or ‘less’ is often preferable to make viewing easier:
This allows you to view pages of the output at a time without having to scroll up and down in the Terminal window.
To search for a specific process (or application name, for that matter), you can use grep like so:
ps aux|grep process
Or to look for applications:
ps aux|grep «Application Name»
When looking for apps running in the GUI, it’s usually best to use the same case that the apps use in Mac OS X, or else you may not find anything.
Источник
View information about Mac processes in Activity Monitor
Processes are programs running on your Mac. Processes can be apps, system apps used by macOS or invisible background processes.
Use Activity Monitor to get information about these processes, including how much memory and CPU time the processes are using.
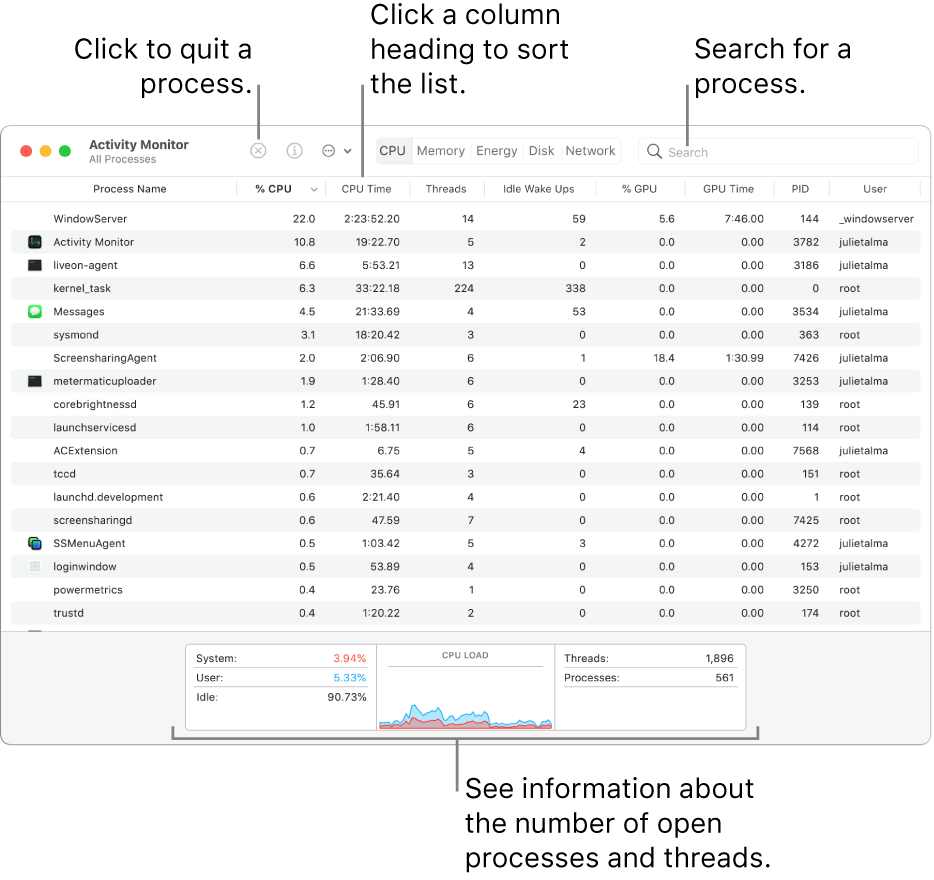
View process activity
In the Activity Monitor app  on your Mac, do any of the following:
Get information about a process: Select the process, then double-click it or click the Info button  in the Activity Monitor window (or use the Touch Bar).
Sort processes: Click a column heading to sort the list.
Reverse the order of items in the column: Click the triangle  in the selected column heading.
See general information about all processes: Click CPU in the Activity Monitor window (or use the Touch Bar). Information about the number of open processes and threads appears at the bottom of the window.
Search for a process: Enter the name of a process or app in the search field.
Show more columns
You can choose which columns you want to display in the Activity Monitor window.
In the Activity Monitor app on your Mac, choose View > Columns, then choose the columns you want to show (columns that are visible have a tick).
Group processes for easier viewing
In the Activity Monitor app on your Mac, in the View menu, choose one of the following:
All Processes: Shows all the processes running on your Mac.
All Processes, Hierarchically: Shows processes that belong to other processes, so you can see the parent/child relationship between them.
My Processes: Shows processes owned by your user account.
System Processes: Shows processes owned by macOS.
Other User Processes: Shows processes that aren’t owned by root or the current user.
Active Processes: Shows running processes that aren’t sleeping.
Inactive Processes: Shows running processes that are sleeping.
GPU Processes: Shows running processes owned by the computer’s GPU.
Windowed Processes: Shows processes that can create a window. These processes are usually apps.
Selected Processes: Shows only processes you selected in the Activity Monitor window.
Applications in last 12 hours: Show only the apps running processes in the last 12 hours.
Processes, by GPU: Shows running GPU processes grouped by GPU.
By default, information in the Activity Monitor window is updated every 5 seconds. To change this, see Change how often information is updated.
Источник
How to View and Kill Processes Using the Terminal in Mac OS X
Occasionally in Mac OS X, it may be necessary to force a program or process to quit. For example, if a particular program fails to respond or unexpectedly hangs. Every application on a Mac comprises of one or more processes.
It’s usually possible to use the Force Quit command (⌘⌥ esc) in the Apple Menu, but only individual applications are listed in the Force Quit Applications window rather than all processes which are running on your computer.
If you are new to using the OSX Terminal, I can recommend the Macintosh Terminal Pocket Guide by Daniel J. Barrett as a great way to get started.
The basic steps to check and kill a process are:
- Open the Terminal application
- List the running processes
- Find the process you want to close
- Kill the process
About Terminal
Probably the most useful tool to check and kill processes is called Terminal, which is an application that provides access to the lower levels of the Mac OS X operating system and files. Terminal is a text-based tool which lets you conduct all manner of routine tasks such as viewing directories, copying, moving and deleting files, as well as obtain detailed information about each process running including:
- the process ID (PID)
- the elapsed time spent running
- the command or application file path
About Activity Monitor
A related indispensable application is Activity Monitor – a graphical tool that allows you to manage processes, however it doesn’t have quite the same capabilities that Terminal does. Activity Monitor shows common process-related details such as the memory used and percentage of CPU that each process is consuming. When used together, Activity Monitor and Terminal provide a powerful yet relatively straightforward way to inspect and manage wayward processes.
The main Activity Monitor window is shown below.
Each application on your Mac has an associated Process ID (a PID) and a user-friendly name. From here you can inspect or quit each process, but in this example we use Activity Monitor simply as a companion to Terminal.
The Apple Mail application is displayed in Activity Monitor with a PID number of 14649. Note that process ID’s are assigned by Mac OS, and therefore will not be the same on your computer as somebody else’s.
The Activity Monitor Application
» data-medium-file=»https://www.chriswrites.com/wp-content/uploads/B1-Pic1-Activity-Monitor-300×220.png» data-large-file=»https://www.chriswrites.com/wp-content/uploads/B1-Pic1-Activity-Monitor.png» loading=»lazy» src data-src=»https://www.chriswrites.com/wp-content/uploads/B1-Pic1-Activity-Monitor.png» alt=»The Activity Monitor Application» width=»550″ height=»404″> The Activity Monitor Application
How to Use Terminal
The first step is to open Terminal either from the Applications -> Utilities folder or simply type Terminal into Spotlight. Terminal is always represented by the icon below.
Once it opens you’ll be presented with a standard Terminal window as below.
The first line shows the date and time when you last logged in. The second line is the command prompt which is where you enter the commands you wish to execute . The command prompt always begins with your computer name followed by your local Account Name.
The current directory (the “working directory”) when you open Terminal always defaults to your Home Folder.
The Terminal Window
» data-medium-file=»https://www.chriswrites.com/wp-content/uploads/B1-Pic3-Terminal-Window-300×191.png» data-large-file=»https://www.chriswrites.com/wp-content/uploads/B1-Pic3-Terminal-Window.png» loading=»lazy» src data-src=»https://www.chriswrites.com/wp-content/uploads/B1-Pic3-Terminal-Window.png» alt width=»550″ height=»351″>
Basic Terminal Commands
Before we describe how to check and terminate a process on your computer it’s worth knowing a few basic Terminal commands.
- To show the current folder name type pwd
- To list the files in the current folder type ls -l
- To move into another folder type cd
Note that many commands in Terminal can accept various options (sometimes called switches) that can alter their effect. The simplest way to discover the available command-line options is to type the command into Terminal followed by -? such as ls -?
Another useful command is apropos. Enter apropos into the Terminal window for a description of that command and its options.
To View All Processes
- Type ps -ax at Terminal’s command prompt to list every process running, along with additional details such as the PID, the elapsed time running, and the process name and location (shown in the CMD column)
» data-medium-file=»https://www.chriswrites.com/wp-content/uploads/B1-A2-Pic4-Process-List-300×125.png» data-large-file=»https://www.chriswrites.com/wp-content/uploads/B1-A2-Pic4-Process-List.png» loading=»lazy» src data-src=»https://www.chriswrites.com/wp-content/uploads/B1-A2-Pic4-Process-List.png» alt=»Running Processes Displayed» width=»550″ height=»229″> Running Processes Displayed
To Find a Specific Process
The process list displayed using ps -ax may include a hundred or more processes, but it’s quite simple to identify a process based on the name in the CMD column (for example Skype is listed as /Applications/Skype.app/Contents/MacOS/Skype), or even by the PID if you already know it.
As shown in Activity Monitor earlier, the Mail application on my Mac had the PID 14649, so it’s simple to scroll down the Terminal window until the relevant process is found.
One very useful command to help find a process by name or PID is grep which can filter out the desired information. It can be used in conjunction with the ps -ax command to list only the process that you are interested in.
The “pipe” function (“|”) simply uses the output from the process list as an input to grep, to filter out the desired process name.
Assuming that Skype is actually running, you may see a result something like this:
roly$ ps -ax | grep Skype 14530 ?? 0:56.32 /Applications/Skype.app/Contents/MacOS/Skype -psn_0_9218250 14947 ttys000 0:00.00 grep Skype
This example shows that Skype has a PID of 14530 and also the folder where Skype was launched from. The last line is just the process ID of the grep command itself, which can be safely ignored.
Repeating the command with the Skype process ID instead i.e. ps -ax | grep Skype yields the same result.
To Terminate (Kill) a Process
Once you know the process ID, killing it using Terminal is very simple. Be cautious however because forcing a process to suddenly exit can have unforeseen consequences, so it’s advisable to check carefully that the process you are about to kill is the correct one. There are essentially two easy ways to kill a process:
- By PID: the simplest way is with the kill command followed by the PID, which causes the selected process to terminate immediately. In the Sky example, kill 14530 does the job and causes the process to exit immediately
- By name: this method uses the killall command to kill all the processes that contain that name. For example killall Skype will terminate all the processes that have Skype in their name
Caution: killall should be used sparingly to avoid accidentally terminating the wrong processes. There is no confirmation prompt to ask if you really do wish to kill the processes, so check carefully beforehand.
Before you go
After spending over 20 years working with Macs, both old and new, theres a tool I think would be useful to every Mac owner who is experiencing performance issues.
CleanMyMac is highest rated all-round cleaning app for the Mac, it can quickly diagnose and solve a whole plethora of common (but sometimes tedious to fix) issues at the click of a button. It also just happens to resolve many of the issues covered in the speed up section of this site, so Download CleanMyMac to get your Mac back up to speed today.
Источник


