- Run Linux GUI apps on the Windows Subsystem for Linux (preview)
- Install support for Linux GUI apps
- Prerequisites
- Fresh install — No prior WSL installation
- Existing WSL install
- Run Linux GUI apps
- Update the packages in your distribution
- Install Gedit
- Install GIMP
- Install Nautilus
- Install VLC
- Install X11 apps
- Install Google Chrome for Linux
- Install Microsoft Teams for Linux
- Install Microsoft Edge browser for Linux
- 5 Tools to Help You Run Windows Programs in Linux
- Get the best of both worlds with these Windows emulators
- Plain Classic WINE
- Install WINE
- Install on Fedora
- Install on openSUSE
- Install on Arch Linux and Manjaro
- Lutris
- Install on Ubuntu and Linux Mint
- Install on Debian
- Install on Fedora
- Install on openSUSE
- Install on Arch Linux and Manjaro
- Play On Linux
- Install Play On Linux
- Available Windows Programs
- Crossover
- Опыт настройки и использования WSL (подсистемы Linux в Windows 10)
- Установка WSL и дистрибутива
- Установка X-сервера, Xfce и прочих GUI’шных приложений
- Взаимодействие окружения Windows и окружения подсистемы Linux
- Особенности, ограничения и подводные камни
- Итоги
Run Linux GUI apps on the Windows Subsystem for Linux (preview)
You can now preview Windows Subsystem for Linux (WSL) support for running Linux GUI applications (X11 and Wayland) on Windows in a fully integrated desktop experience.
WSL 2 enables Linux GUI applications to feel native and natural to use on Windows.
- Launch Linux apps from the Windows Start menu
- Pin Linux apps to the Windows task bar
- Use alt-tab to switch between Linux and Windows apps
- Cut + Paste across Windows and Linux apps
You can now integrate both Windows and Linux applications into your workflow for a seamless desktop experience.
Install support for Linux GUI apps
Prerequisites
You will need to be on Windows 11 Build 22000 or higher to access this feature. You can join the Windows Insiders Program to get the latest preview builds.
Installed driver for vGPU
To run Linux GUI apps, you should first install the preview driver matching your system below. This will enable you to use a virtual GPU (vGPU) so you can benefit from hardware accelerated OpenGL rendering.
Fresh install — No prior WSL installation
If you have not already done so, install WSL and set up a user name and password for your Linux distribution.
Open a command prompt with administrator privileges.
Select Start, type PowerShell, right-click Windows PowerShell, and then select Run as administrator.
Run this command and reboot your machine when prompted:
Once your machine has finished rebooting, installation will continue and you will be asked to enter a username and password. This will be your Linux credential for the Ubuntu distribution.
You’re now ready to begin using Linux GUI apps on WSL!
Existing WSL install
If you already have WSL installed on your machine, you can update to the latest version that includes Linux GUI support by running the update command from an elevated command prompt.
Select Start, type PowerShell, right-click Windows PowerShell, and then select Run as administrator.
Enter the WSL update command:
You will need to restart WSL for the update to take effect. You can restart WSL by running the shutdown command in PowerShell.
Linux GUI apps are only supported with WSL 2 and will not work with a Linux distribution configured for WSL 1. Read about how to change your distribution from WSL 1 to WSL 2.
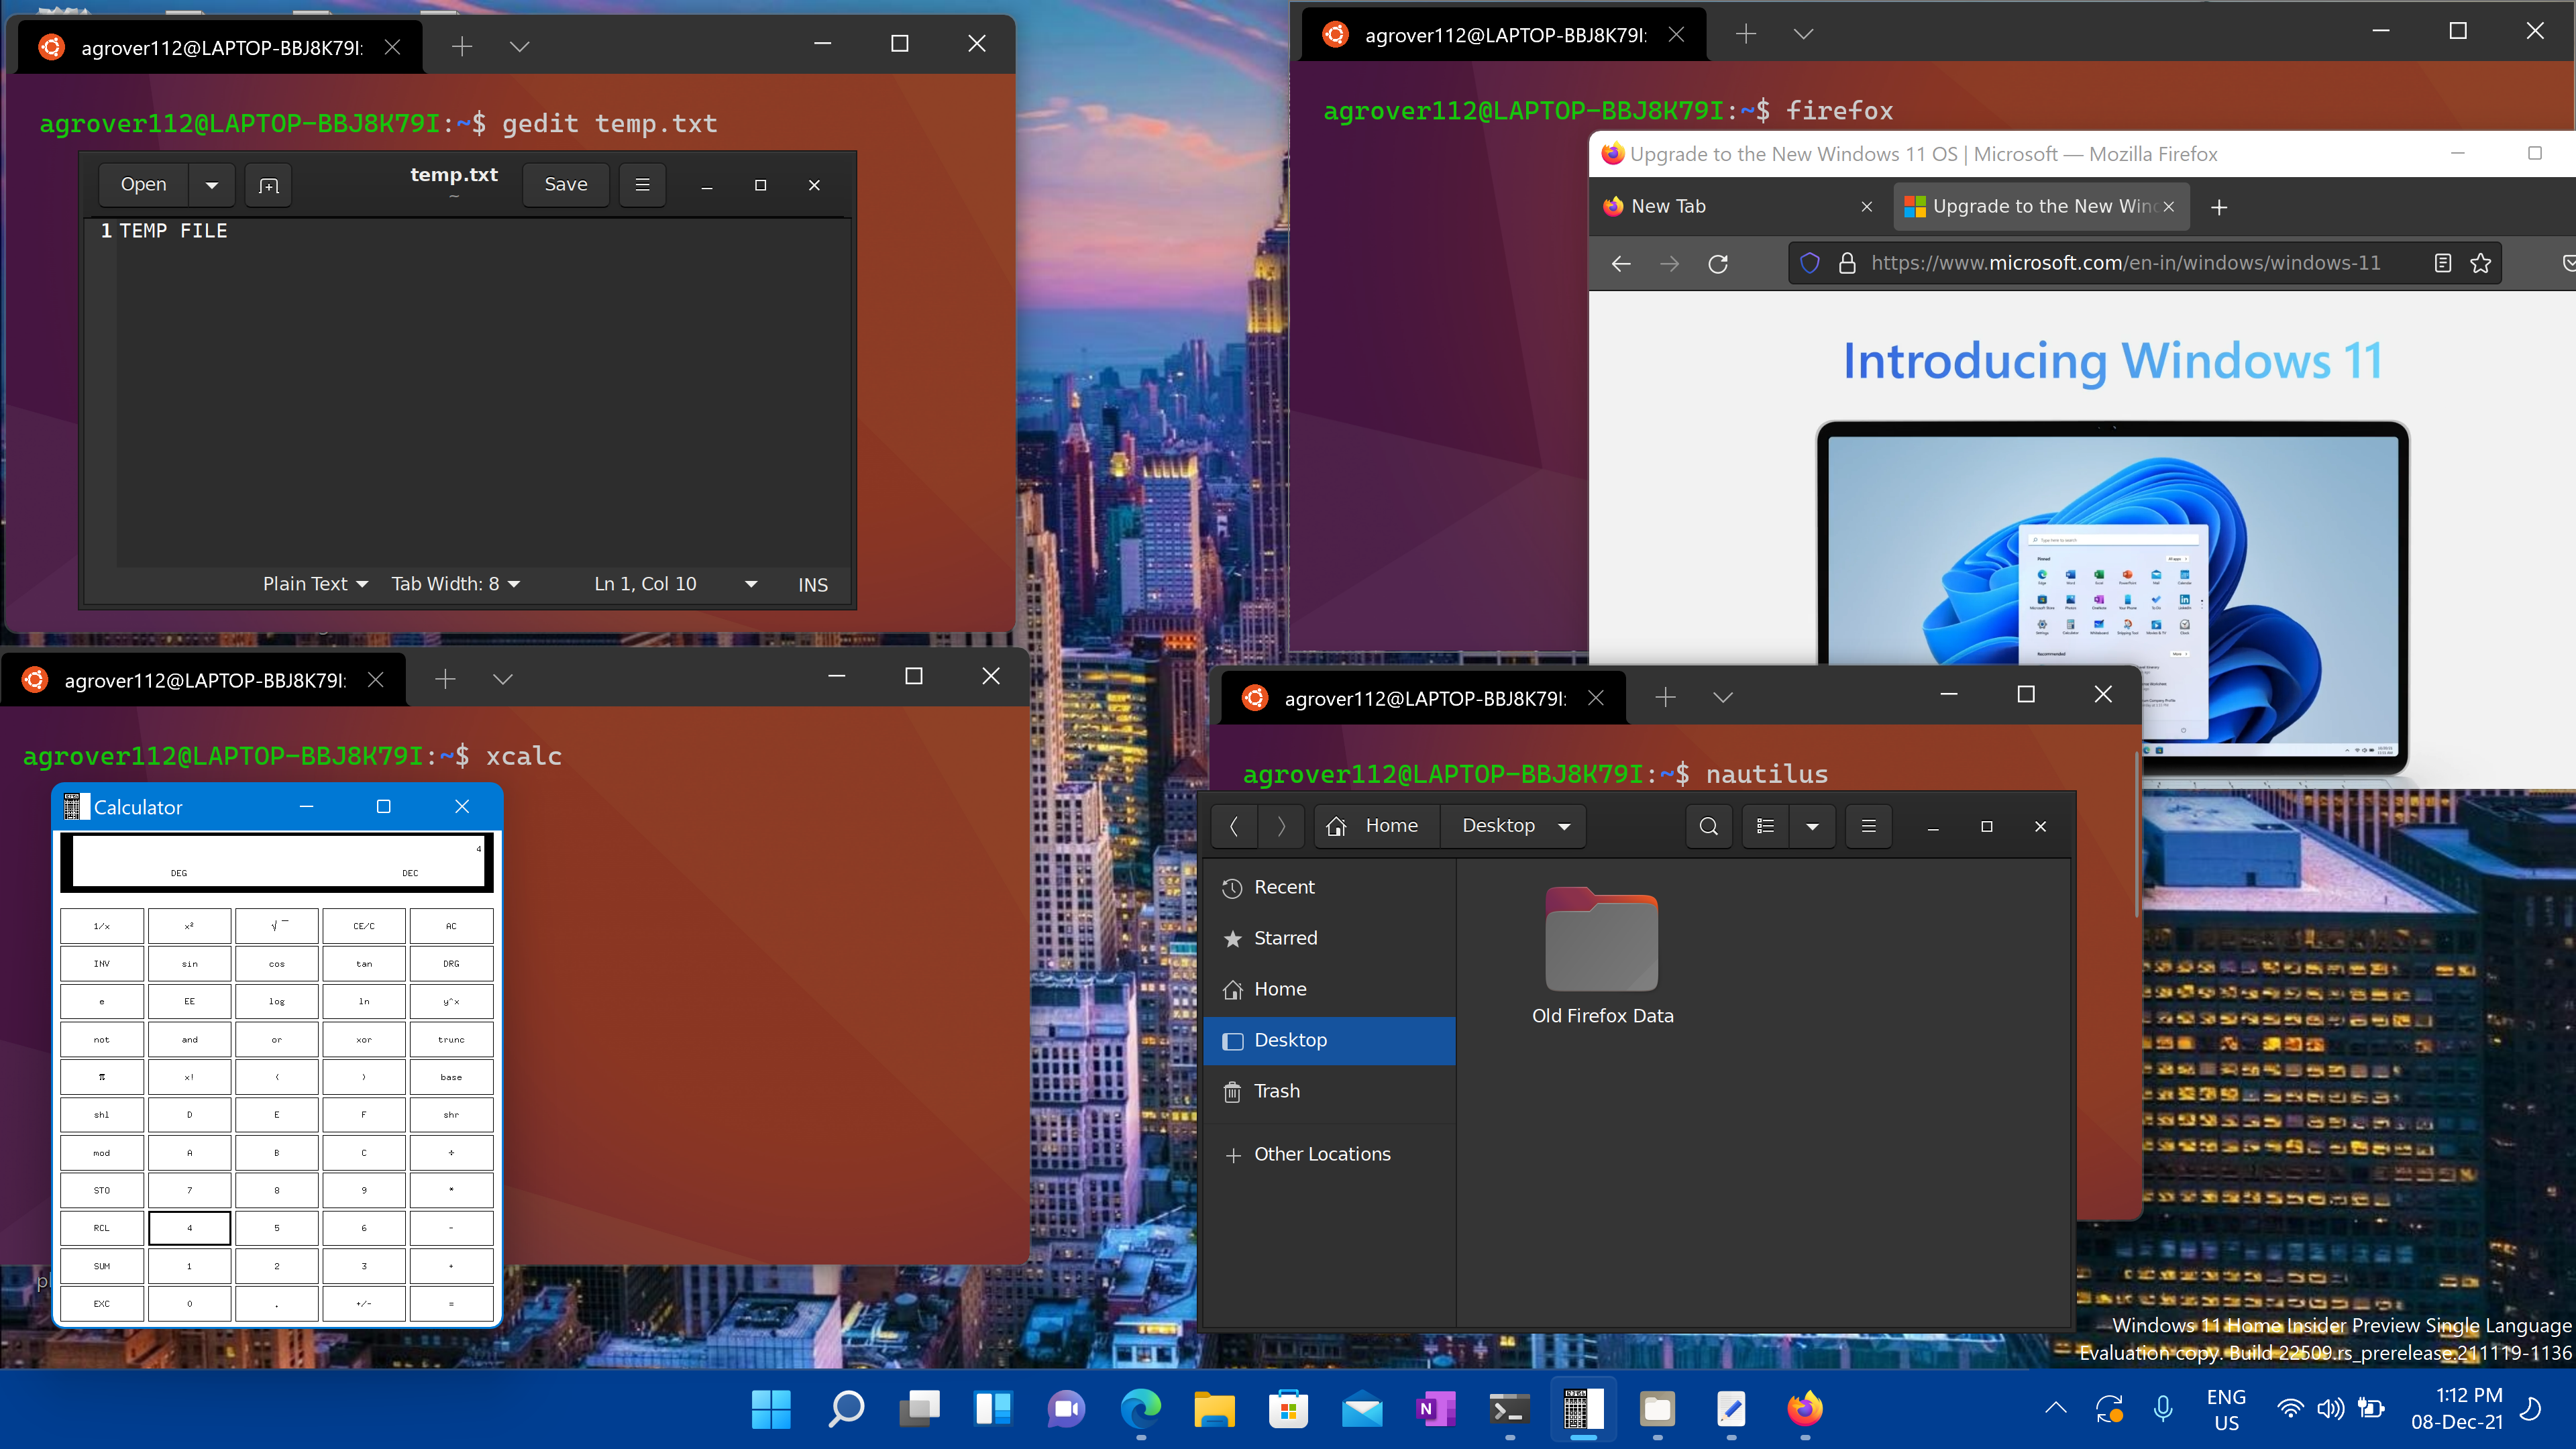
Run Linux GUI apps
You can run the following commands from your Linux terminal to download and install these popular Linux applications. If you are using a different distribution than Ubuntu, it may use a different package manager than apt. Once the Linux application is installed, you can find it in your Start menu under the distribution name. For example: Ubuntu -> Microsoft Edge .
Update the packages in your distribution
Install Gedit
Gedit is the default text editor of the GNOME desktop environment.
To launch your bashrc file in the editor, enter: gedit
Install GIMP
GIMP is a free and open-source raster graphics editor used for image manipulation and image editing, free-form drawing, transcoding between different image file formats, and more specialized tasks.
To launch, enter: gimp
Install Nautilus
Nautilus, also known as GNOME Files, is the file manager for the GNOME desktop. (Similiar to Windows File Explorer).
To launch, enter: nautilus
Install VLC
VLC is a free and open source cross-platform multimedia player and framework that plays most multimedia files.
To launch, enter: vlc
Install X11 apps
X11 is the Linux windowing system and this is a miscellaneous collection of apps and tools that ship with it, such as the xclock, xcalc calculator, xclipboard for cut and paste, xev for event testing, etc. See the x.org docs for more info.
To launch, enter the name of the tool you would like to use. For example:
Install Google Chrome for Linux
To install the Google Chrome for Linux:
- Change directories into the temp folder: cd /tmp
- Use wget to download it: sudo wget https://dl.google.com/linux/direct/google-chrome-stable_current_amd64.deb
- Get the current stable version: sudo dpkg -i google-chrome-stable_current_amd64.deb
- Fix the package: sudo apt install —fix-broken -y
- Configure the package: sudo dpkg -i google-chrome-stable_current_amd64.deb
To launch, enter: google-chrome
Install Microsoft Teams for Linux
To install Microsoft Teams for Linux:
- Change directories into the temp folder: cd /tmp
- Use curl to download the package: sudo curl -L -o «./teams.deb» «https://teams.microsoft.com/downloads/desktopurl?env=production&plat=linux&arch=x64&download=true&linuxArchiveType=deb»
- Use apt to install it: sudo apt install ./teams.deb -y
To launch, enter: teams
Install Microsoft Edge browser for Linux
Find information on how to install the Microsoft Edge browser for Linux using the command line on the Edge Insider site. Select Get instructions under the Command line installation section of the page.
Источник
5 Tools to Help You Run Windows Programs in Linux
Get the best of both worlds with these Windows emulators
:max_bytes(150000):strip_icc()/image-5e6611aebe974bb7886a24b5070c834f.jpg)
Even though open-source software includes free tools, including email clients, office applications, and media players, you might need a software app that works only on Windows. In this case, use one of the tools listed here to run Windows apps on your Linux PC.
:max_bytes(150000):strip_icc()/wordinlinux-585c16d93df78ce2c3521838-4ce23e34bd934a889951300d7c87b636.png)
These tools are based on or use WINE. Aside from virtual machines, WINE is the only way to run Windows applications on Linux. There are wrappers, utilities, and versions of WINE that make the process easier, though, and choosing the right one can make a difference.
Plain Classic WINE
:max_bytes(150000):strip_icc()/wine-5806ec535f9b5805c2ed4fe5.JPG)
Doesn’t require a Windows license to use Windows applications.
The simple core utility behind these tools.
This is the stable and officially supported version.
It doesn’t always run the latest versions of Windows products.
Some games and applications run sluggishly.
Lacks helper scripts.
Doesn’t have the latest patches and improvements.
WINE stands for Wine Is Not An Emulator. WINE provides a Windows compatibility layer for Linux that makes installing, running, and configuring many popular Windows applications possible.
Install WINE
To install WINE, run whichever of the following fits your Linux distribution.
On Ubuntu, Debian, or Mint:
Import the WINE developer key:
Add the repository. Replace eoan with your Ubuntu release.
On Debian, use the following example, replacing buster with the Debian release.
Update your repositories, and install WINE Staging:
Install on Fedora
Add the repository from the WINE developers. Replace 30 in the address with your Fedora release.
Then, install the latest WINE Staging release using DNF.
Install on openSUSE
openSUSE has WINE Staging in its repositories. To install it:
Install on Arch Linux and Manjaro
WINE Staging is in the official Arch repository. Install it normally.
Lutris
:max_bytes(150000):strip_icc()/lutris-install-gog-9a429954417c45d18cf0aa42a0d1d401.jpg)
Easy to play games.
Manage configurations without hassle.
Get the latest versions of WINE.
Manage games in one place.
Takes a little setup on some distributions.
Focused almost exclusively on games.
When it comes to playing Windows games on Linux, there’s no better option than Lutris. Lutris is relatively new compared to the other entries on this list, but it’s more than earned its spot by making it just as easy to install Windows games on Linux as it is on Windows.
With Lutris, you can play games, like Overwatch, on Linux in only a couple of clicks. There’s no need to know the technical details. Someone already did the hard work for you.
Lutris also integrates with other Linux gaming platforms, like Steam, to keep your game library organized. With Lutris, you can access all your games in one place. Lutris keeps separate configurations for each game, so it can manage multiple versions of WINE at once, using the ideal one for each game.
Installing Lutris is fairly simple too.
Install on Ubuntu and Linux Mint
Install the Lutris PPA:
Update Apt, and install Lutris:
Install on Debian
Add the Lutris repository configuration:
Then, import the Lutris signing key:
Finally, update Apt, and install Lutris:
Install on Fedora
Lutris is available in the default Fedora repositories. Install it with DNF.
Install on openSUSE
openSUSE has Lutris in its repositories too. Install it normally.
Install on Arch Linux and Manjaro
Arch also has Lutris in the main repository:
Play On Linux
:max_bytes(150000):strip_icc()/playonlinux-585c1e5a3df78ce2c3536081.png)
Good gaming support.
Install multiple versions of WINE simultaneously.
Excellent community support.
Starting games in full-screen mode can sometimes cause crashing.
Error reporting is lacking.
Similarly to Lutris, Play On Linux provides a graphical interface for WINE. Play On Linux came before Lutris, and it offers many of the same features. Play On Linux is bare-bones and doesn’t include support for Linux games. It takes a general approach, so you may find better office application support here, even though it’s probably not as good as something like Crossover.
Install Play On Linux
On Ubuntu, Debian, and Mint:
sudo apt install playonlinux
On Fedora and CentOS:
sudo dnf install playonlinux
sudo zypper install playonlinux
On Arch and Manjaro:
sudo pacman -S playonlinux
Available Windows Programs
When you first run Play On Linux, a toolbar appears at the top with options to run, close, install, remove, or configure applications. You’ll also see an installation option in the left panel.
You can choose from a number of applications, including development tools such as Dreamweaver, an assortment of retro classics such as Sensible World of Soccer, modern games such as Grand Theft Auto versions 3 and 4, the Half Life series, and more.
The graphics section includes Adobe Photoshop and Fireworks, and you’ll find browsers in the internet section. The office section is a bit hit and miss. Those apps may not work.
Play On Linux requires you to have the setup files for the programs you are installing, although you can download some of the games from GOG.com.
Software installed via Play On Linux is generally more likely to work than software installed with plain WINE.
You also can install non-listed programs. However, the programs listed have been specifically configured to be installed and run using Play On Linux.
Crossover
:max_bytes(150000):strip_icc()/crossover-585c21c85f9b586e0269ee0d.png)
Streamlined setup makes it easy for Linux newcomers to use Windows programs.
Reliable 24/7 customer support with the premium plan.
Applications take up more space on the hard disk due to how it handles containers.
Free trial is limited to 14 days.
Crossover is the only item on this list that isn’t free. It’s a commercial product based on WINE. Installers are available for Debian, Ubuntu, Mint, Fedora, and Red Hat.
When you first run Crossover, you are presented with a blank screen with an Install Windows Software button at the bottom. When you click the button, a new window appears with the following options:
- Select application
- Select installer
- Select bottle
A bottle in Crossover is like a container that installs and configures each Windows application.
When you choose Select application, you’ll see a search bar from which you can search for the program you wish to install by typing a description.
You also can browse the list of applications. A list of categories appears, and as with Play On Linux, you can choose from an array of packages.
When you choose to install an application, a new bottle suitable for that application is created, and you are asked to provide the installer or setup.exe.
Why use Crossover when Play On Linux is free? Some programs work only with Crossover and not Play On Linux. If you need that program, then this is one option.
Источник
Опыт настройки и использования WSL (подсистемы Linux в Windows 10)
К написанию данной статьи меня побудил вопрос на Тостере, связанный с WSL. Я, после нескольких лет использования систем на ядре Linux, около полугода назад перешел к использованию Windows 10 на домашнем ПК. Зависимость от терминала и Linux окружения в моей работе практически сразу привели меня к вопросу: или ставить виртуалку или попробовать WSL. Я выбрал второе, и остался вполне доволен.
Под катом я расскажу как установить и настроить WSL, на какие я наткнулся проблемы и ограничения, как запускать Linux приложения из Windows и наоборот, а так же как интегрировать элементы окружения Xfce в окружение рабочего стола Windows.

Никогда не думал, что однажды вернусь на Windows, но повод попробовать мне дали стечения обстоятельств: жена, далекая от IT, дергала почти каждый раз, когда у нее возникала необходимость воспользоваться компом; проснулась ностальгия по одной игре, но она никак не хотела адекватно работать под wine; а тут еще мне подарили коробочную Windows 10 Pro. WSL я поставил чуть ли не сразу после установки системы, поигрался несколько вечеров, понял, что продукт для моих задач годный, но хочется более привычный терминал и вообще некоторых удобств.
Установка WSL и дистрибутива
Сразу оговорюсь, в интернете можно найти описание установки с помощью выполнения команды lxrun /install в командной строке или консоли PowerShell. Данный способ больше не работает (после выхода WSL в стабильный релиз). Насколько мне известно, сейчас WSL можно установить только из Microsoft Store вместе с предпочитаемым дистрибутивом.
Так же отмечу, что когда установку производил я, на выбор были доступны дистрибутивы OpenSUSE, SUSE Linux Enterprise и Ubuntu 16.04 — последний я и установил. Сейчас также доступны Ubuntu 18.04, Debian 9 и Kali Linux, возможно появятся и другие дистрибутивы. Действия по установке могут отличаться. Так же, часть проблем описанных в статье может быть уже исправлена.
Находим в магазине желаемый дистрибутив и устанавливаем. Установка пройдет быстро, так как скачает только эмулятор ядра Linux и утилиту для запуска подсистемы, которая окажется в системной папке в трех экземплярах: wsl.exe, bash.exe и ubuntu.exe (вместо ubuntu будет имя Вашего дистрибутива). Все они равнозначны и делают одно и то же — запускают собственный эмулятор терминала, в нем linux’овый bash работающий под эмулятором ядра. При первом же запуске нас попросят придумать логин и пароль для пользователя по умолчанию, а после произойдет непосредственно установка дистрибутива. В качестве пользователя по умолчанию указываем root без пароля — это потребуется для дальнейших шагов. Безопасность не пострадает, кроме того при подготовке материалов к статье, в англоязычном туториале, я наткнулся на информацию, что новые версии WSL теперь делают пользователем по умолчанию root без пароля без лишних вопросов.
Дожидаемся установки. Далее первым делом стоит обновить зеркала apt на ближайшие. Для этого понадобится CLI текстовый редактор. В комплекте только vi, я же больше предпочитаю nano, поэтому ставлю его:
sudo вводить не требуется, так как мы уже под root’ом. Отредактируем файл /etc/apt/sources.list:
У меня лучше всего работают зеркала Яндекса, поэтому мой файл выглядит так:
Нажимаем Ctrl+O для сохранения и Ctrl+X для выхода. Теперь можно обновить систему до актуального состояния:
После обновления можно создать нашего основного пользователя. В данной статье я назову его user1, Вы же можете задать привычное имя:
Далее переходим в папку юзера, зайдем под ним, установим пароль и отредактируем файл
Все, подсистема готова к использованию… почти.
Установка X-сервера, Xfce и прочих GUI’шных приложений
Первая же проблема, на которую я натолкнулся — bash-completion в предлагаемом эмуляторе терминала работал, мягко говоря, некорректно. Кроме того, данный эмулятор не умеет вкладки, а каждый его экземпляр запускает все в новом пространстве процессов, с отдельным init’ом (который кстати не заменить). Мне захотелось нормальный эмулятор терминала, некоторых других GUI приложений, а так же панельку, чтоб это все быстро запускать.
Когда я гуглил этот вопрос, я наткнулся на множество проблем, вроде необходимости перевода dbus на tcp протокол. На данный момент всех этих проблем нет. В подсистеме нормально работают unix-domain-socket’ы и все спокойно общается через них.
Первым делом нам понадобится X-сервер, притом установленный в основную систему (в Windows). Лично я использую для этих целей VcXsrv — порт X11 на Windows. Официальный сайт указанный в about самой утилиты его сейчас не предоставляет, поэтому гуглим установщик и устанавливаем все по умолчанию.
Пока идет установка возвращаемся в терминал WSL, командой exit выходим обратно в root’а. Первым делом настроим русские локали:
Далее установим некоторые компоненты Xfce. Можно конечно установить его целиком из мета-пакета, но большинство компонентов нам не понадобится, а модульная архитектура Xfce позволяет нам поставить только необходимое:
Запускать каждый раз окружение руками не очень удобно, поэтому я автоматизировал данный процесс. Для этого в основной системе создадим в удобном для нас месте папку, а в ней 3 файла для запуска:
- config.xlaunch — файл настроек для VcXsrv
x-run.vbs — WSL всегда запускается со своим эмулятором терминала, если его закрыть — завершатся все его дочерние процессы. Чтоб данное окно не мозолило глаза, неплохо его запускать скрытым. К счастью в Windows встроен интерпретатор VBScript, который позволяет это сделать в одну строчку:
Поясню, что здесь происходит. Мы говорим VBscript выполнить приложение wsl с параметром cd /home/user1; DISPLAY=:0 LANG=ru_RU.UTF-8 su user1 -c xfce4-session , папка запуска нам не важна, поэтому пустая строка, действие open — запуск, 0 — скрытый режим. Самому wsl мы отдаем команду на выполнение: переход в папку пользователя, затем с установкой переменных окружения DISPLAY (дисплей X-сервера) и LANG (используемая локаль) мы запускаем xfce4-session от имени нашего пользователя user1 (благодаря команде su)
Далее можем запустить наш start.bat и настроить панель Xfce под себя. Замечу, что здесь я наткнулся на еще одну проблему — панель прекрасно отображается поверх всех окон, но вот выделить себе место, как панель на рабочем столе Windows она не может. Если кто знает решение данной проблемы, поделитесь в комментариях.
Ну и под конец данной части, скриншот моего рабочего стола:
Взаимодействие окружения Windows и окружения подсистемы Linux
Запускать Linux приложения напрямую из Windows можно через те же 3 команды — bash, wsl или ubuntu. Не забываем, что по умолчанию запуск идет от root, поэтому стоит понижать привилегии через su , так же нужно не забывать передавать переменную окружения DISPLAY=:0 если приложению требуется X-сервер. Так же нужно менять папку, из которой должно работать приложение, через cd внутри WSL. Пример, посчитаем md5 для file.txt на диске D средствами Linux’овой md5sum:
Доступ к файловой системе Linux так же имеется, лежит она в %localappdata%\Packages\CanonicalGroupLimited.UbuntuonWindows_79rhkp1fndgsc\LocalState\rootfs . Читать таким образом файлы можно, а вот писать — не желательно, можно поломать файловую систему. Думаю проблема в том, что Windows не умеет работать с правами и владельцами файловой системы Linux.
Из Linux так же можно запускать Windows приложения. Просто запускаем exe-шник и он выполнится в основной системе.
Диски Windows монтируются в /mnt в соответствии со своими буквами в нижнем регистре. Например диск D будет смонтирован в /mnt/d . Из Linux можно свободно читать и писать файлы Windows. Можно делать на них симлинки. Права у таких файлов всегда будут 0777, а владельцем будет root.
Сетевой стек у подсистемы общий с Windows. Сервер поднятый в Linux будет доступен на localhost в Windows и наоборот. Однако unix-domain-socket для Windows будет просто пустым файлом, работать с этим можно только внутри Linux. Выход во внешнюю сеть у Linux так же есть, в том числе можно слушать порты, если этого не запрещает фаервол.
ifconfig в Linux и ipconfig в Windows выдают одинаковую информацию о сетевых интерфейсах.
Из диспетчера задач Windows можно спокойно прибить процесс внутри подсистемы Linux. Однако Linux увидит только свои процессы.
Особенности, ограничения и подводные камни
Ядро Linux в WSL не настоящее. Это всего лишь прослойка-эмулятор, которая часть Linux-специфичных задач выполняет сама, а часть проксирует напрямую в ядро winNT. Большая часть api в нем реализована, но не все. Свое ядро собрать не получится, как и не получится подключить модули ядра (.ko, Kernel Object).
Init процесс у WSL тоже свой и заменить его, например, на system.d не выйдет. У меня давно есть желание написать менеджер демонов на go, который бы работал с файлами юнитов system.d и предоставлял бы схожий интерфейс, да все руки не доходят.
Нет поддержки openFUSE, соответственно примонтировать виртуальную или удаленную файловую систему не получится. Так же нельзя сделать mount из файла, mount вообще ничего кроме bind здесь, похоже, не умеет.
Так же нет никакой возможности разбить файловую систему Linux на несколько разделов/дисков.
Прямой доступ к железу практически отсутствует. Все таки мы находимся в песочнице Windows, а не в полноценном Linux. /dev и /sys заметно пустуют, в них лишь проц да виртуальные устройства. Доступ к GPU — только через X-сервер, напрямую — никак, так что нейросети обучать придется в Windows.
В JS разработке столкнулся с тем, что electron.js отказался запускаться в WSL, пришлось дублировать окружение node.js в Windows.
Итоги
Статья получилась довольно длинной, надеюсь, что она окажется еще и полезной.
WSL для меня лично оказался инструментом вполне юзабельным, решающим мои задачи fullstack backend разработчика. Виртуалка с Linux за полгода так и не понадобилась. По общим ощущениям Windows+WSL намного функциональнее, чем Linux+Wine.
Пока писал статью, обнаружил, что в Microsoft Store появилась сборка WSL с Debian 9.3, данный дистрибутив мне более симпатичен, чем Ubuntu, поэтому буду пробовать ставить.
Источник


