- Getting Started with PostgreSQL on Windows
- A Step by Step Guide to Installing and Setting up Postgres on your Windows Machine.
- So what is Postgres huh?😏
- Enough said, Who uses it?😒
- Let’s get down to it!😎
- Step 1. Grab some Chocolatey 🍫:
- Step 2. Now stir in Postgres 🐘 with “choco”:
- Step 3. Setting up the environment variables:
- Step 4. Kickstarting Postgres Database Cluster and Server:
- Step 5. Interesting commands to get you started:
- FINALLY! 🚀
- WHAT NEXT? 🤔
- Set Up a PostgreSQL Database on Windows
- How do I install just the client tools for PostgreSQL on Windows?
- 7 Answers 7
Getting Started with PostgreSQL on Windows
A Step by Step Guide to Installing and Setting up Postgres on your Windows Machine.

Jul 13, 2019 · 5 min read

So what is Postgres huh?😏
PostgreSQL, also known as Postgres, is a free and open-source relational database management system, emphasizing extensibility and technical standards compliance. It is designed to handle a range of workloads, from single machines to data warehouses or web services with many concurrent users. Basically, Postgres has superpowers; capable of handling very large datasets as though it was smashing peanuts.
Enough said, Who uses it?😒
Now, you are wondering who could possibly need all that. Well, thanks to its superpowers, a lot of firms use it. Including top-rank companies like Netflix, Uber, Spotify and etc.
Let’s get down to it!😎
I was on a p r oject, that I needed to scale, and part of the business requirement was Postgres. It was super frustrating to get it started on a Windows machine, due to lack of efficient tutorials and knowledge-base even the official site and documentation were not forthcoming.
To avoid the same stress I went through, and therefore make life relatively easier for you, follow the steps without missing/jumping any.
Step 1. Grab some Chocolatey 🍫:
Chocolatey is this badass software/package manager for Windows.
It lets you manage, install and uninstall packages like Postgres right from the Command Prompt (CMD)/PowerShell CLI.
To install Chocolatey, launch CMD as admin, run the following line, and let the magic begin.
When it’s done, CMD should return this line as one of the results:
We can also confirm that Chocolatey is now working by simply calling “choco” in CMD.
You should get the following result:
Step 2. Now stir in Postgres 🐘 with “choco”:
To grab and install Postgres;
Copy, paste and run the following line;
Note: Where it says ‘ passwordgoeshere ’, that’s the required password assigned to Postgres user, you can change it to a preferred password.
Now, this might take a while, depending on the on the speed of your PC and/or internet.
When it’s done, it might return some errors and failures, don’t be bothered.
To confirm that it has been installed;
This folder (“ C:\Program Files\PostgreSQL\10”) should have been created, containing all necessary installation files as seen below:

Step 3. Setting up the environment variables:
Now that we have Postgres on our machine, it would be nice to directly use Postgres in CMD by calling ‘ psql’ and/or ‘ pg_ctl’(just as we use Chocolatey by calling ‘ choco’).
To do this, you need to include Postgres in the system’s environment variables.
Windows+R should launch ‘Windows Run’ then you can swiftly type in ‘ SystemPropertiesAdvanced’ and continue, using the images and corresponding captions as seen below:


Step 4. Kickstarting Postgres Database Cluster and Server:
After restarting your PC, navigate to the “ C:\Program Files\PostgreSQL\10\data” folder. Delete all files and sub-folders in that folder, so that it is completely empty.
In order to make use of this folder, you need to give ownership and grant full access to Everyone(User Group). To do this;
Launch CMD as admin, then run the following command:
We can now initialize the Postgres database cluster and server,
To do this; run the following command:
When it’s done initializing, CMD should return this line as one of the results:
Now that we have initialized, we can start the Postgres server,
To do this; run the following command:
Yuppie!,
It’s almost done.
Postgres server is now running.
Right out the box, Postgres creates three databases included ‘ postgres’.
Step 5. Interesting commands to get you started:
To list out the available databases, run:
To connect to a database in this case ‘postgres ’ since it’s available, run:
To disconnect from a database, run:
To create a database, run:
To create a user, run:
Here is a concise list of some interesting commands
- \? list all the commands
- \l list databases
- \conninfo display information about the current connection
- \c [DBNAME] connect to the new database, e.g., \c template1
- \dt list tables of the public schema
- \dt .* list tables of certain schema, e.g., \dt public.*
- \dt *.* list tables of all schemas
- Then you can run SQL statements, e.g., SELECT * FROM my_table; (Note: a statement must be terminated with a semicolon ; )
- \q quit psql
FINALLY! 🚀
You’re all set to use Postgres on your Machine.
Wondering why we didn’t do any GUI, or if a GUI exists for Postgres?
Well, yes a GUI exists, its called PGAdmin, the cool thing is that it comes as part of the installation we just did.
To use PGAdmin, just go to the Start menu and search ‘pgadmin’, you should click the program with an elephant🐘 icon.
Note: It’s generally adviced that all database query including the creation of the database itself, is done from an SQL file, this is so that changes can be tracked by ‘ git’ or any other version control packaged used.
WHAT NEXT? 🤔
Documentations are your friend, might not be expressly enticing but it gives you superpowers with the respective tool.
Postgres10 Official Doc: HERE
Set Up a PostgreSQL Database on Windows
To use Media Server with a PostgreSQL database, you must download and install a PostgreSQL server and ODBC driver, and configure Media Server to connect to the database through the driver.
The procedure describes setting up the database server using the psql command-line tool. If you prefer, you can use the pgAdmin graphical user interface. For more information, refer to the pgAdmin documentation on www.pgadmin.org.
To set up a PostgreSQL Media Server database on Windows
Download and install a PostgreSQL server. For instructions, refer to the PostgreSQL documentation on www.postgresql.org.
- Ensure that the installation includes the PostgreSQL Unicode ODBC driver.
- During installation, set up a user account with superuser privileges.
Once installed, the PostgreSQL server appears in the Services tab in Windows Task Manager.
Add the PostgreSQL bin directory path to the PATH environmental variable.
This step enables you to use the command psql to start the PostgreSQL command-line tool (psql) from the Windows Command Prompt. If the directory path is not added to the PATH variable, you must specify the psql.exe file path in the Command Prompt to start psql.
Open the psql command-line tool:
In the Windows Command Prompt, run the command:
Run a CREATE DATABASE command to create a new database. Specify the following database settings.
| Database name | Any name. |
| Encoding | Must be Unicode–either UTF8 or UCS2. |
| Collation | Any that is compatible with the encoding. |
| Locale | Any that is compatible with the encoding. |
Connect to the new database using the command:
Run the postgres.sql script provided in the Media Server installation directory. This script sets up the database schema that Media Server requires. The schema is inserted inside the public schema.
Micro Focus recommends running the following command to ensure that the script stops running if it encounters an error:
Run the script using the command:
where path is the script file path.
Replace backslashes in the file path with forward slashes. The psql command-line tool does not recognize backslashes in file paths.
Grant privileges to the user that Media Server will connect as. If security is not a consideration you could grant all privileges, but the required privileges are:
| Database | Create Temporary Tables |
| All tables | Select, Insert, Update, Delete |
| All functions and stored procedures | Execute |
| All sequences | Usage |
| databaseName | is the name of the database that you created. |
| userName | is the user name that Media Server will connect as. |
Open the Data Sources (ODBC) program:
In the Windows Control Panel, click System and Security.
The System and Security window opens.
Click Administrative Tools.
The Administrative Tools window opens.
Double-click Data Sources (ODBC).
The ODBC Data Source Administrator dialog box opens.
In the User DSN tab, click Add. .
The Create New Data Source dialog box opens.
Select the PostgreSQL Unicode driver from the list and click Finish.
The PostgreSQL Unicode ODBC Driver (psqlODBC) Setup dialog box opens.
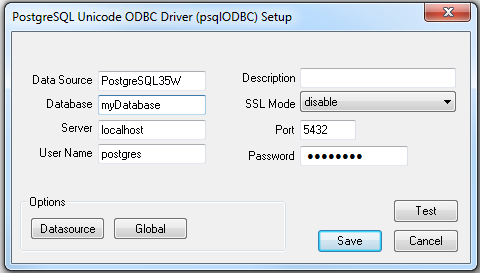
Complete the data source information fields:
| Data Source | The data source name (DSN). Media Server uses this string to connect to the database server. |
| Database | The name of the database that you created in Step 2. |
| Server | The IP address or hostname of the server that the database server is installed on. |
| User Name | The user name to connect to the database server with. |
| Description | An optional description for the data source. |
| SSL Mode | |
| Port | The port to use to communicate with the database server. |
| Password | The password for the user account that connects to the database server. |
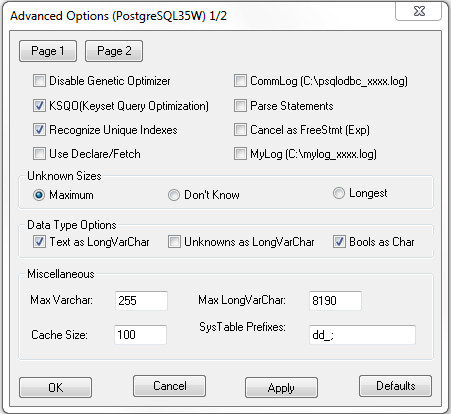
The Advanced Options (driverName) 1/2 dialog box opens.
The Advanced Options (driverName) 2/2 dialog box opens.
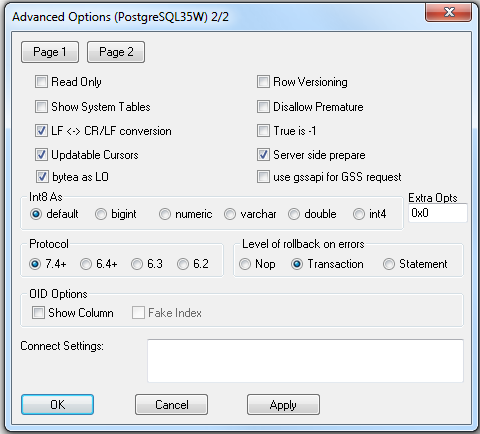
Click Apply and then OK.
The Advanced Options (driverName) 2/2 dialog box closes.
In the PostgreSQL Unicode ODBC Driver (psqlODBC) Setup dialog box, click Test to test the connection.
The Connection Test box opens containing a message describing whether the connection was successful. If the connection failed, use the information in the message to resolve any issues.
Click OK to close the Connection Test box.
In the PostgreSQL Unicode ODBC Driver (psqlODBC) Setup dialog box, click Save to close the dialog box.
In the ODBC Data Source Administrator dialog box, click OK to close the dialog box.


