- Настройка среды разработки в Windows для Rust Set up your dev environment on Windows for Rust
- Установка Visual Studio (рекомендуется) или Microsoft C++ Build Tools Install Visual Studio (recommended) or the Microsoft C++ Build Tools
- Установка Rust Install Rust
- Установка Visual Studio Code Install Visual Studio Code
- Здравствуй, мир! Hello, world! Руководство (использование Rust с VS Code) tutorial (Rust with VS Code)
- Rust для Windows Rust for Windows
Настройка среды разработки в Windows для Rust Set up your dev environment on Windows for Rust
В разделе Общие сведения о разработке в Windows с помощью Rust мы ознакомили вас с языком Rust и рассказали, что это такое и из чего состоит. In the Overview of developing on Windows with Rust topic, we introduced Rust and talked about what it is and what some of its main moving parts are. В этом разделе мы настроим среду разработки. In this topic, we’ll set up our development environment.
Рекомендуется выполнять разработку Rust в среде Windows. We recommend that you do your Rust development on Windows. Однако если вы планируете локальную компиляцию и тестирование в Linux, разработку можно также выполнять с помощью Rust в подсистеме Windows для Linux (WSL). However, if you plan to locally compile and test on Linux, then developing with Rust on the Windows Subsystem for Linux (WSL) is also an option.
Установка Visual Studio (рекомендуется) или Microsoft C++ Build Tools Install Visual Studio (recommended) or the Microsoft C++ Build Tools
В Windows для Rust требуются определенные инструменты сборки C++. On Windows, Rust requires certain C++ build tools.
Можно скачать Microsoft C++ Build Tools или просто установить Microsoft Visual Studio (рекомендуется). You can either download the Microsoft C++ Build Tools, or (recommended) you might prefer just to install Microsoft Visual Studio.
В качестве интегрированной среды разработки (IDE) для Rust мы будем использовать Visual Studio Code, а не Visual Studio. We’ll be using Visual Studio Code as our integrated development environment (IDE) for Rust, and not Visual Studio. Но вы по-прежнему можете установить Visual Studio. But you can still install Visual Studio without expense. Доступен выпуск Community Edition — он предоставляется бесплатно для учащихся, участников проектов с открытым кодом и отдельных пользователей. A Community edition is available—it’s free for students, open-source contributors, and individuals.
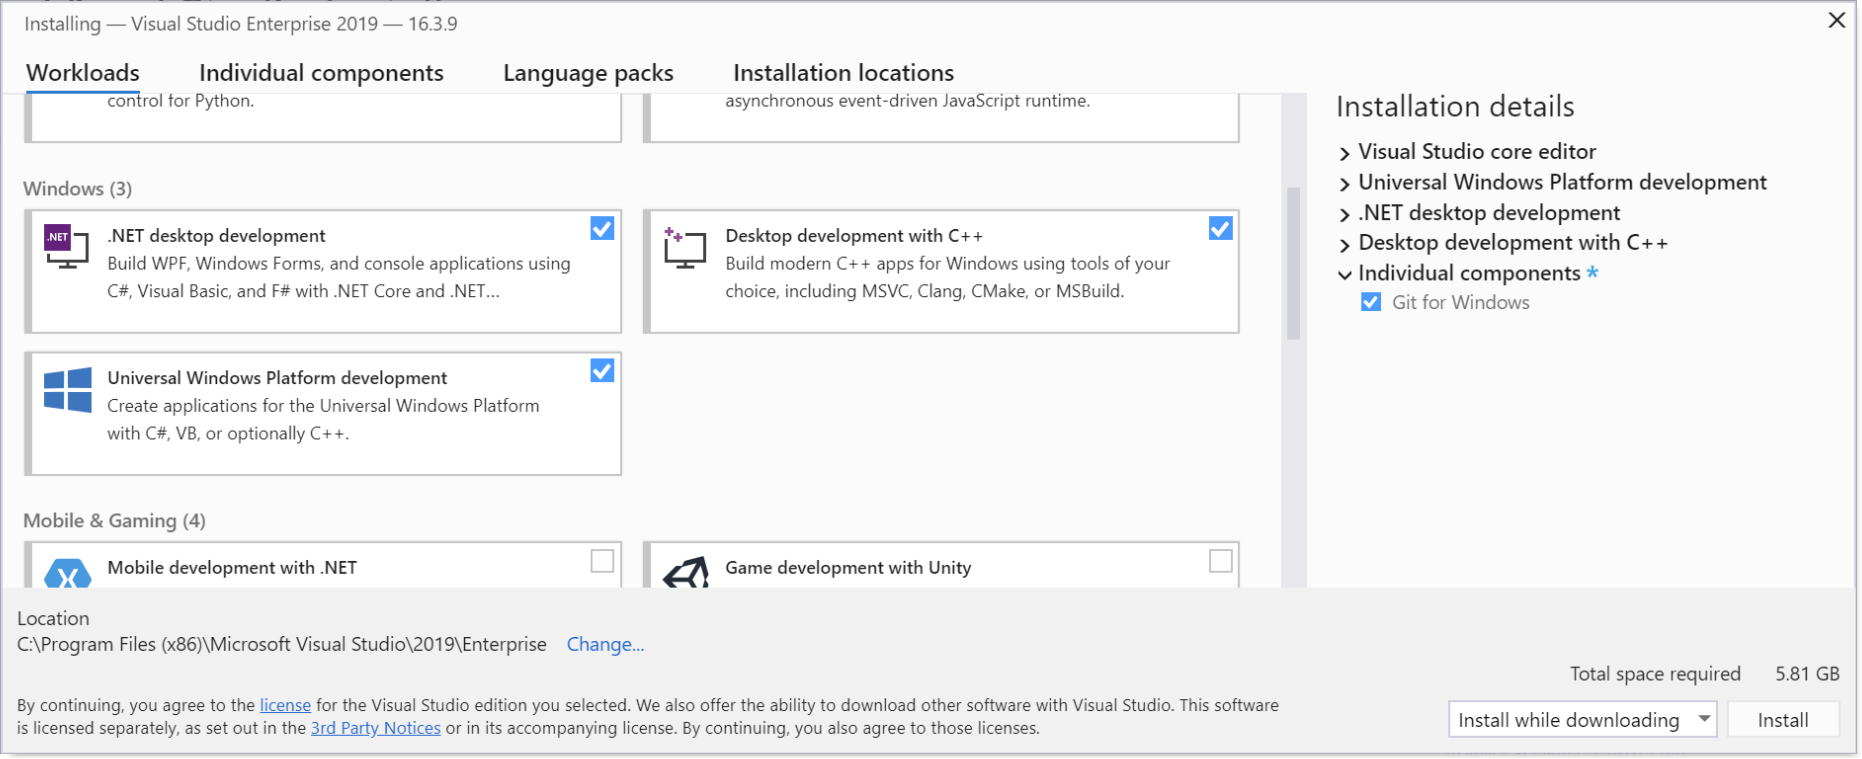
При установке Visual Studio мы рекомендуем выбрать несколько рабочих нагрузок Windows: —разработку классических приложений .NET, разработку классических приложений C++ и разработку для универсальной платформы Windows. While installing Visual Studio, there are several Windows workloads that we recommend you select—.NET desktop development, Desktop development with C++, and Universal Windows Platform development. Возможно, вы не думаете, что вам потребуются все три, но вполне вероятно, что в будущем некоторые зависимости окажутся необходимы, так что будет проще выбрать все три рабочие нагрузки. You might not think that you’ll need all three, but it’s likely enough that some dependency will arise where they’re required that we feel it’s just simpler to select all three.
Для новых проектов Rust по умолчанию используется Git. New Rust projects default to using Git. Поэтому также добавьте в набор отдельный компонент Git для Windows (используйте поле поиска, чтобы найти его по имени). So also add the individual component Git for Windows to the mix (use the search box to search for it by name).
Установка Rust Install Rust
Теперь установите Rust с веб-сайта Rust. Next, install Rust from the Rust website. Веб-сайт обнаружит, что вы используете Windows, и предложит вам 64- 32-разрядные установщики инструмента rustup для Windows, а также инструкции по установке Rust в подсистеме Windows для Linux (WSL). The website detects that you’re running Windows, and it offers you 64- and 32-bit installers of the rustup tool for Windows, as well as instructions on installing Rust to the Windows Subsystem for Linux (WSL).
Rust очень хорошо работает в Windows. Поэтому нет необходимости использовать WSL (если вы не планируете локальную компиляцию и тестирование в Linux). Rust works very well on Windows; so there’s no need for you to go the WSL route (unless you plan to locally compile and test on Linux). Так как у вас Windows, рекомендуется просто запустить установщик rustup для 64-разрядной версии Windows. Since you have Windows, we recommend that you just run the rustup installer for 64-bit Windows. Затем все будет настроено для записи приложений для Windows с помощью Rust. You’ll then be all set to write apps for Windows using Rust.
После завершения работы установщика Rust все будет готово к программированию с помощью Rust. When the Rust installer is finished, you’ll be ready to program with Rust. У вас еще не будет удобной интегрированной среды разработки (это будет рассмотрено в следующем разделе, —Установка Visual Studio Code). You won’t have a convenient IDE yet (we’ll cover that in the next section—Install Visual Studio Code). И вы еще не настроили среду для вызова интерфейсов API Windows. And you’re not yet set up to call Windows APIs. Но вы можете запустить командную строку (x64 Native Tools Command Prompt for VS или любой сеанс cmd.exe ) и, возможно, выполнить команду cargo —version . But you could launch a command prompt (the x64 Native Tools Command Prompt for VS, or any cmd.exe ), and perhaps issue the command cargo —version . Если отобразился номер версии, это подтверждает, что Rust установлен правильно. If you see a version number printed, then that confirms that Rust installed correctly.
Если вы хотите узнать, что за ключевое слово cargo мы использовали выше, то Cargo — это название инструмента в среде разработки Rust, который управляет проектами (а точнее, пакетами) и их зависимостями. If you’re curious about the use of the cargo keyword above, Cargo is the name of the tool in the Rust development environment that manages and builds your projects (more properly, packages) and their dependencies.
Если вы действительно хотите углубиться в программирование на этом этапе (даже без удобства интегрированной среды разработки), то можете прочитать раздел Hello, World! And if you really do want to dive in to some programming at this point (even without the convenience of an IDE), then you could read the Hello, World! книги по языку программирования Rust на веб-сайте Rust. chapter of the The Rust Programming Language book on the Rust website.
Установка Visual Studio Code Install Visual Studio Code
Применяя Visual Studio Code (VS Code) в качестве текстового редактора или интегрированной среды разработки (IDE), можно использовать преимущества языковых служб, такие как завершение кода, выделение синтаксиса, форматирование и отладка. By using Visual Studio Code (VS Code) as your text editor/integrated development environment (IDE), you can take advantage of language services such as code completion, syntax highlighting, formatting, and debugging.
VS Code также содержит встроенный терминал, позволяющий вводить аргументы командной строки (например, вводить команды для Cargo). VS Code also contains a built-in terminal that enables you to issue command-line arguments (to issue commands to Cargo, for example).
Сначала скачайте и установите Visual Studio Code для Windows. First, download and install Visual Studio Code for Windows.
После VS Code установите расширение rust-analyzer. After you’ve installed VS Code, install the rust-analyzer extension. Можно либо установить расширение rust-analyzer из Visual Studio Marketplace, либо открыть VS Code и выполнить поиск rust-analyzer в меню расширений (CTRL+SHIFT+X). You can either install the rust-analyzer extension from the Visual Studio Marketplace, or you can open VS Code, and search for rust-analyzer in the extensions menu (Ctrl+Shift+X).
Для поддержки отладки установите расширение CodeLLDB. For debugging support, install the CodeLLDB extension. Можно либо установить расширение CodeLLDB из Visual Studio Marketplace, либо открыть VS Code и выполнить поиск CodeLLDB в меню расширений (CTRL+SHIFT+X). You can either install the CodeLLDB extension from the Visual Studio Marketplace, or you can open VS Code, and search for CodeLLDB in the extensions menu (Ctrl+Shift+X).
В качестве альтернативы расширению CodeLLDB для поддержки отладки можно использовать расширение Microsoft C/C++ . An alternative to the CodeLLDB extension for debugging support is the Microsoft C/C++ extenson. Расширение C/C++ не интегрируется с интегрированной средой разработки, как CodeLLDB. The C/C++ extension doesn’t integrate as well with the IDE as CodeLLDB does. Но расширение C/C++ предоставляет более подробную отладочную информацию. But the C/C++ extension provides superior debugging information. Поэтому его стоит иметь под рукой на всякий случай. So you might want to have that standing by in case you need it.
Можно либо установить расширение C/C++ из Visual Studio Marketplace, либо открыть VS Code и выполнить поиск C/C++ в меню расширений (CTRL+SHIFT+X). You can either install the C/C++ extension from the Visual Studio Marketplace, or you can open VS Code, and search for C/C++ in the extensions menu (Ctrl+Shift+X).
Чтобы открыть терминал в VS Code, выберите Вид > Терминал или нажмите клавиши CTRL+` (символ обратного апострофа). If you want to open the terminal in VS Code, select View > Terminal, or alternatively use the shortcut Ctrl+` (using the backtick character). Терминалом по умолчанию является PowerShell. The default terminal is PowerShell.
Здравствуй, мир! Hello, world! Руководство (использование Rust с VS Code) tutorial (Rust with VS Code)
Давайте испытаем Rust с помощью простого приложения «Hello, World!» Let’s take Rust for a spin with a simple «Hello, world!» . app.
Сначала запустите командную строку (x64 Native Tools Command Prompt for VS или любой сеанс cmd.exe ) и перейдите ( cd ) в папку, в которой буду храниться проекты Rust. First, launch a command prompt (the x64 Native Tools Command Prompt for VS, or any cmd.exe ), and cd to a folder where you want to keep your Rust projects.
Затем укажите Cargo создать проект Rust с помощью следующей команды. Then ask Cargo to create a new Rust project for you with the following command.
Аргументом, который вы передаете в команду cargo new , является имя проекта, который необходимо создать. The argument you pass to the cargo new command is the name of the project that you want Cargo to create. В нашем случае это first_rust_project. Here, the project name is first_rust_project. Рекомендуется именовать проекты Rust в «змеином регистре» (все слова состоят из строчных букв, а пробелы заменены символами подчеркивания). The recommendation is that you name your Rust projects using snake case (where words are lower-case, with each space replaced by an underscore).
Cargo создаст проект с указанным именем. Cargo creates a project for you with the name that you supply. Фактически новый проект Cargo содержит исходный код для очень простого приложения, которое выводит сообщение Hello, World! , And in fact Cargo’s new projects contain the source code for a very simple app that outputs a Hello, world! как мы скоро убедимся. message, as we’ll see. Помимо проекта first_rust_project инструмент Cargo создал папку first_rust_project и разместил в ней файлы исходного кода проекта. In addition to creating the first_rust_project project, Cargo has created a folder named first_rust_project, and has put the project’s source code files in there.
Теперь с помощью команды cd перейдите в эту папку, а затем запустите VS Code из нее. So now cd into that folder, and then launch VS Code from within the context of that folder.
В обозревателе VS Code откройте файл src > main.rs . Это файл исходного кода Rust, содержащий точку входа приложения (функцию main). In VS Code’s Explorer, open the src > main.rs file, which is the Rust source code file that contains your app’s entry point (a function named main). Вот как это будет выглядеть. Here’s what it looks like.
Когда вы откроете первый файл .rs в VS Code, то увидите уведомление о том, что некоторые компоненты Rust не установлены, и запрос, нужно ли их установить. When you open the first .rs file in VS Code, you’ll get a notification saying that some Rust components aren’t installed, and asking whether you want to install them. Нажмите кнопку Да, и VS Code установит языковой сервер Rust. Click Yes, and VS Code will install the Rust language server.
Взглянув на код в main.rs , можно сразу же сказать, что main — это определение функции, и что код выводит строку «Hello, World!» You can tell from glancing at the code in main.rs that main is a function definition, and that it prints the string «Hello, world!». Дополнительные сведения о синтаксисе см. в разделе Anatomy of a Rust Program (Структура программы Rust) на веб-сайте Rust. For more details about the syntax, see Anatomy of a Rust Program on the Rust website.
Теперь давайте попробуем запустить приложение в отладчике. Now let’s try running the app under the debugger. Установите точку останова на строке 2 и щелкните Выполнить > Запустить отладку (или нажмите клавишу F5). Put a breakpoint on line 2, and click Run > Start Debugging (or press F5). Доступны также команды Debug и Run, встроенные в текстовый редактор. There are also Debug and Run commands embedded inside the text editor.
При первом запуске приложения в отладчике отображается диалоговое окно «Cannot start debugging because no launch configuration has been provided» (Не удается начать отладку, так как конфигурация запуска не указана). When you run an app under the debugger for the first time, you’ll see a dialog box saying «Cannot start debugging because no launch configuration has been provided». Нажмите кнопку ОК, чтобы отобразить второе диалоговое окно с сообщением «Cargo.toml has been detected in this workspace. Click OK to see a second dialog box saying «Cargo.toml has been detected in this workspace. Would you like to generate launch configurations for its targets?» (В этой рабочей области обнаружен файл Cargo.toml. Вы хотите создать конфигурации запуска для его целевых объектов?) Would you like to generate launch configurations for its targets?». Нажмите кнопку Да. Click Yes. Затем закройте файл launch.json и начните отладку снова. Then close the launch.json file and begin debugging again.
Как видите, отладчик останавливается на строке 2. As you can see, the debugger breaks at line 2. Нажмите клавишу F5, чтобы продолжить, и приложение продолжит выполнение до завершения. Press F5 to continue, and the app runs to completion. В области Терминал вы увидите ожидаемые выходные данные: «Hello, World!» In the Terminal pane, you’ll see the expected output «Hello, world!».
Rust для Windows Rust for Windows
Вы можете не только использовать Rust в Windows, но и создавать приложения для Windows с помощью Rust. Not only can you use Rust on Windows, you can also write apps for Windows using Rust. С помощью крейта windows вы можете вызывать любые предыдущие, текущие и будущие интерфейсы API Windows. Via the windows crate, you can call any Windows API past, present, and future. Дополнительные сведения об этом, а также примеры кода см. в разделе Rust для Windows и крейт windows. There are more details about that, and code examples, in the Rust for Windows, and the windows crate topic.


