- Secure Shell (SSH)
- Using the Windows 10 OpenSSH client
- Using PuTTY
- Download an SSH client
- Connect to your device
- Update account password
- Configure your Windows IoT Core device
- Commonly used utilities
- Конфигурация сервера OpenSSH для Windows 10 версии 1809 и Windows Server 2019 OpenSSH Server Configuration for Windows 10 1809 and Server 2019
- Настройка стандартной оболочки OpenSSH для Windows Configuring the default shell for OpenSSH in Windows
- Конфигурация Windows в файле sshd_config Windows Configurations in sshd_config
- AllowGroups, AllowUsers, DenyGroups, DenyUsers AllowGroups, AllowUsers, DenyGroups, DenyUsers
- AuthenticationMethods AuthenticationMethods
- AuthorizedKeysFile AuthorizedKeysFile
- ChrootDirectory (добавлена поддержка в версии 7.7.0.0) ChrootDirectory (Support added in v7.7.0.0)
- HostKey HostKey
- Сопоставление Match
- PermitRootLogin PermitRootLogin
- SyslogFacility SyslogFacility
- Не поддерживается Not supported
Secure Shell (SSH)
Secure Shell (SSH) allows you to remotely administer and configure your Windows IoT Core device
Using the Windows 10 OpenSSH client
The Windows OpenSSH client requires that your SSH client host OS is Windows 10 version 1803(17134). Also, the Windows 10 IoT Core device must be running RS5 Windows Insider Preview release 17723 or greater.
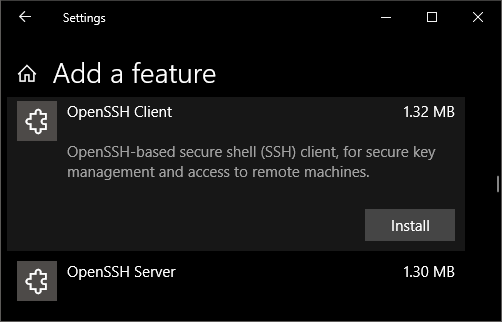
The OpenSSH Client was added to Windows 10 in 1803 (build 17134) as an optional feature. To install the client, you can search for Manage Optional Features in Windows 10 settings. If the OpenSSH Client is not listed in the list of installed features, then choose Add a feature.

Next select OpenSSH Client in the list and click Install.
To login with a username and password use the following command:
Where host is either the IP address of the Windows IoT Core device or the device name.
The first time you connect you see a message like the following:
Type yes and press enter.
If you need to login as DefaultAccount rather than as administrator, you will need to generate a key and use the key to login. From the desktop that you intend to connect to your IoT Device from, open a PowerShell window and change to your personal data folder (e.g cd
Register the key with ssh-agent (optional, for single sign-on experience). Note that ssh-add must be performed from a folder that is ACL’d to you as the signed-in user (Builtin\Administrators and the NT_AUTHORITY\System user are also ok). By default cd
from PowerShell should be sufficient as shown below.
If you receive a message that the ssh-agent service is disabled you can enable it with sc.exe config ssh-agent start=auto
To enable single sign, append the public key to the Windows IoT Core device authorized_keys file. Or if you only have one key you copy the public key file to the remote authorized_keys file.
If the key is not registered with ssh-agent, it must be specified on the command line to login:
If the private key is registered with ssh-agent, then you only need to specify DefaultAccount@host:
The first time you connect you see a message like the following:
Type yes and press enter.
You should now be connected as DefaultAccount
To use single sign-on with the administrator account, append your public key to c:\data\ProgramData\ssh\administrators_authorized_keys on the Windows IoT Core device.
You will also need to set the ACL for administrators_authorized_keys to match the ACL of ssh_host_dsa_key in the same directory.
To set the ACL using PowerShell
If you see a REMOTE HOST IDENTIFICATION CHANGED message after making changes to the Windows 10 IoT Core device, then edit C:\Users .ssh\known_hosts and remove the host that has changed.
Using PuTTY
Download an SSH client
In order to connect to your device using SSH, you’ll first need to download an SSH client, such as PuTTY.
Connect to your device
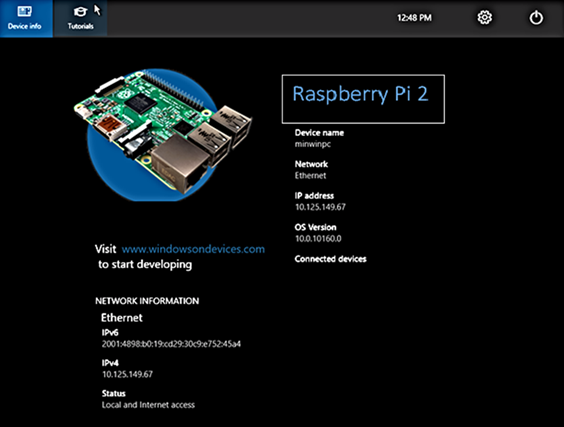
In order to connect to your device, you need to first get the IP address of the device. After booting your Windows IoT Core device, an IP address will be shown on the screen attached to the device:
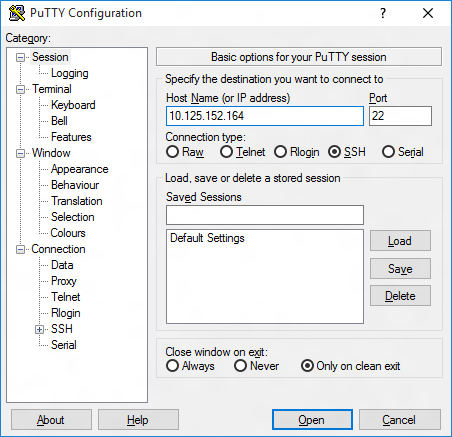
Now launch PuTTY and enter the IP address in the Host Name text box and make sure the SSH radio button is selected. Then click Open .
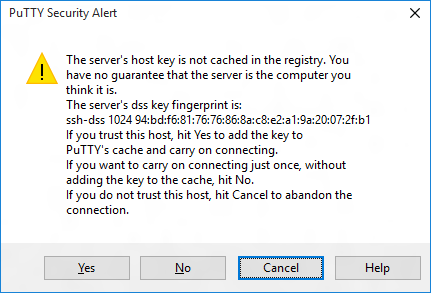
If you’re connecting to your device for the first time from your computer, you may see the following security alert. Just click Yes to continue.
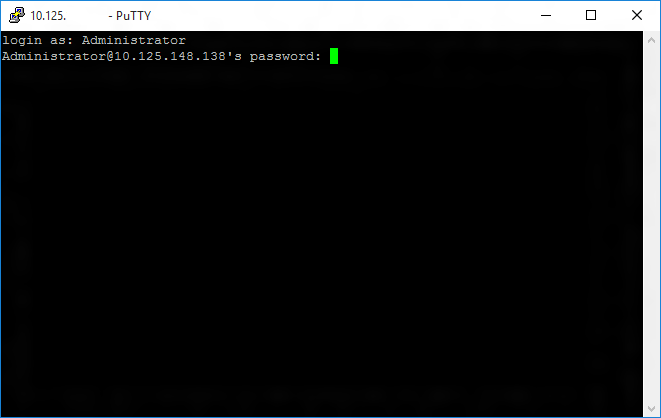
If the connection was successful, you should see login as: on the screen, prompting you to login.
Enter Administrator and press enter. Then enter the default password p@ssw0rd as the password and press enter.
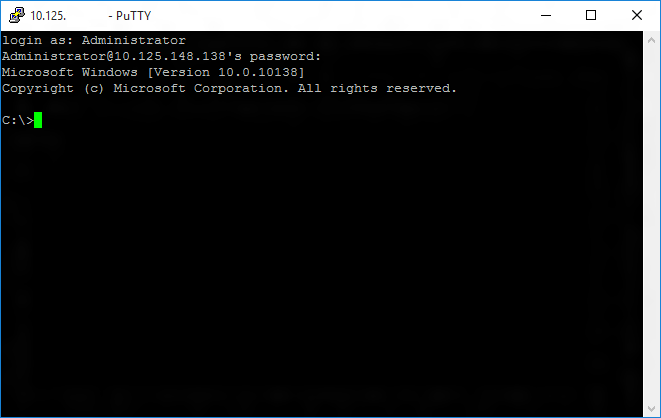
If you were able to login successfully, you should see something like this:
Update account password
It is highly recommended that you update the default password for the Administrator account.
To do this, enter the following command in the PuTTY console, replacing [new password] with a strong password:
Configure your Windows IoT Core device
To be able to deploy applications from Visual Studio 2017, you will need to make sure the Visual Studio Remote Debugger is running on your Windows IoT Core device. The remote debugger should launch automatically at machine boot time. To double check, use the tlist command to list all the running processes from PowerShell. There should be two instances of msvsmon.exe running on the device.
It is possible for the Visual Studio Remote Debugger to time out after long periods of inactivity. If Visual Studio cannot connect to your Windows IoT Core device, try rebooting the device.
If you want, you can also rename your device. To change the ‘computer name’, use the setcomputername utility:
You will need to reboot the device for the change to take effect. You can use the shutdown command as follows:
Commonly used utilities
See the Command Line Utils page for a list of commands and utilities you can use with SSH.
Конфигурация сервера OpenSSH для Windows 10 версии 1809 и Windows Server 2019 OpenSSH Server Configuration for Windows 10 1809 and Server 2019
В этой статье описывается настройка сервера OpenSSH (sshd) для ОС Windows. This topic covers the Windows-specific configuration for OpenSSH Server (sshd).
Для OpenSSH предоставляется подробная документация по параметрам конфигурации на веб-сайте OpenSSH.com, и мы не намерены дублировать ее в этом пакете документации. OpenSSH maintains detailed documentation for configuration options online at OpenSSH.com, which is not duplicated in this documentation set.
Настройка стандартной оболочки OpenSSH для Windows Configuring the default shell for OpenSSH in Windows
Стандартная оболочка командной строки предоставляет пользователю интерфейс, который он увидит при подключении к серверу по протоколу SSH. The default command shell provides the experience a user sees when connecting to the server using SSH. По умолчанию в среде Windows изначально используется командная оболочка Windows (cmd.exe). The initial default Windows is the Windows Command shell (cmd.exe). Кроме того, Windows включает PowerShell и Bash, и вы можете настроить в качестве оболочки по умолчанию для сервера любую из оболочек командной строки сторонних производителей, которые предоставляются для Windows. Windows also includes PowerShell and Bash, and third party command shells are also available for Windows and may be configured as the default shell for a server.
Чтобы задать командную оболочку по умолчанию, для начала убедитесь, что папка установки OpenSSH находится в системном пути. To set the default command shell, first confirm that the OpenSSH installation folder is on the system path. В среде Windows по умолчанию она устанавливается в папку SystemDrive:WindowsDirectory\System32\openssh. For Windows, the default installation folder is SystemDrive:WindowsDirectory\System32\openssh. Следующие команды позволяют узнать текущее значение пути (переменную среды path) и добавить к нему стандартную папку установки OpenSSH. The following commands shows the current path setting, and add the default OpenSSH installation folder to it.
| Командная оболочка Command shell | Используемая команда Command to use |
|---|---|
| Команда Command | путь path |
| PowerShell PowerShell | $env:path $env:path |
Настройка оболочки SSH по умолчанию выполняется в реестре Windows, где вам нужно добавить полный путь к исполняемому файлу оболочки в строковое значение DefaultShell в разделе Computer\HKEY_LOCAL_MACHINE\SOFTWARE\OpenSSH. Configuring the default ssh shell is done in the Windows registry by adding the full path to the shell executable to Computer\HKEY_LOCAL_MACHINE\SOFTWARE\OpenSSH in the string value DefaultShell.
Например, следующая команда PowerShell устанавливает PowerShell.exe в качестве оболочки по умолчанию: As an example, the following Powershell command sets the default shell to be PowerShell.exe:
Конфигурация Windows в файле sshd_config Windows Configurations in sshd_config
В среде Windows программа sshd по умолчанию считывает данные конфигурации из файла %programdata%\ssh\sshd_config, но вы можете указать другой файл конфигурации, запустив команду sshd.exe с параметром -f. In Windows, sshd reads configuration data from %programdata%\ssh\sshd_config by default, or a different configuration file may be specified by launching sshd.exe with the -f parameter. Если указанный файл отсутствует, sshd создаст новый файл с конфигурацией по умолчанию при запуске службы. If the file is absent, sshd generates one with the default configuration when the service is started.
Ниже перечислены элементы конфигурации специально для среды Windows, которые можно указать в sshd_config. The elements listed below provide Windows-specific configuration possible through entries in sshd_config. Существуют и другие параметры конфигурации, которые здесь не перечислены, так как они подробно описаны в документации по OpenSSH для Win32 в Интернете. There are other configuration settings possible in that are not listed here, as they are covered in detail in the online Win32 OpenSSH documentation.
AllowGroups, AllowUsers, DenyGroups, DenyUsers AllowGroups, AllowUsers, DenyGroups, DenyUsers
Управление тем, какие пользователи и группы могут подключаться к серверу, осуществляется с помощью директив AllowGroups, AllowUsers, DenyGroups и DenyUsers. Controlling which users and groups can connect to the server is done using the AllowGroups, AllowUsers, DenyGroups and DenyUsers directives. Директивы разрешения и запрета обрабатываются в следующем порядке: DenyUsers, AllowUsers, DenyGroups и наконец AllowGroups. The allow/deny directives are processed in the following order: DenyUsers, AllowUsers, DenyGroups, and finally AllowGroups. Все имена учетных записей должны быть указаны в нижнем регистре. All account names must be specified in lower case. Дополнительные сведения о шаблонах с подстановочными знаками вы найдете в разделе PATTERNS непосредственно в файле ssh_config. See PATTERNS in ssh_config for more information on patterns for wildcards.
При настройке правил для пользователей и (или) групп в домене используйте следующий формат: user?domain* . When configuring user/group based rules with a domain user or group, use the following format: user?domain* . Windows поддерживает несколько форматов для указания субъектов домена, но многие из них конфликтуют со стандартными шаблонами в Linux. Windows allows multiple of formats for specifying domain principals, but many conflict with standard Linux patterns. По этой причине добавлен символ *, чтобы поддерживать полные доменные имена. For that reason, * is added to cover FQDNs. Кроме того, этот подход использует «?» вместо «@», чтобы избежать конфликтов с форматом username@host. Also, this approach uses «?», instead of @, to avoid conflicts with the username@host format.
Пользователи и группы, входящие в рабочие группы, а также подключенные к Интернету учетные записи всегда разрешаются в имена локальных учетных записей (без сегмента домена, примерно как стандартные имена в UNIX). Work group users/groups and internet-connected accounts are always resolved to their local account name (no domain part, similar to standard Unix names). Пользователи и группы домена строго разрешаются в формат NameSamCompatible, то есть «короткое_имя_домена\имя_пользователя». Domain users and groups are strictly resolved to NameSamCompatible format — domain_short_name\user_name. Все правила конфигурации для пользователей и групп должны соответствовать этому формату. All user/group based configuration rules need to adhere to this format.
Примеры для пользователей и групп домена Examples for domain users and groups
Примеры для локальных пользователей и групп Examples for local users and groups
AuthenticationMethods AuthenticationMethods
Для OpenSSH в Windows поддерживаются только методы проверки подлинности «password» и «publickey». For Windows OpenSSH, the only available authentication methods are «password» and «publickey».
AuthorizedKeysFile AuthorizedKeysFile
По умолчанию используется значение .ssh/authorized_keys .ssh/authorized_keys2. The default is «.ssh/authorized_keys .ssh/authorized_keys2». Если путь не является абсолютным, он вычисляется относительно основного каталога пользователя (или пути к образу профиля). If the path is not absolute, it is taken relative to user’s home directory (or profile image path). Например: Ex. c:\users\user. c:\users\user. Обратите внимание, что если пользователь входит в группу администраторов, используется %programdata%/ssh/administrators_authorized_keys. Note that if the user belongs to the administrator group, %programdata%/ssh/administrators_authorized_keys is used instead.
ChrootDirectory (добавлена поддержка в версии 7.7.0.0) ChrootDirectory (Support added in v7.7.0.0)
Эта директива поддерживается только для сеансов SFTP. This directive is only supported with sftp sessions. Удаленный сеанс подключения к cmd.exe не учитывает ее. A remote session into cmd.exe wouldn’t honor this. Чтобы настроить сервер chroot только для SFTP, укажите параметр ForceCommand со значением internal-sftp. To setup a sftp-only chroot server, set ForceCommand to internal-sftp. Вы также можете настроить SCP с поддержкой chroot, реализовав пользовательскую оболочку, которая допускает только SCP и SFTP. You may also set up scp with chroot, by implementing a custom shell that would only allow scp and sftp.
HostKey HostKey
По умолчанию используются значения %programdata%/ssh/ssh_host_ecdsa_key, %programdata%/ssh/ssh_host_ed25519_key, %programdata%/ssh/ssh_host_dsa_key и %programdata%/ssh/ssh_host_rsa_key. The defaults are %programdata%/ssh/ssh_host_ecdsa_key, %programdata%/ssh/ssh_host_ed25519_key, %programdata%/ssh/ssh_host_dsa_key, and %programdata%/ssh/ssh_host_rsa_key. Если эти файлы отсутствуют, sshd автоматически создает их при запуске службы. If the defaults are not present, sshd automatically generates these on a service start.
Сопоставление Match
Обратите внимание на правила шаблона в этом разделе. Note that pattern rules in this section. Имена пользователей и групп должны быть в нижнем регистре. User and group names should be in lower case.
PermitRootLogin PermitRootLogin
Неприменимо в ОС Windows. Not applicable in Windows. Чтобы предотвратить вход администратора, примените для группы Administrators директиву DenyGroups. To prevent administrator login, use Administrators with DenyGroups directive.
SyslogFacility SyslogFacility
Если вам требуется ведение журнала в файле, используйте LOCAL0. If you need file based logging, use LOCAL0. Журналы создаются в папке %programdata%\ssh\logs. Logs are generated under %programdata%\ssh\logs. Любое другое значение, включая используемое по умолчанию AUTH, направляет журналы в ETW. For any other value, including the default value, AUTH directs logging to ETW. Дополнительные сведения см. в статье о возможностях по ведению журнала в Windows. For more info, see Logging Facilities in Windows.
Не поддерживается Not supported
Следующие параметры конфигурации недоступны в версии OpenSSH, которая поставляется в составе Windows Server 2019 и Windows 10 версии 1809: The following configuration options are not available in the OpenSSH version that ships in Windows Server 2019 and Windows 10 1809:
- AcceptEnv AcceptEnv
- AllowStreamLocalForwarding AllowStreamLocalForwarding
- AuthorizedKeysCommand AuthorizedKeysCommand
- AuthorizedKeysCommandUser AuthorizedKeysCommandUser
- AuthorizedPrincipalsCommand AuthorizedPrincipalsCommand
- AuthorizedPrincipalsCommandUser AuthorizedPrincipalsCommandUser
- сжатие; Compression
- ExposeAuthInfo ExposeAuthInfo
- GSSAPIAuthentication GSSAPIAuthentication
- GSSAPICleanupCredentials GSSAPICleanupCredentials
- GSSAPIStrictAcceptorCheck GSSAPIStrictAcceptorCheck
- HostbasedAcceptedKeyTypes HostbasedAcceptedKeyTypes
- HostbasedAuthentication HostbasedAuthentication
- HostbasedUsesNameFromPacketOnly HostbasedUsesNameFromPacketOnly
- IgnoreRhosts IgnoreRhosts
- IgnoreUserKnownHosts IgnoreUserKnownHosts
- KbdInteractiveAuthentication KbdInteractiveAuthentication
- KerberosAuthentication KerberosAuthentication
- KerberosGetAFSToken KerberosGetAFSToken
- KerberosOrLocalPasswd KerberosOrLocalPasswd
- KerberosTicketCleanup KerberosTicketCleanup
- PermitTunnel PermitTunnel
- PermitUserEnvironment PermitUserEnvironment
- PermitUserRC PermitUserRC
- PidFile PidFile
- PrintLastLog PrintLastLog
- RDomain RDomain
- StreamLocalBindMask StreamLocalBindMask
- StreamLocalBindUnlink StreamLocalBindUnlink
- StrictModes StrictModes
- X11DisplayOffset X11DisplayOffset
- X11Forwarding X11Forwarding
- X11UseLocalhost X11UseLocalhost
- XAuthLocation XAuthLocation
—>


