- Virus & threat protection in Windows Security
- Run the scans you want
- Manage your Virus & threat protection settings
- Manage your real-time protection
- Get access to cloud-delivered protection
- Send us files with automatic sample submission
- Tamper Protection defends your security settings
- Protect files from unauthorized access
- Exclude items from virus scans
- Curate your notifications
- Protect your device with the latest updates
- Stay protected with Windows Security
- Important security info
- Understand and customize Windows Security features
- Status icons indicate your level of safety:
- Run a malware scan manually
- Run a quick scan in Windows Security
- Run an advanced scan in Windows Security
- Schedule your own scan
- Schedule a scan
- Turn Microsoft Defender Antivirus real-time protection on or off
- Turn real-time protection off temporarily
- Virus scanning recommendations for Enterprise computers that are running currently supported versions of Windows
- Applies to:
- Introduction
- More information
- For computers that are running Windows 7 and later versions of Windows
- Turn off scanning of Windows Update or Automatic Update related files
- Turn off scanning of Windows Security files
- Turn off scanning of Group Policy-related files
- Turn off scanning of user profile files
- Running antivirus software on domain controllers
- Turn off scanning of Active Directory and Active Directory-related files
- Turn off scanning of SYSVOL files
Virus & threat protection in Windows Security
If you’re running Windows 10 in S mode, some of the features of the Windows Security interface will be a little different. Windows 10 in S mode is streamlined for tighter security, so the Virus & threat protection area has fewer options than those described here. This is because the built-in security of Windows 10 in S mode automatically prevents viruses and other threats from running on your device. Additionally, devices running Windows 10 in S mode receive security updates automatically.
In previous versions of Windows 10, Windows Security is called Windows Defender Security Center.
Virus & threat protection in Windows Security helps you scan for threats on your device. You can also run different types of scans, see the results of your previous virus and threat scans, and get the latest protection offered by Microsoft Defender Antivirus.
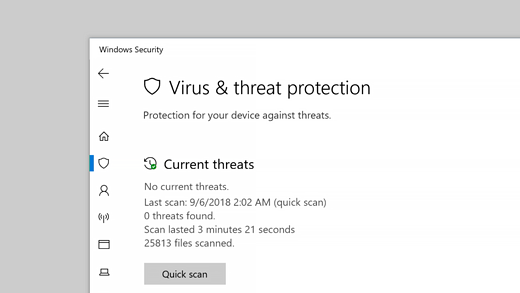
The Current threats area lets you:
See any threats currently on your device.
See the last time a scan was run on your device, how long it took, and how many files were scanned.
Start a new scan.
See threats that have been quarantined before they can affect you.
See anything identified as a threat that you have allowed to run on your device.
Note: If you are using third-party antivirus software, you’ll be able to use its virus and threat protection options here.
Run the scans you want
Even though Windows Security is turned on and scans your device automatically, you can perform an additional scan whenever you want.
Quick scan. Concerned that you may have done something to introduce a suspicious file or virus to your device? Select Quick scan (called Scan now in previous versions of Windows 10) to immediately check your device for any recent threats. This option is useful when you don’t want to spend the time running a full scan on all your files and folders. If Windows Security recommends that you run one of the other types of scans, you’ll be notified when the Quick scan is done.
Scan options .Select this link (called Run a new advanced scan in previous versions of Windows 10) to choose from one of the following advanced scan options:
Full scan. Scans every file or program that’s currently running on your device to make sure there’s nothing dangerous in progress.
Custom scan. Scans only files and folders that you select.
Microsoft Defender Offline scan. Uses the latest definitions to scan your device for the latest threats. Run it when you are concerned that your device has been exposed to malware or a virus, or if you want to scan your device without being connected to the Internet. This will restart your device, so be sure to save files you may have open.
Manage your Virus & threat protection settings
Use Virus & threat protection settings when you want to customize your level of protection, send sample files to Microsoft, exclude trusted files and folders from repeated scanning, or temporarily turn off your protection.
Manage your real-time protection
Want to stop running real-time protection for a short while? You can use the Real-time protection setting to turn it off temporarily; however, real-time protection will turn back on automatically after a short while to resume protecting your device. While real-time protection is off, files you open or download won’t be scanned for threats.
Note: If the device you’re using is part of an organization, your system administrator may prevent you from turning off real-time protection.
Get access to cloud-delivered protection
Provide your device with access to the latest threat definitions and threat behavior detection in the cloud. This setting allows Microsoft Defender to get constantly updated improvements from Microsoft while you’re connected to the internet. This will result in more accurately identifying, stopping, and fixing, threats.
This setting is turned on by default.
Send us files with automatic sample submission
If you’re connected to the cloud with cloud-delivered protection, you can send suspicious sample files to Microsoft to check them for potential threats. Microsoft will notify you if you need to send additional files—and alert you if a requested file contains personal information.
Tamper Protection defends your security settings
Microsoft Defender Antivirus settings can occasionally get changed by malicious, or careless, apps or processes; or sometimes by unaware people. With Tamper Protection turned on, important settings like real-time protection, can’t be easily or accidentally turned off.
This setting is turned on, by default, for consumers.
Protect files from unauthorized access
Use the Controlled folder access setting to manage which folders untrusted apps can make changes to. You can also add additional apps to the trusted list so they can make changes in those folders. This is a powerful tool to make your files safer from ransomware.
When you turn on Controlled folder access, a lot of the folders you use most often will be protected by default. This means that content in any of these folders cannot be accessed or changed by any unknown or untrusted apps. If you add additional folders, they become protected as well.
Exclude items from virus scans
There may be times when you’ll want to exclude specific files, folders, file types, or processes from being scanned, such as if these are trusted items and you are certain you don’t need to take time to scan them. In those rare instances you can add an exclusion for them.
Curate your notifications
Windows Security will send notifications about the health and safety of your device. You can turn these notifications on, or off, on the notifications page. In Virus & threat protection, under Virus & threat protection settings, select Manage settings, scroll down to Notifications and select Change notification settings.
Protect your device with the latest updates
Security intelligence (sometimes referred to as «definitions») are files that contain information about the latest threats that could infect your device. Windows Security uses security intelligence every time a scan is run.
Microsoft automatically downloads the latest intelligence to your device as part of Windows Update, but you can also manually check for it. On the Virus & threat protection page, under Virus & threat protection updates, select Check for updates to scan for the latest security intelligence.
Stay protected with Windows Security
Windows 10 includes Windows Security, which provides the latest antivirus protection. Your device will be actively protected from the moment you start Windows 10. Windows Security continually scans for malware (malicious software), viruses, and security threats. In addition to this real-time protection, updates are downloaded automatically to help keep your device safe and protect it from threats.
Windows 10 in S mode
Some features will be a little different if you’re running Windows 10 in S mode. Because this mode is streamlined for tighter security, the Virus & threat protection area has fewer options. But don’t worry—the built-in security of this mode automatically prevents viruses and other threats from running on your device, and you’ll receive security updates automatically. For more info, see Windows 10 in S mode FAQ.
Important security info
Windows Security is built-in to Windows 10 and includes an antirvirus program called Microsoft Defender Antivirus. (In previous versions of Windows 10, Windows Security is called Windows Defender Security Center).
If you have another antivirus app installed and turned on, Microsoft Defender Antivirus will turn off automatically. If you uninstall the other app, Microsoft Defender Antivirus will turn back on automatically.
If you’re having problems receiving Windows Security updates, see Fix Windows Update errors and the Windows Update FAQ.
For info on how to uninstall an app, see Repair or remove an app in Windows 10.
To change your user account to an admin account, see Create a local user or administrator account in Windows 10.
Understand and customize Windows Security features
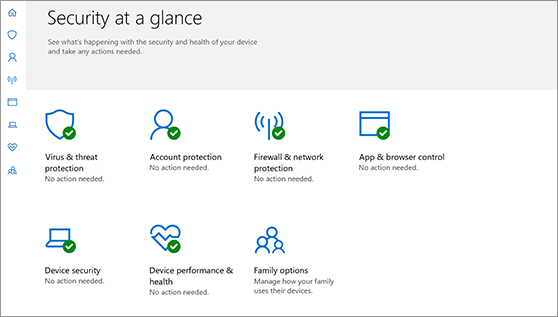
Windows Security is your home to manage the tools that protect your device and your data:
Virus & threat protection. Monitor threats to your device, run scans, and get updates to help detect the latest threats. (Some of these options are unavailable if you’re running Windows 10 in S mode.)
Account protection. Access sign-in options and account settings, including Windows Hello and dynamic lock.
Firewall & network protection. Manage firewall settings and monitor what’s happening with your networks and internet connections.
App & browser control. Update settings for Microsoft Defender SmartScreen to help protect your device against potentially dangerous apps, files, sites, and downloads. You’ll have exploit protection and you can customize protection settings for your devices.
Device security. Review built-in security options to help protect your device from attacks by malicious software.
Device performance & health. View status info about your device’s performance health, and keep your device clean and up to date with the latest version of Windows 10.
Family options. Keep track of your kids’ online activity and the devices in your household.
You can customize how your device is protected with these Windows Security features. To access them, select Start > Settings > Update & Security > Windows Security . Then select the feature you want to explore.
Open Windows Security settings
Status icons indicate your level of safety:
Green means your device is sufficiently protected and there aren’t any recommended actions.
Yellow means there is a safety recommendation for you.
Red is a warning that something needs your immediate attention.
Run a malware scan manually
When you’re concerned about risks to a specific file or folder, you can right-click the file or folder in File Explorer, then select Scan with Microsoft Defender.
If you suspect there’s malware or a virus on your device, you should immediately run a quick scan. This is much faster than running a full scan on all your files and folders.
Run a quick scan in Windows Security
Select Start > Settings > Update & Security > Windows Security and then Virus & threat protection.
Open Windows Security settings
Under Current threats, select Quick scan (or in previous versions of Windows 10, under Threat history, select Scan now).
If the scan doesn’t find any issues, but you’re still concerned, you may want to check your device more thoroughly.
Run an advanced scan in Windows Security
Select Start > Settings > Update & Security > Windows Security and then Virus & threat protection.
Under Current threats, select Scan options (or in previous versions of Windows 10, under Threat history, select Run a new advanced scan).
Select one of the scan options:
Full scan (check files and programs currently running on your device)
Custom scan (scan specific files or folders)
Microsoft Defender Offline scan (run this scan if your device has been, or could potentially be, infected by a virus or malware). Learn more about Microsoft Defender Offline
Select Scan now.
Note: Because of streamlined security, this process isn’t available if you’re running Windows 10 in S mode.
Schedule your own scan
Even though Windows Security is regularly scanning your device to keep it safe, you can also set when and how often the scans occur.
Schedule a scan
Select the Start button, type schedule tasks in the Search box, and in the list of results, select Task Scheduler.
In the left pane, select the arrow (>) next to Task Scheduler Library to expand it, do the same with Microsoft > Windows, and then scroll down and select the Windows Defender folder.
In the top-center pane, select Windows Defender Scheduled Scan. (Point to the choices to see the full names.)
In the Actions pane on the right, scroll down and then select Properties.
In the window that opens, select the Triggers tab, and then select New.
Set your preferred time and frequency, and then select OK.
Review the schedule and select OK.
Note: Because of streamlined security, this process isn’t available if you’re running Windows 10 in S mode.
Turn Microsoft Defender Antivirus real-time protection on or off
Sometimes you may need to briefly stop running real-time protection. While real-time protection is off, files you open or download won’t be scanned for threats. However, real-time protection will soon turn on automatically again to protect your device.
Turn real-time protection off temporarily
Select Start > Settings > Update & Security > Windows Security and then Virus & threat protection > Manage settings. (In previous versions of Windows 10, select Virus & threat protection > Virus & threat protection settings.)
Open Windows Security settings
Switch the Real-time protection setting to Off and choose Yes to verify.
Note: Because of streamlined security, this process isn’t available if you’re running Windows 10 in S mode.
Virus scanning recommendations for Enterprise computers that are running currently supported versions of Windows
Applies to:
Windows Server 2012, all editions
Windows Server 2012 R2, all editions
Windows Server 2016, all editions
Windows Server 2019, all editions
Windows 7, all editions
Windows 8.1, all editions
Windows 10, all editions
Introduction
This article contains recommendations that may help an administrator determine the cause of potential instability on a computer that is running a supported version of Microsoft Windows when it is used together with antivirus software in an Active Directory domain environment or in a managed business environment.
Note We recommend that you temporarily apply these settings to evaluate system behavior. If your system performance or stability is improved by the recommendations that are made in this article, contact your antivirus software vendor for instructions or for an updated version or settings of the antivirus software.
Important This article contains information that shows how to help lower security settings or how to temporarily turn off security features on a computer. You can make these changes to understand the nature of a specific problem. Before you make these changes, we recommend that you evaluate the risks that are associated with implementing this workaround in your particular environment. If you implement this workaround, take any appropriate additional steps to help protect the computer.
More information
For computers that are running Windows 7 and later versions of Windows
Warning This workaround may make a computer or a network more vulnerable to attack by malicious users or by malicious software such as viruses. We do not recommend this workaround but are providing this information so that you can implement this workaround at your own discretion. Use this workaround at your own risk.
Note Windows Defender automatically performs virus scanning for you, beginning in Windows Server 2016 (and Windows 10). See Configure Windows Defender Antivirus exclusions on Windows Server.
We are aware of the risk of excluding the specific files or folders that are mentioned in this article from scans that are made by your antivirus software. Your system will be safer if you do not exclude any files or folders from scans.
When you scan these files, performance and operating system reliability problems may occur because of file locking.
Do not exclude any one of these files based on the file name extension. For example, do not exclude all files that have a .dit extension. Microsoft has no control over other files that may use the same extensions as the files that are described in this article.
This article provides both file names and folders that can be excluded. All the files and folders that are described in this article are protected by default permissions to allow only SYSTEM and administrator access, and they contain only operating system components. Excluding an entire folder may be simpler but may not provide as much protection as excluding specific files based on file names.
Turn off scanning of Windows Update or Automatic Update related files
Turn off scanning of the Windows Update or Automatic Update database file (Datastore.edb). This file is located in the following folder:
Turn off scanning of the log files that are located in the following folder:
%windir%\SoftwareDistribution\Datastore\Logs Specifically, exclude the following files:
The wildcard character (*) indicates that there may be several files.
Turn off scanning of Windows Security files
Add the following files in the %windir%\Security\Database path of the exclusions list:
Note If these files are not excluded, antivirus software may prevent proper access to these files, and security databases can become corrupted. Scanning these files can prevent the files from being used or may prevent a security policy from being applied to the files. These files should not be scanned because antivirus software may not correctly treat them as proprietary database files.
These are the recommended exclusions. There may be other file types that are not included in this article that should be excluded.
Turn off scanning of Group Policy-related files
Group Policy user registry information. These files are located in the following folder:
%allusersprofile%\ Specifically, exclude the following file:
Group Policy client settings files. These files are located in the following folder:
%SystemRoot%\System32\GroupPolicy\Machine\
%SystemRoot%\System32\GroupPolicy\User\ Specifically, exclude the following files:
Turn off scanning of user profile files
User registry information and supporting files. The files are located in the following folder:
userprofile%\ Specifically, exclude the following files:
Running antivirus software on domain controllers
Because domain controllers provide an important service to clients, the risk of disruption of their activities from malicious code, from malware, or from a virus must be minimized. Antivirus software is the generally accepted way to reduce the risk of infection. Install and configure antivirus software so that the risk to the domain controller is reduced as much as possible and performance is affected as little as possible. The following list contains recommendations to help you configure and install antivirus software on a Windows Server domain controller.
Warning We recommend that you apply the following specified configuration to a test system to make sure that in your specific environment it does not introduce unexpected factors or compromise the stability of the system. The risk from too much scanning is that files are inappropriately flagged as changed. This causes too much replication in Active Directory. If testing verifies that replication is not affected by the following recommendations, you can apply the antivirus software to the production environment.
Note Specific recommendations from antivirus software vendors may supersede the recommendations in this article.
Antivirus software must be installed on all domain controllers in the enterprise. Ideally, try to install such software on all other server and client systems that have to interact with the domain controllers. It is optimal to catch the malware at the earliest point, such as at the firewall or at the client system where the malware is introduced. This prevents the malware from ever reaching the infrastructure systems that the clients depend on.
Use a version of antivirus software that is designed to work with Active Directory domain controllers and that uses the correct Application Programming Interfaces (APIs) to access files on the server. Older versions of most vendor software inappropriately change a file’s metadata as the file is scanned. This causes the File Replication Service engine to recognize a file change and therefore schedule the file for replication. Newer versions prevent this problem.
For more information, see the following article in the Microsoft Knowledge Base:
815263Antivirus, backup, and disk optimization programs that are compatible with the File Replication Service
Do not use a domain controller to browse the Internet or to perform other activities that may introduce malicious code.
We recommend that you minimize the workloads on domain controllers. When possible, avoid using domain controllers in a file server role. This lowers virus-scanning activity on file shares and minimizes performance overhead.
Do not put Active Directory or FRS database and log files on NTFS file system compressed volumes.
Turn off scanning of Active Directory and Active Directory-related files
Exclude the Main NTDS database files. The location of these files is specified in the following registr subkey:
HKEY_LOCAL_MACHINE\SYSTEM\CurrentControlSet\Services\NTDS\Parameters\DSA Database File The default location is %windir%\Ntds. Specifically, exclude the following files:
Exclude the Active Directory transaction log files. The location of these files is specified in the following registry subkey:
HKEY_LOCAL_MACHINE\SYSTEM\CurrentControlSet\Services\NTDS\Parameters\Database Log Files Path
The default location is %windir%\Ntds. Specifically, exclude the following files:
Exclude the files in the NTDS Working folder that is specified in the following registry subkey:
HKEY_LOCAL_MACHINE\SYSTEM\CurrentControlSet\Services\NTDS\Parameters\DSA Working Directory Specifically, exclude the following files:
Turn off scanning of SYSVOL files
Turn off scanning of files in the File Replication Service (FRS) Working folder that is specified in the following registry subkey:
HKEY_LOCAL_MACHINE\SYSTEM\CurrentControlSet\Services\NtFrs\Parameters\Working Directory The default location is %windir%\Ntfrs. Exclude the following files that exist in the folder:
edb.chk in the %windir%\Ntfrs\jet\sys folder
Ntfrs.jdb in the %windir%\Ntfrs\jet folder
*.log in the %windir%\Ntfrs\jet\log folder
Turn off scanning of files in the FRS Database Log files that are specified in the following registry subkey:
HKEY_LOCAL_MACHINE\SYSTEM\Currentcontrolset\Services\Ntfrs\Parameters\DB Log File Directory The default location is %windir%\Ntfrs. Exclude the following files.
Note Settings for specific file exclusions is documented here for completeness. By default, these folders allow access only to System and Administrators. Please verify that the correct protections are in place. These folders contain only component working files for FRS and DFSR.
Edb*.log (if the registry key is not set)
FRS Working Dir\Jet\Log\Edb*.jrs
Turn off scanning of the NTFRS Staging folder as specified in the following registry subkey:
HKEY_LOCAL_MACHINE\SYSTEM\Currentcontrolset\Services\NtFrs\Parameters\Replica Sets\GUID\Replica Set Stage By default, staging uses the following location:
Turn off scanning of the DFSR Staging folder as specified in the msDFSR-StagingPath attribute of the object CN=SYSVOL Subscription,CN=Domain System Volume,CN=DFSR-LocalSettings,CN=DomainControllerName,OU=Domain Controllers,DC=DomainName in AD DS. This attribute contains the path to the actual location that DFS replication uses to stage files. Specifically, exclude the following files:
Turn off scanning of files in the Sysvol\Sysvol folder or the SYSVOL_DFSR\Sysvol folder.
The current location of the Sysvol\Sysvol or SYSVOL_DFSR\Sysvol folder and all the subfolders is the file system reparse target of the replica set root. The Sysvol\Sysvol and SYSVOL_DFSR\Sysvol folders use the following locations by default:
The path to the currently active SYSVOL is referenced by the NETLOGON share and can be determined by the SysVol value name in the following subkey:
Exclude the following files from this folder and all its subfolders:


