- How to Network Two Windows 10 Computers
- Connecting two computers running WIndows 10 to each other using local router.
- Network Two Computers Running Windows XP
- Network Two Windows XP Computers
- How to Run Multiple Instances of a Windows Program
- Why some programs allow multiple windows and some don’t?
- Launch multiple instances of programs that allow this feature
- Use different user accounts to open multiple instances of programs
- Use Sandboxie
- To sum up
How to Network Two Windows 10 Computers
Posted on February 5, 2020 by Mel Hawthorne 13 Comments
Connecting two Windows 10 computers together in an ad hoc local network can be useful, it can allow you to share files or game together when you can’t trust, or don’t have a wireless network. To do so, the first step is to plug a Crossover Ethernet Cable from one device into the other. Alternatively, this can also be done with the use of a hub or router – the steps will be the same. Make sure both computers are connected to the same one, and keep in mind that the connection type will be different depending on which type of connection you are using.
Once connected you need to configure the two Ethernet adapters to be able to communicate. Open Control panel and browse to Control Panel > Network and Internet > Network and Sharing Center and then click “Change adapter settings” on the left-hand side.
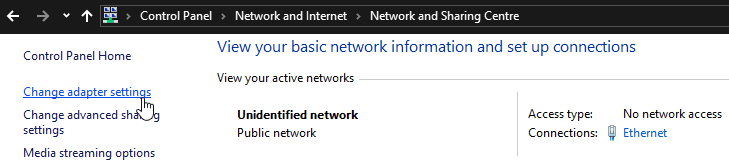 Change adapter settings.
Right-click on your Ethernet device and select properties. In the adapter properties, double click on “Internet Protocol Version 4 (TCP/IPv4)”.
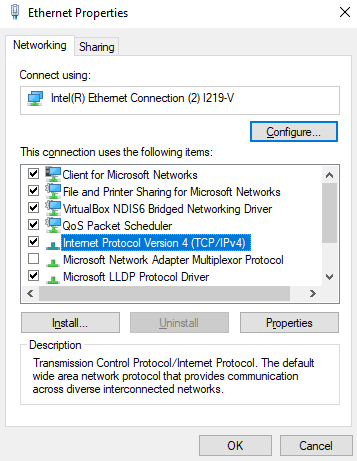 Configure IPv4 settings.
Set the IP address to be 192.168.0.1 and the subnet mask to be 255.255.255.0 on the first device. On the second device, the IP address should be 192.168.0.2 and the subnet mask should be the same as the first host. Apply the changes by clicking ok until you’re back to the list of network adaptors.
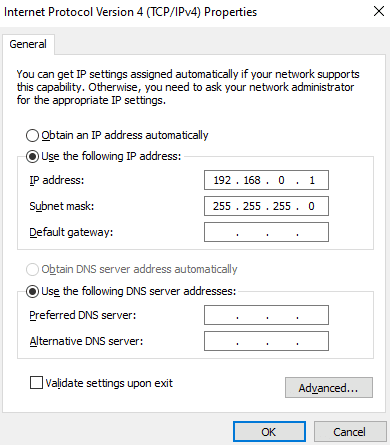 Configure and IP address and subnet mask.
Once both computers are connected and have IP addresses assigned. Go back to Network and Sharing Center and click on “Change advanced sharing settings” on the left-hand side. In the advanced sharing settings menu, ensure “Turn on network discovery” and “Turn on automatic setup of network-connected devices” are both enabled.
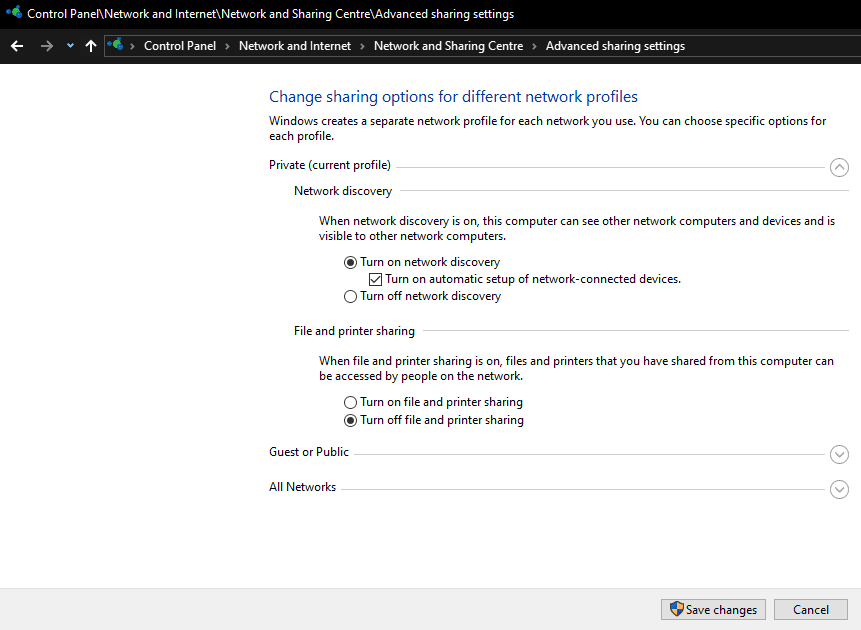 Ensure network discovery is enabled.
Enabling network discovery will allow the Windows 10 devices to identify each other and communicate via network protocols. If you want to connect to a game, web or FTP server this should now work.
Should you want to share files through Windows’ file-sharing features, you will need to enable “File and printer sharing” from the same menu that you enabled network discovery. You will also need to configure the files and folders to be shared.
Connecting two computers running WIndows 10 to each other using local router.
A desktop and a laptop both running Windows 10 show up as connected to my Jetpack router but I can’t get them to comunicate with each other.
My name is Andre Da Costa; an Independent Consultant, Windows Insider MVP and Windows & Devices for IT MVP. I’m here to help you with your problem.
Your best option is to use a basic peer to peer workgroup network with Public File Sharing and Permissions. Learn more:
Open Start > Settings > Network & Internet > Status
Scroll to the bottom
Click Network and Sharing Center
Click Change advanced sharing settings
Expand All Networks
Under Password protected sharing
Switch between ‘Turn on password protected sharing and Turn off password protected sharing’
Then choose ‘Turn off password protected sharing’
Then click ‘Save changes’
Press Windows key + R
Type: optionalfeatures.exe
Hit Enter
Scroll down to SMB 1.0/CIFS File Sharing Support
Tick the SMB 1.0/CIFS Client
Untick SMB 1.0/CIFS Automatic Removal and
Untick SMB 1.0/CIFS Server
Click OK
Restart if prompted.
Additional troubleshooting steps you can attempt:
— shut all computer and network gear down.
— Turn off IPv6
— Try browsing to some of the computers manually, press Windows key + R, type: \\computername, hit Enter
— Press Windows key + R
Type: services.msc
Hit Enter
Other things you can do:
Press the Windows Key and R at the same time to bring up the Run dialog.
Type services.msc in the Run dialog and press Enter.
For each of the following services, locate the service in list, right-click the service and select Properties. Then set the Startup type to Automatic (Delayed Start) and select Apply.
Computer Browser (Browser)
Function Discovery Provider Host (FDPHost)
Function Discovery Resource Publication (FDResPub)
Network Connections (NetMan)
UPnP Device Host (UPnPHost)
Peer Name Resolution Protocol (PNRPSvc)
Peer Networking Grouping (P2PSvc)
Peer Networking Identity Manager (P2PIMSvc)
Restart Windows.
1. Start the «Function Discovery Provider Host» and «Function Discovery Resource Publication» services, and then set them toAutomatic (Delayed Start).
2. When you open Explorer Network, enable network discovery when you are prompted.
Press Windows key + X > computer management—>shared folders—> choose the shared folder, right click it then click Properties > Share Permissions —>protection that everyone can read and execute, see folder contents and read permissions.
Network Two Computers Running Windows XP
Share files without any extra software
If you want to share files between two desktop computers, a good way would be to use the built-in features of Windows. In this way, if you add another computer to your network, you can easily share files with that computer too without having to install any additional software.
If you have two computers that both have wireless cards, then you can check out my post on how to create an ad-hoc network to share files between two computers wirelessly.
In this tutorial, I will walk you through the simple process of setting up file sharing between two computers in Windows XP. Windows Vista has a completely different way of doing file sharing, so that is for another article.
Network Two Windows XP Computers
The first step in networking two computers is to make sure that they are in the same domain or workgroup. You cannot network two Windows computer unless they have one of these in common.
To do this, right-click on My Computer and choose Properties, and click on the Computer Name tab.
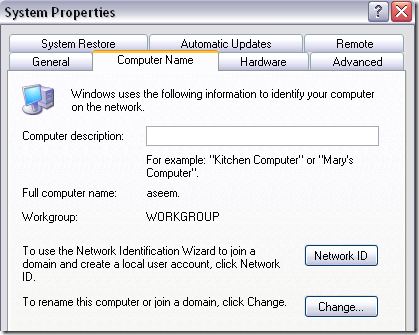
As you can see, my computer is joined to a workgroup called WORKGROUP. If I want to make sure another computer can communicate with this computer, I have to make sure it is also in the workgroup called WORKGROUP. Just click the Change button in order to do this.

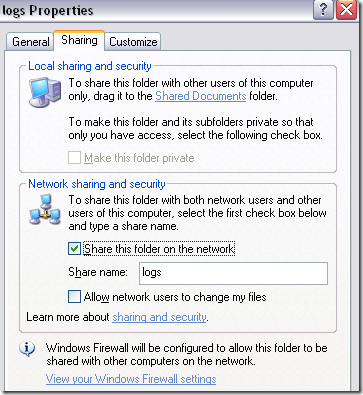
Once both computers are in the same domain or workgroup, you can now setup file sharing. Go to the folder that you want to share in Explorer, right-click on it and choose Properties. Now click on the Sharing tab.

Click on “If you understand the security risks but want to share files without running the wizard, click here”. Now just choose Just enable file sharing when given the two options.

The wizard will jut enable the firewall, but all SP2 and SP3 XP installs automatically have the firewall activated, so you don’t need to worry about that. Now you should see a check box called Share this folder on the network. Go ahead and check that and check the box below if you want others to be able to edit the shared files.
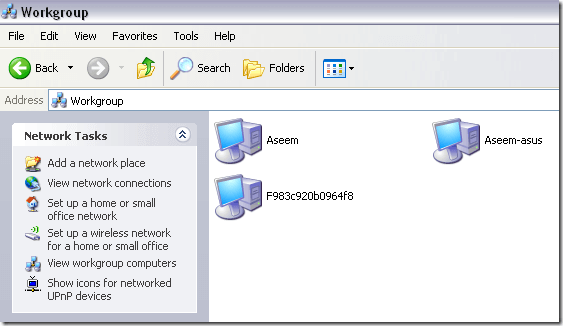
Now go to another computer on the network, open My Computer, and click on My Network Places.

Now click on View workgroup computers to get a list of all the computers in the workgroup. If you can’t see any other computers in My Network Places, read my previous post for solutions.

You should see the name of the computer you setup the shared folder on. Go ahead and double-click on it and you should see the shared folder!
That’s about it! If you have any issues like “Access is denied” or “You do not have permission”, make sure that File and Printer Sharing is added as an exception in the Windows Firewall.

If you have any issues networking two computers, feel free to a post a comment and I will try to help! Enjoy!
Founder of Help Desk Geek and managing editor. He began blogging in 2007 and quit his job in 2010 to blog full-time. He has over 15 years of industry experience in IT and holds several technical certifications. Read Aseem’s Full Bio
How to Run Multiple Instances of a Windows Program
Running multiple instances of programs and files surely boosts productivity. However, many programs won’t allow you to open more than one window and give an error or open the active window when you try to run them twice.
Thankfully, there are some workarounds to bypass this limitation depending on what type of program you are looking to open multiple times simultaneously.
In this article, I will show you multiple methods to open more than one instance of a program in Windows.
Why some programs allow multiple windows and some don’t?
For your own safety, it’s important to know why this limitation is there in the first place. Firstly, this limitation is added by the developer of the program and not the Windows itself. So you should not blame Windows for not giving you an option to run multiple programs.
Now if the developers intentionally added this limitation in their program, then it must have some bad impact on the program. Opening multiple instances of a program can have multiple effects. There is a good chance that the two windows will conflict with each other and lead to program crashes, or data corruption etc.
Some developers may also add this limitation because there would be no point of opening multiple windows of their program. For example, system information tools offer same information no matter how many instances you open.
Furthermore, some programs may offer an unfair advantage when opened multiple times, so developers lock this feature. For example, an online video game may limit this to ensure players don’t log in with multiple accounts and gain an unfair advantage over others.
Overall, you should keep in mind that the limitation is there for a reason and you should always be ready to deal with a bad situation if you are going to run multiple instances.
Launch multiple instances of programs that allow this feature
To open another window of a program, simply launch it again. An easier way to do this is to press and hold the Shift key and click on the program’s icon in the taskbar.
If the program allows multiple windows, then another instance will open up without a hinge. For example, you can open multiple versions of a document and edit them separately, or open multiple documents in the same program; like Microsoft Word documents. You can also open multiple windows of programs like CCleaner and run multiple types of scans at the same time.
As long as a program doesn’t have a conflicting nature, there is a good chance you can open multiple instances of it. So do try opening a program twice and see how it boosts your productivity.
Use different user accounts to open multiple instances of programs
Developers use different methods to put limitation on opening multiple instances of a program and the most commonly used method is through mutex. Mutex prevents threads from accessing the same program if it’s already running.
Fortunately, mutex is tied to the current user profile only. You may not be able to open that program in the current user profile, but you can still open it as a different user. You just need to have two accounts on your PC and you can easily open two instances of the same program.
Create a new user profile
First, I’ll show you how you can create another user account on your PC. If you already have another user account and know the login credentials of it, then you don’t need to go through this step.
For demonstration purpose, I am going to use a Windows 10 PC. If you are a Windows 7 or 8 user, then you can follow instructions provided on the Microsoft support page.
- Open Windows 10 «Settings» and click on «Accounts«. Here move to the «Family & other users» section and click on «Add someone else to this PC» under «Other users«.

- A new window will open up. Click on «I don’t have this person’s sign-in information» link here.
- On the next page, click on the «Add a user without a Microsoft account«. This profile isn’t required to be connected to a Microsoft account, so we skip this step.
- Now provide the username and password for the new account and click «Next«. Your account will be created.


Open two instances of a program
Now that you have two user accounts, let’s open two instances of your required program.
- Open up the required program.
- Open this program again, but this time hold the Shift key and right-click on it. From the context menu click on the new entry «Run as different user«.
- Next, provide the username and password of the newly created account and press enter.
- Another instance of the same program will open up. In the below screenshot, the original Opera browser window is on the left and the newly opened window is on the right.


The newly opened window will have no connection with the first window. It will feel like that the program has been just installed, no configurations, saved data or any other information from the original window will pass on to the new window.
Do remember that this trick will not work on programs that don’t use mutex for preventing program from opening multiple windows. Although most apps do use the mutex, some programs may choose a different method.
For example, video games usually don’t use mutex to prevent multiple instances of them. If this trick didn’t work with your program, then check out the below method.
Use Sandboxie
Although the above method is still the most reliable, but when it doesn’t work then an isolation software will surely work for you.
An Isolation software basically gives a program an environment completely separate from your system. This protects your system from being damaged from an infected program.
However, this also means that you can run multiple instances of that program as well. One in normal windows and other in the isolation software window.
Sandboxie is a popular tool for this purpose that allows you to run another instance of a program for free. If you want to run more than two instances of a program, then you’ll have to upgrade to Sandboxie premium version.

Download and install Sandboxie and make sure you let it add a context menu entry while installing. Now right-click on the program that you want to run in Sandboxie and select «Run with Sandboxie«.
This will launch that program in a safe environment and you will notice that the outline of the window will turn yellow when you hover the mouse cursor at the top.
Unlike the above method, the instance running in the Sandboxie will use the same configurations and data as the original program. However, any changes made or data added in the Sandboxie instance will not be synced with the original program window. Still, you can use the Sandboxie recovery option to recover contents to the actual hard drive.
To sum up
Using an isolation tool like Sandboxie is a sure shot way to open another instance of a program. However, it should not be your first priority as you may face problems while saving some of the data in Sandboxie environment. In most cases, running the program under two accounts should work and will also be easier to save data.


