- Run Windows in your MacBook from an external USB Flash Drive in 6 steps
- Step 1 Prepare the hardware
- Step 2 Prepare the software
- Step 3 Create the USB bootable flash drive
- Step 4 Download the Windows support software
- Step 5 Boot up MacBook with the USB flash drive
- Step 6 Enjoy Windows on MacBook
- Install Windows 7 on USB Flash Drive or External Hard Drive
- Is it possible to install Windows 7 onto a USB drive?
- What do you need to prepare?
- How to install Windows 7 to external hard drive?
- How to Run Windows 10 From a USB Drive
- Running Windows 10 From a USB Drive
- Running WinToUSB
- Running Rufus
- Launch Windows 10 With USB
- Run Windows in your MacBook from an external USB Flash Drive in 6 steps
- Step 1 Prepare the hardware
- Step 2 Prepare the software
- Step 3 Create the USB bootable flash drive
- Step 4 Download the Windows support software
- Step 5 Boot up MacBook with the USB flash drive
- Step 6 Enjoy Windows on MacBook
Run Windows in your MacBook from an external USB Flash Drive in 6 steps

Aug 15, 2018 · 3 min read

We all love MacBooks, the macOS is fast, highly optimized for the hardware and constantly updated by Apple. However, there are times when we need to use Windows OS for tasks that cannot be completed with macOS, like using Windows-only software and playing PC games. The most common ways of using Windows in MacBook are either having a Virtual Windows Machine or installing a guest OS on top of your MacBook via the Boot Camp Assistant. I am not a fan of these two as either solution will consume a certain amount of my precious SSD.
In t h is article, I am going to introduce another solution to install your Windows workspace in an external drive by leveraging the Windows To Go feature, so you can use Windows in your MacBook without installing any additional software or guest OS on it.
Step 1 Prepare the hardware
- An Intel-based MacBook
- A machine running Windows 7 or later (You can use Virtual Machines if you does not have one)
- A fast USB Flash Drive with at least 64GB storage ( I am using a SanDisk Ultra Fit 128GB)
- A USB thumb drive (Optional)
Step 2 Prepare the software
- A Windows Disk Image, you can use your MacBook to download one from the Microsoft Windows Disk Image Download page.
- Rufus, the Windows software to creates a bootable USB flash drive.
- Boot Camp Assist, it comes with macOS and we use it to download the Windows support software that needs to be installed in your Windows workspace
Step 3 Create the USB bootable flash drive
- Transfer the Windows Disk Image from your MacBook to Windows machine via the USB Flash Drive or the USB thumb drive.
- Launch Rufus application, locate USB Flash Drive from the Device drop-down list
- Select the Windows Disk Image iso file from the Boot Selection option
- Tick Windows To Go in the advanced format option, this is an important step, otherwise, Rufus will create a bootable flash drive for standard Windows installation on hard disk.
- Leave the rest of the options as default and hit the START button.
- Grab a coffee as the progress will take around 20–30 minutes
Step 4 Download the Windows support software
Before we go ahead and boot into Windows, let us download the Windows support software so the MacBook has the necessary drivers to work with the Windows OS
- Launch Boot Camp Assist from the Launchpad
- Click on the Download Windows Support Software from the Action menu

- Choose the download destination and transfer the downloaded files to the USB thumb drive
Step 5 Boot up MacBook with the USB flash drive
- Shut down your MacBook completely
- Insert the USB Flash Drive, hold the option key and press the power button, this allows you to choose the Startup disk instead of booting right into the default disk
- Click on the EFI Boot, so it will be used as the Startup disk

Step 6 Enjoy Windows on MacBook
And that is it, you now have a working Windows OS running entirely from an external USB Flash Drive with your MacBook.
Install Windows 7 on USB Flash Drive or External Hard Drive
Learn to install Windows 7 on USB hard drive in a few simple steps. It is even simpler than fresh install Windows on internal hard drive.

By AOMEI  / Last Updated February 27, 2020
Is it possible to install Windows 7 onto a USB drive?
You probably have heard of Windows 8 to Go, which allows you install a portable version of Windows 8 on a Microsoft certified USB flash drive. If you are addicted to the old operating system (OS) Windows 7, you may wonder is there a way to install Windows 7 on USB removable storage device?
With Windows 7 on a USB flash drive or external hard drive, you can take it with you wherever you go and run Windows7 on any PC.
Windows Setup can detect USB hard drive, but when you select the external drive as the target location to install Windows 10/8/7, you will get the error “Windows cannot be installed to this disk”. Luckily, there is a workaround for this, and it is quite simple. Even those who does not know how to install Windows from a USB drive can follow this guide to get it done,
What do you need to prepare?
You may have read some other tutorials or guides talking about installing Windows 7 on external hard drive, but the process is cumbersome and not easy to follow. Here, I will recommend you a free tool AOMEI Partition Assistant that can do this trick for you, so you only need a few clicks.
It provides Windows to Go feature that not only allow you to run Windows 10/8/8.1 from USB stick, but also install Windows 7 onto USB removable storage devices. It does not require Microsoft certificate USB drives.
An external hard drive or USB flash drive that has more than 16GB of capacity. For better performance, it is recommended to use a USB 3.0 drive, and of course, you need to connect it to a USB 3.0 port.
Windows 7 installation file with file extension .iso, .wim, or. esd.
A working PC running Windows 10/8/7. Any version is okay.
Free disk partition manager software AOMEI Partition Assistant Standard Edition.
How to install Windows 7 to external hard drive?
Before you do, you must know the USB external drive will be reformatted to NTFS file system. If there are any valuable data on it, you should save it to another location beforehand. When you prepare the things listed above, you can follow the steps below to create Windows 7 USB install.
Step 1. Download and run AOMEI Partition Assistant. Connect the external drive to your PC.
Step 2. In the main interface, if you see the USB drive is showing in AOMEI Partition Assistant, click on the option Windows to Go Creator in the left panel. Otherwise, you should check is there is a connection problem.
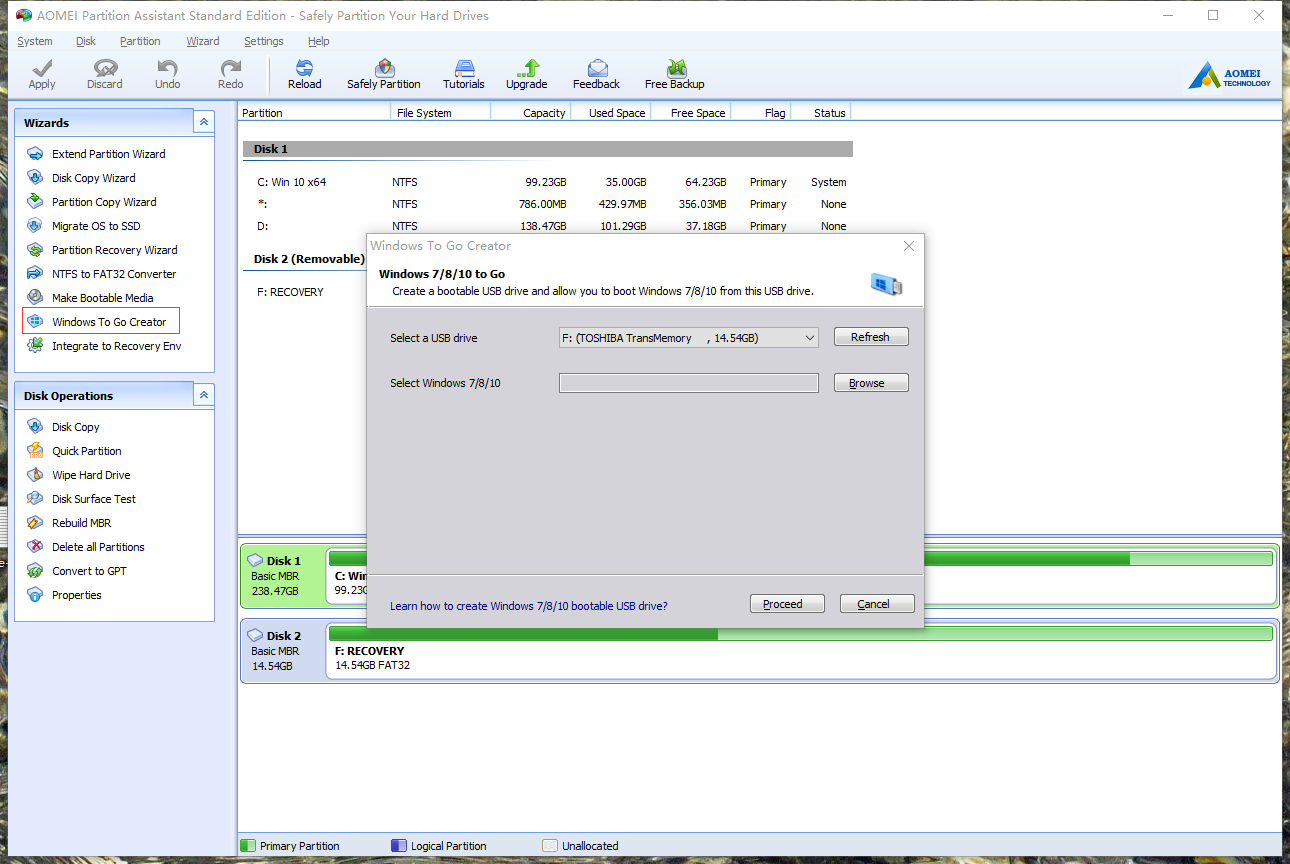
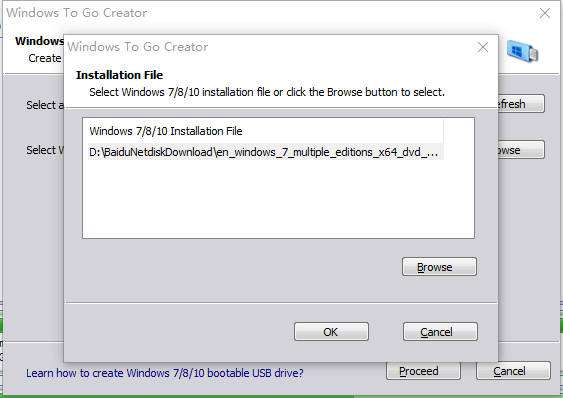
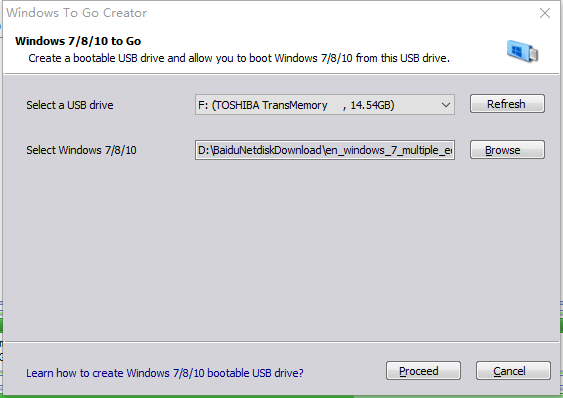
Step 3. In a pop-up window, click Browse to select the Windows 7 installation file, ISO, ESD, or WIM format is all okay.
Step 4. Click Proceed to start this operation.
When the process finishes, you use this new created bootable USB drive to boot any Windows PC and bring this portable version of Windows 7 with you.
As you see from the screenshot, the USB flash drive used to install Windows 7 is an MBR disk, which means it can only boot PCs with Legacy boot mode enabled. If you want it to boot UEFI boot mode computers, you can convert it to GPT disk without data loss.
Besides the ability to install Windows 7 on USB drive, AOMEI Partition Assistant Standard also provides many other great features, like Migrate OS to SSD without reinstalling Windows, Merge Partitions and Resize Partition without data loss.
If you need more advanced features like convert dynamic disk to basic without data loss, you can try the Professional edition of AOMEI Partition Assistant.
How to Run Windows 10 From a USB Drive
Loading and running Windows 10 from a USB drive is a handy option when you’re using a computer saddled with an older version of Windows.


You run Windows 10 on your own computer, but now you’re using another PC outfitted with an older operating system. If you prefer to use the newest version of Windows, though, there’s a way to run Windows 10 directly through a USB drive.
You’ll need a USB flash drive with at least 16GB of free space, but preferably 32GB. You’ll also need a license to activate Windows 10 on the USB drive. That means you have to either purchase one or use an existing one that is associated with your digital ID.
You can then use a Windows USB utility to set up the USB drive with Windows 10. Once you’re done, you’ll be able to boot up off the drive to launch Windows 10.
The major downside of booting from a USB drive is that Windows 10 will run slower than it does off your hard drive. But if you’re in a pinch you can at least work with the OS and access different apps this way.
Microsoft once offered its own tool called Windows to Go, which could generate a bootable Windows USB drive with the Enterprise and Education versions of Windows 10. However, the company has stopped development on that program and no longer updates it.
Instead, you can turn to two utility programs, WinToUSB and Rufus. These tools can create a bootable drive from any version of the operating system and on any type of USB drive.
Running Windows 10 From a USB Drive
If you want to run Windows from a USB, the first step is to sign into your current Windows 10 computer and create a Windows 10 ISO file that will be used to install the operating system onto the drive.
To do this, browse to the Download Windows 10 website. This site offers the latest edition of Windows 10, which at this point is the Windows 10 November 2019 Update, or Windows 10 version 1909.
Click the Download tool now button, then double-click the downloaded MediaCreationTool.exe file to install the program. At the first screen for Applicable notices and license terms, click the Access button. Then click the Create installation media (USB flash drive, DVD, or ISO file) for another PC button and hit Next.
At the Select language, architecture, and edition screen, confirm that all of the options are correct and then click Next.
You’ll then need to choose what media you want to use. Given the option between a USB flash drive and an ISO file, click ISO file. Then click Next.
Choose a location on your hard drive to store the Windows.iso file and click Save. Windows 10 will then generate the necessary ISO file. When the process is done, click Finish.
Running WinToUSB
Next, it’s time to enlist the aid of a third-party Windows USB program. Let’s kick things off with WinToUSB. This program comes in three flavors: Free, Professional, and Enterprise.
Start with the free version to see if you like it, but be aware that the freebie poses certain limitations. Most notably, you can create an installation of Windows 10 Home but not Professional or Enterprise.
If you need either of these editions, the Professional version of WinToUSB costs $29.95, while the Enterprise option will run you $199.95. Download and install the WinToUSB software from the dedicated website.
Next, connect a blank USB flash drive to your computer. Launch WinToUSB from its Start menu shortcut. At the introductory screen, click the button to the right of the Image File field and choose the ISO file you created for Windows 10.
Select the version of Windows 10 you wish to clone onto the USB stick. If you’re using the free version, your only choice is one of the Windows 10 Home versions, so select that one and hit Next.
At the next screen, you’ll need to determine your destination disk. Open the drop-down menu and choose your USB drive. A message pops up asking you to select a partition scheme. Click the MBR for BIOS option and hit Yes.
At the next screen, click the option for Legacy to choose the Installation mode. Click Next and your Windows 10 USB drive will now be created.
When the installation process reaches 100 percent, indicating that it’s finished, close the WinToUSB program and remove the USB drive.
Running Rufus
Now let’s check out Rufus. Download and install the Rufus program from its website, then launch the software. At the Drive Properties window, select your USB drive in the Device field, if it’s not already selected. Click the Select button next to the Boot selection field and select your Windows 10 ISO file.
Click the Image option field and change it to Windows to Go. You can leave the other options at their default values. If you wish, change the Volume label to something like Windows 10. Then click the Start button.
At the next screen, choose the version of Windows that you want to run on the USB drive, then click OK. A warning message flashes that all data on your USB drive will be destroyed. Click OK to continue.
Rufus will now copy the necessary files to the USB drive. After the USB drive has been set up, close the Rufus window.
Launch Windows 10 With USB
When you want to launch Windows 10 on a different computer, insert your USB drive into that PC. Press the appropriate key to launch your Boot menu and choose the option to boot up off the USB drive. The easiest way is to hold the Shift key and restart the computer.
The first time you run Windows 10 off the USB drive, you’ll need to go through the familiar Windows setup process. You’ll also need to activate Windows 10.
You can then install apps onto the USB drive and access any files or documents stored online, so the experience comes close to working on one of your own Windows 10 PCs.
Run Windows in your MacBook from an external USB Flash Drive in 6 steps
Aug 15, 2018 · 3 min read
We all love MacBooks, the macOS is fast, highly optimized for the hardware and constantly updated by Apple. However, there are times when we need to use Windows OS for tasks that cannot be completed with macOS, like using Windows-only software and playing PC games. The most common ways of using Windows in MacBook are either having a Virtual Windows Machine or installing a guest OS on top of your MacBook via the Boot Camp Assistant. I am not a fan of these two as either solution will consume a certain amount of my precious SSD.
In t h is article, I am going to introduce another solution to install your Windows workspace in an external drive by leveraging the Windows To Go feature, so you can use Windows in your MacBook without installing any additional software or guest OS on it.
Step 1 Prepare the hardware
- An Intel-based MacBook
- A machine running Windows 7 or later (You can use Virtual Machines if you does not have one)
- A fast USB Flash Drive with at least 64GB storage ( I am using a SanDisk Ultra Fit 128GB)
- A USB thumb drive (Optional)
Step 2 Prepare the software
- A Windows Disk Image, you can use your MacBook to download one from the Microsoft Windows Disk Image Download page.
- Rufus, the Windows software to creates a bootable USB flash drive.
- Boot Camp Assist, it comes with macOS and we use it to download the Windows support software that needs to be installed in your Windows workspace
Step 3 Create the USB bootable flash drive
- Transfer the Windows Disk Image from your MacBook to Windows machine via the USB Flash Drive or the USB thumb drive.
- Launch Rufus application, locate USB Flash Drive from the Device drop-down list
- Select the Windows Disk Image iso file from the Boot Selection option
- Tick Windows To Go in the advanced format option, this is an important step, otherwise, Rufus will create a bootable flash drive for standard Windows installation on hard disk.
- Leave the rest of the options as default and hit the START button.
- Grab a coffee as the progress will take around 20–30 minutes
Step 4 Download the Windows support software
Before we go ahead and boot into Windows, let us download the Windows support software so the MacBook has the necessary drivers to work with the Windows OS
- Launch Boot Camp Assist from the Launchpad
- Click on the Download Windows Support Software from the Action menu
- Choose the download destination and transfer the downloaded files to the USB thumb drive
Step 5 Boot up MacBook with the USB flash drive
- Shut down your MacBook completely
- Insert the USB Flash Drive, hold the option key and press the power button, this allows you to choose the Startup disk instead of booting right into the default disk
- Click on the EFI Boot, so it will be used as the Startup disk
Step 6 Enjoy Windows on MacBook
And that is it, you now have a working Windows OS running entirely from an external USB Flash Drive with your MacBook.


