- Файл C:\windows\system32\config \systemprofile\desktop недоступен в Windows 10
- Исправить Desktop недоступен в Windows 10
- 1. Создать новую учетную запись пользователя
- 2. Обновить Windows через установочную флешку
- 3. Перезапуск процесса explorer (Проводник)
- 4. Вставить папку Dekstop
- 5. Выполнить чистую установку windows 10
- 6. Переустановить загрузочные файлы
- About User Profiles
- Types of User Profiles
- User Profile Tiles in Windows 7 and Later
- Создание обязательных профилей пользователей Create mandatory user profiles
- Расширение профиля для каждой версии Windows Profile extension for each Windows version
- Обязательный профиль пользователя Mandatory user profile
- Создание профиля пользователя по умолчанию How to create a default user profile
- Как сделать профиль пользователя обязательным How to make the user profile mandatory
- Применение обязательного профиля пользователя для пользователей Apply a mandatory user profile to users
- Применение обязательного профиля пользователя к пользователям How to apply a mandatory user profile to users
- Применение политик для улучшения времени регистрации Apply policies to improve sign-in time
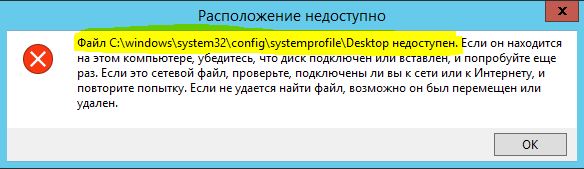
Файл C:\windows\system32\config \systemprofile\desktop недоступен в Windows 10
Обновление для Windows 10 2018 April появилось с множеством превосходных функций, включая некоторые проблемы, такие как «C:\windows\system32\config\systemprofile\desktop недоступен«. Один пользователь рассказал, что сбросил систему и после входа в нее, вместо загрузки на рабочий стол он получил эту ошибку. Другой пояснил, что Windows 10 загружает рабочий стол и становится черный экран с такой же ошибкой. И проблема возникает, когда пользователи обновляют свою версию Windows или выполняют чистую установку.
Исправить Desktop недоступен в Windows 10
Проблема с недоступным рабочим местом обычно возникает из-за поврежденных системных файлов. Однако перезагрузка компьютера должна устранить проблему, но если вы не можете исправить ошибку, следуйте дальнейшим решениям.
1. Создать новую учетную запись пользователя
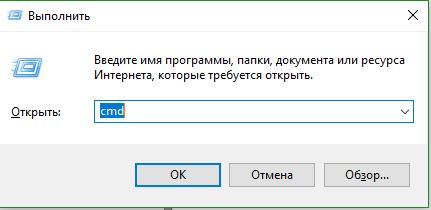
Шаг 1. Запустите командную командную строку от имени администратора. Нажмите Win + R и введите в поле cmd, после чего нажмите Ctrl + Shift + Enter. Если нажать сразу кнопку OK, то cmd запуститься в обычном режиме, но если вы нажмете сочетание кнопок Ctrl + Shift + Enet, Вы запустите её от имени администратора.
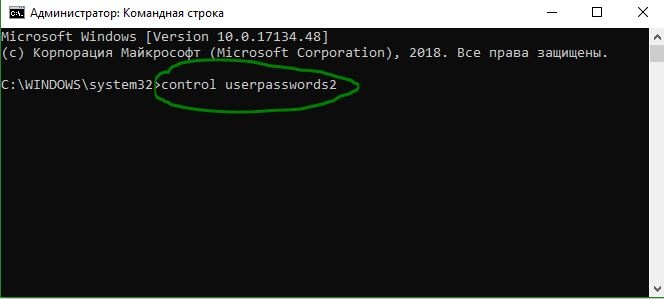
Шаг 2. Введите control userpasswords2 команду и нажмите Enter.
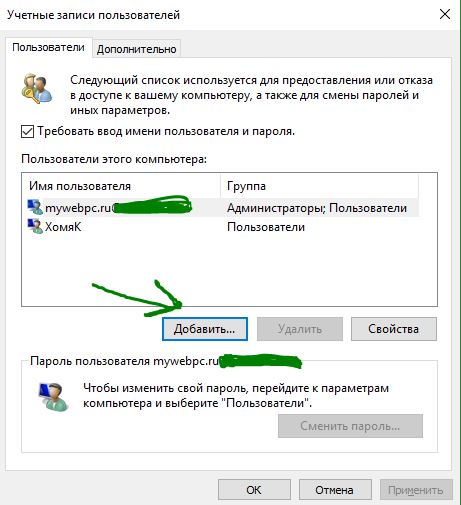
Шаг 3. Нажмите в новом окне «Добавить», чтобы создать учетную запись пользователя. Далее вставьте новый идентификатор электронной почты и код доступа в соответствии с инструкциями на экране. Вы можете добавить локального пользователя или учетную запись Microsoft и назначить ей права администратора, если хотите. Когда вы закончите создание нового пользователя, перезагрузите компьютер и на этот раз войдите в новую учетную запись пользователя. Это наиболее вероятное и простое решение, чтобы сохранить файлы и не переустанавливать windows.
2. Обновить Windows через установочную флешку
Этот способ помог исправить проблему с черным экраном на рабочем столе одному пользователю, с которым я вел переписку в комментариях, и решил его добавить на обозрение. Метод требует вашего внимания, Вы не должны пропустить предложенный вам пункт, чтобы сохранить файлы и приложения, если хотите их сохранить.
Шаг 1. Перейдите на официальный сайт microsoft и скачайте Media Creation. Используйте Media Creation для создания установочной флешки, на которой будет установлена последняя версия Windows 10. Вы можете начать процесс восстановления или обновления Windows 10 с установочной флешки с сохранением файлов и приложений. Если вам не удается запустить процесс установки при загрузке Windows 10, то следуем ниже.
Шаг 2. Подключите установочную флешку к компьютеру и включите свой компьютер до черного проблемного экрана. Далее нажмите Win + R, введите taskmgr и нажмите Ctrl + Shift + Enter, чтобы открыть диспетчер задач с правами администратора. В диспетчере задач нажмите на вкладку «Файл» > «Запустить новую задачу«. В открывшемся диалоговом окне нажмите «Обзор» и перейдите на ранее созданный диск USB. Внутри будет файл setup.exe. Выберите его для запуска. Далее следуйте инструкциям на экране и будьте осторожны и внимательны, не пропустите пункт с сохранением файлов.

3. Перезапуск процесса explorer (Проводник)
Шаг 1. Откройте диспетчер задач, нажав Ctrl + Alt + Del и нажмите снизу подробнее, если у Вас есть такое. Во вкладке «Процессы» найдите процесс под именем Проводник (в Windows 7 он называется explorer.exe). Нажмите на нем правой кнопкой мыши и выберите «Снять задачу«. 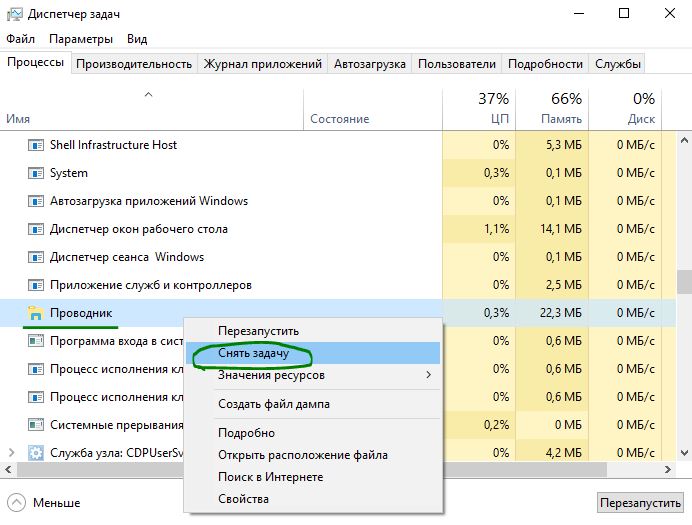
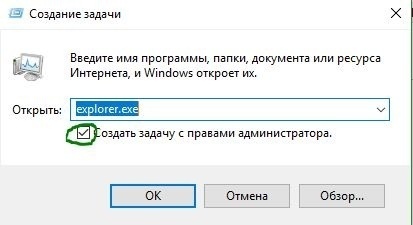
Шаг 2. Далее нажмите сверху на опцию Файл и выберите Запустить новую задачу. В появившимся окошке напишите explorer.exe, поставьте галочку Создать задачу с правами администратора и нажмите OK. В некоторых случаях, пользователи описывает, что проделовали запуск процесса несколько раз, чтобы исправить ошибку.
4. Вставить папку Dekstop
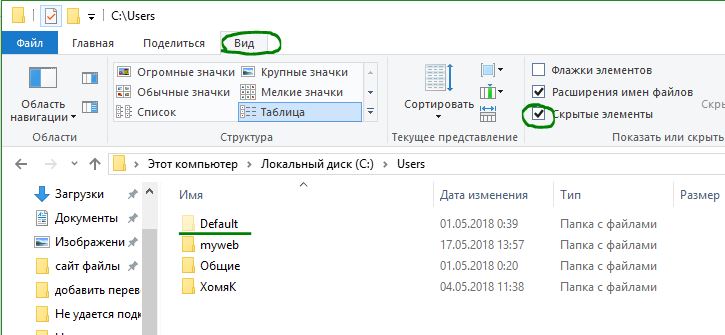
Шаг 1. Откройте «этот компьютер», если не можете с помощью курсора мышки, то нажмите на клавиатуре Win + E. Перейдите C:\User и включите Скрытые элементы нажав на вкладку Вид. Далее Вы увидите папку Default, зайдите в нее и скопируйте папку Dekstop, нажав правой кнопкой мыши по ней, если мышка не работает, то нажмите на клавиатуре кнопку контекстного меню, с правой стороны между AltCtrl и Ctrl.
Шаг 2. После того как Вы скопировали папку Dekstop, перейдите по следующему пути C:\Windows\System32\config\systemprofile и вставьте папку Dekstop в каталог systemprofile. Перезагрузите компьютер или ноутбук, именно перезагрузите, а не выключить и включить.

5. Выполнить чистую установку windows 10
Если ошибка «C:\windows\system32\config\systemprofile\desktop недоступен» появляется после первого проделанного пункта, то имеет смысл установить windows 10 с нуля. Windows 10 вы можете скачать с официального сайта Майкрософт и записать сразу, как ISO образ на флешку для установки или воспользоваться программами для создания загрузочной флешки .
6. Переустановить загрузочные файлы
Возможная причина недоступности рабочего стола — это поврежденные загрузочные файлы. Таким образом, Вы можете восстановить их с помощью командной строки из среды восстановления. Здесь вы найдете идеальный способ — как восстановить главную загрузочную запись (MBR) . Если обнаружу еще способы решения новой ошибки в windows 10, то обязательно сообщу вам. Успехов!
About User Profiles
The system creates a user profile the first time that a user logs on to a computer. At subsequent logons, the system loads the user’s profile, and then other system components configure the user’s environment according to the information in the profile.
Types of User Profiles
- Local User Profiles. A local user profile is created the first time that a user logs on to a computer. The profile is stored on the computer’s local hard disk. Changes made to the local user profile are specific to the user and to the computer on which the changes are made.
- Roaming User Profiles. A roaming user profile is a copy of the local profile that is copied to, and stored on, a server share. This profile is downloaded to any computer that a user logs onto on a network. Changes made to a roaming user profile are synchronized with the server copy of the profile when the user logs off. The advantage of roaming user profiles is that users do not need to create a profile on each computer they use on a network.
- Mandatory User Profiles. A mandatory user profile is a type of profile that administrators can use to specify settings for users. Only system administrators can make changes to mandatory user profiles. Changes made by users to desktop settings are lost when the user logs off.
- Temporary User Profiles. A temporary profile is issued each time that an error condition prevents the user’s profile from loading. Temporary profiles are deleted at the end of each session, and changes made by the user to desktop settings and files are lost when the user logs off. Temporary profiles are only available on computers running WindowsВ 2000 and later.
A user profile consists of the following elements:
- A registry hive. The registry hive is the file NTuser.dat. The hive is loaded by the system at user logon, and it is mapped to the HKEY_CURRENT_USER registry key. The user’s registry hive maintains the user’s registry-based preferences and configuration.
- A set of profile folders stored in the file system. User-profile files are stored in the Profiles directory, on a folder per-user basis. The user-profile folder is a container for applications and other system components to populate with sub-folders, and per-user data such as documents and configuration files. Windows Explorer uses the user-profile folders extensively for such items as the user’s Desktop, Start menu and Documents folder.
User profiles provide the following advantages:
- When the user logs on to a computer, the system uses the same settings that were in use when the user last logged off.
- When sharing a computer with other users, each user receives their customized desktop after logging on.
- Settings in the user profile are unique to each user. The settings cannot be accessed by other users. Changes made to one user’s profile do not affect other users or other users’ profiles.
User Profile Tiles in Windows 7 and Later
In WindowsВ 7 or later, each user profile has an associated image presented as a user tile. These tiles appear to users on the User Accounts Control Panel item and its Manage Accounts subpage.. The image files for the default Guest and default User accounts also appear here if you have Administrator access rights.
NoteВ В The Manage Accounts subpage is accessed through the Manage another account link in the User Accounts Control Panel item.
- %ProgramData%\Microsoft\User Account Pictures\Guest.bmp
- %ProgramData%\Microsoft\User Account Pictures\User.bmp
The user’s tile image is stored in the %SystemDrive%\Users\ \AppData\Local\Temp folder as .bmp. Any slash characters (\) are converted to plus sign characters (+). For example, DOMAIN\user is converted to DOMAIN+user.
The image file appears in the user’s Temp folder:
- After the user completes the initial system setup (OOBE).
- When the user first launches the User Accounts Control Panel item.
- When the user goes to the Manage Accounts subpage of the User Accounts Control Panel item. In addition, tiles for all other users on the computer are shown.
Those instances are the only times that the images are created or updated. Therefore, there are several caveats to keep in mind when using the Temp folder location programmatically:
The user’s tile is not guaranteed to be present. If the user deletes the .bmp file, for instance manually or through a utility that deletes temporary files, that user tile is not automatically recreated until the user launches the User Accounts Control Panel item or Manage Accounts subpage.
User tiles for other users on the computer might not be present in the currently logged-on user’s Temp folder. For example, if User A creates User B through the User Accounts Control Panel item, User B’s tile is created in User A’s Temp folder when Windows sends User A to the Manage Accounts subpage. Because the directory structure is not created for User B until he or she logs on, User A’s Temp folder is the only location that User B’s tile is stored. When User B logs on, the only image stored in User B’s Temp folder is his or her own.
- To get all user tiles for users on a system, applications might need to search in each user’s Temp directory.
- Because the access control list (ACL) of these Temp directories allows access to SYSTEM, Administrator, and the current user, applications need to elevate to access for other users.
Other users’ tiles are not guaranteed to be up-to-date in their Temp folders. If User B updates his or her user tile, User A will not see the change until User A accesses the Manage Accounts subpage. Therefore, if applications use User A’s Temp folder to obtain User B’s tile, those applications can get an out-of-date image file.
Создание обязательных профилей пользователей Create mandatory user profiles
Относится к: Applies to
Обязательный профиль пользователя — это профиль пользователя в роуминге, предварительно настроенный администратором для указания параметров для пользователей. A mandatory user profile is a roaming user profile that has been pre-configured by an administrator to specify settings for users. Параметры, которые обычно определяются в обязательном профиле, включают (но не ограничиваются): значки, которые отображаются на рабочем столе, фоны для рабочего стола, пользовательские предпочтения в панели управления, выбор принтера и другие. Settings commonly defined in a mandatory profile include (but are not limited to): icons that appear on the desktop, desktop backgrounds, user preferences in Control Panel, printer selections, and more. Изменения конфигурации, внесенные во время сеанса пользователя, которые обычно сохраняются в профиле пользователя в роуминге, не сохраняются при присвоении обязательного профиля пользователя. Configuration changes made during a user’s session that are normally saved to a roaming user profile are not saved when a mandatory user profile is assigned.
Обязательные профили пользователей полезны, когда важна стандартизация, например, на устройстве киоска или в образовательных параметрах. Mandatory user profiles are useful when standardization is important, such as on a kiosk device or in educational settings. Только системные администраторы могут вносить изменения в обязательные профили пользователей. Only system administrators can make changes to mandatory user profiles.
Если сервер, на который хранится обязательный профиль, недоступен, например, если пользователь не подключен к корпоративной сети, пользователи с обязательными профилями могут войти с локально кэшируемым экземпляром обязательного профиля, если он существует. When the server that stores the mandatory profile is unavailable, such as when the user is not connected to the corporate network, users with mandatory profiles can sign in with the locally cached copy of the mandatory profile, if one exists. В противном случае пользователь будет подписан с временным профилем. Otherwise, the user will be signed in with a temporary profile.
Профили пользователей становятся обязательными профилями, когда администратор переименовываю файл NTuser.dat (ульй реестра) профиля каждого пользователя в файловой системе сервера профиля от до NTuser.dat NTuser.man . User profiles become mandatory profiles when the administrator renames the NTuser.dat file (the registry hive) of each user’s profile in the file system of the profile server from NTuser.dat to NTuser.man . Расширение приводит к том, что профиль .man пользователя является только для чтения. The .man extension causes the user profile to be a read-only profile.
Расширение профиля для каждой версии Windows Profile extension for each Windows version
Имя папки, в которой хранится обязательный профиль, должно использовать правильное расширение для операционной системы, к которой она будет применена. The name of the folder in which you store the mandatory profile must use the correct extension for the operating system it will be applied to. В следующей таблице перечислены правильные расширения для каждой версии операционной системы. The following table lists the correct extension for each operating system version.
| Версия клиентской операционной системы Client operating system version | Версия операционной системы сервера Server operating system version | Расширение профиля Profile extension |
|---|---|---|
| Windows XP Windows XP | Windows Server 2003 Windows Server 2003 Windows Server 2003 R2 Windows Server 2003 R2 | нет none |
| Windows Vista Windows Vista Windows 7; Windows 7 | Windows Server 2008 Windows Server 2008 Windows Server2008R2 Windows Server 2008 R2 | v2 v2 |
| Windows 8 Windows 8 | Windows Server 2012 Windows Server 2012 | v3 v3 |
| Windows 8.1 Windows 8.1 | Windows Server 2012 R2 Windows Server 2012 R2 | v4 v4 |
| Windows 10, версии 1507 и 1511 Windows 10, versions 1507 and 1511 | Н/Д N/A | v5 v5 |
| Windows 10, версии 1607, 1703, 1709, 1803, 1809, 1903 и 1909 Windows 10, versions 1607, 1703, 1709, 1803, 1809, 1903 and 1909 | Windows Server 2016 и Windows Server 2019 Windows Server 2016 and Windows Server 2019 | v6 v6 |
Дополнительные сведения см. в странице Развертывание профилей пользователей в роуминге, приложения B и роуминга в версиях профилей пользователей в Windows 10и Windows Server Technical Preview. For more information, see Deploy Roaming User Profiles, Appendix B and Roaming user profiles versioning in Windows 10 and Windows Server Technical Preview.
Обязательный профиль пользователя Mandatory user profile
Сначала создайте профиль пользователя по умолчанию с нужными настройками, запустите Sysprep с набором CopyProfile для True в файле ответов, скопируйте настраиваемый профиль пользователя по умолчанию в сетевой файл, а затем переименуйте его, чтобы сделать его обязательным. First, you create a default user profile with the customizations that you want, run Sysprep with CopyProfile set to True in the answer file, copy the customized default user profile to a network share, and then you rename the profile to make it mandatory.
Создание профиля пользователя по умолчанию How to create a default user profile
Во входе на компьютер с Windows 10 в качестве члена локальной группы администратора. Sign in to a computer running Windows 10 as a member of the local Administrator group. Не используйте учетную запись домена. Do not use a domain account.
Для создания профиля пользователя по умолчанию используйте лабораторию или дополнительный компьютер с чистой установкой Windows 10. Use a lab or extra computer running a clean installation of Windows 10 to create a default user profile. Не используйте компьютер, необходимый для бизнеса (то есть производственный компьютер). Do not use a computer that is required for business (that is, a production computer). Этот процесс удаляет все учетные записи домена с компьютера, включая папки профилей пользователей. This process removes all domain accounts from the computer, including user profile folders.
Настройка параметров компьютера, которые необходимо включить в профиль пользователя. Configure the computer settings that you want to include in the user profile. Например, можно настроить параметры фона рабочего стола, удалить приложения по умолчанию, установить бизнес-приложения и так далее. For example, you can configure settings for the desktop background, uninstall default apps, install line-of-business apps, and so on.
В отличие от предыдущих версий Windows, вы не можете применить макет панели запуска и панели задач с помощью обязательного профиля. Unlike previous versions of Windows, you cannot apply a Start and taskbar layout using a mandatory profile. Альтернативные методы настройки меню «Пуск» и панель задач см. в разделе Связанные темы. For alternative methods for customizing the Start menu and taskbar, see Related topics.
Создайте файл ответа (Unattend.xml), который задает параметр CopyProfile true. Create an answer file (Unattend.xml) that sets the CopyProfile parameter to True. Параметр CopyProfile заставляет Sysprep скопировать в настоящее время подписанную папку профиля пользователя в профиль пользователя по умолчанию. The CopyProfile parameter causes Sysprep to copy the currently signed-on user’s profile folder to the default user profile. Для создания файла Unattend.xmlможно использовать диспетчер изображений системы Windows, который входит в набор windows Assessment and Deployment Kit (ADK). You can use Windows System Image Manager, which is part of the Windows Assessment and Deployment Kit (ADK) to create the Unattend.xml file.
Удалить любое приложение, которое не требуется или не требуется на компьютере. Uninstall any application you do not need or want from the PC. Примеры удаления Приложения Windows 10 см. в раздел Remove-AppxProvisionedPackage. For examples on how to uninstall Windows 10 Application see Remove-AppxProvisionedPackage. Список неиспользируемых приложений см. в приложении Understand the different apps included in Windows 10. For a list of uninstallable applications, see Understand the different apps included in Windows 10.
Рекомендуется удалить нежелательные или ненужные приложения, так как это ускорит время регистрации пользователя. It is highly recommended to uninstall unwanted or unneeded apps as it will speed up user sign-in times.
В командной подсказке введите следующую команду и нажмите кнопку ENTER. At a command prompt, type the following command and press ENTER.
(Sysprep.exe расположен по адресу: C:\\Windows\System32\sysprep. (Sysprep.exe is located at: C:\Windows\System32\sysprep. По умолчанию Sysprep ищет unattend.xml в этой же папке.) By default, Sysprep looks for unattend.xml in this same folder.)
Если вы получили сообщение об ошибке с сообщением «Sysprep не удалось проверить установку Windows», откройте %WINDIR%\System32\Sysprep\Panther\setupact.log и найдите запись, например: If you receive an error message that says «Sysprep was not able to validate your Windows installation», open %WINDIR%\System32\Sysprep\Panther\setupact.log and look for an entry like the following:

Чтобы удалить приложение, перечисленное в журнале, используйте в Windows PowerShell раздел Remove-AppxProvisionedPackage и Remove-AppxPackage-AllUsers. Use the Remove-AppxProvisionedPackage and Remove-AppxPackage -AllUsers cmdlet in Windows PowerShell to uninstall the app that is listed in the log.
Процесс sysprep перезагружает компьютер и запускается на экране первого запуска. The sysprep process reboots the PC and starts at the first-run experience screen. Выполните настройка, а затем вопишитесь на компьютер с помощью учетной записи, которая имеет местные привилегии администратора. Complete the set up, and then sign in to the computer using an account that has local administrator privileges.
Щелкните правой кнопкой мыши Начните, перейдите в панель **** управления (представление крупными или небольшими значками) > параметры системы advanced system и щелкните Параметры в разделе > **** Профили пользователей. **** Right-click Start, go to Control Panel (view by large or small icons) > System > Advanced system settings, and click Settings in the User Profiles section.
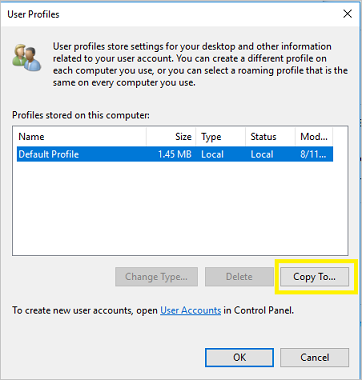
В профилях пользователейщелкните профиль по умолчанию, а затем нажмите кнопку Скопируйте. In User Profiles, click Default Profile, and then click Copy To.
В copy To, в соответствии с разрешенным к использованию, нажмите изменить. In Copy To, under Permitted to use, click Change.
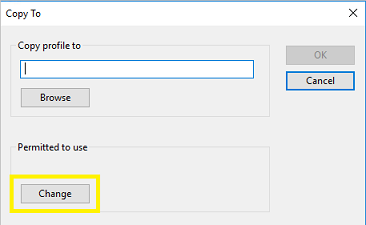
В Выберите пользователя или группу, в введите имя объекта, чтобы выбрать поле, введите, everyone щелкните Check Names, а затем нажмите кнопку ОК. In Select User or Group, in the Enter the object name to select field, type everyone , click Check Names, and then click OK.
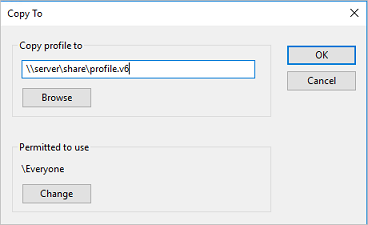
В copy Toв профиле Copy в поле введите путь и имя папки, где необходимо сохранить обязательный профиль. In Copy To, in the Copy profile to field, enter the path and folder name where you want to store the mandatory profile. Имя папки должно использовать правильное расширение для версии операционной системы. The folder name must use the correct extension for the operating system version. Например, имя папки должно закончиться «.v6», чтобы идентифицировать его как папку профилей пользователей для Windows 10 версии 1607. For example, the folder name must end with «.v6» to identify it as a user profile folder for Windows 10, version 1607.
- Если устройство присоединяется к домену и вы входите в учетную запись с разрешениями на запись в общую папку в сети, вы можете ввести общий путь папки. If the device is joined to the domain and you are signed in with an account that has permissions to write to a shared folder on the network, you can enter the shared folder path.
- Если устройство не присоединилось к домену, можно сохранить профиль локально, а затем скопировать его в расположение общей папки. If the device is not joined to the domain, you can save the profile locally and then copy it to the shared folder location.
Нажмите кнопку ОК, чтобы скопировать профиль пользователя по умолчанию. Click OK to copy the default user profile.
Как сделать профиль пользователя обязательным How to make the user profile mandatory
В Проводнике файлов откройте папку, в которой хранится копия профиля. In File Explorer, open the folder where you stored the copy of the profile.
Если папка не отображается, нажмите кнопку Просмотр > вариантов > изменения папки и параметры поиска. If the folder is not displayed, click View > Options > Change folder and search options. На вкладке Просмотр выберите Показать скрытые файлы и папки, **** очистить файлы защищенной операционной системы, нажмите кнопку Да, чтобы подтвердить, что вы хотите показать файлы операционной системы, а затем нажмите кнопку ОК, чтобы сохранить изменения. **** On the View tab, select Show hidden files and folders, clear Hide protected operating system files, click Yes to confirm that you want to show operating system files, and then click OK to save your changes.
Ntuser.dat Переименование Ntuser.man в . Rename Ntuser.dat to Ntuser.man .
Применение обязательного профиля пользователя для пользователей Apply a mandatory user profile to users
В домене вы измените свойства учетной записи пользователя, указав на обязательный профиль в общей папке, которая находится на сервере. In a domain, you modify properties for the user account to point to the mandatory profile in a shared folder residing on the server.
Применение обязательного профиля пользователя к пользователям How to apply a mandatory user profile to users
Откройте пользователи и компьютеры Active Directory (dsa.msc). Open Active Directory Users and Computers (dsa.msc).
Перейдите к учетной записи пользователя, на которую будет назначаться обязательный профиль. Navigate to the user account that you will assign the mandatory profile to.
Щелкните правой кнопкой мыши имя пользователя и откройте свойства. Right-click the user name and open Properties.
На вкладке Profile в поле Путь профиля введите путь к общей папке без расширения. On the Profile tab, in the Profile path field, enter the path to the shared folder without the extension. Например, если имя папки \\** сервер \profile.v6, необходимо ввести \\сервер\профиль. For example, if the folder name is \\server\profile.v6, you would enter \\server\profile.
Нажмите кнопку ОК. Click OK.
Это изменение может занять некоторое время для репликации всех контроллеров домена. It may take some time for this change to replicate to all domain controllers.
Применение политик для улучшения времени регистрации Apply policies to improve sign-in time
Когда пользователь настроен с обязательным профилем, Windows 10 начинается так, как будто это был первый вход при каждом входе пользователя. When a user is configured with a mandatory profile, Windows 10 starts as though it was the first sign-in each time the user signs in. Чтобы повысить производительность входных данных для пользователей с обязательными профилями пользователей, применяем параметры групповой политики, показанные в следующей таблице. To improve sign-in performance for users with mandatory user profiles, apply the Group Policy settings shown in the following table. (В таблице показано, какие версии операционной системы могут применяться к каждому параметру политики.) (The table shows which operating system versions each policy setting can apply to.)
| Параметр групповой политики Group Policy setting | Windows 10 Windows 10 | Windows Server 2016 Windows Server 2016 | Windows 8.1 Windows 8.1 | Windows Server 2012 Windows Server 2012 |
|---|---|---|---|---|
| Конфигурация компьютера > административных шаблонов > system > Logon > Показать первую анимацию входов = Отключено Computer Configuration > Administrative Templates > System > Logon > Show first sign-in animation = Disabled |  | | | |
| Конфигурация компьютера > административных шаблонов > компонентов Windows > поиска > Разрешить Кортана = Отключен Computer Configuration > Administrative Templates > Windows Components > Search > Allow Cortana = Disabled | | |  | |
| Конфигурация компьютеров > административных шаблонов > компонентов Windows > облачного контента > Отключение работы пользователей Microsoft = Включено Computer Configuration > Administrative Templates > Windows Components > Cloud Content > Turn off Microsoft consumer experience = Enabled | | | | |
Вышеуказанные параметры групповой политики можно применить в выпуске Windows 10 Professional. The Group Policy settings above can be applied in Windows 10 Professional edition.


