- Скачать драйвер для Saitek P2500 Rumble Pad (HID)
- Saitek P2500 Rumble Pad (HID)
- Как установить драйвер?
- Драйвер для джойстика Saitek X45 / P990 / P2600
- Saitek p2500 rumble force pad драйвер windows 10
- Saitek Game Controller Drivers Download
- Popular Utilities
- Driver Updates for Popular Saitek Game Controller Models
- Featured Saitek Game Controller Downloads
- How to Update Device Drivers
- Option 1: Update drivers automatically
- Option 2: Update drivers manually
- How to Install Drivers
- Saitek Drivers Download
- Recent Help Articles
- Popular Saitek Device Categories
- Driver Updates for Popular Saitek Device Models
- Featured Saitek Downloads
- How to Update Saitek Device Drivers Quickly & Easily
- Step 1 — Download Your Driver
- Step 2 — Install Your Driver
- How to Open Device Manager
- How to Install drivers using Device Manager
Скачать драйвер для Saitek P2500 Rumble Pad (HID)
Saitek P2500 Rumble Pad (HID)
Драйвер это по своей сути связующее звено между операционной системой, то есть программным обеспечением и железом, то есть физическими устройствами, таким как видеокарты, принтеры, процессоры и т.д. В операционной системе могут быть заложены базовые драйвера для самых необходимых устройств — мышка, клавиатура, но для всего остального потребуются свежие драйвера.
Как установить драйвер?
a) Для начала надо на рабочем столе выбрать значок (Мой компьютер) и нажать по нему правой кнопкой мыши, в выпадающем меню выбрать (Свойства).
b) Теперь переходим на вкладку (Оборудование) и нажимает на кнопку (Диспетчер устройств).
c) Теперь необходимо выбрать устройство для которого будет устанавливаться/обновляться драйвер. На строке с устройством надо нажать правой кнопкой мыши и в выпадающем меню выбрать (Свойства), либо можно просто дважды по нему щелкнуть, чтобы перейти в нужные настройки.
d) Переходим на вкладку (Драйвер), выбираем кнопку (Обновить).
e) В появившемся диалоговом окне выбираем пункт (Нет, не в этот раз) и переходим (Далее).
f) На этом этапе есть два вариант. Можно попытаться установить драйвера в автоматическому режиме, тогда ОС сама попытается найти подходящие устройству драйвера и установить их, для этого выбираем (Автоматическая установка (рекомендуется)) , если попытка завершится неудачно, то надо переходить ко второму пункту (Установка из указанного места) и выбираем (Далее).
g) Этот пункт меню подразумевает выбор между поиском драйвера на сменных носителях и вариантом указать папку с драйвером самостоятельно. Поэтому если в наличии есть диск с драйверами, то надо вставьте диск в CD-rom и выбрать вариант (Поиск на сменных носителях (дискетах, компакт-дисках..)) и перейти (Далее).
Если драйвер найден и скачен в интернете самостоятельно, то надо указать в ручную путь к папке в которой находятся установочный данные для драйвера следующим образом. Выбираем пункт (Включить следующее место поиска:) и переходим в (Обзор), теперь из списка выбираем папку с драйвером и кликаем на кнопку (ОК). Теперь смело переходим (Далее), если все сделано правильно, то начнется установка необходимого драйвера.
Драйвер для джойстика Saitek X45 / P990 / P2600
| Устройство |  Windows Windows | Bit |  |  |
| Saitek X45 | 10 / 8.1 / 8 / 7 | 32 | 1.7 [MB] | Скачать |
| 64 | 2.0 [MB] | Скачать | ||
| Saitek P990 | 10 / 8.1 / 8 / 7 | 32 | 1.6 [MB] | Скачать |
| 64 | 1.8 [MB] | Скачать | ||
| Saitek P2600 | 10 / 8.1 / 8 / 7 | 32 | 4.7 [MB] | Скачать |
| 64 | 5.1 [MB] | Скачать |
Драйверы для джойстиков Saitek X45 Digital joystic and throttle / P990 Gamepad / P2600 Rumble Force Gamepad к ОС Windows 7 / 8 / 8.1 / 10 (32/64-bit) с возможной поддержкой русского языка.
Как определить разрядность своей операционной системы читайте здесь.
Мануалы на английском в формате pdf: X45 , P990 , P2600 .
Saitek p2500 rumble force pad драйвер windows 10
Данная тема является продолжением статьи //4pda.ru/2014/12/12/190359/
Здесь обсуждаем способ создания нативной поддержки для устройств ввода и делимся готовыми решениями.
1. Создание файла с VID и PID
Подключаем наше устройство ввода и запускаем приложение USB Device Info. Нас интересует вкладка Linux, в которой выбираем своё устройство (у меня оно было последним в списке) и ищем значения строчек Vendor ID и Product ID. В моём случае это были 0c45 и 7700 соответственно. 
Так же VID и PID можно посмотреть подключив устройство к ПК.
Для Bluetooth устройств:
Узнать эти значения для Bluetooth девайсов можно открыв файл /proc/bus/input/devices.
Копируем любой файл из /system/usr/keylayout на sdcard и переименовываем его в соответствии с полученными данными, для моего джойстика название получилось таким: Vendor_0c45_Product_7700.kl. (Обратите внимание, что регистр букв имеет значение)
2. Получение кодов кнопок
Запускаем приложение KeyTest и, вооружившись бумагой и карандашом, начинаем поочерёдно нажимать кнопки на устройстве, записывая цифры, высвечивающиеся после scanCode=. Я записывал коды, располагая их на бумаге, как кнопки на геймпаде. 
Из программы можно выйти только по кнопке «Домой».
ВНИМАНИЕ!
Если Геймпад видно в первом шаге, но кейтест не реагирует на нажатия, возможно, у вас отсутствует нужный модуль в ядре — скажите «спасибо» автору прошивки.
Но не отчаивайтесь, есть возможное решение Нативная поддержка для устройств ввода (Пост wm-hater #52134473)
3. Маппинг кнопок
Теперь, когда стали известны коды всех клавиш, необходимо прописать их функции. Тут есть два пути:
а) найти среди имеющихся в Android конфигов устройство, максимально приближенное к вашему, и просто изменить в нём коды кнопок, скопировав содержимое в свой файл;
б) прописать все самому.
Я пошёл по второму пути, ибо мой джойстик имеет только крестовину управления и четыре кнопки. Для начала нужно понять синтаксис файла раскладки, он очень прост:
key код_кнопки действие_кнопки
Но тут возник вопрос: а какие действия кнопок писать в конфиге? За много лет использования различных геймпадов на Android я для себя определил, что самый универсальный конфиг — это раскладка от Sony Xperia Play, она одинаково хорошо ведёт себя как в играх, так и в интерфейсе системы.
Ok Google, key mapping for Xperia Play
Нас интересует третья колонка, но запись действий в ней немного отличается от тех, что были найдены в системе — это не помеха, просто убираем KEYCODE_.
Прописываю свои кнопки (помните листок с карандашными записями? Самое время найти его. ):
. ВНИМАНИЕ .
Нужен текстовый редактор с поддержкой unix кодировки!
Блокнот из состава Windows НЕ подойдет ,
Используйте, к примеру, Notepad++
4. Момент истины
Сохраняем наш файл и копируем его в папку /system/usr/keylayout. Выставляем права -rw -r -r (644). Перезагружаем устройство (сам я этого не делал, просто заблокировал и разблокировал, но для чистоты совести и эксперимента обязан был это написать).
Подключаем наше устройство, и если всё сделали правильно, тут же сможете «крестовиной» перемещаться по меню Android. Кнопка, на которую назначили DPAD_CENTER, будет кнопкой выбора, а BUTTON_B — кнопкой «назад».
Q: Все прописываю верно, но конфиг не цепляется.
А: Если вы пропишете коды действий с ошибкой, например:
key 123 BUTTON_HOME вместо key 123 HOME
то система будет считать этот файл ошибочным.
Самый лучший способ проверить подхватывается ваш kl файл системой или нет — стереть все кейкоды или закомментировать их знаком #:
# key 123 BUTTON_HOME
Если файл подхватился — никакой реакции на кнопки не будет, но в KeyTest все будет отображаться.
Q: Все прописываю верно и без ошибок но все или часть кнопок не работают.
А: Попробуйте прописать scancode в hex формате: Нативная поддержка для устройств ввода (Пост romanctest #69194647)
Q: Дуалшок 4 постоянно отваливается или работает с задержкой.
А: Нативная поддержка для устройств ввода (Пост maxmergov #81264882)
Saitek Game Controller Drivers Download
After you upgrade your computer to Windows 10, if your Saitek Game Controller Drivers are not working, you can fix the problem by updating the drivers. It is possible that your Game Controller driver is not compatible with the newer version of Windows.
- Updates PC Drivers Automatically
- Identifies & Fixes Unknown Devices
- Supports Windows 10, 8, 7, Vista, XP
Popular Utilities
Driver Updates for Popular Saitek Game Controller Models
Featured Saitek Game Controller Downloads
How to Update Device Drivers
There are two ways to update drivers.
Option 1 (Recommended): Update drivers automatically — Novice computer users can update drivers using trusted software in just a few mouse clicks. Automatic driver updates are fast, efficient and elimate all the guesswork. Your old drivers can even be backed up and restored in case any problems occur.
Option 2: Update drivers manually — Find the correct driver for your Game Controller and operating system, then install it by following the step by step instructions below. You’ll need some computer skills to use this method.
Option 1: Update drivers automatically
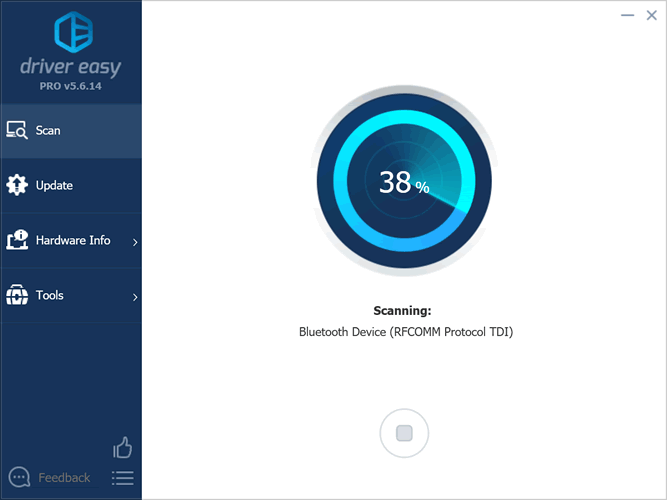
The Driver Update Utility for Saitek devices is intelligent software which automatically recognizes your computer’s operating system and Game Controller model and finds the most up-to-date drivers for it. There is no risk of installing the wrong driver. The Driver Update Utility downloads and installs your drivers quickly and easily.
You can scan for driver updates automatically and install them manually with the free version of the Driver Update Utility for Saitek, or complete all necessary driver updates automatically using the premium version.
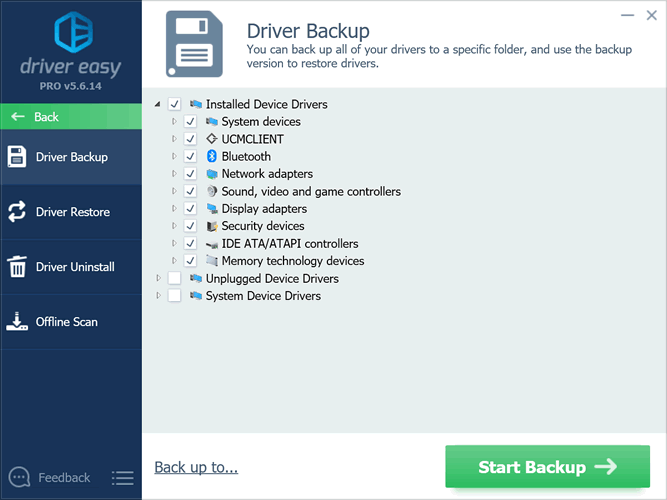
Tech Tip: The Driver Update Utility for Saitek will back up your current drivers for you. If you encounter any problems while updating your drivers, you can use this feature to restore your previous drivers and configuration settings.
Download the Driver Update Utility for Saitek.
Double-click on the program to run it. It will then scan your computer and identify any problem drivers. You will see a results page similar to the one below:
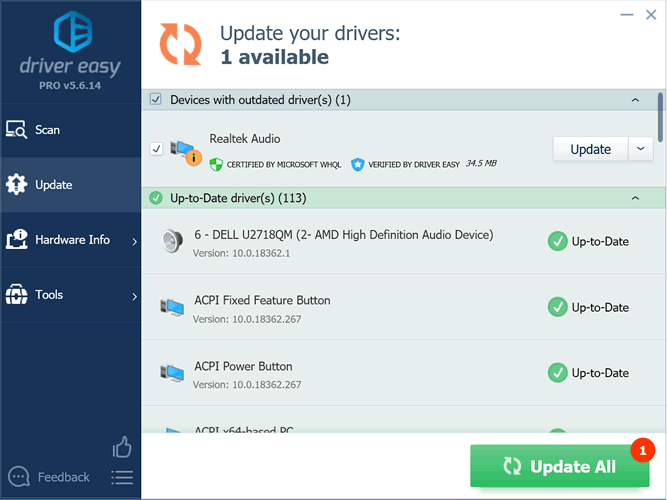
Click the Update button next to your driver. The correct version will be downloaded and installed automatically. Or, you can click the Update All button at the bottom to automatically download and install the correct version of all the drivers that are missing or out-of-date on your system.
Before updating, use the built-in driver backup feature to save your current drivers to a specified folder. Use this backup folder to safely restore drivers if necessary:
Option 2: Update drivers manually
To find the latest driver, including Windows 10 drivers, choose from our list of most popular Saitek Game Controller downloads or search our driver archive for the driver that fits your specific Game Controller model and your PC’s operating system.
Tech Tip: If you are having trouble finding the right driver update, use the Saitek Game Controller Driver Update Utility. It is software which finds, downloads and istalls the correct driver for you — automatically.
After downloading your driver update, you will need to install it. Driver updates come in a variety of file formats with different file extensions. For example, you may have downloaded an EXE, INF, ZIP, or SYS file. Each file type has a slighty different installation procedure to follow. Visit our Driver Support Page to watch helpful step-by-step videos on how to install drivers based on their file extension.
How to Install Drivers
After you have found the right driver, follow these simple instructions to install it.
- Power off your device.
- Disconnect the device from your computer.
- Reconnect the device and power it on.
- Double click the driver download to extract it.
- If a language option is given, select your language.
- Follow the directions on the installation program screen.
- Reboot your computer.
Saitek Drivers Download
The best way to fix your PC to run at peak performance is to update your drivers. If your system is slow, unresponsive or crashes often, the problem may be with your drivers. Sometimes, after upgrading to a newer operating system such as Windows 10, problems can occur because your current driver may only work with an older version of Windows. To download and update your drivers, follow the instructions below.
- Updates PC Drivers Automatically
- Identifies & Fixes Unknown Devices
- Supports Windows 10, 8, 7, Vista, XP
Recent Help Articles
Popular Saitek Device Categories
Driver Updates for Popular Saitek Device Models
Featured Saitek Downloads
How to Update Saitek Device Drivers Quickly & Easily
Tech Tip: Updating drivers manually requires some computer skills and patience. A faster and easier option is to use the Driver Update Utility for Saitek to scan your system for free. The utility tells you which specific drivers are out-of-date for all of your devices.
Step 1 — Download Your Driver
To get the latest driver, including Windows 10 drivers, you can choose from the above list of most popular Saitek downloads. Click the download button next to the matching model name. After you complete your download, move on to Step 2.
If your driver is not listed and you know the model name or number of your Saitek device, you can use it to search our driver archive for your Saitek device model. Simply type the model name and/or number into the search box and click the Search button. You may see different versions in the results. Choose the best match for your PC and operating system.
If you don’t know the model name or number, you can start to narrow your search down by choosing which category of Saitek device you have (such as Printer, Scanner, Video, Network, etc.). Start by selecting the correct category from our list of Saitek Device Drivers by Category above.
We employ a team from around the world. They add hundreds of new drivers to our site every day.
Tech Tip: If you are having trouble deciding which is the right driver, try the Driver Update Utility for Saitek. It is a software utility that will find the right driver for you — automatically.
Saitek updates their drivers regularly. To get the latest Windows 10 driver, you may need to go to the Saitek website to find the driver for to your specific Windows version and device model.
Step 2 — Install Your Driver
Once you download your new driver, then you need to install it. To install a driver in Windows, you will need to use a built-in utility called Device Manager. It allows you to see all of the devices recognized by your system, and the drivers associated with them.
How to Open Device Manager
In Windows 10 & Windows 8.1, right-click the Start menu and select Device Manager
In Windows 8, swipe up from the bottom, or right-click anywhere on the desktop and choose «All Apps» -> swipe or scroll right and choose «Control Panel» (under Windows System section) -> Hardware and Sound -> Device Manager
In Windows 7, click Start -> Control Panel -> Hardware and Sound -> Device Manager
In Windows Vista, click Start -> Control Panel -> System and Maintenance -> Device Manager
In Windows XP, click Start -> Control Panel -> Performance and Maintenance -> System -> Hardware tab -> Device Manager button
How to Install drivers using Device Manager
Locate the device and model that is having the issue and double-click on it to open the Properties dialog box.
Select the Driver tab.
Click the Update Driver button and follow the instructions.
In most cases, you will need to reboot your computer in order for the driver update to take effect.
Tech Tip: Driver downloads and updates come in a variety of file formats with different file extensions. For example, you may have downloaded an EXE, INF, ZIP, or SYS file. Each file type has a slighty different installation procedure to follow.
If you are having trouble installing your driver, you should use the Driver Update Utility for Saitek. It is a software utility that automatically finds, downloads and installs the right driver for your system. You can even backup your drivers before making any changes, and revert back in case there were any problems. You can safely update all of your drivers in just a few clicks. Once you download and run the utility, it will scan for out-of-date or missing drivers:
When the scan is complete, the driver update utility will display a results page showing which drivers are missing or out-of-date. You can update individual drivers, or all of the necessary drivers with one click.
For more help, visit our Driver Support Page for step-by-step videos on how to install drivers for every file type.


