- Mounting and mapping shares between Windows and Linux with Samba
- More Linux resources
- Setting up a Share Using Windows ACLs
- Namespaces
- Page actions
- Contents
- Introduction
- Preparing the Host
- File System Support
- Samba Extended ACL Support
- Enable Extended ACL Support on a Unix domain member
- Granting the SeDiskOperatorPrivilege Privilege
- Adding a Share
- Setting Share Permissions and ACLs
- Setting ACLs on a Folder
- File System ACLs in the Back End
- Настройка файлового сервера в локальной сети на Windows/Linux
- Что это такое?
- Создание и настройка частной сети
- Настройка файлового сервера
- Настройка файлового сервера на Linux (Debian/Ubuntu)
- Настройка общего публичного каталога на Windows
- Настройка общего приватного каталога на Windows
- Подключение к общему каталогу с помощью Linux
- Если общий каталог находится на Windows Server?
- Если общий каталог находится на Linux?
- Подключение к общему каталогу с помощью Windows
- Если общий каталог находится на Windows Server?
- Если общий каталог находится на Linux?
Mounting and mapping shares between Windows and Linux with Samba

More Linux resources
In my previous article, Interoperability: Getting started with Samba, I covered installing and configuring Samba shares on a Linux server. The real power of Samba comes when Windows clients can communicate with Linux file servers. In this article, I will cover how you can access Samba shares from both Linux and Windows clients.
Install the Samba client packages
To access Samba share from Linux clients we need to install a few Samba client packages.
On the client machine, install the samba-common and samba-client packages.
Check for available shares
Let’s check if we can access our shares from the server. We can use either the hostname or ip address of the server. If you use the hostname , make sure DNS is working.
Create a directory that we can use as our mount point. I’m going to create a directory under /mnt , but you can use any directory you would like to. You may need to configure SELinux on that directory.
Now, mount the share.
Now that we’ve mounted our share, we can check the mounts with the following command:
Let’s make that directory mount persistently so it can withstand a reboot. Using the text editor of your choice, edit the /etc/fstab file. You can do this in multiple ways, but I’m going to demonstrate two ways to mount the Samba share at boot in /etc/fstab .
The first option provides a username and password for the Samba user in the fstab .
The other option is to create a credential file. You can call this file anything, but I would like to call it cred . I would like to place credentials files in the home directory of the user. In our demonstration it will be /home/user/.cred .
The _netdev option is important since we are mounting a network device. Clients may hang during the boot process if the system encounters any difficulties with the network.
Now create that .cred file inside the user’s home directory.
Next, add the Samba user’s username and password.
Finally, mount all filesystems.
Access a share from a Windows client
I will be using Windows 10 as my client machine with a workgroup called SAMBA . We need to create a local user account on the Windows machine that matches the username and password of the Samba user account we created in my previous article. Although account creation is not necessary, this will make things simpler when accessing the share.
Like I mentioned above, this step is optional and you can skip it completely. Although there are multiple approaches to adding a new local user on a Windows machine, for the simplicity of this article I will be using PowerShell. Launch PowerShell as an administrator and issue following commands:
Now that we have created a new local user account matching the Samba user account, we can log in to Windows with our newly created user account.
Access a share from Windows Explorer
To access the Samba share from Windows Explorer, start typing the IP address to our share in the search area. I am using the hostname of the Samba server. In my case, it is centos . You can also access the share by using the IP address of the Samba server.

You might be prompted to enter the username and password to access the share if you skipped the local user creation process. If you get prompted for credentials, enter the Samba username and password we created in the previous article.
You will need to enter the Samba share path every time you want to access the share. There is a better way to access the share by mapping a drive to Samba share in Windows.
Mapping a drive to a Samba share
To map a drive to the Samba share, open PowerShell and issue following command:

Accessing a Samba share on Linux and Windows is easy. With this basic setup, you will be able to access file shares from client machines in your network. With somewhat more configuration, you can deploy Samba shares in a domain environment. Samba can do more than file share. If you would like to learn more about Samba, read this article about Windows and Linux interoperability. This is a basic set up, but you can do so much more with Samba.
[ Want to test your sysadmin skills? Take a skills assessment today. ]
Setting up a Share Using Windows ACLs
Namespaces
Page actions
Contents
Introduction
Extended access control lists (ACL) enable you to set permissions on shares, files, and directories using Windows ACLs and applications. Samba supports shares using extended ACLs on:
- Domain members
- Active Directory (AD) domain controllers (DC)
- NT4 primary domain controller (PDC)
- NT4 backup domain controllers (BDC)
- Standalone hosts
Preparing the Host
You need to set up Samba before you are able to create a share. Depending on what type of Samba server you require, see:
File System Support
The file system, the share will be created on, must support:
- user and system xattr name spaces.
- extended access control lists (ACL).
For further details, see File system support.
Samba Extended ACL Support
To create a share with extended access control list (ACL) support, the smbd service must have been built with ACL support enabled. A Samba host working as an Active Directory (AD) domain controller (DC), is always enabled with extended ACL support.
To verify if Samba has been built with ACL support, enter:
If no output is displayed:
- Samba was built using the —with-acl-support=no parameter.
- The Samba configure script was unable to locate the required libraries for ACL support. For details, see Package Dependencies Required to Build Samba.
Enable Extended ACL Support on a Unix domain member
Ideally you have a system that supports NFS4 ACLs. The following example is for systems like Linux, where you don’t have those kind of ACLs. To configure shares using extended access control lists (ACL) on a Unix domain member, you must enable the support in the smb.conf file. To enable extended ACL support globally, add the following settings to the [global] section of your smb.conf file:
 | On a Samba Active Directory (AD) domain controller (DC), extended ACL support is automatically enabled globally. You must not enable the support manually. |
Alternatively, to enable extended ACL support only for a specific share, add the parameters to the share’s section.
For further details about the parameters, see the smb.conf(5) man page.
Granting the SeDiskOperatorPrivilege Privilege
Only users and groups having the SeDiskOperatorPrivilege privilege granted can configure share permissions.
| Only users or groups that are known to Unix can be used. This means that if you use the winbind ‘ad’ backend on Unix domain members, you must add a uidNumber attribute to users, or a gidNumber to groups in AD. |
| If you use the winbind ‘ad’ backend on Unix domain members and you add a gidNumber attribute to the Domain Admins group in AD, you will break the mapping in idmap.ldb . Domain Admins is mapped as ID_TYPE_BOTH in idmap.ldb , this is to allow the group to own files in Sysvol on a Samba AD DC. It is suggested you create a new AD group ( Unix Admins for instance), give this group a gidNumber attribute and add it to the Administrators group and then, on Unix, use the group wherever you would normally use Domain Admins . |
To grant the privilege to the Unix Admins group, enter:
| It is recommended to grant the privilege to a group instead of individual accounts. This enables you to add and revoke the privilege by updating the group membership. |
To list all users and groups having the SeDiskOperatorPrivilege privilege granted, enter:
| You need to grant the SeDiskOperatorPrivilege privilege on the Samba server that holds the share. |
Adding a Share
To share the /srv/samba/Demo/ directory using the Demo share name:
- As the root user, create the directory:
- To enable accounts other than the domain user Administrator to set permissions on Windows, grant Full control ( rwx ) to the user or group you granted the SeDiskOperatorPrivilege privilege. For example (if using the ‘ad’ backend):
- Otherwise for any other backend:
- Add the [Demo] share definition to your smb.conf file:
Further share-specific settings and file system permissions are set using the Windows utilities.
| Do not set ANY additional share parameters, such as force user or valid users . Adding them to the share definition can prevent you from configuring or using the share. |
It is recommended that you add this line to your share:
This will make Samba ignore the system ACL’s
- Reload the Samba configuration:
Setting Share Permissions and ACLs
When you configure a share with extended access control lists (ACL) support, you set the share permissions using Windows utilities instead of adding parameters to the share section in the smb.conf file.
To set permissions and ACLs on the Demo share:
- Log on to a Windows host using an account that has the SeDiskOperatorPrivilege privilege granted. e.g. SAMDOM\Administrator or SAMDOM\john where john is a member of Unix Admins .
- Click Start , enter Computer Management , and start the application.
- Select Action / Connect to another computer .
- Enter the name of the Samba host and click OK to connect the console to the host.
- Open the System Tools / Shared Folders / Shares menu entry.
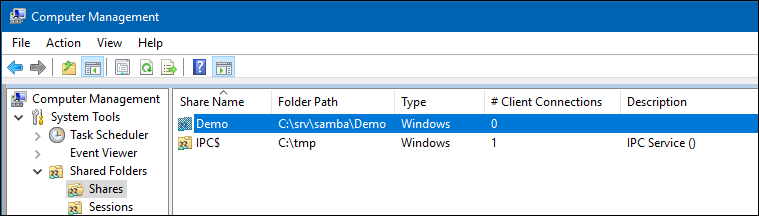
- Right-click to the share and select Properties .
- Select the Share Permissions tab and check the share permissions, you need to see Everyone . For example:
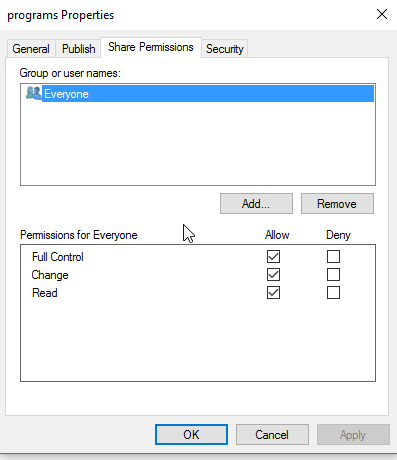
| If the permissions are as above, you do not need to change anything, if not, change it to just allow Everyone : Full Control, Change and Read . You should only need to make changes to the Security tab. |
Samba stores the share tab permissions in the /usr/local/samba/var/locks/share_info.tdb database.
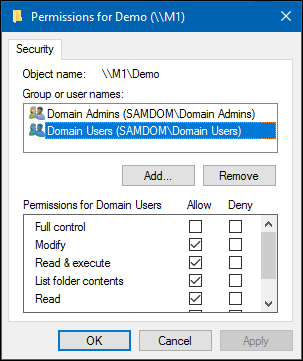
- Select the Security tab.
- Click the Edit button and set the file system ACLs on the share’s root directory. For example:
 For details about using the SYSTEM account on a Samba share see The SYSTEM Account. For details where the ACLs are stored, see File System ACLs in the Back End.
- Click the Add button.
- Click Advanced button
- Click Find Now
- Select a user or group from the list, Domain Users for instance.
- Click OK
- Click OK
- Select permissions to grant, Full control for instance.
- A windows security box should open, asking if you want to continue, Click Yes
- If you check the list of Group or user names , you should find Domain Users listed
- Click OK to close the Permissions for Demo window.
- Click OK to store the updated settings.
For further details about configuring share permissions and ACLs, see the Windows documentation.
Setting ACLs on a Folder
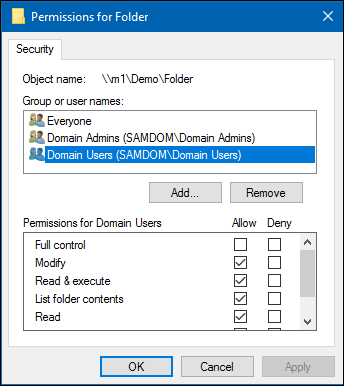
To set file system permissions on a folder located on a share that uses extended access control lists (ACL):
- Log on to a Windows host using an account that has Full control on the folder you want to modify the file system ACLs.
- Navigate to the folder.
- Right-click to the folder and select Properties .
- Select the Security tab and click the Edit button.
- Set the permission. For example:
 For details about using the SYSTEM account on a Samba share see The SYSTEM Account. For details where the ACLs are stored, see File System ACLs in the Back End.
- Click OK to close the Permissions for Folder window.
- Click OK to store the updated settings.
For further details about setting ACLs, see the Windows documentation.
File System ACLs in the Back End
Samba stores the file system permissions in extended file system access control lists (ACL) and in an extended attribute. For example:
- To list the extended ACLs of the /srv/samba/Demo/ directory, enter:
- To list the security.NTACL extended attribute of the /srv/samba/Demo/ directory, enter:
The previous example of file system ACLs and the extended attribute is mapped to the following Windows ACLs:
Настройка файлового сервера в локальной сети на Windows/Linux
В инструкции описан процесс настройки общего файлового сервера для всех пользователей локальной или виртуальной сети с операционными системами Linux и Windows.
Что это такое?
Файловый сервер работает по протоколу SMB/CIFS и позволяет предоставить доступ к общим ресурсам в локальной сети, например, текстовым файлам или сетевым принтерам. Для его развертывания на Windows используются штатные средства ОС, на Linux используется файловый сервер Samba.
В инструкции рассмотрена настройка файлового сервера на серверах с операционными системами Linux и Windows. На сервере будет находиться 2 каталога — публичный и приватный. К файловому серверу подключение будет происходить как с операционной системы Windows, так и с Linux, т.к. в виртуальной или физической локальной сети могут находиться серверы с разными ОС.

Создание и настройка частной сети
Для начала в панели управления должны быть созданы все необходимые для сети серверы.
После создания необходимо объединить все машины в единую локальную сеть через панель управления в разделе Сети. В результате серверы получат локальные IP-адреса.
После создания частной сети необходимо настроить сетевые адаптеры на каждом сервере. Об этом можно прочитать в наших инструкциях:
Настройка файлового сервера
Прежде всего, необходимо определиться, на сервере с какой операционной системой будет находиться общий каталог.
Настройка файлового сервера на Linux (Debian/Ubuntu)
Для развертывания файлового сервера на системах Linux используется инструмент SAMBA. Ниже перечислены действия по его установке и настройке.
Прежде всего следует обновить локальную базу пакетов:
Далее установите пакеты из главного репозитория:
apt-get install -y samba samba-client
Создайте резервную копию файла конфигурации Samba:
cp /etc/samba/smb.conf /etc/samba/smb.conf.bak
Создайте или выберете директорию, к которой все пользователи будут иметь общий доступ:
mkdir -p /samba/public
Перейдите к этому каталогу и измените режим доступа и владельца:
cd /samba
chmod -R 0755 public
Создайте или выберете каталог, к которому иметь доступ будут ограниченное число пользователей:
Создайте группу пользователей, которые будут иметь доступ к приватным данным:
Создайте нужных пользователей с помощью команды useradd:
Добавьте созданных пользователей в группу:
usermod -aG smbgrp user1
Измените группу, которой принадлежит приватная директория:
chgrp smbgrp /samba/private
Задайте пароль, с помощью которого пользователь будет подключаться к каталогу:
smbpasswd -a user1
Откройте файл конфигурации на редактирование с помощью текстового редактора, например nano:
Замените содержимое файла на следующие строки:
[global]
workgroup = WORKGROUP
security = user
map to guest = bad user
wins support = no
dns proxy = no
[public]
path = /samba/public
guest ok = yes
force user = nobody
browsable = yes
writable = yes
[private]
path = /samba/private
valid users = @smbgrp
guest ok = no
browsable = yes
writable = yes
Сохраните внесенные изменения, нажав CTRL+X, затем Enter и Y.
Значения параметров выше:
- global — раздел с общими настройками для Samba сервера
- workgroup — рабочая группа Windows, WORKGROUP — значение по умолчанию для всех Windows машин, если вы не меняли самостоятельно
- security — режим безопасности, значение user означает аутентификацию по логину и паролю
- map to guest — задает способ обработки запросов, bad user — запросы с неправильным паролем будут отклонены, если такое имя пользователя существует
- wins support — включить или выключить поддержку WINS
- dns proxy — возможность запросов к DNS
- public — название общего каталога, которое будут видеть пользователи сети, может быть произвольным и не совпадать с именем директории
- path — полный путь до общего каталога
- browsable — отображение каталога в сетевом окружении
- writable — использование каталога на запись, инверсия read only
- guest ok — авторизация без пароля
- force user — пользователь по умолчанию
- valid users — список пользователей, у которых есть доступ к каталогу, через @ указывается unix-группа пользователей
Проверить настройки в smb.conf можно с помощью команды:
Чтобы изменения вступили в силу, перезапустите сервис:
service smbd restart
Далее нужно настроить firewall, открыв порты, которые использует SAMBA. Настоятельно рекомендуем разрешить только подключения из локального диапазона IP-адресов или виртуальной частной сети. Адресное пространство вашей частной сети вы можете увидеть в панели управления 1cloud.
Замените значение параметра –s в правилах ниже для соответствия адресному пространству вашей частной сети. Как правило префикс сети /24, если вы явно не подразумеваете иного:
iptables -A INPUT -p tcp -m tcp —dport 445 –s 10.0.0.0/24 -j ACCEPT
iptables -A INPUT -p tcp -m tcp —dport 139 –s 10.0.0.0/24 -j ACCEPT
iptables -A INPUT -p udp -m udp —dport 137 –s 10.0.0.0/24 -j ACCEPT
iptables -A INPUT -p udp -m udp —dport 138 –s 10.0.0.0/24 -j ACCEPT
Теперь необходимо сделать так, чтобы указанные выше правила фаервола iptables были сохранены после перезагрузки машины. Для это установим пакет iptables-persistent:
apt-get install iptables-persistent
После установки откроется окно с предложением последовать запомнить текущие правила iptables для IPv4 и IPv6. Подтвердите это действие.
Проверить актуальные правила iptables можно командой:
В выводе команды вы должны увидеть ранее добавленные разрешающие политики (Accept).
Настройка общего публичного каталога на Windows
Для общего доступа к файлам по сети в Windows используются стандартные средства ОС.
Чтобы пользователи локальной сети могли без пароля подключаться к общему ресурсу, необходимо в панели управления снять ограничения защиты. Откройте панель управления и перейдите в раздел Сеть (Network and Internet) -> Центр управления сетями и общим доступом (Network and Sharing Center) -> Расширенные настройки общего доступа (Advanced sharing settings). В разделе Все сети (All Networks) выберете опцию Отключить доступ с парольной защитой (Turn off password protected sharing) и сохраните изменения.

Далее, чтобы настроить общий доступ к каталогу на Windows необходимо создать или выбрать нужный и открыть его свойства. В свойствах перейдите во вкладку Доступ (Sharing) и нажмите Расширенная настройка (Advanced Sharing).

В открывшемся окне отметьте галочкой Открыть общий доступ к этой папке (Share this folder), для того чтобы она стала общедоступной. В поле Имя общего ресурса (Share name) введите имя, которое будет видно всем пользователям. Далее нажмите Разрешения (Permissions) для настройки прав доступа.

Выберете нужные права доступа для всех пользователей (Everyone). Нажмите Применить (Apply), чтобы изменения вступили в силу.

Теперь в свойствах каталога нажмите Общий доступ (Share).

В поле поиска введите Все пользователи (Everyone) и нажмите Добавить (Add). Для полного доступа выберете права Read/Write и нажмите Поделиться (Share).


Теперь ваш каталог Windows доступен всем пользователям локальной сети без пароля.
Настройка общего приватного каталога на Windows
Для настройки общего каталога, который будет доступен только определенным пользователям, необходимо, чтобы данные пользователи существовали на сервере с общей папкой и на Windows машине с которой будет происходить подключение (наличие пользователя на Linux сервере не требуется), причем логин и пароль пользователей должны полностью совпадать. О том как создать нового пользователя читайте в нашей инструкции.
Чтобы пользователи локальной сети могли без пароля подключаться к общему ресурсу, необходимо в панели управления снять ограничения защиты. Откройте панель управления и перейдите в раздел Сеть (Network and Internet) -> Центр управления сетями и общим доступом (Network and Sharing Center) -> Расширенные настройки общего доступа (Advanced sharing settings). В разделе Все сети (All Networks) выберете опцию Отключить доступ с парольной защитой (Turn off password protected sharing) и сохраните изменения.

Далее, чтобы настроить общий доступ к каталогу на Windows необходимо создать или выбрать нужный и открыть его свойства. В свойствах перейдите во вкладку Доступ (Sharing) и нажмите Расширенная настройка (Advanced Sharing).


Так как каталог будет доступен только определенным пользователям, необходимо удалить группу Все пользователи (Everyone) с помощью кнопки Удалить (Remove).

Далее с помощью кнопки Добавить (Add) добавьте пользователей для управления каталогом.

Введите имя и нажмите Проверить имена (Check Names), выберете полное имя пользователя и нажмите OK.

Установите нужные права и нажмите Применить (Apply).

Теперь в свойствах каталога нажмите Поделиться (Share).

В поле поиска введите имя пользователя и нажмите Добавить (Add). Для полного доступа выберете права Чтение/Запись (Read/Write) и нажмите Поделиться (Share).

В итоге каталог стает общедоступным для определенных пользователей.

Подключение к общему каталогу с помощью Linux
Чтобы подключиться к общему каталогу, необходимо установить клиент для подключения:
sudo apt-get install smbclient
Для подключения используйте следующий формат команды:
Также можно выполнить монтирование общего каталога, для этого установите дополнительный пакет утилит:
sudo apt-get install cifs-utils
Для монтирования используйте следующий формат команды:
mount -t cifs -o username= ,password= // /
Где — адрес машины, на которой расположена общая директория, а — путь до общей директории.
mount -t cifs -o username=Everyone,password= //10.0.1.2/Win /root/shares/public
Если общий каталог находится на Windows Server?
Если общий каталог находится на сервере с операционной системой Windows, то для публичного каталога используйте имя пользователя Everyone, а в качестве пароля просто нажмите Enter. Например:
smbclient -U Everyone \\\\10.0.1.2\\Win
Enter Everyone’s password:
OS=[Windows Server 2016 Standard 14393] Server=[Windows Server 2016 Standard 6.3]
smb: \>
Для приватного каталога используйте имя пользователя и пароль, которому разрешен доступ.
Если общий каталог находится на Linux?
Если общий каталог находится на сервере с операционной системой Linux, то для публичного каталога используйте имя пользователя nobody, а в качестве пароля просто нажмите Enter. Например:
smbclient -U nobody \\\\10.0.1.2\\public
Enter nobody’s password:
OS=[Windows Server 2016 Standard 14393] Server=[Windows Server 2016 Standard 6.3]
smb: \>
Для приватного каталога используйте имя пользователя и пароль, которому разрешен доступ.
Подключение к общему каталогу с помощью Windows
Для подключения используйте Проводник Windows, в адресную строку введите строку в следующем формате:

Если общий каталог находится на Windows Server?
Если вы подключаетесь к приватному каталогу, то он откроется автоматически, а если подключаетесь к публичному, то перед вами вами появится окно для ввода данных для входа. Введите логин Everyone и пустой пароль, нажмите OK. В результате вы будете подключены к общему каталогу.

Если общий каталог находится на Linux?
Для подключения к публичной папке не требуется вводить логин или пароль, достаточно в адресную строку ввести нужный ip-адрес без ввода дополнительной информации. Для подключения к приватному каталогу введите логин и пароль пользователя в появившееся окно.


