- Костылим macOS после замены диска MacBook на 512 ГБ SSD M.2 Samsung 970 PRO (возвращаем быструю загрузку системы)
- Resolved Problem Formatting Samsung 970 EVO Plus NVMe SSD
- F-Train
- F-Train
- velocityg4
- F-Train
- Question: Q: 970 evo mac pro
- Helpful answers
- > Do the Samsung 970 EVO Plus drives work ? New Firmware Available 2B2QEXM7
- Bigboy008
- dehjomz
- Macxita
- yigitrkz
- bootpcanon
- Attachments
- Bigboy008
- stonejb
- SSD Tools & Software | Download | Samsung V-NAND SSD
- UNetbootin — Homepage and Downloads
- jaymonkey
- EvilDan
- stonejb
Костылим macOS после замены диска MacBook на 512 ГБ SSD M.2 Samsung 970 PRO (возвращаем быструю загрузку системы)
После апгрейда SSD на своем MacBook Air 13 mid 2013 с дефолтных эпловских 120 Гб на 512 Гб М.2 Samsung 970 PRO на macOS Catalina заметил пренеприятную для больного перфекциониста особенность — система стала дольше включаться, на 10 сек. это точно.
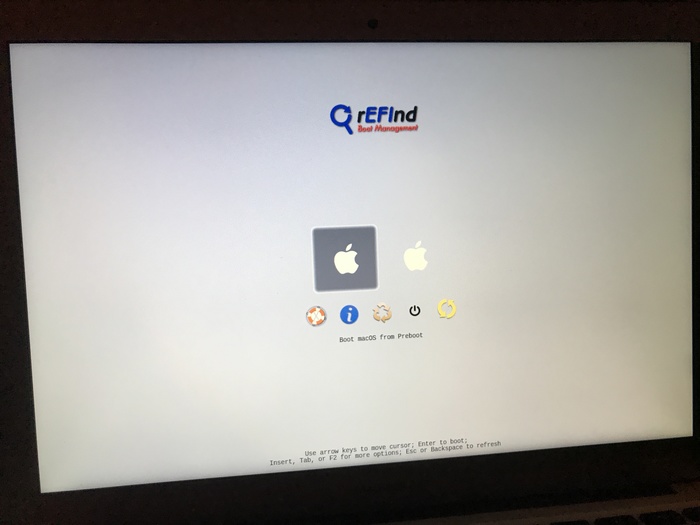
После звука «фанфар» раздающихся после нажатия на кнопку включения приходилось ждать те самые 10 сек. когда наконец появится «яблочко» загрузчика macOS с прогресс баром загрузки. При том, если после включения зажать клавишу «alt» и выбрать вручную для загрузки системы диск «Macintosh HD», то это самое «яблочко» загрузчика появлялось сразу и macOS в итоге загружалось быстрее на те 10 сек. ожидания. И тут закралась мысль, что бут-загрузчик от Apple «не спешит» с загрузкой системы с диска отличного от оригинального, что вполне в характере яблочной компании. В голову пришла идея заменить загрузчик системы на иной. Погуглив наткнулся на rEFInd Boot Manager (оф. сайт https://www.rodsbooks.com/refind/ ). Принцип работы — программа прописывает себя в системный раздел EFI, при этом эпловский бут-загрузчик остается на месте (от него кстати вообще избавиться нельзя, т.к. он сидит в прошивке Boot ROM на плате). Так вот после установки rEFInd начинает грузиться данный загрузчик, где если ничего не настраивать, появляется графическое окно загрузчика как на фото с обратным секундомером. Графическим интерфейсом rEFInd обделен, все настройки делаются вручную через конфиг файл. На сайте разработчика нашелся мануал как отредактировать конфиг файл.
В итоге, что я сделал: 1) включил мгновенную загрузку, т.е. убрал счетчик обратного времени, 2) убрал лого «rEFInd», 3) заменил серый фон на черный, чтобы во время долисекундного переключения серый фон загрузчика rEFInd не мелькал при переходе на стадию загрузки системы с «яблочком» на черном фоне.
На выходе получил то, что хотел — система стала загружаться на те самые 10 сек. быстрее, лого с «яблочком» загрузки после звука «фанфар» появляется уже на 2-ей сек. с прогресс баром загрузки системы. Если, что то стандартные эпловские опции по горячим клавишам при загрузке системы остались на месте: зайти в режим рекавери, выбрать диск для загрузки, сбросить настройки и т.п.
Ниже прилагаю пошаговые действия настройки загрузчика rEFInd Boot Manager с готовым конфигом.
1. На время установки загрузчика отключим SIP: в режиме рекавери (cmd + R) в терминале вводим без кавычек: «csrutil disable«
2. Качаем загрузчик refind-bin-0.12.0 (на время написании статьи совместим с macOS Catalina 10.15.4) https://cloud.mail.ru/public/4RqW/prgLonRfs
3. В папке находим и запускаем файл «refind-install«, откроется терминал, где нужно будет ввести пароль.
4. Перегружаемся, чтобы проверить установился ли наш загрузчик.
5. Если всё ок и загрузчик встал на место — открываем терминал и вводим команду для предоставления себе рут прав: «sudo -s«
6. Вводим следующую команду в терминале для создания временной папки для монтирования раздела EFI куда установился наш загрузчик: «mkdir /Volumes/EFI«
7. Вводим очередную команду в терминале для монтирования раздела EFI: «mount_msdos /dev/disk0s1 /Volumes/EFI«
8. Далее в Finder открываем появившийся диск EFI и следуем в папку «/EFI/EFI/refind«
9. Подменяем файл «refind.conf» и папку «icons» на те, что лежат в папке «заменить файлы после установки» в ранее скаченном архиве «refind-bin-0.12.0».
10. Далее извлекаем правой из Finder раздел EFI и выходим из сессии в терминале командой: «exit» и выключаем MacBook! (если сразу перезагрузиться, то изменений не произойдет, т.к. настройки загрузчика не вступят в силу, пол дня у меня на это ушло, чтобы догадаться).
11. Включаемся и радуемся быстрой загрузки и если хотим снова включаем SIP: «csrutil enable«.
Источник
Resolved Problem Formatting Samsung 970 EVO Plus NVMe SSD
F-Train
macrumors 65816
[Edit: see post #4 for how I was able to fix the problem.]
I have a 2018 Mac mini and I have this SSD as an external drive in a third party enclosure (TEKQ), which I successfully formatted Extended (Journaled).
I decided to reformat it APFS and I’m running into significant problems.
I got as far as what you see in the photo (note «Container Disk3», no name), but can’t go further.
Disk Utility and Terminal both hang indefinitely when I try to create an APFS Volume or erase/reformat to another format, regardless of what format I choose, including efforts to return to Extended (Journaled). I’ve even tried Paragon Software’s NTFS for Mac to see if I could format NTFS, but with the same result.
Running Disk Utility First Aid initially said that there is a corruption problem. At that point, I ran Recovery First Aid, which said that the problem was fixed. Now Disk Utility First Aid also hangs.
Looking at old threads, a couple of people have fixed this kind of problem, or similar, by formatting on a Windows or Linux machine, and then reformatting on a Mac. To try that, I need a computer with a TB3 port, but calls today to friends with Windows computers came up blank. On the upside, it looks like I inspired one friend to buy himself a new laptop
Any ideas, brilliant or otherwise?
F-Train
macrumors 65816
After further explorations with Recovery Mode First Aid and Terminal/diskutil, I’m pretty sure that the SSD and the enclosure are healthy.
Diskutil identifies the disk as APFS and says that there is an APFS container, but also says that there isn’t a file system in place. Everything that I’ve tried to correct that results in the process hanging.
I guess the next step is to plug the drive into a Windows computer, once I’ve managed to locate one that has a Thunderbolt 3 port, and try to format the drive NTFS or exFAT; if that works, then plug the drive back into my Mac mini and try to format it Extended (Journaled).
I just returned a WD My Passport SSD on the ground that it was defective. I had formatted it APFS and it was acting strangely. With this new issue, I’m beginning to wonder whether the problem was the WD drive or APFS.

velocityg4
macrumors 603
As for a Linux machine. You can boot Linux off a USB Flash Drive. I’d say use Ubuntu. As you’ll more readily find instructions for it. Don’t forget to disable Secure Boot.
Are you just erasing the disk or changing the partition map? I’d say convert it to MBR + ExFAT then return it to GUID + APFS.
F-Train
macrumors 65816
[Edit: Since writing this, I have run into further problems. Will update.]
First, thanks @velocityg4 for your post.
I’ve solved the problem and want to explain how in case others run into the same issue.
I booted into Boot Camp Windows. I’m new to Boot Camp and didn’t realise that all of Windows’s disk management tools are available via Boot Camp.
Windows Disk Management showed that there were two partitions, one a Mac EFI partition, the other unallocated. It was also clear that the drive is healthy.
I ran Windows Command using the command DISKPART with the command «clean». This did what it says on the tin. It erased everything, including the two partitions.
Next, I formatted the disk exFAT, downloaded a game from Steam, and ran the game to make sure that the drive is working properly.
Finally, I booted into macOS, where I was able to reformat the drive Extended (Journaled).
I don’t know what’s going on with AFPS. If I decide to try to format it AFPS again, I’ll do it via Disk Utility > Edit > Convert to AFPS rather than via Disk Utility’s Graphical User Interface. I believe that that should work, but for the moment I’m going to leave well enough alone
As part of this exercise, I discovered that WD has a page on converting its external drives to AFPS. I was unaware of this page when I was trying to get a WD My Passport SSD to work properly with AFPS (post #2), and it calls for more than a simple Disk Utility Erase/Convert. This may explain the odd behaviour that I was getting from the WD drive. Interestingly, it looks like WD may not be the only external drive manufacturer that has a somewhat unusual process for formatting drives as AFPS.
I hope that this thread is helpful to someone in the future.
Источник
Question: Q: 970 evo mac pro
Been looking for this info but have not found anything. Im looking to upgrade the SSD in my 2013 Mac Pro (trash can) with a 970 evo (via adapter) I’ve read that these have been a issue in some earlier macbooks but works fine with 2015 models and up. I know the Mac Pro was pretty future proof so I wanted to see if someone was using this or the 960 evo in their Mac Pro and how’s its working out?
Mac Pro, iOS 12.1
Posted on Nov 22, 2018 7:12 PM
Helpful answers
I»ve being using this set up for about two weeks on my late 2013 Mac Pro: my initiation to get it done properly is as follows:
1- Save you data to start because you’ll be removing the default Apple internal SSD.
2- just make sure BEFORE swapping the SSD that with High Sierra with all Security updaters or Mojave was installed on that computer before pulling the default SSD. You are trying to get the latest firmware update into that computer.
3- I used the Simtech with the Samsung 970 NVMe placed into it. Seat it properly then only install either High Sierra or Mojave onto that Samsung. Anything earlier is not going to work. Don’t even use Disk Utility to try and make it an HFS disk. Not going to do the job.
4- the 2013 Mac Pro boots, sleeps and wakes properly.
5- ASP shows as TRIM = YES. amazing
6- ASP shows link width as 4 another amazing
7- HEAT I used Intel power gadget to measure and the heat difference between the Apple default and this Samsung was one degree, This was placing stress using Handbrake on one full encode. I have not used a heat sink on the Samsung. If you read the Samsung readme found online they spout off about their superior product to control heat. I’m pretty sure heat will not be a big issue especially not using a program such a Handbrake. But if over time it does then I’ll just swap in my Apple default. Keep that default around in case you need to make any other firmware update.
Good luck for me so far so good.
ps I did try this on my late 2013 rMBPRO , it took my install but remained screen black but turned on and would not boot. So I pulled it and replaced the Apple default and got it back to normal. I’m thinking that I did not pull the battery connector and that might have caused an SMC problem which I could not clear. I’m going to try it again but I’m not hung up on this one.
Источник
> Do the Samsung 970 EVO Plus drives work ? New Firmware Available 2B2QEXM7

Bigboy008

dehjomz

Macxita

yigitrkz

bootpcanon
Attachments
Bigboy008
@bootpcanon: a quick addition to your list: In case you want to use this process for a macbook. You need to press the option key while restarting the MB and then select the EFI option to start from the USB.
It then also boots into the Samsung update process.
stonejb
I was working on 970 EVO Plus with Sonnet 4×4 pcie card these days.
Finally it works, for several hours and restarts, including Mojave installation.
In Samsung Support site, there is an ISO file of firmware update utility for EVO Plus, named
NVMe SSD-970 EVO Plus Firmware
SSD Tools & Software | Download | Samsung V-NAND SSD
UNetbootin — Homepage and Downloads
Download the Unetbootin for Mac and open it, ignore the alert that it may not be compatible
It can create an EFI bootable USB working with Mac.
Startup with the boot USB, step by step, it will update firmware to drives one by one, even in a RAID set.
For the system installation, I formatted the drive to APFS, and it ran very smoothly.
My System: Mac Pro 2010, 12 cores, 5,1 of boot ROM 141.0.0.0.0
OS: Mojave 10.14.5 (18F132)
PCIe card: Sonnet M.2 4×4 PCIe card, x16 PCIe 3.0, up to 4 SSD’s

jaymonkey
Moderator
Good to know Samsung have finally addressed the issue . thanks for the update guys.

EvilDan
So I’m running into issues trying to update the firmware (2Tb EVO Plus in external TB3 enclosure). I’ve tried the Samsung Magician software in Boot Camp windows where the SSD is detected but it believes that 1B2QEXM7 firmware is the latest version so does not offer an update.
I’ve also tried creating the bootable USB firmware update where it runs but then I get to the screen with «Samsung Firmware Updater 3.1» and Press Any Key but I press all the keys on the MacBook Pro keyboard and nothing happens to progress to the next section to detect the SSD.
Anyone come up against the same and have a solution? Many thanks.
UPDATE: I’ve been able to format it as ex-FAT in Disk Utility and able to run a performance benchmark in Samsung Magician which is giving sequential speeds of: Read 2510 MB/s and Write 739 MB/s. Obviously I want it as an APFS drive preferable so will keep trying to update.
stonejb
So I’m running into issues trying to update the firmware (2Tb EVO Plus in external TB3 enclosure). I’ve tried the Samsung Magician software in Boot Camp windows where the SSD is detected but it believes that 1B2QEXM7 firmware is the latest version so does not offer an update.
I’ve also tried creating the bootable USB firmware update where it runs but then I get to the screen with «Samsung Firmware Updater 3.1» and Press Any Key but I press all the keys on the MacBook Pro keyboard and nothing happens to progress to the next section to detect the SSD.
Anyone come up against the same and have a solution? Many thanks.
UPDATE: I’ve been able to format it as ex-FAT in Disk Utility and able to run a performance benchmark in Samsung Magician which is giving sequential speeds of: Read 2510 MB/s and Write 739 MB/s. Obviously I want it as an APFS drive preferable so will keep trying to update.
Источник


