- SanDiskSecureAccessV3_win.exe на флешке что это? (RunSanDiskSecureAccess_Win.exe)
- Основные функции SanDiskSecureAccess
- Важные моменты
- Удаление SanDiskSecureAccessV3
- SanDisk SecureAccessV3.02 6.0.37
- Leave a Reply Cancel reply
- Question: Q: how to uninstall sandisk secure access manager
- Helpful answers
- SanDisk SecureAccess
- What Is SanDisk Secure Access and How to Use It? [Partition Manager]
- Summary :
- Quick Navigation :
- What Is SanDisk Secure Access?
- How to Use SanDisk Secure Access?
- SanDisk Secure Access FAQ
- ABOUT THE AUTHOR
SanDiskSecureAccessV3_win.exe на флешке что это? (RunSanDiskSecureAccess_Win.exe)
 После покупки флешки, на ней можно найти SanDiskSecureAccessV3_win.exe — расширение exe сообщает что это установщик. Как оказалось — это фирменная программа SanDisk SecureAccess, которая обеспечивает защиту содержимого флешки от несанкционного доступа.
Работа программы заключается в создании зашифрованной области на накопителе. Доступ к области только по паролю.
Шифрование происходит по алгоритму AES (Advanced Encryption Standard) используя 128-разрядный ключ.
V3 в названии означает версию программы.
Защищенная область идеально подходит для хранения важных, личных файлов/документов. Учитывая высокую скорость записи/чтения современных флешек и большой обьем — программа SanDisk SecureAccess действительно удобна. Минус только один — забыв пароль файлы будут утеряны навсегда.
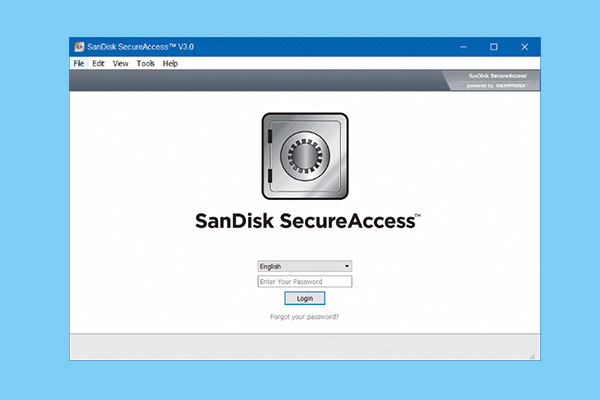
К сожалению, в версии V3.0 русский язык отсутствует:

Если не будете ставить программу SanDisk SecureAccess, файлы на флешке можно удалить:

При наличии антивируса, можно нажать правой кнопкой по флешке в окне Мой компьютер и просканировать на вирусы.
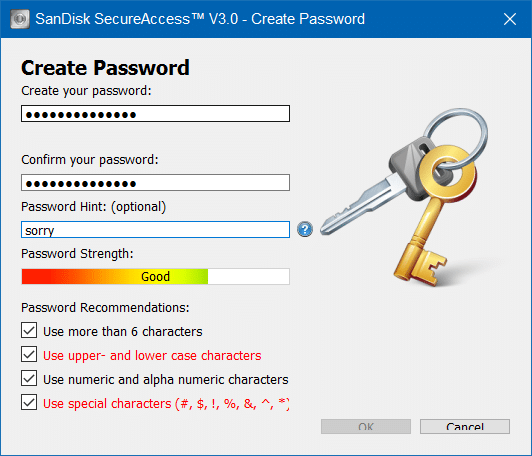
Окно Create Password (создание пароля):

Внешний вид утилиты (правда здесь версия V2.0, но все же):

Один юзер столкнулся с проблемой при удалении защищенной области SanDisk SecureAccess. Решение оказалось простым — необходимо в управление дисками пересоздать раздел флешки:

Что интересно — один юзер заметил скрытые файлы:

Такие файлы могли появиться при создании загрузочной флешки. Возможно раньше флешка использовалась именно как загрузочная. Во всех остальных вариантах данные файлы — не нужны.
Также на флешке могут быть:
- club_application — предположительно папка, в которой хранятся дополнительные файлы программы (так называемые ресурсы).
- My Vaults — возможно как-то связано с защищенной областью.
- SanDiskSecureAccess — папка либо инсталлятор приложения.
- RunClubSanDisk — модуль/батник запуска ClubSanDisk.
- RunSanDiskSecureAccess_Win — запуск инсталляции ПО.
При подозрении наличия вируса на флешке — проверьте файлы на сайте ВирусТотал. Использовать сервис очень просто — открыли сайт, загрузили файл, после чего он будет проверен десятками антивирусными движками.
Если вы программу не собираетесь устанавливать — файлы можно удалить. В любом случае, при необходимости утилиту SanDisk SecureAccess можно загрузить на официальном сайте:
Данное ПО не является обязательным и предоставляется в качестве дополнительной функции:

Основные функции SanDiskSecureAccess
Перечислим главные функции утилиты:
- Высокая скорость работы.
- Надежные настройки пароля (использование спец знаков/символов).
- Поддержка редактирования документов, которые находятся в защищенном хранилище.
- Поддержка создания зашифрованного бэкапа/восстановления.
- После копирования файлов в защищенную область их можно удалить, используя технологию File Shredder (предположительно имеется ввиду удаление без возможности восстановления).
Важные моменты
Некоторые особенности, о которых важно знать:
- При потери пароля, информацию восстановить будет невозможно.
- Отсутствует возможность восстановить пароль.
- Служба поддержки SanDisk не в силах помочь восстановить файлы. Секретный/универсальный пароль отсутствует.
- Сброс пароля возможен только в одном случае — удаление раздела > создание нового. После — форматирование. После перечисленных действий файлы будут стерты.
Утилита поддерживает работу на Windows 7/8/10/Vista, а также Мак версии 10.7+ (только Интел).
Удаление SanDiskSecureAccessV3
Для удаления можно использовать специальные удаляторы — Revo Uninstaller, Uninstall Tool. Подходит для продвинутых пользователей.
Либо использовать штатные функции удаления ПО — окно Программы и компоненты. Зажмите Win + R, введите команду:

В списке установленного софта найдите SanDiskSecureAccess, кликните правой кнопкой мыши, выберите Удалить. Следуйте инструкциям на экране.
Источник
SanDisk SecureAccessV3.02 6.0.37

SanDisk SecureAccess – бесплатное приложение для защиты критически важных и конфиденциальных файлов на любом SanDisk USB флеш-диске. При желании, программе можно скормить флешку любого другого производителя, но это требует небольшого допила. Например, мне удалось подружить SMI-флешку, немного изменив идентификационную информацию на следующую:
VID = 0781
PID = 558B
Vendor: SanDisk
Product: Extreme
При использовании SecureAccess, доступ к вашему личному хранилищу будет ограничен персональным паролем, и все ваши файлы автоматически шифруются алгоритмом AES-128.
Программное обеспечение SecureAccess не является обязательным для использования на флеш-накопителе и при желании её можно удалить, без каких-либо последствий.
Русскоязычное PDF-руководство пользователя выпускалось только для первой версии (SecureAccessV1) и доступно по ссылке данной ниже.
ВАЖНО: Программа шифрует данные с помощью 128-битного шифрование AES. Так что если забудете пароль, вы не сможете восстановить информацию хранящуюся на флэшке. Даже служба поддержки клиентов компании SanDisk не может выручить вас и предоставить альтернативный способ доступа к зашифрованным данным. Всё что останется вам сделать, это отформатировать накопитель и при желании переустановить программу SecureAccess.
; for Windows:
SanDisk SecureAccess V1.1.19755 ; RunSanDiskSecureAccess-Win.rar; size: 13 021 844 bytes
SanDisk SecureAccessV2.0 5.4.16W ; SanDiskSecureAccessV2_win_5.4.16.rar; size: 7 552 910 bytes
SanDisk SecureAccessV3.0 6.0.17W ; SanDiskSecureAccessV3_win_6.0.17.rar; size: 7 640 083 bytes
SanDisk SecureAccessV3.01 6.0.32W ; SanDiskSecureAccessV3_win_6.0.32.rar; size: 8 332 822 bytes
SanDisk SecureAccessV3.01 6.0.34W ; SanDiskSecureAccessV3_win_6.0.34.rar; size: 8 331 576 bytes
SanDisk SecureAccessV3.02 6.0.36W ; SanDiskSecureAccessV3_win_6.0.36.rar; size: 8 558 503 bytes
SanDisk SecureAccessV3.02 6.0.37W ; SanDiskSecureAccessV3_win_6.0.37.rar; size: 8 558 446 bytes
; for MacOS:
SanDisk SecureAccess V1.1.1975M ; RunSanDiskSecureAccess_Mac.app.rar; size: 14 390 645 bytes
SanDisk SecureAccessV2.0 5.4.16M ; SanDiskSecureAccessV2_mac_5.4.16.rar; size: 9 114 789 bytes
SanDisk SecureAccessV2.0 5.4.19M ; SanDiskSecureAccessV2_mac_5.4.19.rar; size: 12 990 662 bytes
SanDisk SecureAccessV3.01 6.0.34M ; SanDiskSecureAccessV3_mac_6.0.34.rar; size: 14 042 051 bytes
SanDisk SecureAccessV3.02 6.0.37M ; SanDiskSecureAccessV3_mac_6.0.37.rar; size: 13 601 931 bytes
SanDisk SecureAccess v2.0 for Mac users [DownloadForMac_SanDiskSecureAccessV2.0.pdf] ; download; size: 291 736 bytes
SanDisk SecureAccess v3.01 for Mac users [DownloadForMac_SanDiskSecureAccessV3.01.pdf] ; download; size: 344 113 bytes
SanDisk SecureAccessV2 Quick Start Guide 80-36-03698_ML v2.0 [QuickStartGuide_SanDiskSecureAccessV2.0.pdf] ; download; size: 2 218 483 bytes
SanDisk SecureAccessV3 Quick Start Guide 12-10-2016 [SanDiskSecureAccessV3.0_QSG.PDF] ; download; size: 2 227 454 bytes
SanDisk SecureAccessV1 Quick Start Guide 80-36-03471_KO [sd-secureaccess-qsg-1-2012.pdf] ; download; size: 8 227 150 bytes
SanDisk SecureAccessV2 Quick Start Guide 80-36-03698_ML [secureaccessv2-qsg.pdf] ; download; size: 1 616 031 bytes
SanDisk SecureAccessV3 Quick Start Guide 10-11-2016 [secureaccessv3-qsg.pdf] ; download; size: 2 228 606 bytes
Leave a Reply Cancel reply
This site uses Akismet to reduce spam. Learn how your comment data is processed.
Источник
Question: Q: how to uninstall sandisk secure access manager
I just installed SanDisk secureaccess manager on my imac for a thumbdrive, and it has seemed to caused all sorts of problems for my mav. How do I uninstall?
MacBook, Mac OS X (10.6.8)
Posted on Sep 23, 2013 2:00 PM
from the Sandisc user guide:
«delete the SanDisk SecureAccess Manager folder located in the Application folder».
Posted on Sep 23, 2013 2:32 PM
Helpful answers
Uninstalling Software: The Basics
Most OS X applications are completely self-contained «packages» that can be uninstalled by simply dragging the application to the Trash. Applications may create preference files that are stored in the /Home/Library/Preferences/ folder. Although they do nothing once you delete the associated application, they do take up some disk space. If you want you can look for them in the above location and delete them, too.
Some applications may install an uninstaller program that can be used to remove the application. In some cases the uninstaller may be part of the application’s installer, and is invoked by clicking on a Customize button that will appear during the install process.
Some applications may install components in the /Home/Library/Applications Support/ folder. You can also check there to see if the application has created a folder. You can also delete the folder that’s in the Applications Support folder. Again, they don’t do anything but take up disk space once the application is trashed.
Some applications may install a startupitem or a Log In item. Startupitems are usually installed in the /Library/StartupItems/ folder and less often in the /Home/Library/StartupItems/ folder. Log In Items are set in the Accounts preferences. Open System Preferences, click on the Accounts icon, then click on the LogIn Items tab. Locate the item in the list for the application you want to remove and click on the «-» button to delete it from the list.
Some software use startup daemons or agents that are a new feature of the OS. Look for them in /Library/LaunchAgents/ and /Library/LaunchDaemons/ or in /Home/Library/LaunchAgents/.
If an application installs any other files the best way to track them down is to do a Finder search using the application name or the developer name as the search term. Unfortunately Spotlight will not look in certain folders by default. You can modify Spotlight’s behavior or use a third-party search utility, EasyFind , instead.
Some applications install a receipt in the /Library/Receipts/ folder. Usually with the same name as the program or the developer. The item generally has a «.pkg» extension. Be sure you also delete this item as some programs use it to determine if it’s already installed.
There are many utilities that can uninstall applications. Here is a selection:
Источник
SanDisk SecureAccess
Защитите свои личные файлы
Защитите свои личные файлы
Программное обеспечение SanDisk SecureAccess создает личную папку, защищенную паролем, на вашем USB-накопителе SanDisk, где вы можете хранить ваши самые важные личные файлы. Ваши данные будут защищены надежным 128-битным шифрованием AES.
Защищает личные данные и конфиденциальные бизнес-файлы
Независимо от того, являетесь ли вы обычным пользователем USB или занятым профессионалом, программное обеспечение SanDisk SecureAccess обеспечит вам необходимую безопасность данных. Вы сможете защитить отсканированные личные документы от посторонних глаз и сохранить свои деловые секреты в безопасности — даже если ваш диск утерян или украден.
Передача файлов без проблем
Перенос файлов в личную папку прост и интуитивно понятен: просто перетащите файлы из любого места на своем компьютере в папку. Когда файлы загружаются, они будут надежно защищены.
Безопасное резервное копирование ваших данных в Интернете
Программное обеспечение SanDisk SecureAccess также предоставляет вам до 2 ГБ безопасного облачного хранилища, предлагаемого YuuWaa. После краткой регистрации вы можете использовать программное обеспечение SanDisk SecureAccess, чтобы одним нажатием кнопки отправить семейные фотографии, важные деловые документы и другие личные данные в облако.
Совместимость
Программное обеспечение SanDisk SecureAccess поддерживается Windows XP, Windows Vista, Windows 7 и Mac OS 10.5 и выше. Использование с Mac требует дополнительной загрузки программного обеспечения.
Источник
What Is SanDisk Secure Access and How to Use It? [Partition Manager]
By Linda | Follow | Last Updated August 11, 2020
Summary :
What is SanDisk Secure Access? Should I keep it on my USB flash drive? How to use SanDisk Secure Access? In this post, MiniTool Partition Wizard will introduces SanDisk Secure Access and shows you how to use this software to password protect and back up your USB drive data.
Quick Navigation :
What Is SanDisk Secure Access?
In order to increase the value of products, manufacturers of U disks and branded mobile hard disks generally include value-added software and tools with various functions in their products. SanDisk Secure Access is such software. It is the official software that comes with the product of SanDisk USB flash drive. Its functions include U disk data encryption and online backup of data.
Available in both Mac and Windows flavors, SanDisk Secure Access software uses 128 bit AES encryption to create a password-protected folder—SanDiskSecureAccess Vault—on the flash drive. Any locked files are moved into the SanDiskSecureAccess Vault and can be accessed only with a password.
In addition, SanDisk Secure Access comes with a backup facility for up to 2 GB of data online. The online backup facility can be used to share personal pictures, documents, confidential business secrets or banking details safely via secure media. But to avail this facility, SanDisk Secure Access users need to complete a brief registration process with the service provider.
With Secure Access, users are assured that important data is secure and accessible even if the pen drive gets stolen or lost.
To protect your data, you may have encrypted your SD card. But do you know how to encrypt SD card? In this post, you can find the answer.
How to Use SanDisk Secure Access?
SanDisk Secure Access is not a necessary part of the SanDisk flash drive and it can be easily deleted. But fortunately, you can download and install it again easily. Here is the tutorial on how to install and use SanDisk Secure Access:
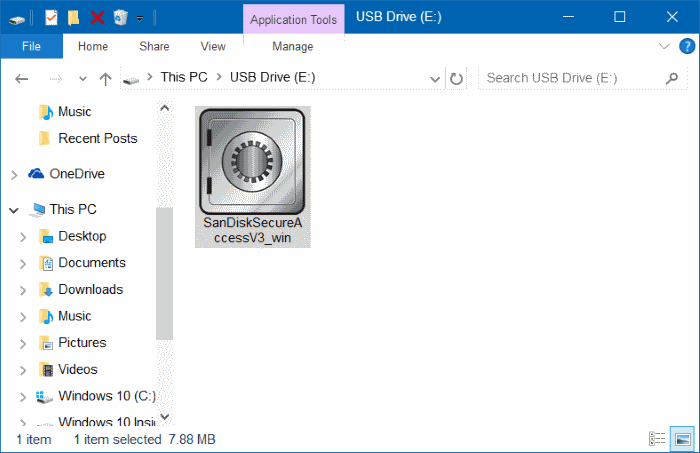
Step 1: Download SanDisk Secure Access from its official download page. Connect your SanDisk USB flash drive to your computer. Then, copy the previously downloaded Secure Access setup file into the USB drive.
Step 2: Double-click on the SecureAccess setup file to start installing this software. Follow the wizard to accept the license terms and set up a strong password. The strong password should consist of at least six characters and SanDisk recommends you to create it by including both upper and lower case letters, numeric and alpha numeric numbers, and special characters.
Step 3: After setting the password, click OK button to create a new vault on your USB drive. Then, a window pops up, which tells you how to use SanDisk SecureAccess. After reading the «How to» guide, please click Next button.
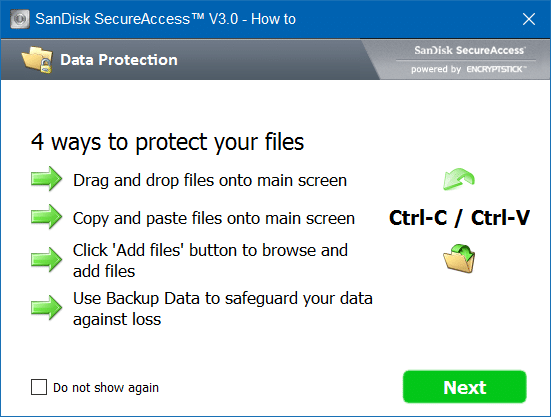
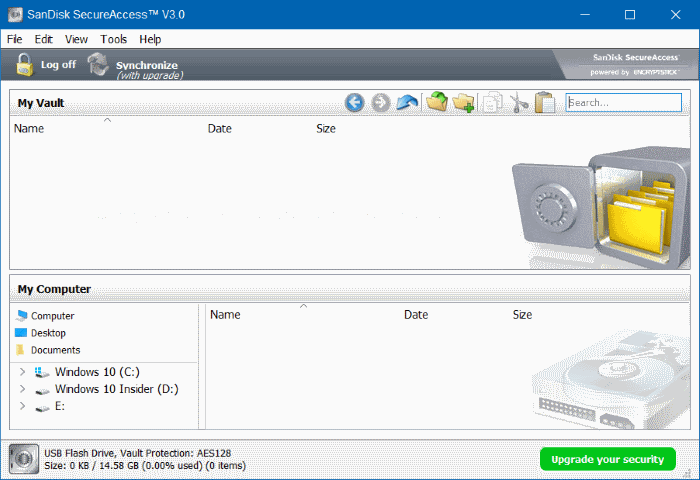
Step 4: When SanDisk SecureAccess opens, you can get the following window. To password protect a file or folder, you just need to drag or copy this file or folder to My Vault section.
You can take 5 ways to protect valuable, personal or confidential data in Windows platform, and detailed steps for each method are shown in this post.
However, while the SecureAccess makes it easy for users to password protect files, anyone who has access to your USB drive can delete the password-protected SecureAccess vault with ease. In short, although no can view your sensitive file(s), they can delete your file(s).
To avoid such a case, you should backup your important files to a safe place before storing them on USB flash drive. Of course, you can also click Tools > Backup Data to back up your vault data online. Please note that you can only have one backup file at a time.
How to make SanDisk data recovery when you come across data loss from SanDisk SD card/USB drive/SSD/memory stick? Check out this post for the best solution.
SanDisk Secure Access FAQ
If you have backed up vault data online, you can restore the data on another SanDisk USB flash drive when the old drive is damaged or lost. Please note that this operation will delete all files in the current vault. You should make sure your vault is empty or save all files from the current vault to another location before proceeding. Here are steps:
- Click Tools >Restore Data.
- Choose the location to be restored from the backup file using drop-down menu and click Next.
- Select the backup to be restored and click Next.
- Enter the Vault Password used when the backup was created.
- Click on Restorefor the restore operation to start.
- Wait until the restore operation is finished and then click Close.
ABOUT THE AUTHOR

Position: Columnist
Author Linda has been working as an editor at MiniTool for 1 year. As a fresh man in IT field, she is curious about computer knowledge and learns it crazily. Maybe due to this point, her articles are simple and easy to understand. Even people who do not understand computer can gain something.
By the way, her special focuses are data recovery, partition management, disk clone, and OS migration.
Источник


