- Save all windows updates
- Description
- System Requirements
- Versions History
- Using WinUpdatesList
- Connecting to another operating system (Windows 2000/XP only)
- 4 Ways To View And Save List Of Updates Installed On Windows 10
- Using Windows Update History
- Using Command-line options – DISM/SystemInfo
- SystemInfo
- Using PowerShell
- Using WinUpdatesList
- Continue Reading:
- 2 thoughts on “ 4 Ways To View And Save List Of Updates Installed On Windows 10 ”
- Delete Downloaded Windows Update Files in Windows 10
- Run the built-in Windows Update troubleshooter.
- To Delete Downloaded Windows Update Files in Windows 10,
- Delete Downloaded Windows Update Files with a Batch File
- Here’s how does it work
- About Sergey Tkachenko
- 5 thoughts on “ Delete Downloaded Windows Update Files in Windows 10 ”
- Save all Windows processes to a text file
- The Tasklist tool
Save all windows updates
Notice: This tool is very old and it’s not updated anymore. There is a new tool that replaces this old tool:
Windows Updates History Viewer
Description
System Requirements
Versions History
- Version 1.33:
- Fixed issue: The ‘Installation Date’ column displayed the time in GMT instead of local time.
- Version 1.32:
- Fixed the URLs on Microsoft Web site to the current format: http://support.microsoft.com/kb/xxxxxx
- Fixed to display the ‘Last Modified Time’ values according to daylight saving time settings.
- Version 1.31:
- Added ‘Mark Odd/Even Rows’ option, under the View menu. When it’s turned on, the odd and even rows are displayed in different color, to make it easier to read a single line.
- Added ‘Add Header Line To CSV/Tab-Delimited File’ option. When this option is turned on, the column names are added as the first line when you export to csv or tab-delimited file.
- Version 1.30:
- Added partial support for Windows 7/Vista/2008. The windows updates information is displayed in the upper pane, but there is no installed files information in the lower pane. Also on these version of Windows, you cannot view the information on remote computer.
- Added ‘Long Description’ column, for Windows 7/Vista/2008 only.
- Version 1.23:
- Fixed bug: The dates displayed in system locale, instead of user locale.
- Version 1.22:
- Added support for saving as comma-delimited file.
- Fixed bug: The main window lost the focus when the user switched to another application and then returned back to WinUpdatesList.
- Version 1.21:
- Fixed bug: Crash when running wul.exe with command-line parameters.
- Version 1.20:
- Changed Operating System column to Application.
- Added filter by application (Windows, .NET, and others)
- Added ‘Last Modified Time’ column.
- Fixed Web link for .NET Updates.
- Configuration is now saved to cfg file instead of the Registry.
- Updates with extra sub-key level (in the Registry) are now displayed properly.
- Version 1.13: A tooltip is now displayed when a string in a column is longer than the column length.
- Version 1.12: Added support for Windows XP styles.
- Version 1.11:
- On Windows 2000/XP: new command-line options that allows you to connect another operating system on local or remote computer.
- Computer name is now added to XML and HTML files.
- Version 1.10:
- Added support for Windows 98/ME
- ‘Open Web Link’ now opens each link in a new browser window.
- Command-Line support.
- Version 1.00 — First Release.
Using WinUpdatesList
The main window of WinUpdatesList contains 2 panes: The upper pane displays the list of all updates installed on your computer. When you select an hotfix in the upper pane, the lower pane display the list of files installed with the selected hotfix.
If you want to get more information about a specific update, select the desired item in the upper pane, and then from the File menu (or from the popup menu) choose ‘Open Web Link’. This option opens your browser with a Web page in Microsoft site that provides information about the selected Windows update.
Notice: Some operations, like saving to file or copying to the clipboard, are performed on the pane that currently has the focus. For example: If you press Ctrl+C while the lower pane is focused, the selected files list will be copied to the clipboard. If the upper pane has the focus, the selected updates in the upper pane will be copied.
Connecting to another operating system (Windows 2000/XP only)
The second parameter specifies the Windows folder of the operating system.
Be aware that when you use this option, WinUpdatesList loads the Registry of the other operating system as a new hive under HKEY_LOCAL_MACHINE, and than unloads it after you exit from WinUpdatesList.
4 Ways To View And Save List Of Updates Installed On Windows 10
Normally, Windows Update does not require any administration. Microsoft is making it much like a set it and forget it tool. But some applications require specific hotfixes and updates installed on your computer before they can run. For example, some applications require a specific version of .NET Framework, Visual C++ redistributable or Java, etc. And some apps require hotfixes instead of add-ons.
In this article, we will discuss how to view a list of all the Windows updates installed on your computer, whether they are feature updates, hotfixes or quality updates. There are several ways of doing this. We will discuss some ways of viewing and saving the list of installed updates in Windows 10. Each method has its own advantages. You can use whichever is suitable for your specific requirement. If you are a network administrator, you should pay attention to the command-line and PowerShell methods as these can be used to extract data from remote computers as well.
So let’s start with the visual option first.
Using Windows Update History
- Go to Windows Settings (Windows key + i)
- Go to Update & Security
- Select Windows Update from the left-hand menu and click on View update history link on the right-hand side.
View update history in Windows 10
This will show you all the updates installed on your Windows 10 computer. The updates are categorized into the following categories:
- Quality updates
- Driver updates
- Definition updates
- Other updates
The only caveat in using this method is you can’t search for a specific update. You will have to go through the list of updates manually.
Using Command-line options – DISM/SystemInfo
There are two commands which can be used to extract Windows updates information from the system. Let’s discuss them one by one.
Run the following command to get all information about each hotfix installed on your computer.
wmic qfe list full
You can also format the output as a table so that it is easy to read and comprehend.
wmic qfe list full /format:table
If full information is not required, you can use the following command to get the summary:
wmic qfe list brief
And if you want to find a specific hotfix, run the following command:
wmic qfe list brief | find “KB4495667”
To save the complete output in a file, run the following command:
wmic qfe list full /format:table > C:\Users\Usman\Desktop\WindowsUpdatesReport.html WMIC command to list installed Windows updates
SystemInfo
If you only want a list of KnowledgeBase updates numbers, then you can use the systeminfo command.
- Open Command Prompt
- Run the following command
systeminfo | find “KB”
systeminfo hotfixes installed
Using PowerShell
Getting the same information which we got from command-line is easier in PowerShell.
- Open PowerShell with administrative privileges
- Run the following command:
Get-Hotfix - This will list down all the hotfixes installed on the computer and also show the installation date of each hotfix.
PowerShell get hotfix
Using WinUpdatesList
WinUpdatesList is a third-party software which can be used for the same purpose. Since it is a portable tool, it can be run from a network location. The biggest advantage of using WinUpdatesList is that it will list down every update possible from Windows Updates, hotfixes, Windows Defender definition updates, .NET Framework updates, driver updates, etc. You can also save the update as CSV file. It will give you a lot of information about each update like its name, installation date, installed by (if you are on a domain network), update type, link to the hotfix page online, uninstall command (if available), last modified, etc.
I hope these methods will be informative for you and it will become easier for you to view and save the list of all the installed updates and hotfixes in Windows 10 and even earlier versions of Windows including Windows Server. Which method do you prefer for your specific need and why? Your comments below will be highly appreciated.
Continue Reading:
Usman Khurshid is a seasoned IT Pro with over 15 years of experience in the IT industry. He has experience in everything from IT support, helpdesk, sysadmin, network admin, and cloud computing. He is also certified in Microsoft Technologies (MCTS and MCSA) and also Cisco Certified Professional in Routing and Switching. Reach him at Twitter @usmank11
2 thoughts on “ 4 Ways To View And Save List Of Updates Installed On Windows 10 ”
Hey, iTechtics I reviewed your article it seems nice. I like it. Cheers from Techforpc site.
Delete Downloaded Windows Update Files in Windows 10
How to Delete Downloaded Windows Update Files in Windows 10
If you are running into issues with Updates, you can try to delete downloaded Windows Update files. When an update package is damaged or fails to install, Windows 10 may keep the corrupted file on the drive, so it will further cause issues with updates. Here is how to delete the downloaded Windows Update files that Windows 10 doesn’t delete itself.
Windows 10 checks for updates automatically unless you disable this feature manually. The operating system comes with the Windows Update service, which automatically downloads and installs the updates from Microsoft. The downloaded update files are stored on your system drive in the C:\Windows folder.
There are certain reasons for having corrupted Windows Update files. It can be an improper shutdown, OS crash, power failure, or something gone wrong with your Registry. After that, Windows Update may fail to do its job properly. The OS may fail to check for updates, or fail to install them. Sometimes, the Windows Update page in Settings cannot be opened!
To fix most of the Windows Update issues in Windows 10, usually it is enough to run the built-in Windows Update troubleshooter.
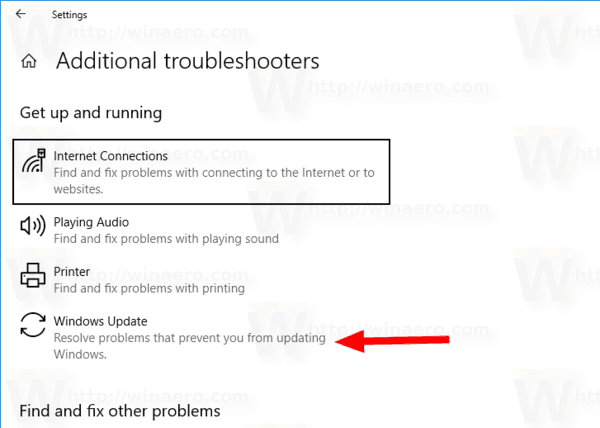
Run the built-in Windows Update troubleshooter.
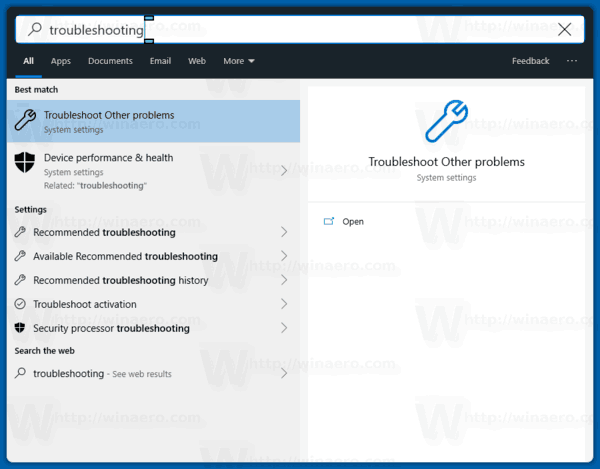
- Open the Start menu and type: troubleshooting and press Enter.

- Click «Windows Update».
- Click «Run as administrator» in the Troubleshooter’s dialog and complete the Windows Update troubleshooter. See if Windows Update works properly.
When you run into issues though with updates, you may spend hours or even days figuring out what is going wrong. In such case, you can try to delete downloaded Windows Update files to start over. The SoftwareDistribution folder contains files related to updates obtained via Windows Update, it is present on all versions of Windows. It could have a couple of hundreds megabytes of size. But if this folder is much larger, this indicates that some updates are corrupted.
To Delete Downloaded Windows Update Files in Windows 10,
- Press Win + R on the keyboard and type services.msc in the Run box.
- Stop the service named Windows Update.
- Open File Explorer .
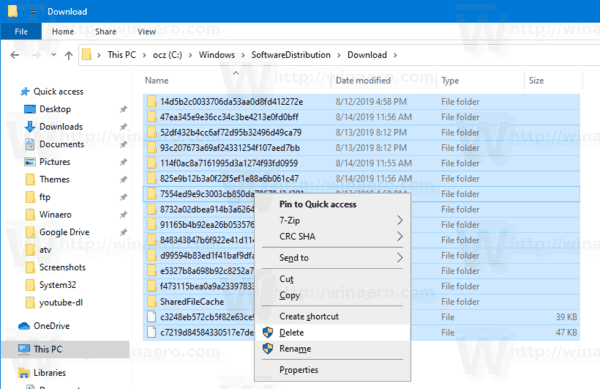
- Go to C:\WINDOWS\SoftwareDistribution\Download. Copy-paste this path to the explorer’s address bar.
- Select all files of the folder(press the Ctrl-A keys).
- Press the Delete key on the keyboard.
- Windows may request for administrator privileges to delete those files. Turn on the option «Do this for all current items» in the dialog and click on Continue.
Restart Windows 10 and check for updates. See if this fixed your issues.
Alternatively, you can create a batch file to automate the process.
Delete Downloaded Windows Update Files with a Batch File
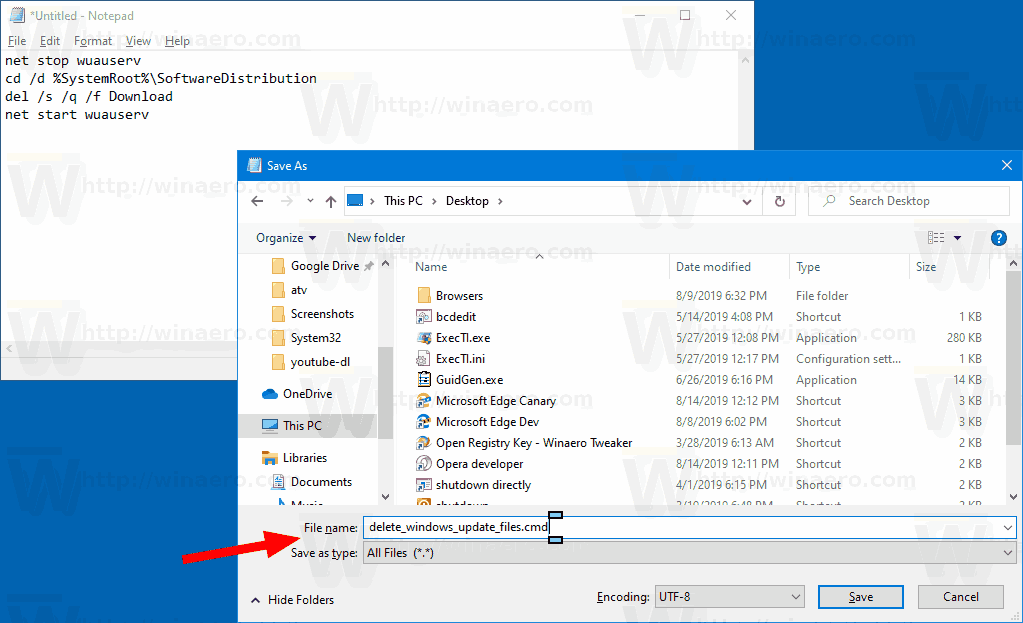
- Open Notepad.
- Paste the following text:
net stop wuauserv
cd /d %SystemRoot%\SoftwareDistribution
del /s /q /f Download
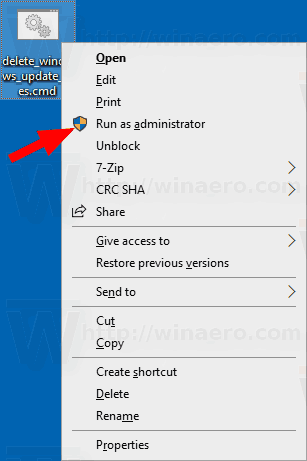
net start wuauserv - Save it to a file with a *.cmd extension. You can place it on the Desktop.
- Right-click the file you have created and start it as Administrator from the context menu.
You are done. Now restart the PC and check for available updates.
Here’s how does it work
The command net stop wuauserv stops the Windows Update service. Next, the cd command switches the current folder to C:\Windows\SoftwareDistribution. The del command erases the contents of the Download folder and its subfolders. Finally, the last command, net start wuauserv , starts the Windows Update service again.
To save your time, you can download this ready-to-use batch file.
Articles of interest:
Winaero greatly relies on your support. You can help the site keep bringing you interesting and useful content and software by using these options:
Share this post
About Sergey Tkachenko
Sergey Tkachenko is a software developer from Russia who started Winaero back in 2011. On this blog, Sergey is writing about everything connected to Microsoft, Windows and popular software. Follow him on Telegram, Twitter, and YouTube.
5 thoughts on “ Delete Downloaded Windows Update Files in Windows 10 ”
i haven’t noticed this before but Also disk clean-up has an option to delete update files also,
AFAIK it cleans up WinSxS instead.
Hi Sergey, Is any chance to fix loop booting PC after Windows OS updates without reinstalling OS ?
Save all Windows processes to a text file
It can sometimes be useful to dump the list of all running processes on a Windows machine. While you can use the Task Manager or third-party applications like Process Explorer or TaskSchedulerView to list all running tasks and manage them directly from within the interface.
Third-party apps like Process Explorer support the exporting of all processes to text files on the system but the standard Task Manager of the Windows operating system does not.
Windows includes the command line tool tasklist that is designed to display the list of tasks and filter the listing. While it does not support built-in export options, it does support the option to direct command line output elsewhere.
Tasklist, just like taskkill which we published a guide about earlier, is a handy command line tool that all supported versions of Windows support.
The Tasklist tool

You can run tasklist from the command line and don’t need elevated rights for that. Just tap on Start, type cmd.exe and open the Command Prompt from the results to get started.
Simply typing tasklist and hitting the Enter-key displays a list of all running processes on the system. Each process is listed with its name, process ID, session name and number, and memory usage.
You can save the process listing right away by running the command tasklist > output directory and file name, e.g. tasklist > d:\processes.txt.

The utility supports three different display formats. Table is used by default but you may use the command /fo to switch to list or csv view instead. Just use tasklist /fo csv to display the list of processes in a comma separated format instead.
Tasklist shines when it comes to supported filters. You can use filters to display information that you need from information that you don’t need. Filters exist to display processes by memory usage, CPU time, process ID, window title, or username among others.
Filters support operators such as eq=equal, ne=not equal, or gt=greater. Note that the filters WINDOWTITLE and STATUS are not supported when you run tasklist on a remote system.
Here is a list of examples that demonstrate filter usage:
- tasklist /fi «USERNAME eq Martin» — returns the list of processes run under the user Martin.
- tasklist /fi «USERNAME ne NT AUTHORITY\SYSTEM» /fi «STATUS eq running» — returns all processes that are running under system processes.
- tasklist /fi «MODULES eq nt*» — Lists all processes that have a DLL that begins with nt.
- tasklist /fi «PID gt 2000» — displays all processes with an ID greater than 2000.
- tasklist /fi «MEMUSAGE gt 4096» — lists all processes whose memory usage is greater than 4096 Kilobytes.
You can combine filters with other parameters:
- tasklist /s BasementComp /svc /fi «MEMUSAGE gt 4096» — Lists processes on the remote computer BasementComp that use more than 4 Megabytes of RAM.
- tasklist /s BasementComp /u maindom\joe /p password — to list processes on the remote computer BasementComp using the user joe and joe’s password.
You can save all outputs to a text file using the > destination command.
Additional information is provided when you run tasklist /? and on Microsoft’s Docs website.
Now You: Which command line tools do you use?


