- How to Set the Default Save Location in Windows 10
- How can I change my Windows 10 Default «Save As» Location to «Desktop» and remove the extra «Save As» Prompt?
- Replies (7)
- Save locations in Windows 10
- Replies (2)
- Change default Save location for Documents, Music, Pictures, Videos in Windows 10
- Change default location of User folders
- 1] Change default location of Documents folder using Properties
- 2] Change where new content is saved via Settings
- 3] Change default Save location for User Profile folders via Registry
- Set Default Save Location for Library in Windows 10
- Set default save location for a library using the Manage Ribbon command
- Set default save location for a library using its properties
- About Sergey Tkachenko
How to Set the Default Save Location in Windows 10

Windows 10 brings a lot of novelties, and one of them is the ability to set default save location for your files, other than the system drive. In fact, you can choose if you want to save your documents, pictures, etc. to the system drive, or you want to store them on an external drive.
But there’s one limitation of this method. Because you’re unable to change the default save location of apps that you download and install on your computer. You can only change the default save location of documents, images and other files, but since Windows 10 is still in it’s testing phase, we wouldn’t be surprised if Microsoft decides to change that.
To set the default save location for your files in Windows 10, do the following:
- While on the desktop window, go to the Start Menu
- From Start menu, under the Places section from the left pane, click on Settings
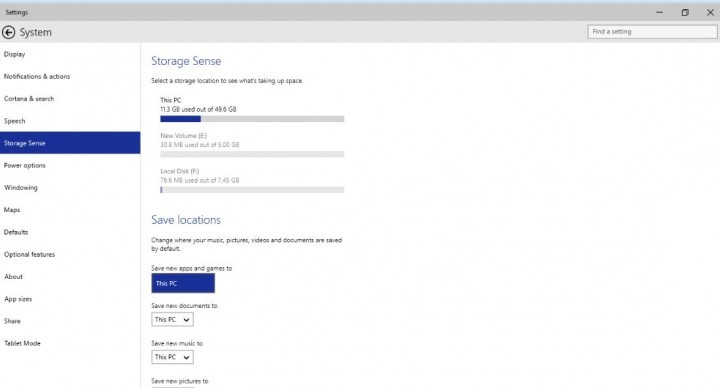
- In the Settings window, click the System icon
- From the navigation pane of the System window, click to select the Storage Sense option
- Under the Save locations section from the right pane, choose the drop-down list under the Save new documents to option
- In the displayed window, click the drive letter representing the external connected storage device where you want to set the default save location for your documents, pictures and other files
- Now you’ve set the default save location for your files and you can continue using your PC normally
Some users reported that they’re unable to change their default save location, as they’re forced to set it to a system drive. And if you also have this problem, you have to check if your other hard disk, or an external storage is connected properly to your computer and is fully functional, because if it’s not connected well, it might cause some problems in Storage Sense and you’ll be unable to set your default save location to that drive.
How can I change my Windows 10 Default «Save As» Location to «Desktop» and remove the extra «Save As» Prompt?
Whenever I try to save a file I always get an extra «save as» menu that I wouldn’t get with windows 8.
Is there a way to remove this additional prompt that is completely unecessary for ALL of my programs that I save from? I would also like to change the default save location to «Desktop» for all of my software and applications. Basically, I want to click «save as» and then «save» all within a second and know that whatever file or picture I am saving will be saved to my desktop. The things I do at work are very repetative and having to manually change the save location for files every time is quite annoying.
Replies (7)
![]()
Thank you for posting in Microsoft Community.
I understand that you are trying to make Desktop as the default saving location for the files. Before that, I suggest you to answer some questions below to assist you better.
- Through which application are you trying to save the files?
- Are you getting this in File explorer or any other application?
Please post to us with some more clarity to understand the issue better and help you.
1 person found this reply helpful
Was this reply helpful?
Sorry this didn’t help.
Great! Thanks for your feedback.
How satisfied are you with this reply?
Thanks for your feedback, it helps us improve the site.
How satisfied are you with this reply?
Thanks for your feedback.
![]()
I will get the «Save As» prompt that I posted a picture of on my first post when I use Adobe. This prompt is actually really slow and takes about 3 seconds to load up and then I will have to click on Desktop before it gives me the old save as prompt that I use to get in Windows 8 or earlier.
I will get this prompt when I go to «Save As» on any Microsoft Office program, such as Word:
This will default to the «Onedrive», where I will have to doubleclick «This PC» and have to change the directory to Desktop. That takes a few seconds more than necessary.
And I will get the old prompt when I «Save As» in programs like Notepad or Paint:
The «Save As» prompt shown above is the prompt that all programs used to use to save documents. I want all of my programs to use this prompt so that they automatically default to desktop without me having to go through other prompts that waste time.
I didn’t have this issue until I upgraded to windows 10, which means it’s likely an issue with the Onedrive. The Onedrive should NOT be the default save location for people that use Windows 10, it should just be optional rather than shoving it down our throats.
Save locations in Windows 10
Replies (2)
![]()
Thank you for posting your query in Microsoft Community.
I understand your concern, and we in Community will try to help you in the best possible way we can
Before providing assistance, I would like to ask you to answer the question stated below:
1. Are you logged in through an Administrator account in the computer?
2. Is this issue persisting only to external drive and One Drive only?
3. Is this issue occurring with all the folders and files?
As of now, I suggest that you locate the file or folder that you want to import, follow the steps given below and check if the issue still persist:
Change permissions to full control.
1. Right click on the folder and select Properties .
2. Go to the Security Tab and click Edit .
3. Now, click on Add and in the Textbox type » Everyone «. Click Check Names.
4. Click on Ok .
5. Now select Everyone from the Group or Usernames menu.
6. Check Full Control .
7. Click on Apply and then OK.
Hope this information helps and let us know the status of the issue we will be glad to help you further.
Change default Save location for Documents, Music, Pictures, Videos in Windows 10
Windows 10 lets you easily change the default Save location for Documents, Music, Picture, and Video User Profile folders. You can now easily save your personal files like Documents, Music, Picture, and Videos to another drive or partition or even an external drive by default.
We have already seen how to move apps to another location and how to install Windows 10 Apps to another Partition. The procedure for changing the default save location for personal files in Windows 10 is similar.
Change default location of User folders
You can change the default location of user folders like the Documents, Music, Picture, and Videos folders via their respective Folder Properties, Settings app, or by editing the Registry. Let us take a look at the procedure involved. While we have taken the Documents folder as an example, the procedure is the same for other User Profile folders as well.
1] Change default location of Documents folder using Properties
The procedure is as follows:
- Open File Explorer
- Navigate to the Documents folder located in C:\Users\
- Right-click on the folder and select Properties.
- Open Location tab and enter the desired new path.
- Click Move.
- It will open the Explorer dialog box.
- Navigate to and select the desired new location; or else manually enter the path.
- Click Apply/OK.
The folder and its contents will get moved.
2] Change where new content is saved via Settings
Windows 10 makes things easier as you can do so via the Settings app.
Open Start Menu > Settings > System settings.
Next, click on Storage in the left pane.
Scroll down a bit and find Change where new content is saved.
Click on it to open the following panel.
Here you will see New documents will save to setting – and similar settings for Music, Pictures & Videos.
Select the location from the drop-down menu.
Thus you can set different Save locations for different types of files.
3] Change default Save location for User Profile folders via Registry
Press Win+R keys to open the Run box. Now type regedit and hit Enter to open the Registry Editor. Next, navigate to the following path:
On the right-hand side, you will a key called Personal. If you want to change the path of the Documents folder, you need to work on Personal. If you want to change the path of the Video folder, you need to use the Video. Similarly, there are Pictures for Pictures folder, Music for Music folder.
So double-click on the concerned key, and enter the new value according to your folder.
The default paths are:
- Documents: %USERPROFILE%\Documents
- Music: %USERPROFILE%\Music
- Pictures: %USERPROFILE%\Pictures
- Video: %USERPROFILE%\Videos
Having done this, exit the Registry Editor, restart your computer, and check.
The folder should have moved to the new location.
If you are suffering from the low space issues after upgrading, you can use this technique to move Documents and other personal folders from the default system drive to another drive.
Set Default Save Location for Library in Windows 10
Today, we’ll see how to set the default save location for a library in Windows 10. This location will be used every time you save a file to the library.
Using the Default Save Location option, you can specify the default folder in a Library where a file or another folder will be stored when you copy, move, or save directly to the library.
For a library, you can also specify a public save location. It sets the folder in which other users can save a file or another folder when copied, moved, or saved directly to the library.
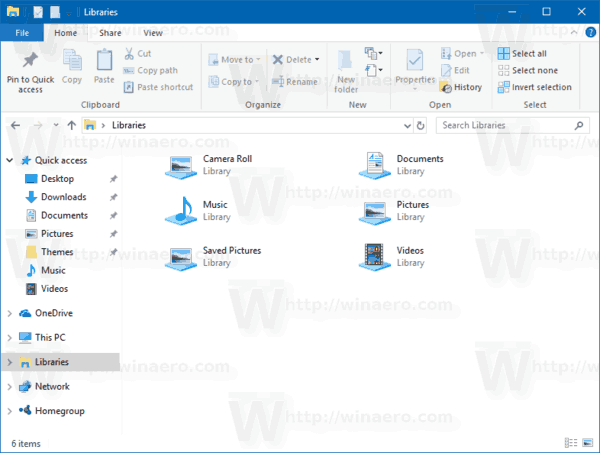
You might want to enable libraries as described here:
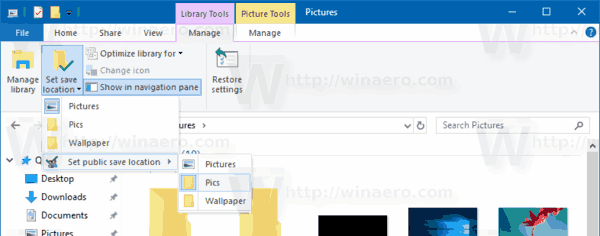
To set default save location for a library in Windows 10, do the following.
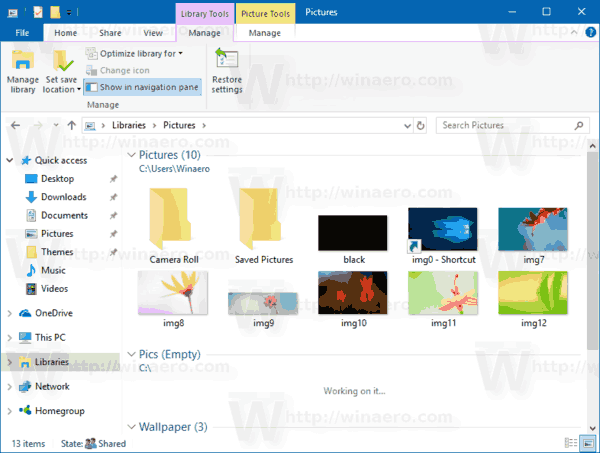
- Open File Explorer.
- Open the desired library.

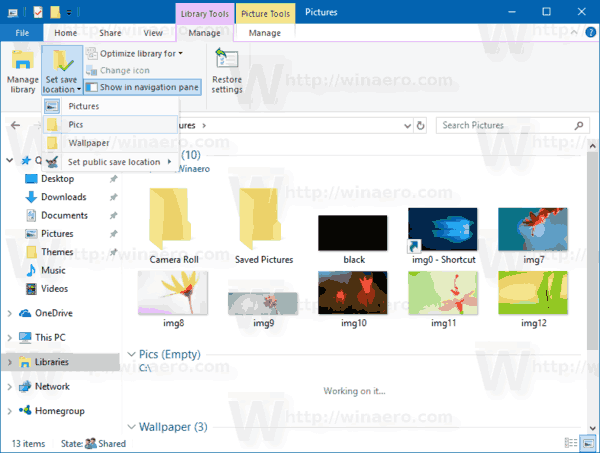
- On the Ribbon, see the «Library Tools» section. There, click on the Manage tab.
- Click on the Set save location button.
- In the drop-down menu, select one of the included folders to set it as the default save location.
- Repeat the same for the «Set public save location» drop-down menu.
There are two more ways to set the default save location for a library. Let’s review them.
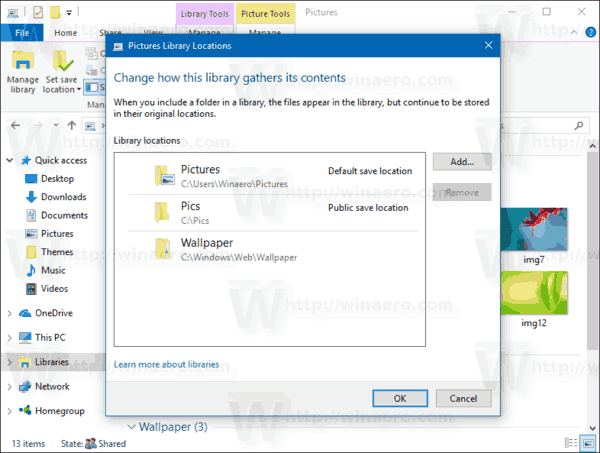
Set default save location for a library using the Manage Ribbon command
- Open File Explorer.
- Open the desired library.
- On the Ribbon, see the «Library Tools» section. There, click on the Manage tab.
- Click on the Manage library button.
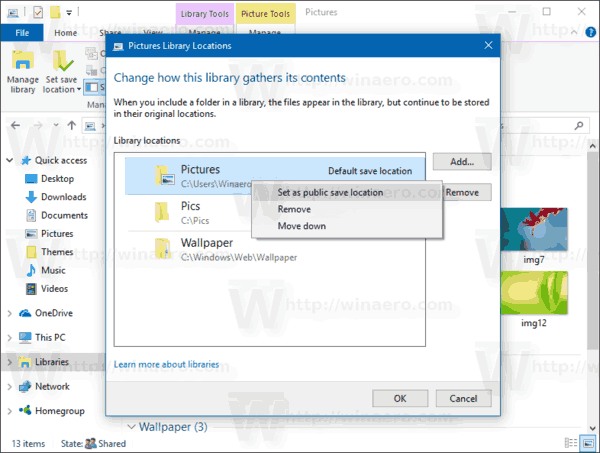
- The following dialog will open:There, right-click the desired folder and select Set as default save location in the context menu to set the folder as the default save location.
- Right click the folder you want to set as the default public save location (it can be the same folder you have selected in the previous step) and select Set as public save location in the context menu.
 There, right-click the desired folder and select Set as default save location in the context menu to set the folder as the default save location.
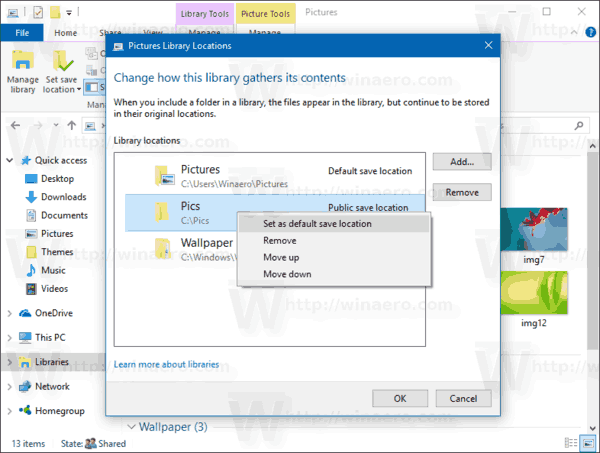
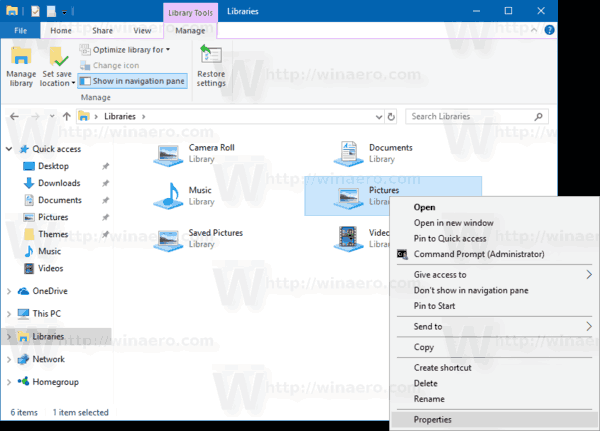
Alternatively, you can right-click the library in the navigation pane or in the Libraries folder and configure the same using the Library Properties dialog.
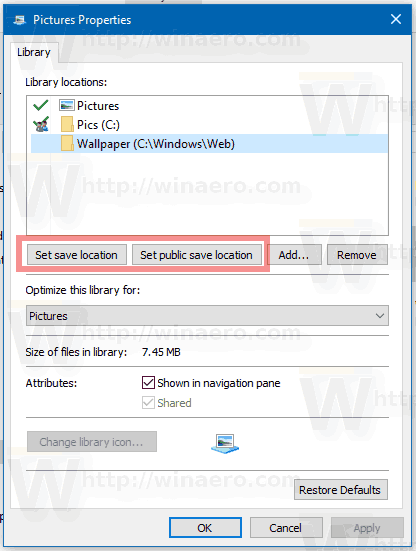
Set default save location for a library using its properties
- Open File Explorer.
- Go to the Libraries folder.
- Right click the desired library and select Properties in the context menu.
- The Properties dialog will be opened. There, select the desired folder and click on the button Set save location to set the selected folder as the default save location.
- Select the folder you would like to use as the library’s default public save location and click on the button Set public save location.
Winaero greatly relies on your support. You can help the site keep bringing you interesting and useful content and software by using these options:
Share this post
About Sergey Tkachenko
Sergey Tkachenko is a software developer from Russia who started Winaero back in 2011. On this blog, Sergey is writing about everything connected to Microsoft, Windows and popular software. Follow him on Telegram, Twitter, and YouTube.


