- How to take and save screenshots on Windows 10 [STEP-BY-STEP GUIDE]
- How do I take screenshots on PC?
- Where does Windows 10 save my screenshots?
- Editor’s choice: Use a dedicated tool for screenshots
- 4 quick methods to take screenshots on PC
- Method 1 – Use Print Screen key
- Method 2 – Use Windows Key + PrtScn shortcut
- Fix: Windows 10 Not Saving Screenshots To Screenshots Folder
- Check if Windows 10 saving screenshots to OneDrive
- Check where Windows 10 is saving screenshots
- Check permissions for Screenshots folder
- Where are screenshots saved? Change their location in Windows 10
- Quick Steps:
- Where do print screens go on Windows 10?
- How to change the Windows 10 Screenshots folder location
- How to restore the default location of the Windows 10 Screenshots folder
- Would you like an easier way to find your screenshots in Windows 10?
How to take and save screenshots on Windows 10 [STEP-BY-STEP GUIDE]


- Download Restoro PC Repair Tool that comes with Patented Technologies (patent available here).
- Click Start Scan to find Windows issues that could be causing PC problems.
- Click Repair All to fix issues affecting your computer’s security and performance
- Restoro has been downloaded by 0 readers this month.
Sometimes you need to quickly share a screenshot with someone online. Creating and sharing them is relatively simple, and today we’re going to show you where your screenshots go on Windows 10.
How do I take screenshots on PC?
Creating screenshots on Windows 10 is fairly simple, and it doesn’t even require you to use a complex software application.
You can easily create screenshots on Windows 10 with built-in tools or with dedicated tools, and today we’re going to show you where your screenshots are saved by default on Windows 10.
Where does Windows 10 save my screenshots?
If you haven’t changed your default settings, you should be able to find your screenshots under the following path: C:Users[User]My PicturesScreenshots.
Of course, you can also create a dedicated folder where you can save your screenshots. You can create the folder on your desktop or use a location of your choice.
Furthermore, you can also upload your screenshots if you need to share them with someone. Follow this article to find out more about how to upload screenshots and what tools to use.
Editor’s choice: Use a dedicated tool for screenshots
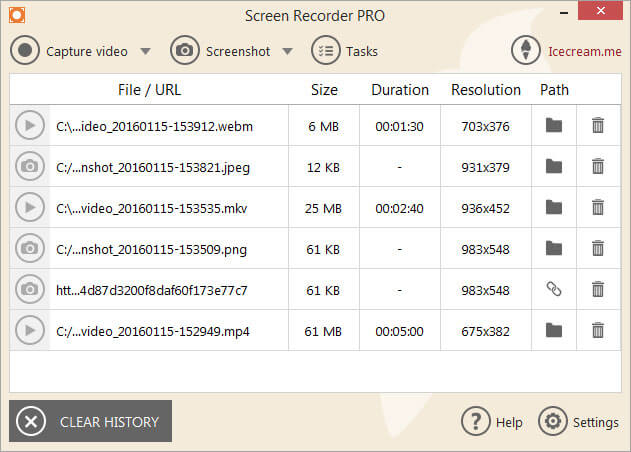
Icecream Screen Recorder is a simple tool, straightforward yet with enough features to accomplish what you want but not confuse you. Keep your screenshots organized, ready to be used right away with this innovative program.
You can save your screenshots straight to your hard drive to the destination of your choosing. And, you will be able to store the screenshots in various file formats.
This software is a viable alternative to typical screen capturing apps that are on the market.
You can easily capture an image in order to highlight particular areas or a specific section.
This tool is ideal if you use multiple browsers during your daily Internet sessions.
Here are just some of its features:
- Project history: you can easily find your past projects
- Screen area selection: select the area you want to be recorded
- Drawing panel: add arrows, lines, and marks to your capture
- You can also record online videos.
- Capture videos with the simple click of a button.
- Change format of the recorded videos
- Schedule screen recording
Icecream Screen Recorder is already the world’s bestseller and you can give it a try for free right now. A fully-functional trial version is available for download.
4 quick methods to take screenshots on PC
Method 1 – Use Print Screen key
This is probably one of the oldest methods of creating screenshots. To create a screenshot simply press the Print Screen or PrtScn key on your keyboard. By pressing this key you’ll create a screenshot of your entire screen.
If you want to create just a screenshot of your current window, you can do so by using Alt + PrtScn shortcut.
By using these shortcuts your screenshot will be saved to your Clipboard. In order to save it to your hard drive, you need to start Paint or any other image editing software and paste the screenshot from the Clipboard by pressing Ctrl + V shortcut.
Although this method is rather simple, we have to warn you that you won’t be able to view any previously made screenshots. Clipboard saves only one entry at the time, and if you accidentally copy something else into Clipboard you’ll remove your screenshot.
If you use this method, it’s recommended to paste the screenshot to your image editor as soon as you can in order not to lose it. By using any image editing tool you can save the screenshot to any folder that you want.
We have to mention that you can somewhat avoid the problem with Clipboard simply by using a clipboard manager tool. These types of tools allow you to view all items that were copied to your Clipboard so you won’t ever lose your unsaved screenshots again.
If you’re having trouble with copy-paste on Windows 10, this complete guide will help you solve any issues with it.
Method 2 – Use Windows Key + PrtScn shortcut
Print Screen shortcut was available in previous versions of Windows, but with Windows 8 Microsoft introduced a new shortcut. In Windows 8 we got Windows Key + PrtScn shortcut, and this one made its way to Windows 10.
We have to mention that some laptops might use a slightly different shortcut, so be sure to check your laptop’s instruction manual for details.
By using this shortcut your screen will become dim for a half second and you’ll hear the shutter sound. This means that you successfully created a screenshot.
Fix: Windows 10 Not Saving Screenshots To Screenshots Folder
Last Updated on October 2, 2018 by admin 12 Comments
Windows 10 allows you to quickly capture the screen by simultaneously pressing Windows logo + PrtSc (Print Screen) keys. The captured screenshot is automatically saved in Pictures > Screenshots folder.
We have seen many users complaining that Windows 10 doesn’t automatically save the captured screenshot in the Pictures > Screenshots folder.
If you are also experiencing this issue, the given below solutions should help you fix the issue.
Solution 1 of 3
Check if Windows 10 saving screenshots to OneDrive
If you are using a Microsoft account to sign-in to Windows 10 or using OneDrive on your Windows 10 PC, you should check if Windows 10 is automatically saving screenshots to your OneDrive account. Although Windows 10 displays a “The screenshot was added to your OneDrive” desktop notification upon saving the screenshot to your OneDrive (unless you have turned off the notification), we suggest you check OneDrive settings.
Step 1: Right-click on the OneDrive icon in the system tray, click More and then click Settings.

Step 2: Navigate to the AutoSave tab. Make sure that Automatically save screenshots I capture to OneDrive option is NOT selected. If selected, unselect it and then click OK button.

Solution 2 of 3
Check where Windows 10 is saving screenshots
If the screen is dimming for a moment when you press Windows logo + Print Screen but not saving the screenshot in the Screenshots folder, you can easily check where the screenshot is being saved. Here is how:
Step 1: Open the Quick Access in File Explorer.
Step 2: In the Recent files section, the file at the top of the list is the recently taken screenshot (with the same name). Right-click on the file and then click Open file location option to open its original location.

Solution 3 of 3
Check permissions for Screenshots folder
If the Screenshot folder doesn’t have the write permission, Windows 10 might not be able to save in that folder. Here is how to check and alter permissions.
Step 1: Right-click on the Screenshots folder and then click Properties to open the Properties dialog.
Step 2: In the Security tab, click on the Edit button. Make sure the system account has “Full control.”
If these solutions didn’t help you resolve the issue, try resetting Windows 10 to default settings without data loss or reinstall Windows 10 without data loss.
Where are screenshots saved? Change their location in Windows 10
To answer questions like “Where are my screenshots in Windows 10?” or “Where do print screens go on Windows 10?”, you must first understand there are several ways to take screenshots on your computer or device. Screenshots (also called print screens by some) are saved to your clipboard or in a default location, and you can easily change the Windows 10 screenshot folder. If you want to know where are screenshots saved on Windows 10 and learn how to change their default location, read this guide:
Quick Steps:
- Go to C:\Users\your_name\Pictures\Screenshots, where “your_name” is the name of your user account.
- Right-click on Screenshots to open a contextual menu and choose Properties.
- Access the Location tab, and you can see the existing path to your Screenshots folder.
- To change where your print screens go in Windows 10, click or tap on the Move button.
- Browse your Windows 10 computer or device until you find the folder you created for screenshots, click or tap on it to select it, and then press on the Select Folder button.
- Click or tap OK or Apply.
- Confirm your choice.
NOTE: We’ve already explored how to take Windows screenshots in detail, if you want to read all about the built-in methods available in Windows 10. In case you’re wondering how to find screenshots on other devices as well (iPhones, Android smartphones, Mac), check out our guide about screenshot locations.
Where do print screens go on Windows 10?
In Windows 10, there is more than one way to capture the screen, and you have to take that into account when trying to find out where screenshots are saved.
In some cases, print screens go to your clipboard, and you have to paste a screenshot into an image editing program like Paint before saving it somewhere else. The default location suggested by Paint for storing images is This PC, but you can browse and choose a different one when you save a screenshot.
Decide where screenshots are saved from Paint
If you’re using Snip & Sketch to take screenshots, the app suggests the Pictures folder when you save the results, but you can choose another location.
Choose where screenshots are saved with Snip & Sketch
TIP: The apps remember the new folder you browsed to, which becomes the suggested location the next time you save a screenshot.
If you’re a gamer, it might interest you how to take screenshots in Steam and their location. Additionally, you can also use the Xbox Game bar to capture gameplay. To learn more about it and change its default screenshot folder, read How can I record my gameplay on a Windows 10 PC?
However, there is another, more comfortable way of taking screenshots, initially introduced in Windows 8. It saves the results automatically and doesn’t require third-party applications to do so. To use it, press Windows + Print Screen simultaneously on your keyboard.
Use the Windows + Print Screen buttons to save screenshots automatically
While this keyboard shortcut is convenient, it’s not obvious where Windows 10 print screens go. All the screenshots you take without using other tools are stored in the same default folder, called Screenshots. You should be able to find it by accessing Pictures inside your user folder.
IMPORTANT: The Screenshots folder is created only after you take your first screenshot using the method above.
Browse to the Windows 10 Screenshots folder
If you did not change the default location of your Pictures user folder, the path to the Screenshots folder is “C:\Users\your_name\Pictures\Screenshots” – where “your_name” is the name of your Windows 10 user account, as seen above.
Alternatively, you can also select the Pictures location from the Quick Access Navigation pane to go to the folder where screenshots are saved.
Use Quick Access to access the Windows 10 Screenshots folder
Although this location may be intuitive and work for most people, there are situations in which you may want to change it.
How to change the Windows 10 Screenshots folder location
If you want your Windows + Print Screen captures saved to another location, you should first create a new folder for your screenshots. The folder, which can be anywhere you want on your Windows 10 PC, gets renamed to Screenshots as soon as you make it the default location for your automatic screen captures. However, you can change its name afterwards.
Then, access the Properties of the Screenshots folder found in Pictures (“C:\Users\your_name\Pictures\Screenshots”). Right-click or press-and-hold on Screenshots to open a contextual menu and press Properties.
Open the Properties of the Windows 10 Screenshots folder
Access the Location tab, and you can see the existing path to your Screenshots folder. To change where your print screens go in Windows 10, click or tap on the Move button.
Press Move to change where Windows 10 saves screenshots
This opens the “Select a Destination” window. Browse your Windows 10 computer or device until you find the folder you created for screenshots, click or tap on it to select it, and then press on the Select Folder button.
Choose the new Windows 10 screenshots location
Going back to the Screenshots Properties window, you should see the new path you chose for the Screenshots folder. Click or tap OK or Apply.
Press OK or Apply to change where print screens go in Windows 10
Windows 10 asks if you want to move all the screenshots from the old location to the new one. Choose Yes, and all your old screenshots are relocated to the new Screenshots folder. All the screenshots you take from now on are going to be saved in the new location.
Move all captures to the new Windows 10 Screenshots folder
Depending on how many screenshots you have made so far, the moving process might take a while. When it’s done, the original Screenshots folder disappears from Pictures. You can see the new folder you chose as default was renamed to Screenshots.
The new Windows 10 Screenshots folder is the one you defined
The Screenshots folder is changed only for the current user account. Repeat this procedure for each account whose Screenshots folder you want to move.
IMPORTANT: It is essential not to move the Screenshots folder location to another system folder, like directly to Desktop. If you do that, you cannot redirect it later, as explained in How to change user folder locations in Windows 10.
How to restore the default location of the Windows 10 Screenshots folder
If you want to move the Screenshots folder back to its original location, you can easily do so from its Properties. Access the Screenshots Properties, as explained in the previous chapter, and press the Restore Default button in its Location tab.
Restore the default location where your print screens go in Windows 10
As soon as you do that, the path in the field above the Restore Default button changes to the default Pictures one. Click or tap OK or Apply to save your changes.
Change where you find screenshots in Windows 10
If the original Screenshots folder no longer exists, then it must be created. When Windows 10 asks whether you want to create it, press Yes.
Recreate the default Screenshots folder in Windows 10 to return to the initial location for saving captures
Move all your screenshots to the default Screenshots folder, as explained in the previous chapter. Then, press OK, and the Screenshots folder is restored to its default location.
TIP: If you need further help finding or restoring your Screenshots folder, check out our guide on How to restore Downloads and other user folders in Windows 10.
Would you like an easier way to find your screenshots in Windows 10?
Finding the location of your Windows 10 screenshots should not be a challenge. Sure, you might come across it eventually, but we wish there were an easier way for users to tell where each screenshot is saved. For instance, if you use VLC to screenshot videos, the location is immediately displayed on the screen. We’d like to see Microsoft do something similar or at least have Windows 10 display a notification about the screenshot location. What is your opinion? Would you prefer a simpler way to find screenshots in Windows 10? Let us know in the comments.


