- How To Scan All TCP and UDP Ports with Nmap?
- Scan All TCP Ports with Range
- Faster Scan For All Ports
- Scan All TCP Ports
- Scan All UDP Ports with Range
- Scan All UDP Ports
- Scan All TCP UDP Ports
- How to check open ports in Linux using the CLI
- What the hell are a TCP and UDP ports?
- Port numbers
- Check open ports in Linux
- Using netstat to list open ports
- Use ss to list open ports
- Listening ports and applications using lsof command
- nmap command
- The open port doesn’t mean anyone from outside can access those ports
- Conclusion
- 5 Best Free and Open Source Linux Port Scanners
- Top Port Scanners on Ubuntu Linux
- 1. Angry IP Scanner
- 4. Nmap — network mapper
- 3. pnscan
- 4. knocker
- How To Use Nmap to Scan for Open Ports
- Introduction
- Understanding Ports
- Identifying Common Ports
- Checking Open Ports
- Using Nmap
- Scanning Ports with nmap
- Conclusion
How To Scan All TCP and UDP Ports with Nmap?
Nmap is a very useful and popular tool used to scan ports. Nmap by default scans the most popular 1000 ports. We may need to change the port range and protocol type to all while scanning with Nmap.
Scan All TCP Ports with Range
We can specify the port range with the -p option. As we know TCP port numbers are between and 65535 . We will use -p0-65535 as an option in order to scan all TCP ports. We do not specify the TCP protocol because the default protocol for Nmap port scan is TCP.
Faster Scan For All Ports
If we are scanning all ports this will take a lot of time. If the situation is not critical we can use a faster scan with -T5 parameter. This is the fastest scan level for Nmap. This option can be used for UDP scans too.
Scan All TCP Ports
Another way to specify all TCP ports is a dash. We can use -p- which is more practical then port range specification.
Scan All UDP Ports with Range
Nmap uses TCP as the default protocol for the port scan. We should explicitly specify the UDP protocol for the UDP port scan. We will use the same port range specification used in TCP. We will use -sU for UDP protocol specification.
Scan All UDP Ports
We can also scan all UDP ports by using the -sU option. We will use -p- to specify all ports easily. -p- express all ports from 0 to 65535. UDP scan is slow and takes some time to complete.
Scan All TCP UDP Ports
We can scan all UDP and TCP ports in a single command. We will use -sU for UDP and sT for TCP protocol. We will also specify the port range we want to scan which is all TCP and UDP ports that start from 0 to 65535. This will scan all 65535 ports of TCP and UDP for the specified remote host or IP address. Keep in mind that this will take some time because especially UDP scan is slow according to the TCP scan. We will also provide root privileges with the sudo command.
Источник
How to check open ports in Linux using the CLI
I need to list all open ports in Linux cloud server. How do I check open ports in Linux using the CLI? Can you give me the command to check open ports in Linux operating system?
To troubleshoot server problems and to avoid security issue, one needs to find out open TCP and UDP ports. In this tutorial, you will learn the different Linux commands to check open ports in Linux for auditing and securing the server.
| Tutorial details | |
|---|---|
| Difficulty level | Easy |
| Root privileges | Yes |
| Requirements | Linux command line |
| Est. reading time | 5 minutes |
What the hell are a TCP and UDP ports?
A port is nothing but a 16-bit number between 0 to 65535. For example, TCP port number 22 may be forwarded to the OpenSSH server. Therefore, 22 port number is a way to identify the sshd (OpenSSH server) process.
Port numbers
- The Well Known Ports are those from 0 through 1023.
- The Registered Ports are those from 1024 through 49151.
- The Dynamic and Private Ports are those from 49152 through 65535.
A registered port is a network port assigned by the Internet Assigned Numbers Authority (IANA) and stored in /etc/services file. Use the cat command or grep command/egrep command to view port numbers and service mappings:
Display a list of applications and their ports assigned by IANA
Check open ports in Linux
The procedure to monitor and display open ports in Linux is as follows:
- Open a Linux terminal application
- Use ss command to display all open TCP and UDP ports in Linux.
- Another option is to use the netstat command to list all ports in Linux.
- Apart from ss / netstat one can use the lsof command to list open files and ports on Linux based system.
- Finally, one can use nmap command to check TCP and UDP ports too.
Let us see all commands and examples in details.
Using netstat to list open ports
- No ads and tracking
- In-depth guides for developers and sysadmins at Opensourceflare✨
- Join my Patreon to support independent content creators and start reading latest guides:
- How to set up Redis sentinel cluster on Ubuntu or Debian Linux
- How To Set Up SSH Keys With YubiKey as two-factor authentication (U2F/FIDO2)
- How to set up Mariadb Galera cluster on Ubuntu or Debian Linux
- A podman tutorial for beginners – part I (run Linux containers without Docker and in daemonless mode)
- How to protect Linux against rogue USB devices using USBGuard
Join Patreon ➔
- -t : All TCP ports
- -u : All UDP ports
- -l : Display listening server sockets
- -p : Show the PID and name of the program to which each socket belongs
- -n : Don’t resolve names
- | grep LISTEN : Only display open ports by applying grep command filter.
Use ss to list open ports
The ss command is used to dump socket statistics. It allows showing information similar to netstat. It can display more TCP and state information than other tools. The syntax is:
sudo ss -tulpn
Sample outputs:
Listening ports and applications using lsof command
Let us run the following to check open TCP and UDP ports using the lsof command:
sudo lsof -i -P -n | grep LISTEN
Where,
- -i : Look for listing ports
- -P : Inhibits the conversion of port numbers to port names for network files. Inhibiting the conversion may make lsof run a little faster. It is also useful when port name lookup is not working properly.
- -n : Do not use DNS name
- | grep LISTEN : Again only show ports in LISTEN state using the grep command as filter.
nmap command
In addition, to above commands one can use the nmap command which is an open source tool for network exploration and security auditing. We are going to use nmap to find and list open ports in Linux:
$ sudo nmap -sT -O localhost
$ sudo nmap -sU -O 192.168.2.254 ##[ list open UDP ports ]##
$ sudo nmap -sT -O 127.0.0.1 ##[ list open TCP ports ]##
$ sudo nmap -sTU -O 192.168.2.24
Sample outputs:
The open port doesn’t mean anyone from outside can access those ports
So far, you know how to find and list open TCP and UDP ports on Linux. However, those ports can still be blocked by software, cloud, or hardware firewall. Hence, you need to verify that your corporate firewall is not blocking incoming or outgoing access. For instance on Linux server we list or dump firewall rules using the following syntax:
sudo iptables -S
# IPv6
sudo ip6tables -S
Conclusion
In conclusion, finding out open ports is one of the most fundamental duties of a Linux system administrator for security reasons. Therefore, close down all unwanted ports and configure firewall such as UFW and FirewallD to open or block ports as per your requirements. After reading this tutorial, you should have a good understanding of how to check for open ports in Linux. See IANA’s offical list of TCP, UDP and other ports here for more information.
🐧 Get the latest tutorials on Linux, Open Source & DevOps via
Источник
5 Best Free and Open Source Linux Port Scanners
A port scanner is a utility which probes a server or host to verify if the virtual ports of a system are open or closed. Ports allow different applications on the same computer to share network resources simultaneously.
Computers that are connected to a local area network or internet run many different services that listen at well-known (and not so well-known) port numbers. Port numbers range from 0 to 65535, with port numbers from 0 to 1023 considered to be the well-known ports. These include ports reserved for the File Transfer Protocol (FTP), Secure Shell (SSH), telnet, Domain Name System (DNS), Hypertext Transfer Protocol (HTTP) used in the World Wide Web, Network News Transfer Protocol (NNTP), to name a few. Port numbers from 1024 to 49151 are known as registered ports, and the range from 49152 to 65535 are allocated to dynamic or private ports.
Port scanning is a popular technique used by attackers to find services that they may be able to compromise. A port scan assists the attacker in finding which ports are available. The scan sends a message to each port, with the response indicating whether the port is used and can therefore be probed further for weaknesses. There are a variety of different forms of scanning which include TCP, SYN, UDP, ACK, Window, and FIN scanning.
However, port scanning has many legitimate uses such as network inventory and the verification of the security of a network. Port scanners therefore represent an important tool for users and system administrators to verify the security policies of their computers and network.
Linux has a good range of port scanners that help administrators identify and rectify weaknesses in a system. To provide an insight into the software that is available, we have compiled a list of 5 of our favorite port scanners. Hopefully, there will be something of interest here for administrators or users that want to scan computers and services that are running on a network. We give our strongest recommendation to Nmap, an indispensable utility to gather information about remote computers.

Let’s explore the 5 port scanners at hand. For each application we have compiled its own portal page, a full description with an in-depth analysis of its features, screenshots, together with links to relevant resources.
Источник
Top Port Scanners on Ubuntu Linux
Here is a list of port scanners that work on Ubuntu/Linux.
1. Angry IP Scanner
Download and Install from http://www.angryip.org/
Fast and easy to use network scanner and port scanner.
To scan ports got to Tools > Preferences > Ports > Port Selection
Enter the ports you want to scan
Start the scan.

4. Nmap — network mapper
Install : sudo apt-get install nmap
Nmap is a utility for network exploration or security auditing. It supports ping scanning (determine which hosts are up), many port scanning techniques, version detection (determine service protocols and application versions listening behind ports), and TCP/IP fingerprinting (remote host OS or device identification). Nmap also offers flexible target and port specification, decoy/stealth scanning, sunRPC scanning, and more.
nmap also has with an easy to use GUI frontends :
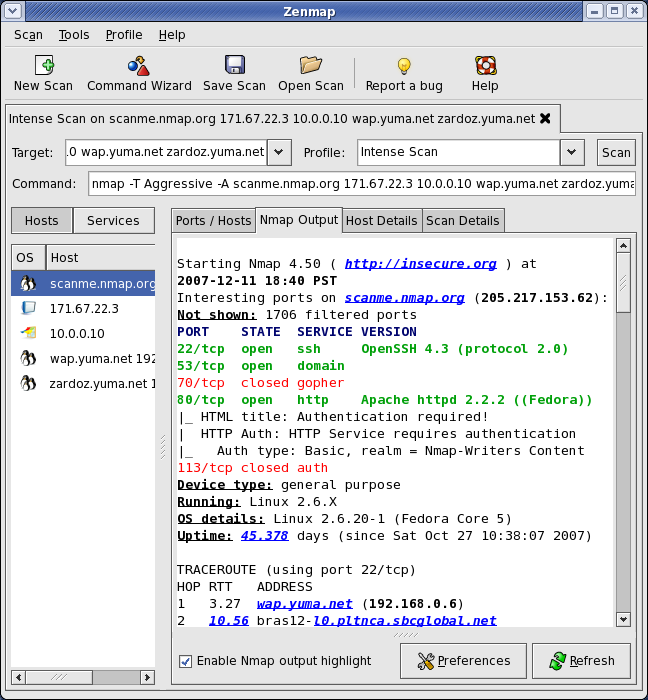
1. zenmap
Install : sudo apt-get install zenmap
http://nmap.org/zenmap/
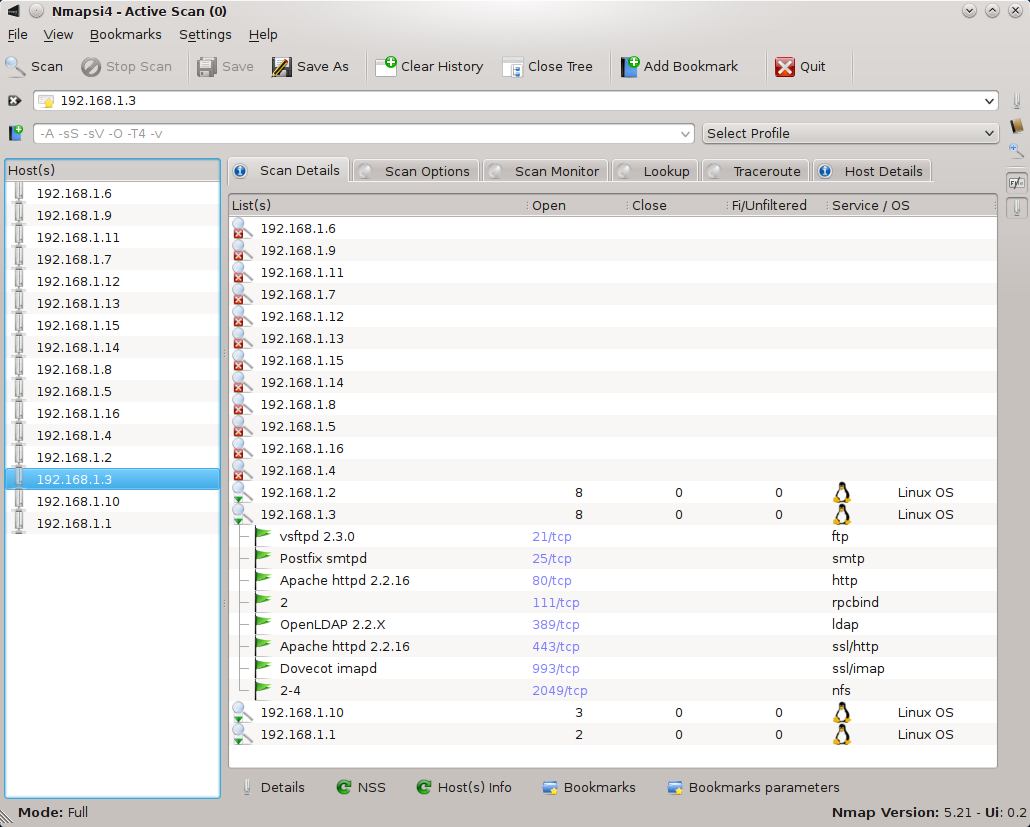
2. Nmapsi4
Install : sudo apt-get install nmapsi4
http://www.nmapsi4.org/
3. Umit
Install : sudo apt-get install umit
http://www.umitproject.org/
3. pnscan
Install : sudo apt-get install pnscan
Pnscan is a multi threaded port scanner that can scan a large network very quickly. If does not have all the features that nmap have but is much faster.
4. knocker
Install : sudo apt-get install knocker
A Tech Enthusiast, Blogger, Linux Fan and a Software Developer. Writes about Computer hardware, Linux and Open Source software and coding in Python, Php and Javascript. He can be reached at [email protected] .
Источник
How To Use Nmap to Scan for Open Ports
Last Validated on September 2, 2020 Originally Published on September 24, 2013
Introduction
Networking is an expansive and overwhelming topic for many budding system administrators. There are various layers, protocols, and interfaces, and many tools and utilities that must be mastered to understand them.
In TCP/IP and UDP networking, ports are endpoints for logical communications. A single IP address may have many services running, such as a web server, an application server, and a file server. In order for each of these services to communicate, they each listen and communicate on a specific port. When you make a connection to a server, you connect to the the IP address and a port.
In many cases, the software you use specifies the port for you. For example, when you connect to https://digitalocean.com , you’re connecting to the digitalocean.com server on port 443 , the default port for secure web traffic. Since it’s the default, your browser adds the port for you.
In this tutorial you’ll explore ports in more detail. You’ll use the netstat program to identify open ports, and then use the nmap program to get information about the state of a machine’s ports on a network. When you’re done you’ll be able to identify common ports and scan your systems for open ports.
Note: This tutorial covers IPv4 security. In Linux, IPv6 security is maintained separately from IPv4. For example, “nmap” scans IPv4 addresses by default but can also scan IPv6 addresses if the proper option is specified (nmap -6).
If your VPS is configured for IPv6, please remember to secure both your IPv4 and IPv6 network interfaces with the appropriate tools. For more information about IPv6 tools, refer to this guide: How To Configure Tools to Use IPv6 on a Linux VPS
Understanding Ports
There are many layers in the OSI networking model. The transport layer is the layer primarily concerned with the communication between different services and applications.
This layer is the main layer that ports are associated with.
Some knowledge of terminology is needed to understand port configuration. Here are some terms that will help you understand the discussion that will follow:
Port: An addressable network location implemented inside of the operating system that helps distinguish traffic destined for different applications or services.
Internet Sockets: A file descriptor that specifies an IP address and an associated port number, as well as the transfer protocol that will be used to handle the data.
Binding: The process that takes place when an application or service uses an internet socket to handle the data it is inputting and outputting.
Listening: A service is said to be “listening” on a port when it is binding to a port/protocol/IP address combination in order to wait for requests from clients of the service.
Upon receiving a request, it then establishes a connection with the client (when appropriate) using the same port it has been listening on. Because the internet sockets used are associated with a specific client IP address, this does not prevent the server from listening for and serving requests to other clients simultaneously.
- Port Scanning: Port scanning is the process of attempting to connect to a number of sequential ports, for the purpose of acquiring information about which are open and what services and operating system are behind them.
Identifying Common Ports
Ports are specified by a number ranging from 1 to 65535 .
Many ports below 1024 are associated with services that Linux and Unix-like operating systems consider critical to essential network functions, so you must have root privileges to assign services to them.
Ports between 1024 and 49151 are considered “registered”. This means that they can be “reserved” (in a very loose sense of the word) for certain services by issuing a request to the IANA (Internet Assigned Numbers Authority). They are not strictly enforced, but they can give a clue as to the possible services running on a certain port.
Ports between 49152 and 65535 cannot be registered and are suggested for private use.
Because of the vast number of available ports, you won’t ever have to be concerned with the majority of the services that tend to bind to specific ports.
However, there are some ports that are worth knowing due to their ubiquity. The following is only a very incomplete list:
- 20: FTP data
- 21: FTP control port
- 22: SSH
- 23: Telnet (Insecure, not recommended for most uses)
- 25: SMTP
- 43: WHOIS protocol
- 53: DNS services
- 67: DHCP server port
- 68: DHCP client port
- 80: HTTP — Unencrypted Web traffic
- 110: POP3 mail port
- 113: Ident authentication services on IRC networks
- 143: IMAP mail port
- 161: SNMP
- 194: IRC
- 389: LDAP port
- 443: HTTPS — Secure web traffic
- 587: SMTP — message submission port
- 631: CUPS printing daemon port
- 666: DOOM — This legacy game actually has its own special port
These are just a few of the services commonly associated with ports. You should be able to find the appropriate ports for the applications you are trying to configure within their respective documentation.
Most services can be configured to use ports other than the default, but you must ensure that both the client and server are configured to use a non-standard port.
You can get a list of some common ports by looking at the /etc/services file:
It will give you a list of common ports and their associated services:
Depending on your system, this will display multiple pages. Press the SPACE key to see the next page of entries or press Q to return to your prompt.
This is not a complete list; you’ll be able to see that shortly.
Checking Open Ports
There are a number of tools you can use to scan for open ports. One that is installed by default on most Linux distributions is netstat .
You can quickly discover which services you are running by issuing the command with the following parameters:
You’ll see results like the following:
This shows the port and listening socket associated with the service and lists both UDP and TCP protocols.
The nmap tool is another method you can use to identify ports.
Using Nmap
Part of securing a network involves doing vulnerability testing. This means trying to infiltrate your network and discover weaknesses in the same way that an attacker might.
Out of all of the available tools for this, nmap is perhaps the most common and powerful.
You can install nmap on an Ubuntu or Debian machine by entering:
One of the side benefits of installing this software is an improved port mapping file. You can see a much more extensive association between ports and services by looking in this file:
You’ll see output like this:
Besides having almost 20 thousand lines, this file also has additional fields, such as the third column, which lists the open frequency of that port as discovered during research scans on the internet.
Scanning Ports with nmap
Nmap can reveal a lot of information about a host. It can also make system administrators of the target system think that someone has malicious intent. For this reason, only test it on servers that you own or in situations where you’ve notified the owners.
The nmap creators provide a test server located at scanme.nmap.org .
This, or your own servers are good targets for practicing nmap.
Here are some common operations that can be performed with nmap. We will run them all with sudo privileges to avoid returning partial results for some queries. Some commands may take a long while to complete:
Scan for the host operating system:
Skip network discovery portion and assume the host is online. This is useful if you get a reply that says “Note: Host seems down” in your other tests. Add this to the other options:
Scan without preforming a reverse DNS lookup on the IP address specified. This should speed up your results in most cases:
Scan a specific port instead of all common ports:
To scan for TCP connections, nmap can perform a 3-way handshake (explained below), with the targeted port. Execute it like this:
To scan for UDP connections, type:
Scan for every TCP and UDP open port:
A TCP “SYN” scan exploits the way that TCP establishes a connection.
To start a TCP connection, the requesting end sends a “synchronize request” packet to the server. The server then sends a “synchronize acknowledgment” packet back. The original sender then sends back an “acknowledgment” packet back to the server, and a connection is established.
A “SYN” scan, however, drops the connection when the first packet is returned from the server. This is called a “half-open” scan and used to be promoted as a way to surreptitiously scan for ports, since the application associated with that port would not receive the traffic, because the connection is never completed.
This is no longer considered stealthy with the adoption of more advanced firewalls and the flagging of incomplete SYN request in many configurations.
To perform a SYN scan, execute:
A more stealthy approach is sending invalid TCP headers, which, if the host conforms to the TCP specifications, should send a packet back if that port is closed. This will work on non-Windows based servers.
You can use the “-sF”, “-sX”, or “-sN” flags. They all will produce the response we are looking for:
To see what version of a service is running on the host, you can try this command. It tries to determine the service and version by testing different responses from the server:
Finally, you can use nmap to scan multiple machines.
To specify a range of IP addresses with “-” or “/24” to scan a number of hosts at once, use a command like the following:
Or scan a network range for available services with a command like this:
There are many other command combinations that you can use, but this should get you started on exploring your networking vulnerabilities.
Conclusion
Understanding port configuration and how to discover what the attack vectors are on your server is only one step to securing your information and your VPS. It is an essentail skill, however.
Discovering which ports are open and what information can be obtained from the services accepting connections on those ports gives you the information that you need to lock down your server. Any extraneous information leaked out of your machine can be used by a malicious user to try to exploit known vulnerabilities or develop new ones. The less they can figure out, the better.
Источник


