- Install and use a scanner in Windows 10
- Установка и использование сканера в Windows 10
- Scanning Software for Fujitsu Scanners: ScandAll PRO 2.0 Fujitsu Scanners
- Quick Reference
- Detailed Reference
- ScandAll PRO Standard
- ScandAll PRO 2.0 Premium
- ScandAll PRO 2.0 Standard
- Import/Export Profiles
- Batch Editing Tools
- PDF Editing
- Resume Batch Functionality
- Two New 1D Barcodes
- JPEG 7 Supuport
- ScanSnap Mode
- ScandAll PRO 2.0 Premium Additional Features
- Two-dimensional Barcode
- Advanced logging features
Install and use a scanner in Windows 10
When you connect a scanner to your device or add a new scanner to your home network, you can usually start scanning pictures and documents right away. If your scanner doesn’t automatically install, here’s some help to get things working.
Select one of the following sections, or select Show all. Any section you choose will open to show you more info on using your scanner.
In most cases, all you have to do to set up a scanner is to connect it to your device. Plug the USB cable from your scanner into an available USB port on your device, and turn the scanner on. If that doesn’t work, here’s a way to do it manually.
Select Start > Settings > Devices > Printers & scanners or use the following button.
Open the Printers & scanners settings
Select Add a printer or scanner. Wait for it to find nearby scanners, then choose the one you want to use and select Add device.
Note: If your scanner is included in a multifunction or All-In-One printer, you may only see the name of your printer. To see your scanner, under Printers & scanners, select your installed printer, select Manage, and then choose your scanner.
If your scanner is turned on and connected to the network, Windows should find it automatically. Available scanners can include all scanners on a network, such as Bluetooth and wireless scanners or scanners that are plugged into another device and shared on the network. Here’s a way to do it manually.
Select Start > Settings > Devices > Printers & scanners or use the following button.
Open the Printers & scanners settings
Select Add a printer or scanner. Wait for it to find nearby scanners, then choose the one you want to use, and select Add device.
If your scanner isn’t in the list, select The printer that I want isn’t listed, and then follow the instructions to add it manually.
If you use wireless access points, extenders or multiple wireless routers with separate SSIDs, you’ll need to ensure that you’re connected to the same network as the scanner for your PC to find and install it.
If you have a new wireless scanner that hasn’t been added to your home network, read the instructions that came with the scanner and check the scanner manufacturer’s website to learn more and to get up-to-date software for your scanner.
If your scanner is included in a multifunction or All-In-One printer, you may only see the name of your printer. To see your scanner, under Printers & scanners, select your installed printer, select Manage, and then choose your scanner.
You might need administrator permission to install some scanners.
If you want to see if your scanner is installed, make sure that your scanner is turned on and use the Open the Printers & scanners settings button, or follow these steps:
Under Printers & devices, look for your scanner.
Note: If your scanner is included in a multifunction or All-In-One printer, you may only see the name of your printer. To see your scanner, under Printers & scanners, select your installed printer, select Manage, and then choose your scanner.
Once your scanner is installed, use the Windows Scan app to scan a picture or document. Here’s how:
Note: Need to install the Windows Scan app? You can get the app at Microsoft Store.
Make sure your scanner is turned on.
In the search box on the taskbar, type Windows Scan, and then select Scan from the results.
Do one of the following:
Place the item you want to scan face down on the scanner’s flatbed and close the cover.
Place the item you want to scan in the scanner’s document feeder.
On the Scan page, do the following:
Under Scanner, select the scanner you want to use.
Under Source, select the location you prefer to scan from.
Under File type, select the type of file you want the scan to be saved as. For example, you can save the file in different file formats—such as JPEG, Bitmap, and PNG.
Select Show more to show the Save file to options.
Under Save file to, browse to the location where you want to save the scan.
Select Scan at the bottom of the screen to scan your document or picture.
After your scan is finished, select View to see the scanned file before you save it, or select Close to save it. You can edit the scanned document or picture in the preview that appears when you select View.
To locate a previously saved scan file, select File Explorer from the taskbar, and then select the location that you chose to save your scanned files.
If none of these instructions solved your scanner problem, there could be an issue with the scanner itself. Go to the scanner manufacturer’s website for specific troubleshooting info.
Установка и использование сканера в Windows 10
Как правило, подключив сканер к устройству или добавив новый сканер в домашнюю сеть, вы можете сразу начать сканирование изображений и документов. Если сканер не устанавливается автоматически, ознакомьтесь с этой статьей, чтобы получить помощь в работе.
Выберите один из следующих разделов или нажмите Показать все. При открытии любого раздела отобразятся дополнительные сведения об использовании сканера.
В большинстве случаев для установки сканера достаточно подключить его к устройству. Подключите USB-кабель к сканеру к USB-порту устройства и включите сканер. Если это не сработает, вот как можно сделать это вручную.
Нажмите кнопку Пуск > Параметры > Устройства > Принтеры и сканеры или используйте следующую кнопку.
Открытие параметров «принтеры & сканеры»
Выберите Добавить принтер или сканер. Дождитесь, когда он найдется рядом со сканерами, выберите нужный вариант и нажмите кнопку Добавить устройство.
Примечание: Если сканер входит в многофункциональный или один из принтеров, вы можете увидеть только название принтера. Чтобы просмотреть сканер, в разделе принтеры & сканерывыберите установленный принтер, нажмите кнопку Управление, а затем выберите нужный сканер.
Если сканер включен и подключен к сети, Windows найдет его автоматически. Список доступных сканеров может включать в себя все сканеры в сети, например беспроводные и Bluetooth-сканеры или сканеры, подключенные к другим устройствам и доступные в сети. Ниже описан способ, как сделать это вручную.
Нажмите кнопку Пуск > Параметры > Устройства > Принтеры и сканеры или используйте следующую кнопку.
Открытие параметров «принтеры & сканеры»
Выберите Добавить принтер или сканер. Дождитесь, когда он найдется рядом со сканерами, выберите нужный вариант и нажмите кнопку Добавить устройство.
Если сканера нет в списке, выберите Необходимый принтер отсутствует в списке, а затем следуйте инструкциям, чтобы добавить его вручную.
При использовании беспроводных точек доступа, расширителей или нескольких беспроводных маршрутизаторов с отдельными SSID необходимо убедиться, что вы подключены к той же сети, что и сканер, чтобы компьютер нашел и установил его.
Если вы приобрели беспроводной сканер, то сведения о том, как добавить его в домашнюю сеть, см. в руководстве, поставляемом в комплекте с сканером. Дополнительные сведения и новые версии программного обеспечения для сканера см. на веб-сайте его изготовителя.
Если сканер входит в многофункциональный или один из принтеров, вы можете увидеть только название принтера. Чтобы просмотреть сканер, в разделе принтеры & сканерывыберите установленный принтер, нажмите кнопку Управление, а затем выберите нужный сканер.
Для установки некоторых сканеров вам может потребоваться разрешение администратора.
Если вы хотите узнать, установлен ли на вашем сканере, убедитесь, что сканер включен, и нажмите кнопку » открыть принтеры & сканеры » или выполните указанные ниже действия.
В разделе Принтеры и устройства найдите ваш сканер.
Примечание: Если сканер входит в многофункциональный или один из принтеров, вы можете увидеть только название принтера. Чтобы просмотреть сканер, в разделе принтеры & сканерывыберите установленный принтер, нажмите кнопку Управление, а затем выберите нужный сканер.
После установки сканера используйте приложение «Сканер Windows» для сканирования документа или изображения. Для этого выполните следующие действия.
Примечание: Необходимо установить приложение «Сканер Windows»? Вы можете получить приложение в Microsoft Store.
Убедитесь, что сканер включен.
В поле поиска на панели задач введите » сканирование Windows» и выберите пункт » Сканировать из результатов».
Выполните одно из следующих действий:
Поместите документ, который следует сканировать, лицевой стороной вниз на планшет сканера и закройте крышку.
Поместите документ, который требуется отсканировать, в податчик документов сканера.
На странице «Сканирование» выполните следующие действия.
В разделе Сканер выберите сканер, который хотите использовать.
В разделе Источник выберите расположение для сканирования.
В разделе Тип файла выберите тип файла для сохранения сканированного изображения. Например, файл можно сохранить в различных форматах: JPEG, BMP и PNG.
Выберите Показать больше для отображения параметров сохранения файла.
В разделе Конечная папка укажите желаемое расположение для сохранения файла, полученного в результате сканирования.
Нажмите кнопку Сканировать в нижней части экрана, чтобы отсканировать документ или изображение.
После завершения проверки нажмите кнопку Просмотр , чтобы Просмотреть сканированный файл, а затем нажмите кнопку Закрыть , чтобы сохранить его. Вы можете редактировать отсканированный документ или изображение в окне предварительного просмотра, которое появляется при выборе пункта Просмотр.
Чтобы найти сохраненные ранее файл сканирования выберите Проводник на панели задач, а затем выберите расположение, которое вы выбрали для сохранения сканированных файлов.
Если ни одно из этих действий не помогло решить проблему со сканером, возможно, проблема заключается в неправильной работе оборудования самого сканера. Посетите на веб-сайт производителя сканера для получения конкретной информации об устранении неполадок.
Scanning Software for Fujitsu Scanners: ScandAll PRO 2.0 Fujitsu Scanners

| PDF Datasheet (4.90 MB ) |
Buy PA43404-A704
ScandAll PRO is a powerful image capture application, providing customers with the tools needed to produce quality digital image files from paper documents.
As with earlier versions, ScandAll PRO provides the following: PDF Creation, Page Editing, Barcode Recognition, Optical Character Recognition (OCR), Indexing Data, Thumbnails, Printing, Basic Logging, and driver support for TWAIN, ISIS, and Kofax VRS.
Additional features:
Batch editing and resume batch functionality make post scanning organization much easier. Profiles are exportable in compressed format to reduce configure time and increase consistency across desktop deployment. JPEG7 gives improved TIFF compression, and for a limited number of models, one touch ScanSnap mode has been added to make scanning easier.
ScandAll PRO 2.0 Standard provides powerful new features to improve deployment and workflow speeds.
ScandAll PRO 2.0 Premium adds two-dimensional barcode recognition and advanced logging features to track important batch information.
ScandAll PRO 2.0 Premium allows Standard customers to upgrade to Premium for discounted rate.
Quick Reference
| ScandAll PRO | |||||
|---|---|---|---|---|---|
| Standard | Premium | Premium Upgrade | |||
| Features | |||||
| Import/Export Profiles | Yes | Yes | Yes | ||
| PDF Editing | Yes | Yes | Yes | ||
| Resume Batch Functionality | Yes | Yes | Yes | ||
| New 1D barcodes (EAN128, ITF) | Yes | Yes | Yes | ||
| JPEG7 Compression | Yes | Yes | Yes | ||
| ScanSnap Mode | Yes | Yes | Yes | ||
| 2D Barcodes (PDF417 & QR Code) | Yes | Yes | |||
| Advanced Logging | Yes | Yes | |||
| Specifics | |||||
| Previous Version Required | No | No | Yes, 2.0 Standard | ||
| Recommended Scanner Models | fi-5900C, fi-6140, fi-6240, fi-6130, fi-6230, fi-5750C, fi-5650C, fi-5120C, fi-5220C, fi-5110C, fi-4860C2, fi-4340C | fi-5900C, fi-7160, fi-7260, fi-6140, fi-6240, fi-6130, fi-6230, fi-5750C, fi-5650C, fi-5120C, fi-5220C, fi-5110C, fi-4860C2, fi-4340C | fi-6130Z, fi-6230Z, fi-6110, fi-5015C | ||
Detailed Reference
ScandAll PRO Standard
ScandAll PRO 2.0 Premium
ScandAll PRO 2.0 Standard
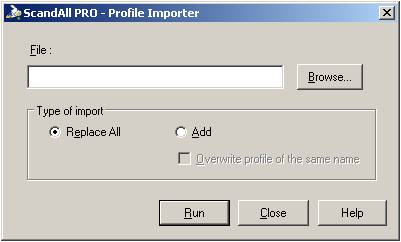
Import/Export Profiles
Speed up set up time, eliminate mistakes, and standardize profiles with ScandAll PRO’s importer. Import also allows operators to keep existing profiles that are needed for specialized stations.
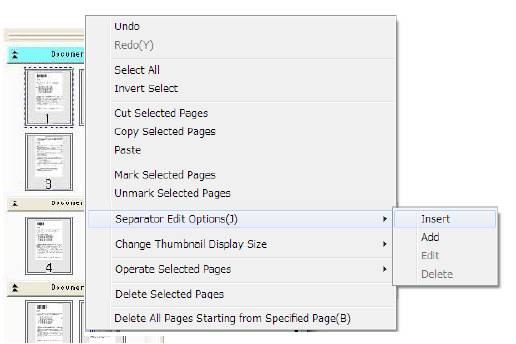
Batch Editing Tools
ScandAll PRO now allows for collapsed batch views as well as insert and delete function for batch separation before saving.
PDF Editing
Edit PDF files after they are saved with ScandAll PRO. Features include deskew, cropping, key word set up, and rotation.

Resume Batch Functionality
Adding to the append current batch feature, ScandAll PRO 2.0 has improved jam recovery to increase overall scanning speeds.
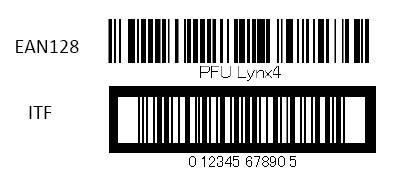
Two New 1D Barcodes
ScandAll PRO now suppers EAN128 and ITF Barcodes.
JPEG 7 Supuport
ScandAll PRO 2.0 supports JPEG 7 for newer TIFF software decoders as well as JPEG 6 for legacy systems.
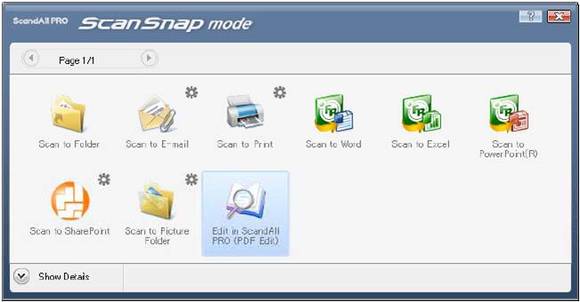
ScanSnap Mode
ScandAll PRO 2.0 allows one touch scanning to file, Word, Excel, PowerPoint for the following scanners: fi-6770, fi-6670, fi-5530C2, fi-6140, fi-6240, fi-6130, fi-6230, fi-6140Z, fi-6240Z, fi-6130Z, fi-6230Z, fi-6110.
ScandAll PRO 2.0 Premium Additional Features
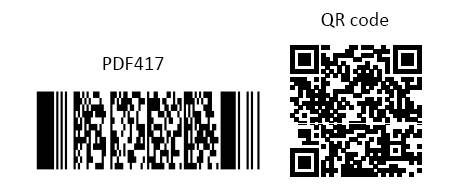
Two-dimensional Barcode
Two Dimensional Barcode Recognition, PDF417 and QR Code, increases recognition and allows for users to put more information into a smaller space.
Advanced logging features
Operators can now control what information is logged with each batch, selecting any or all of the following fields: Separator No., Total pages in current document, Current page number in document batch, Page number. Actual page number, Date and Time, Computer name, User name, File name (full path), File name, Folder name, Batch folder name, Profile Name, Scanner name, Resolution, Width, Height, Bit depth, Barcode recognition results, Barcode type, Zone OCR results, Mark (user), Mark (multifeed), Mark (AIQC), Character string 1-4.


